Geometry Manipulator Handles
Creating Geometry Handles
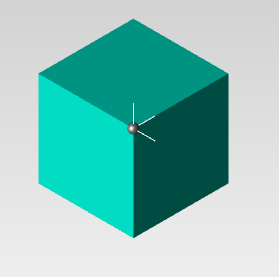
After examining a model by rotating the camera and zooming in and out, 3D application users tend to want to manipulate a model. This can mean anything from translation to rotation and scaling. For applications developers who are looking for a simple way to implement this functionality, HOOPS/MVO provides a set of geometry manipulator handles via the static method HUtilityGeomHandle::SetupManipulator. When calling this function, simply pass a segment to attach the handles, a pointer to an instance of HBaseView and the location of the handles. The remaining parameters let you determine what kind of handles you want to make available. If you pass nothing, all six handle types will be created. The following code sample shows how to create handles for a cube:
HC_Open_Segment_By_Key(m_pHView->GetModelKey());
                int pcount, flist_count;
                pcount = 8;
                flist_count = 30;
                HPoint pts[8];
                int faces[30] = {4, 0, 1, 2, 3,
                                                4, 1, 5, 6, 2,
                                                4, 5, 4, 7, 6,
                                                4, 4, 0, 3, 7,
                                                4, 3, 2, 6, 7,
                                                4, 0, 4, 5, 1};

                pts[0].Set(0,0,0);
                pts[1].Set(2,0,0);
                pts[2].Set(2,2,0);
                pts[3].Set(0,2,0);
                pts[4].Set(0,0,2);
                pts[5].Set(2,0,2);
                pts[6].Set(2,2,2);
                pts[7].Set(0,2,2);

                HC_KEY key = HC_KInsert_Shell(pcount, pts, flist_count, faces);
                HC_Set_Color("faces=aquamarine");
                char type[MVO_BUFFER_SIZE];
                HC_Show_Key_Type(key, type);
                if (strcmp(type, "segment")!=0)
                {
                        key = HC_KShow_Owner_By_Key(key);
                }
                HUtilityGeomHandle::SetupManipulator(key, m_pHView,0);

HC_Close_Segment();
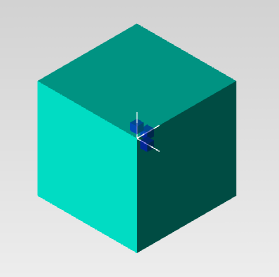
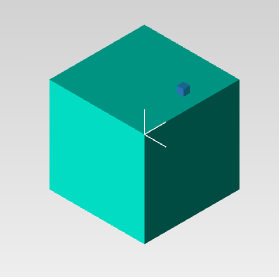
In the parameter list, the first handle is the nonuniform scale handle. To use this handle, pass true for the AddNonUniformScale. The nonuniform scale handle is drawn as three blue shaded cube positioned on the x, y and z axes. When one cube is activated by the mouse, the user can scale the object along that axis. If you want to allow users to scale an object uniformly, pass true for the AddScale parameter. This handle appears as one blue cube slighter removed from the white triad that centers the handlers.
|
|
The left image shows a cube with the nonuniform scaler (three blue shaded cubes) while the right image show a cube with the uniform scaler (one blue shaded cube).
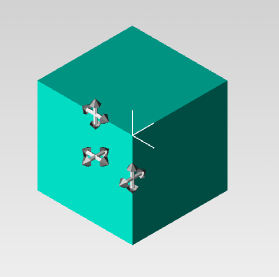
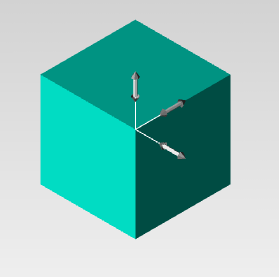
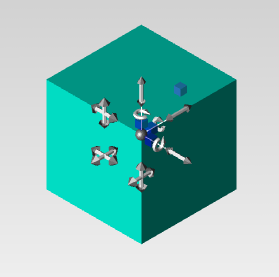
The AddPlane, AddAxisMove, and AddViewplaneMove parameters enable geometry handles for translation. If you pass true for the AddPlane parameter, HUtilityGeomHandle will create three crossed arrows to represent the x, y and z planes. When one of the crossed arrows is activated, the user can move the model along that plane. If the AddAxisMove parameter is set to true, a set of three double sided arrows will be drawn to indicate the x, y and z axes. When a user selects one of these arrows, she will be able to move the model along the associated axis. Finally, the geometry handle associated with the AddViewplaneMove parameter allows users to move the model along the view plane. This handle is represented as a sphere.
|
|
|
The left most image shows a cube with the Plane Move handles (a set of three crossed arrows). The center image shows with the Axis Move handles (a set of three double sided arrow). The right image show a cube with View Plane Move handles (a shaded sphere).
To create an handle that rotates a model, pass true for the AddAxisRotate parameter. HUtilityGeomHandle draws three arrows in the shape of semicircles positioned along the x, y and z axes. When one of these arrows is selected, the user can rotate the model around the associated axis.

|
|
The left image shows a cube with the axis rotate handles (three blue semicircular arrows) while the right image show a cube with the all the handles drawn.
Once the user no longer needs the geometry manipulators, you can deactivate them by calling HUtilityGeomHandle::ClearAllHandles. First open the segment in which your geometry manipulators reside, then call HUtilityGeomHandle::ClearAllHandles passing null. The following sample code show how we deactivate the handles created for the cube at the beginning of this section. Example:
HC_Open_Segment_By_Key(m_pHView->GetModelKey());
        HUtilityGeomHandle::ClearAllHandles(0);
HC_Close_Segment();
m_pHView->Update();
Custom Geometry Manipulator Handles
The static function HUtilityGeomHandle::SetupManipulator provides geometry handles for basic manipulation. However, the HUtilityGeomHandle class also offers ways to create and tailor geometry handles to your exact specification.
Attaching a custom handle to an existing object is a simple process. First a new handle object needs to be created:
HUtilityGeomHandle ghandle;
Next we create a simple piece of geometry that we want to attach the handle to:
HPoint p1(-1,-1,-1), p2(1,1,1), p3;

HC_Open_Segment_By_Key(m_pHView->GetModel()->GetModelKey());
  HC_Open_Segment("temp");
        HUtility::InsertBox(&p1,&p2);
The handle must be created in the same segment as the geometry. Then make a simple call to the HUtilityGeomHandle::Insert function. It takes a 3D position, in object relative coordinates, that defines the position of the handle. This function returns a segment key which can be used to access the handle:
HC_KEY hkey = ghandle.Insert(p1);
Next a constraint type needs to be specified for the handle. You can find the type of constraints on a handle by calling HUtilityGeomHandle::GetConstraintType and passing the handle key. A handle can currently be constrained to a given ray, a plane, a rotation vector, to a scale factor or to delete geometry (on/off). In this example, we choose the ray constraint. The two points passed into HUtilityGeomHandle::ConstrainToRay define the ray that the handle along with the attached geometry can be moved on. Example:
  p3.Set(-1, 1, -1);
  ghandle.ConstrainToRay(hkey, p1, p3, m_pHView);
HC_Close_Segment();
HC_Close_Segment();
m_pHView->Update();
This creates the handle which will appear at the next call to HBaseView::Update. To actually manipulate the handle, we have provided an operator called HOpMoveHandle that automatically detects handles, activates them and acts on their various types. The source code of this operator is also a good starting point for writing your own “handle aware” operators:
LocalSetOperator(new HOpMoveHandle(m_pHView, false));
m_pHView->Update();
To check if a given key belongs to a geometry handle, you can use the function HUtilityGeomHandle::IsGeomHandle which takes a key and returns either the top level key for the handle or -1 if the key does not belong to a handle.
To adjust a mouse position returned by a GUI event to a given ray, there is a utility function called HUtilityGeomHandle::AdjustPointToRay which makes sure that the handle movement corresponds correctly to the mouse position.
When you are done with your handle, you can deactive it by calling HUtilityGeomHandle::ClearAllHandles. Note that you must call this method inside the segment where your handle resides passing null for the first parameter. Then, reset your HOpMoveHandle operator as seen in the sample code below:
((HOpMoveHandle *)m_pHView->GetHandleOperator())->Reset();
