Supported Platforms
Platform |
Architecture |
Minimum supported OS |
Compiler |
|---|---|---|---|
Windows |
x64 |
Windows 10 |
VS 2017, VS 2019 |
Linux |
x86 or x64 |
CentOS 7 / RHEL 7 (glibc 2.17) |
devtoolset 8 / GCC 8.2.3 |
macOS |
ARM64 or x64 |
macOS 10.9 |
Xcode 12.2 (LLVM) |
iOS |
ARM64, x86_64 |
iOS 11.0 |
Xcode 12.2 (LLVM) |
Android |
arm64-v8a, x86_64 |
Android 5.1 |
Android NDK r18b with LLVM’s libc++ |
Xamarin |
Visual Studio 2017, Xamarin Studio 6.1.2 |
Windows
The officially supported platform and development environment for Windows is noted in the table above. You can choose to develop in either C++ or C#. The solution file is called visualize_vc<version>.sln; it contains all the projects you might need to compile during the course of your development cycle, including the MFC Sandbox, a WPF Sandbox, and the sample code. The default installation directory is of the form hoops_visualize_hps<version>_vc<version>.
Tech Soft provides Visualize libraries as pre-compiled binaries, thus, there is nothing extra that needs to be built. Your application links to the Visualize libraries during the build process and subsequently to the DLLs at runtime.
C++
A few modifications must be made to a clean project file in order to compile a HOOPS Visualize application:
The first step is to set the include file path in the project. It should be set to the include subdirectory of the root install location.
Add the desired Visualize libraries to the project
Ensure the dynamic libraries are in the environment PATH or your application’s working directory. The DLLs are found in <install_dir>bin<platform_name>, and the names correspond with the library names from step 2. For example, if you are using functionality found in hps_sprk.lib, the DLL is named hps_sprk.dll.
When running your Visualize application, the operating system will need to locate the Visualize DLLs in the environment PATH or the application’s directory.
Conflicting Macros in Windows C++ Builds
There is a macro conflict that occurs frequently with certain Windows headers. The problem is that these headers #define a number of common names. Since #define can’t be scoped by a namespace or class, they cause conflicts with other code. The most commonly encountered conflicts are min, max, and Window.
The solution is to simply include the HPS header file after any Windows headers. This will enable Visualize to determine if _WINDOWS_ is defined, and if so, it will undefine the conflicting macros.
C#
Similar to C++, your C# application must reference the Visualize C# assemblies that it requires. They are located in in <HPS_INSTALL_DIR>bin<platform_name>. The assembly names correspond to the C++ DLLs noted in the previous subsection, with one minor difference. The names include cs - for example, hps_core.dll becomes hps_cs_core.dll
The C# assemblies depend on the corresponding C++ DLLs. Thus, when using the hps_cs_core.dll assembly, the supporting C++ binary called hps_core.dll must also be in the environment PATH or the application’s directory. The C++ DLLs are also located in <HPS_INSTALL_DIR>bin<platform_name>.
Additionally, when compiling, the platform target must be either 32 or 64-bit. The “Any CPU” target will not work.
Linux
The officially supported platform and development environment for Linux is noted in the table at the top of this page. There is a makefile for the sample applications (hps_samples), and a subdirectory for the QT sandbox (qt_sandbox).
For the samples, users can navigate to samples/code/cpp and run
make <platform>
…where <platform> is one of [linux32, linux32-debug, linux64, linux64-debug].
For the QT sandbox, there is a qt_sandbox.pro file which can be used to build the application using QtCreator. If you are using HPS on a Linux platform and directly or indirectly invoking the X11 API outside of HPS, please see the Special Platform Initialization section.
OSX
The officially supported platform and development environment for OSX is noted in the table at the top of this page. There is a workspace for the sample applications (hps_samples_osx), and subdirectories for the Cocoa sandbox (cocoa_sandbox) and QT sandbox (qt_sandbox).
Please be aware of special requirements when creating and managing windows. Specifically, window creation must occur on the main thread. Additionally, after the window is resized, the application must make an update on the main thread. Typically this will happen in the NSView::drawRect method.
If you do not manage your windows this way, it could lead to undefined behavior!
Mobile Support
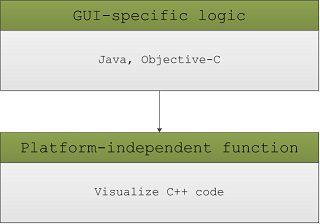
The Visualize Mobile development framework allows you to code once for both systems to maintain platform-independent Visualize code.
This applies especially to events and event handling, where the interface related to user input is abstracted from platform-specific GUI or language. The sandboxes are set up so that the platform-specific events will trigger Visualize function calls:
If you choose not to use the framework provided by the sandboxes, you will have to coordinate this event handoff yourself.
iOS
The officially supported platform and development environment for iOS is noted in the table at the top of this page. There is no top-level workspace. The iOS package provides three library files, libhps_core.a, libhps_sprk.a, and libhps_sprk_ops.a.
In addition to the Visualize libraries mentioned above, your application should also link to these third-party libraries:
quartzcore.framework
opengles.framework
libz.1.2.5.dylib
NOTE: You must be registered in the iOS developer program. This step is required in order to run on a physical iOS device (as opposed to just running on the simulator).
The iOS Sandbox
The iOS Sandbox is a sample application which shows how to integrate Visualize into an iOS app. It can be found at <HPS_INSTALL_DIR>/samples/ios_sandbox/iOS-Sandbox.xcodeproj. iOS developers are encouraged to review it or use it as a template when writing their own Visualize application.
Of particular interest is the MobileSurfaceView class, which provides the infrastructure. MobileSurfaceView is a subclass of the Cocoa UIView class. Here, we are specifying that we want a CAEGLLayer as the view’s layer type. Your application will need to do something similar:
+ (Class)layerClass
{
        // Indicate that we will be using OpenGL ES
        return [CAEAGLLayer class];
}
Additionally, the MobileSurfaceView init function includes the following initialization. If you create a custom view class you will need to do this as well:
CAEAGLLayer * eaglLayer = static_cast<CAEAGLLayer*>(self.layer);
eaglLayer.opaque = TRUE;
eaglLayer.drawableProperties = [NSDictionary dictionaryWithObjectsAndKeys:
                                                        [NSNumber numberWithBool:FALSE],
                                                        kEAGLDrawablePropertyRetainedBacking,
                                                        kEAGLColorFormatRGBA8,
                                                        kEAGLDrawablePropertyColorFormat, nil];
Any model that is to be loaded by the iOS Sandbox must be added to the Xcode project.
Handling Input Events
The iOS Sandbox will listen for events generated by the operating system, use them to build Visualize events, then inject the event objects into the Visualize event queue. If you do not use the iOS Sandbox as a template, you will have to make these connections yourself in order for Visualize to receive user input. You can see how input events are passed to Visualize by inspecting the sandbox code. For example, the sandbox injects a touch-down event in this way:
// MobileSurfaceView.mm (iOS-specific code)

- (void)touchesMoved:(NSSet *)touches withEvent:(UIEvent *)event {
        int xPosArray[MAX_TOUCHES];
        int yPosArray[MAX_TOUCHES];
        int idArray[MAX_TOUCHES];

        int numTouches = [self buildTouchEvent:touches
                                                   withXArray:xPosArray
                                                   withYArray:yPosArray
                                                   withIdArray:idArray];

        self.surfacePointer->touchMove(numTouches, xPosArray, yPosArray, idArray);
}
self.surfacePointer->touchMove refers to the following platform-independent function:
// MobileSurface.cpp (platform-independent code)

void MobileSurface::touchMove(int numTouches, int xposArray[], int yposArray[], int idArray[])
{
        InjectTouchEvent(HPS::TouchEvent::Action::Move, numTouches, xposArray, yposArray, idArray);
}
As mentioned above, you are encouraged to use the iOS Sandbox as a template for your own application, as it will maintain platform independence related to events and event handling. All the platform-independent code related to the iOS Sandbox can found in <HPS_INSTALL_DIR>/samples/mobile_shared.
Android
The officially supported platform and development environment for Android is noted in the table at the top of this page.
The Android package provides four binary libraries, libhps_core.so, libhps_sprk.so, libhps_sprk_ops.so, and libhps_sprk_exchange.so.
The libraries mentioned above are C++ native binaries. While the Visualize sandbox applications for Android (excluding Xamarin) conduct all GUI instantiation and interaction in Java via the Android SDK, the interaction with the Visualize interface is implemented in C++ with CMake as the make language. An example of how to combine the C++ and Java code into an application can be found in the Android Sandbox project.
To build for Android, you must also have Python in your environment’s path.
The Android Sandbox
The Android Sandbox is a sample application which shows how to integrate Visualize into an Android app. It can be found at <HPS_INSTALL_DIR>/samples/android_sandbox. Developers are encouraged to review it or use it as a template when writing their own Visualize application. If you do not start with the Sandbox, you will have to create much of the “glue” code yourself (see “Android Sandbox-Specific notes” below).
Android Sandbox Requirements
In addition to the requirements listed in the table at the top of this page, the sandbox project also requires:
Android Studio 2.2+
Python 2.7+
Java Runtime Environment
You may need to manually install the appropriate USB driver for your Android device. See http://developer.android.com/tools/extras/oem-usb.html for more info.
The configuration options for the android_sandbox should be set via the local.properties file contained in the root folder of the sandbox (the local.properties file will be generated when you open the project in Android Studio). The android_sandbox acknowledges the following variables:
ndk.abis |
This should contain a comma separated list of native architectures you wish to target. This defaults to all architectures (x86_64, arm64-v8a). |
ndk.arguments |
This passes additional arguments to the NDK build process. For example, you could pass “-DUSING_EXCHANGE=1” here to enable HOOPS Exchange support. |
ndk.dir |
This should point to the root directory of the Android NDK you are using. |
sdk.dir |
This should point to the root directory of the Android SDK you are using. |
For example, you could populate your local.properties file to look like the following:
# escape ':' and '=' since they are special characters
sdk.dir=T\:\Android\android-sdk-windows
ndk.dir=C\:\android-ndk-r16b

# these are comma separated lists with NO spaces in between
ndk.abis=x86_64,arm64-v8a # only compile for 64 bit archs
ndk.arguments=-DUSING_EXCHANGE=1 # enable exchange support
Android Sandbox-specific Notes
Any model that is to be loaded by the Android Sandbox must be present in the hps/samples/android_sandbox/app/src/main/assets/datasets.
Since Visualize is written in C++ and Android uses Java, the JVM must use JNI to call Visualize methods from Java. For event handling, Visualize handles this process for you during the build using a Python script. The script examines your C++ event handler declarations, creates corresponding Java functions, and sets up the JNI calls. The benefit of this system is that you can do all of your programming in C++ and you don’t have to worry about JNI. Additionally, platform-independence is maintained.
As mentioned above, you are encouraged to use the Android Sandbox as a template for your own application, as it will maintain platform independence related to events and event handling. All the platform-independent code related to the Android Sandbox can found in <HPS_INSTALL_DIR>/samples/mobile_shared.
You may notice that after opening the sandbox project in Android Studio, the project structure looks familiar. The jni folder contains the Java-C++ interface. The samples/mobile_shared directory contains files common to all mobile platforms. Of particular interest is UserMobileSurface.h. In that file, you’ll see the GUI event handler function declarations are all preceded by the SURFACE_ACTION identifier. During the build process, the Python script sip.py (requires Python 2.7+) uses these tags to automatically generate the Java-C++ interface wrappers. In UserMobileSurface.cpp, you’ll see the implementation function of each SURFACE_ACTION. Any new GUI component you add to your application should follow this paradigm when calling Visualize.
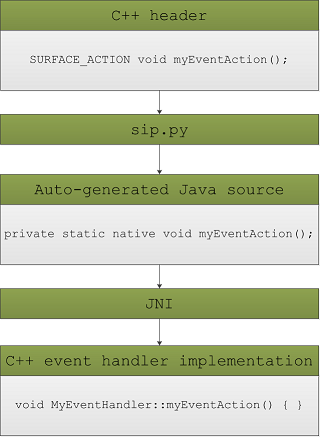
You should not modify any of the files that are auto-generated. Auto-generated files all have a comment near the top that looks like this:
// Auto-generated file
Any parameters present in your C++ event function declarations will be marshalled by sip.py into a form that is usable by C++:
char const *becomesStringchar *becomesStringBufferint []becomes arrays andoutparameters
Instructions on using Visualize operators for handling user input events can be found in the Programming Guide, section 6.
Android-specific Issues
There is a known issue with Gradle 3.5.3+ and NDK versions r18b or older where it doesn’t recognize the usage of the “c++_shared” or “c++_static” toolchains. To avoid this error, don’t accept dialog prompts asking you to upgrade the sandbox Gradle version.
Using the Android Sandbox with Exchange
While the HPS Android package includes libhps_sprk_exchange.so, the Android Sandbox does not link against it or package it by default. To enable this, we must first inform the Android Sandbox of where your HOOPS Exchange installation is. This can be done by setting the HEXCHANGE_INSTALL_DIR environment variable on your machine, which points to your local HOOPS Exchange installation.
Next, we need to inform the C++ code / makefiles that HOOPS Exchange is being used - this can be done by editing the ndk.args variable of the local.properties file as shown under the Android Studio Requirements section:
USING EXCHANGE := 1
Lastly, we need to tell the Java code to load the Exchange shared objects, which can be done by navigating to hps/samples/android_sandbox/app/src/main/java/com/techsoft3d/hps/sandbox/ViewerUtils.java and setting the USING_EXCHANGE variable to true.
Limitations
Any SURFACE_ACTION function declaration must be written on a single line. sip.py cannot process multiline function declarations.
Xamarin
As of Visualize 2017, HPS officially added Xamarin support for iOS and Android. Xamarin wraps the native iOS and Android SDKS in C# as well as providing platform agnostic GUI abstractions via Xamarin.Forms. The xamarin_sandbox projects included in Visualize 2017 utilizes Xamarin.Forms to isolate all application code (including the creation of GUI controls and HPS usage) into a single place, allowing users to approach a “code once, deploy everywhere” workflow.
The xamarin sandbox is split into several components.
xamarin_sandbox: Contains logic and interfaces generic to all platforms.
xamarin_sandbox.Droid: Contains Android-specific implementations of interfaces defined in xamarin_sandbox for usage in the generic codebase.
xamarin_sandbox.iOS: Contains iOS-specific implementations of interfaces defined in xamarin_sandbox for usage in the generic codebase.
Special Considerations
Even though Xamarin does its best to limit executable size / runtime boot overhead by aggressively stripping symbols, the resulting application will be larger and slower to boot than its native counterpart due to the overhead of the .NET runtime.
Xamarin defines some reflection-based APIs which may provide some initial difficulties on platforms (like iOS) where Xamarin is performing aggressive symbol stripping and removes functions and members that are indirectly referenced via reflection.
Building the Xamarin Package
In order to build the xamarin_sandbox you will need to download the HPS package(s) for the architecture(s) you are targeting in addition to the supplemental HPS Xamarin package. For example, if you’re targeting Android, you’ll need the HPS package for Android, along with the Xamarin package. If you’re targeting both iOS and Android, you’ll need the iOS HPS package, the Android HPS package, and the Xamarin package.
Once all these packages are downloaded, unzip / copy the root of each archive on top of each other. Then navigate to <HPS_INSTALL_DIR>/samples/xamarin_sandbox and open xamarin_sandbox.sln in either Visual Studio or Xamarin Studio.
Targeting Android
To build the xamarin_sandbox target for Android, select xamarin_sandbox.Droid as your active project and make sure that your target configuration is ‘Any CPU’. Once that is selected, you are ready to build and deploy.
If you want to use xamarin_sandbox_exchange instead, then select xamarin_sandbox_exchange.Droid as your active project instead. The exchange project only requires that you have the exchange root defined in the HEXCHANGE_INSTALL_DIR environment variable.
Targeting iOS
WARNING: It is recommended for users targeting iOS to use Xamarin Studio as their IDE for this project. Visual Studio is not recommended for building and deploying this app as it requires a remote OSX build machine to link in the iOS SDK Frameworks. This process is problematic as it requires the HPS libraries to be copied over to the OSX build machine for linking, which may take a long time given the size of the HPS binaries.
To build the xamarin_sandbox target for iOS, select xamarin_sandbox.iOS as your active project. If you are targeting a physical device, set your configuration to ‘iPhone’, and if you are targeting a simulator set your configuration to ‘iPhone Simulator’. Once that is selected, you are ready to build and deploy.
If you want to use xamarin_sandbox_exchange instead, then select xamarin_sandbox_exchange.iOS as your active project. The Exchange project only requires that you have the HOOPS Exchange root defined in the HEXCHANGE_INSTALL_DIR environment variable.
Using HOOPS Visualize on a Virtual Machine
The above operating systems are thoroughly tested and officially supported when installed on bare metal, and Developer Support will attempt to reproduce and troubleshoot HOOPS Visualize problems that you may encounter when using a bare metal configuration. We recognize that developers and end-users may wish to utilize an operating system as a virtual machine (VM), but as there are several dozen VM products, we cannot provide official testing and support for VMs. HOOPS Visualize can function on a VM, but the behavior depends on how the following conditions are met:
The VM operating system must meet the HOOPS Visualize system requirements, which includes fully compliant OpenGL or Direct3D runtime support. To verify that a VM operating system is set up to run one (or both) of those interfaces, you should utilize one of the 3D configuration tools included with the operating system. The glxinfo utility validates that OpenGL is set up on Linux systems, and the DxDiag.exe utility validates that DirectX is set up on Windows. In order to validate the OpenGL set up on Windows, you could utilize a 3rd party or open source utility such as GLMark.
The VM vendor must provide a compliant and stable VM implementation of the operating system and 3D APIs. Note that 3D performance, stability, and functionality may vary greatly depending on the VM product being used. For example, additional VM modules may be required for 3D support, the VM vendor may support a limited range of GPUs, OpenGL/Direct3D support may be emulated in software, etc…
Please consult your VM documentation or vendor for details about how to meet the HOOPS Visualize system requirements and address any VM performance or functionality limitations. Tech Soft 3D does not provide technical support for VM-specific problems which are not reproducible on a bare metal installation.
Special Platform Initialization
If you are using Visualize on a Linux / Unix platform and directly or indirectly invoking the X11 API outside of Visualize, you will need to make a call to XInitThreads as the first X11 function in your application.
