API Conventions
The HOOPS Visualize API is implemented in C++ and C#. In this manual, C++ syntax will be favored in the general case, although C# code examples are provided. The two APIs have been engineered to be as similar as possible - please see this section for a list of significant differences. All classes are members of the HPS namespace. For the sake of brevity, the code snippets provided as examples in this programming guide do not always explicitly declare the HPS namespace identifier for class names. To use the HOOPS Visualize API, you must include hps.h in your C++ source.
Using Keys and Objects
Almost every Visualize object is derived from HPS::Object. One method that is shared among all objects
is HPS::Object::Type(). This method is useful for identifying and comparing objects, especially when the objects have been downcasted. For example, consider the HPS::ShellKey type, which derives from HPS::Key. A function might return a HPS::Key, and you would like to know what type of key you have. The Type() function will provide this information:
    HPS::Key myKey = some_function();
    HPS::Type myKeyType = myKey.Type();

    switch (myKeyType) {
        case HPS::Type::ShellKey:
            break; // object was a shell key
        case HPS::Type::CircleKey:
            break; // object was a circle key
        case HPS::Type::MarkerKey:
            break; // object was a marker
        default:
            break; // object was something else
    }
HPS.Key myKey = some_function();
HPS.Type myKeyType = myKey.Type();

switch (myKeyType)
{
    case HPS.Type.ShellKey:
        break; //object was a shell key
    case HPS.Type.CircleKey:
        break; // object was a circle key
    case HPS.Type.MarkerKey:
        break; // object was a marker
    default:
        break; // object was something else
}
Identifying Keys
Type(), ObjectType(), HasType(), and Empty() are all members of the superclass HPS::Object. When using keys, it is always better to check the type if there is ever any doubt of its validity. The code snippet above shows the normal way to do this. A valid key will return Type::<typename> - for example, a shell key will return Type::ShellKey. An invalid key will return HPS::Object::Type::None. Attempting to use an invalid key will result in an HPS::InvalidObjectException.
However, you should be aware that Type() can cause a negative impact on performance if many calls are made repeatedly. This is because Visualize must read-lock the database to ensure that any creation or deletion operations (which are asynchronous) are completed before it can determine the state of any object with absolute certainty. This is why we recommend only calling Type() when the object’s type is truly in doubt, and never in a tight loop. If you are certain of the object’s type, there is no need to call Type(). Instead, construct the target object and use it normally. Consider placing this code inside a try/catch block as a defensive measure. For example, you could do the following:
    bool valid = false;

    try {
        // assume it is a ShellKey
        ShellKey selected_shell(selected_key); // this will throw if not a ShellKey
        selected_shell.GetFaceCount();
        valid = true;
    }
    catch (InvalidObjectException const&) {
        // fall back to using Type()
    }
bool valid = false;

try
{
    // assume it is a ShellKey
    ShellKey selected_shell = new ShellKey(selected_key); // this will throw if not a ShellKey
    selected_shell.GetFaceCount();
    valid = true;
}
catch (InvalidObjectException ioe)
{
    // fall back to using Type()
}
ObjectType() differs in that it returns a static value tied to the typename of your variable, whereas Type() will tell you what the underlying derived type is. For instance, if you retrieve several HPS::Key objects from a selection event, ObjectType() will always return HPS::Type::Key but Type() will return the derived type, such as HPS::Type::ShellKey, HPS::Type::SegmentKey, HPS::Type::TextKey, etc…
HasType() can be used in two different ways. First, it lets you know if your object derives from a certain type. For example, if you have an HPS::Key variable, you can call HasType(HPS::Type::GeometryKey) if you just want to know if it is any type of geometry key (geometry keys represent items like shells, NURBS curves, text, etc). Secondly, it lets you test masks such as HPS::Type::ExchangeMask (masks don’t have an equivalent object you can instantiate) to see if the object you are working with is any type related to Exchange.
Empty() can be used to determine if an existing object has been modified. The function generally asks the question “Does this object have any information?” For example, in the case of a kit, it checks to see if any settings have been made. All fresh new kits are “empty”, but that does not make them invalid.
Common Actions
Most actions in Visualize have a common prefix which indicates what type of action will occur. The following is a list of the most common action prefixes:
Set: Set allows you to specify a value for an attribute or characteristic for the associated class. For example, the HPS::CameraControl has ‘set’ methods that allow you to specify the values for camera target, field, projection, etc.
mySegmentKey.GetCameraControl().SetProjection(HPS::Camera::Projection::Orthographic);
mySegmentKey.GetCameraControl().SetProjection(HPS.Camera.Projection.Orthographic);
Unset: Unset is the opposite of Set. All subsegments will inherit the new value unless explicitly overridden. If you set a value for a specific attribute on a segment or piece of geometry and then want to remove the local attribute so that the default or parent attribute can be inherited, use Unset. Because Visualize assumes there is at least a default value for every segment, most attributes of a window segment cannot be unset. The exception is user data, which can be unset.
Show: Show allows you to get information about the associated object or attribute. For instance, the HPS::VisibilityControl has ‘show’ methods which let you know the geometry primitives that will be visible. Show functions always return a bool value which indicates whether the value was set locally on the segment (for inherited values, it would return false).
Insert: Insert is primarily used for adding geometry to a segment in the database. This is a database action which alters the segment tree. For instance, there is a method for inserting every type of geometry into a HPS::SegmentKey.
    mySegmentKey.InsertShell(shellKit);
    mySegmentKey.InsertText(textKit);
    mySegmentKey.InsertSphere(sphereKit);
mySegmentKey.InsertShell(shellKit);
mySegmentKey.InsertText(textKit);
mySegmentKey.InsertSphere(sphereKit);
Delete: Delete allows you to remove something from the database. This method is available on any key.
Assignment: Assignment behaves differently depending on the object type.
When using the assignment operator with objects such as keys, the result of the assignment is that both keys will refer to the same underlying object in the internal database. When operating on other object types, such as HPS::UTF8 objects or kits, assignment can be thought of as copying a container.
Define: Define is used for the creation of definitions such as textures, line styles and glyphs. Definitions are created in portfolios and then applied to their respective geometry primitives via the ‘Set’ action.
Edit: Edit is primarily for geometry. Once you have inserted your geometry, you might want to change specific pieces of information. Edit gives you finer grained control within a characteristic set. For instance, editable geometry characteristics include face lists, vertex lists, planes, or line weight.
Update: Update is the action used to draw the scene. Update is only available from a HPS::WindowKey or a view hierarchy object, such as HPS::Canvas or HPS::View.
        windowKey.Update(); // call Update on a WindowKey instance

        myCanvas.Update(); // alternatively, if you're using the view hierarchy, call it on a Canvas
windowKey.Update(); // call Update on a WindowKey instance

myCanvas.Update();  // alternatively, if you're using the view hierarchy, call it on a Canvas
There are some instances where you will need to use Update in a slightly different way. For more information, see section 7 of the Programming Guide, which covers rendering.
Using a KeyPath
A HPS::KeyPath is an ordered list of keys that forms an unambiguous chain from a scene graph leaf to its root. Because a Visualize segment can [non-recursively] include any other segment an arbitrary number of times, the geometry within the included segment can potentially be instanced multiple times. In this case, how would one reference a single piece of the instanced geometry? You can do this with a HPS::KeyPath. For example, if you would like to highlight a shell in an included segment, you would need to build a key path from the geometry back to the root segment. Note that it is only necessary to specify the ambiguous keys, (such as include links) since Visualize can determine simple parent-child relationships on its own. Consider the diagram below which shows a triangle shell which has been included multiple times:
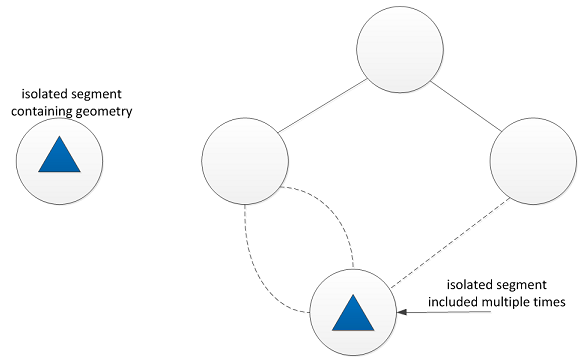
Representation of a scene graph with include links (denoted by dashed lines). In the main tree, the left segment will have the triangle included twice, and the right segment will include it once.
Since the triangle segments are included, the geometry within them is copied to multiple places in the scene at render time even though the segment has only one associated database key. In order for Visualize to distinguish one particular triangle from the other triangle instances, the key path must be provided to resolve the ambiguity. The key path is built from the leaf to the root. In this simple case, only the shell key and the include link is needed:
    KeyArray keyArray(2);
    keyArray[0] = shellKey;
    keyArray[1] = includeKey;

    KeyPath keyPath;
    keyPath.SetKeys(keyArray);
HPS.Key[] keyArray = new HPS.Key[2];
keyArray[0] = shellKey;
keyArray[1] = includeKey;

HPS.KeyPath keyPath = new HPS.KeyPath();
keyPath.SetKeys(keyArray);
Determining Net Attributes
Key paths are also used to determine a segment’s net attributes. A net attribute is the value that is calculated for a particular attribute after the tree has been walked down to that point. It may not always be obvious what the value of the attribute is because a segment could be included at any point in the tree and inherit whatever attribute is set on the parent. Again, a key path removes this ambiguity by referencing the include links associated with the segment. For example, to show the net camera on an included segment, build the key path for that segment and use:
keyPath.ShowNetCamera(cameraKit);
keyPath.ShowNetCamera(out cameraKit);
Database Interaction
When interacting with the database, three types of activities are primarily performed:
Retrieving information from the database
Inserting information into database
Changing information in the database
Information Retrieval
The retrieval of information is achieved via the Show method. For any given Visualize object, if it has a method whose name begins with Show, you know that you can query information with it. You can show information into a kit or individual data structures. In the sample code below, we retrieve camera information from mySegmentKey in two different ways: showing into a kit and using the HPS::CameraControl to query information.
    Point target, pos;

    // retrieving information with a kit in one call to the database
    HPS::CameraKit myCameraKit;
    mySegmentKey.ShowCamera(myCameraKit);
    myCameraKit.ShowTarget(target);
    myCameraKit.ShowPosition(pos);

    // retrieving information from the database via the CameraControl
    mySegmentKey.GetCameraControl().ShowTarget(target);
    mySegmentKey.GetCameraControl().ShowPosition(target);
HPS.Point target, pos;

// retrieving information with a kit in one call to the database
HPS.CameraKit myCameraKit;
mySegmentKey.ShowCamera(out myCameraKit);
myCameraKit.ShowTarget(out target);
myCameraKit.ShowPosition(out pos);

// retrieving information from the database via the CameraControl
mySegmentKey.GetCameraControl().ShowTarget(out target);
mySegmentKey.GetCameraControl().ShowPosition(out pos);
As shown above, you can achieve the same task using either a kit or a control. Which method you choose depends on the situation as well as your own style preference.
Information Creation
Inserting information into the database includes the insertion of geometry, creation of subsegments, and creation of style definitions (textures, material palettes, glyphs, etc.). When you create one of these elements, a newly created object is returned so that you can perform further actions with it. Here is an example of creation and insertion:
    HPS::SegmentKey mySegmentKey = HPS::Database::CreateRootSegment();

    HPS::TextKey myText = mySegmentKey.InsertText(Point(0.0f, 0.0f, 0.0f), "My string is here.");
HPS.SegmentKey mySegmentKey = HPS.Database.CreateRootSegment();

HPS.TextKey myText = mySegmentKey.InsertText(new HPS.Point(0.0f, 0.0f, 0.0f), "My string is here.");
Information Modification
The modification of existing information in the database is often performed on attributes but also can be performed on some geometry types like shells and meshes. Attribute modification is performed by Set and Unset while changes to geometry can be made via the Edit method. There are two ways to modify information in the database. You can make direct modifications to the database or group them into a transactional object.
In direct modification, you access a database object, choose an action, determine the object and pass any required parameters. The request for the modification will be dispatched immediately. For example, in the code snippet below, text is rendered in bold:
myText.SetBold(true);
myText.SetBold(true);
If we set the text color to yellow, we make another call to the database:
myText.SetColor(HPS::RGBAColor(1, 1, 0));
myText.SetColor(new HPS.RGBAColor(1, 1, 0));
These examples show an efficient way to make quick modifications to the database.
Often, it is desirable to make changes to the state of the database in order to convey an idea. For instance, imagine a scene with a number of annotations in it. Whenever you want to bring attention to a specific annotation, you might highlight the text in the annotation. Each time the highlighting is applied, you could make two database calls:
set text to bold
change the text color to yellow
A better way to do this would be to create a kit that encapsulates the highlight state. The following example demonstrates the idea:
    // create the kit
    HPS::TextKit highlightText;

    // set the attributes to highlight our text
    highlightText.SetBold(true);

    // using RGBColor to set text to yellow
    highlightText.SetColor(HPS::RGBAColor(1, 1, 0));

    // apply the changes to the database
    myTextKey.Set(highlightText);
// create the kit
HPS.TextKit highlightText = new HPS.TextKit();

// set the attributes to highlight our text
highlightText.SetBold(true);

// using RGBColor to set text to yellow
highlightText.SetColor(new HPS.RGBAColor(1, 1, 0));

// apply the changes to the database
myTextKey.Set(highlightText);
This may seem like a logical solution, and indeed it is in certain situations. However, it can quickly become unwieldy if your highlight style has many attributes to set. The most robust way to accomplish this is to use one of the more advanced styling or conditional styling approaches. For more information on the benefits of using kits, see the explanation on kits in the next subsection.
Using Kits as Transactional Objects
If you want to make multiple changes that require complex manipulations, it is more efficient to perform these operations outside of the database, logically group them, and then commit them all at once. You can do this with transactional objects called kits. For most database objects, there is an analogous kit object that exists outside of the database. Every setting that exists for a key, you can apply to a kit. Below is a sample list describing some database objects and their analogous transactional objects:
Database object |
Transactional object |
|---|---|
HPS::ShellKey |
HPS::ShellKit |
HPS::LineKey |
HPS::LineKit |
HPS::CylinderKey |
HPS::CylinderKit |
While it is possible to insert an object into the Visualize database and subsequently modify it, this is not the most efficient way. The example below makes four database calls:
    // four calls directly to the database - slower
    HPS::TextKey myTextKey = mySegmentKey.InsertText(Point(0.0f, 0.0f, 0.0f), "My important text string.");
    myTextKey.SetBold(true);
    myTextKey.SetLineSpacing(1.5f);
    myTextKey.SetRotation(20);
// four calls directly to the database - slower
HPS.TextKey myTextKey = mySegmentKey.InsertText(new HPS.Point(0.0f, 0.0f, 0.0f), "My important text string.");
myTextKey.SetBold(true);
myTextKey.SetLineSpacing(1.5f);
myTextKey.SetRotation(20);
Using transactional objects, we can accomplish the same task outside of the database and then commit it atomically to the database using a kit.
        // preferred method is to build the kit, then make one database call:
        HPS::TextKit textKit;
        textKit.SetText("My important text string.");
        textKit.SetPosition(Point(0, 0, 0));
        textKit.SetBold(true);
        textKit.SetLineSpacing(1.5f);
        textKit.SetRotation(20);
        mySegmentKey.InsertText(textKit);
// preferred method is to build the kit, then make one database call:
HPS.TextKit textKit = new HPS.TextKit();
textKit.SetText("My important text string.");
textKit.SetPosition(new HPS.Point(0, 0, 0));
textKit.SetBold(true);
textKit.SetLineSpacing(1.5f);
textKit.SetRotation(20);
mySegmentKey.InsertText(textKit);
If you need to modify an existing object, the same recommendations apply. If you’re modifying just one or two attributes, it may be better to operate directly on the associated key. However, when adjusting multiple values, the kit is usually faster:
    HPS::TextKit textKit;
    myTextKey.Show(textKit); // copies existing database object into the kit

    // adjusting the kit
    textKit.SetFont("times new roman");
    textKit.SetSize(10, Text::SizeUnits::Points);
    textKit.SetColor(RGBAColor(1, 0, 0));

    // reinserting into database
    myTextKey.Set(textKit);
HPS.TextKit textKit = new HPS.TextKit();
myTextKey.Show(out textKit); // copies existing database object into the kit

// adjusting the kit
textKit.SetFont("times new roman");
textKit.SetSize(10, HPS.Text.SizeUnits.Points);
textKit.SetColor(new HPS.RGBAColor(1, 0, 0));

// reinserting into database
myTextKey.Set(textKit);
Since a transactional object groups operations together, Visualize provides kits not just for database objects like shells and lines but also for some high-level segment attributes such as cameras. Kits exist only in memory and don’t actually write or read from the database - they write and read from their own container.
Attribute Controls
While a particular segment may or may not include geometry, every segment has a set of attributes. When a local attribute is unset, its value will revert to the inherited value from the parent segment. Window segments have a set of default attributes applied to them by Visualize, thus, a value for every attribute is guaranteed. Unlike kits, controls are tied to a segment key and each set and unset will trigger a database write and each show will trigger a database read.
Certain attributes are compound and require multiple parts to have meaning. A camera is one example. A camera has, among other things, a position, a target, and a field of view. In this case, manipulating and examining a key’s attributes is accomplished using a special control. A control is a utility class that enables you to manipulate compound attributes. To access the camera attribute, you would use the HPS::CameraControl.
    Point target, pos;
    float w, h;

    HPS::CameraControl myCameraControl = mySegmentKey.GetCameraControl();
    myCameraControl.ShowTarget(target);
    myCameraControl.ShowField(w, h);
    myCameraControl.ShowPosition(pos);
HPS.Point target, pos;
float w, h;

HPS.CameraControl myCameraControl = mySegmentKey.GetCameraControl();
myCameraControl.ShowTarget(out target);
myCameraControl.ShowField(out w, out h);
myCameraControl.ShowPosition(out pos);
A control performs very specific actions. It can show, set and unset attribute values. You can deduce which control you need to request from an HPS::Key by learning their naming convention. A control’s name begins with the attribute category that it accesses:
<AttributeCategory>Control
For instance, the name HPS::VisibilityControl, tells us from the name that it can show, set, and unset visibility attributes. However, when getting attribute values using attribute controls, be aware that only those attributes explicitly set on the local segment can be retrieved. If you need to find the value of an inherited attribute, use a key path as described in this section.
Additionally, if you are querying a segment in an isolated segment tree, be aware that it may not have a value for a particular attribute. This is because isolated root segments have no parent and are not initialized with default attribute values. The following code snippet shows the typical logic required for deterimining whether the line visibility attribute has been set, and if so, whether it is true or false:
    bool state;
    if (mySegmentKey.GetVisibilityControl().ShowLines(state)) {
        // visibility is defined for lines in seg
        // if state == true then visibility for lines is explicitly set to ON for this segment
        // if state == false then visibility for lines is explicitly set to OFF for this segment
    }
    else {
        // visibility has NOT been defined for lines in seg. It might be inherited from above, though.
        // To get the NET visibility for lines you will need a KeyPath.
    }
bool state;
if (mySegmentKey.GetVisibilityControl().ShowLines(out state))
{
    // visibility is defined for lines in seg
    // if state == true then visibility for lines is explicitly set to ON for this segment
    // if state == false then visibility for lines is explicitly set to OFF for this segment
}
else
{
    // visibility has NOT been defined for lines in seg. It might be inherited from above, though.
    // To get the NET visibility for lines you will need a KeyPath.
}
Method Chaining
Transactional objects have another feature that increases their efficiency. When you call a set method on a kit, the method returns the very same kit. This is part of the method chaining feature in Visualize. The method chaining allows you to make multiple attribute modifications in one code statement:
<subject> <action & object> <action & object> <action & object>
Let’s take another look at our highlightText kit.
highlightText.SetBold(true);
highlightText.SetBold(true);
From highlightText, our HPS::TextKit transactional object, we call the TextKit::SetBold method. This method returns the very same HPS::TextKit. This allows us to modify another attribute inside the HPS::TextKit such as color. Let’s take a look at how we can set bold and color using method chaining:
highlightText.SetBold(true).SetColor(RGBAColor(1, 0, 1));
highlightText.SetBold(true).SetColor(new RGBAColor(1, 0, 1));
At the end of the above call, highlightText has set the attributes for bold and color in the HPS::TextKit. Now, let’s take a look at how to apply these changes to the database:
        // create our highlight text kit
        HPS::TextKit highlightText;
        highlightText.SetBold(true).SetColor(RGBAColor(1, 0, 1));

        // apply the changes to the database
        myTextKey.Set(highlightText);
// create our highlight text kit
HPS.TextKit highlightText = new HPS.TextKit();
highlightText.SetBold(true).SetColor(new HPS.RGBAColor(1, 0, 1));

// apply the changes to the database
myTextKey.Set(highlightText);
Although we have used the Set action in our discussion, this applies to Unset and Edit methods as well.
In Summary
In review of the previous sections, there are three ways to modify attributes within the database:
Modify one piece of information at a time executing a database transaction each time.
        myTextKey.SetBold(true);
        myTextKey.SetColor(RGBAColor(1, 0, 1));
myTextKey.SetBold(true);
myTextKey.SetColor(new RGBAColor(1, 0, 1));
Modify multiple pieces of information outside of the database through a kit and then commit them with one database transaction.
        // create the kit
        HPS::TextKit highlightText;

        // set the attributes highlight the text
        highlightText.SetBold(true);

        // using RGBColor to set text to yellow
        highlightText.SetColor(HPS::RGBColor(1, 1, 0));

        // apply the changes to the database
        myTextKey.Set(highlightText);
// create the kit
HPS.TextKit highlightText = new HPS.TextKit();

// set the attributes highlight the text
highlightText.SetBold(true);

// using RGBColor to set text to yellow
highlightText.SetColor(new RGBAColor(1, 1, 0));

// apply the changes to the database
myTextKey.Set(highlightText);
Modify multiple pieces of information outside of the database through a kit via method chaining and then commit them with one database transaction.
        // create our highlight text kit
        HPS::TextKit highlightText;
        highlightText.SetBold(true).SetColor(HPS::RGBColor(1, 1, 0));

        // apply the changes to the database
        myTextKey.Set(highlightText);
// create our highlight text kit
HPS.TextKit highlightText = new HPS.TextKit();
highlightText.SetBold(true).SetColor(new HPS.RGBAColor(1, 1, 0));

// apply the changes to the database
myTextKey.Set(highlightText);
The above methods accomplish the same task in different ways. The approach you take will be based the your application’s needs and your style preference.
Text Encoding
When using the C++ interface, the UTF8 class is used as a replacement for character arrays. As its name suggests, it is an implementation of the UTF-8 standard, used to represent any character in the Unicode character set. All strings you pass to Visualize are assumed to be UTF-8 encoded and any string that comes out of Visualize will be UTF-8 encoded (however, strings that are already UTF-8 encoded should not be doubly encoded). The UTF8 class is made available to facilitate this process. When calling a function, any string returned to the caller is encapsulated in a UTF8 object.
If you need to pass wide-character data to Visualize, you need to convert it into a format that Visualize understands. The UTF8 class facilitates that in two ways. The first is a constructor that can create a UTF8 object from a wide character (wchar_t) string. The second is an implicit cast operator from a UTF8 object to a char const *, essentially allowing a UTF8 object to be used as a character string. So, given a function such as:
HPS::TextKit::SetText(char const * in_utf8);
…you can do something like:
        HPS::TextKit myTextKit;
        wchar_t const* wide_string = L"this string is wide and not UTF-8 encoded";
        myTextKit.SetText(UTF8(wide_string));
A locale can optionally be set on the UTF8 class. The locale is passed as the second parameter to the constructor. Internally, we use setlocale from locale.h (see http://www.cplusplus.com/reference/clocale/setlocale/), so any parameter acceptable to that function is legal for our UTF8 class. Note that leaving the parameter unspecified, or passing an empty string, forces UTF8 to use the default locale of the environment.
When using C#, the UTF8 class is not applicable. Use the C# String class instead. String is UTF-16 encoded, but the Visualize API will implicitly convert any C# String passed to it.
Enumerations as Parameters
Except for those that map to objects or native data types, Visualize uses enumerations for all options passed as function parameters. The code sample below shows the enum for specifying the DirectX11 driver.
HPS::Database::CreateStandAloneWindow(HPS::Window::Driver::DirectX11);
HPS.Database.CreateStandAloneWindow(HPS.Window.Driver.DirectX11);
The Concept Class
In the example above, HPS::Window is a concept class. A concept class is a class that contains only enums and possibly static functions. The constructor is private because they are not intended to be instantiated. The purpose of the concept class is simply to contain enums and facilitate their access by all instantiated objects.
Multi-Threading
HOOPS Visualize is completely thread-safe. However, there are very few application use-cases where it is beneficial to call the API from multiple threads of execution. This is because Visualize internally creates threads as needed to optimize performance. All calls to the Visualize API are routed through an internal dispatcher which is able to divide processing work among threads. For example, when updating a scene, Visualize will automatically queue that action on a rendering thread. The same logic applies to areas such as Database interactions and internal memory management.
Additionally, many of the most time-consuming operations - which would normally be candidates for multi-threading - depend on the Database being locked in a read-only state. For example, when updating the scene, the Database is locked in a read-only state. While the Database is locked, interaction is limited to read-only operations such as query, export, or selection. Any operations that modify the scene-graph, such as setting attributes, modifying graphical primitives, camera rotations, or highlighting are considered ‘write’ operations and require the Database to be unlocked, so building a complex multi-threaded framework where your application accesses the Visualize API from multiple threads is unlikely to provide any benefit. It is legal to perform ‘write’ operations while the Database is locked because Visualize is thread-safe, but such operations will simply be queued until the read lock is lifted.
If you feel you have use-cases or can achieve potential performance gains by accessing the Visualize API from multiple threads in your application, we strongly encourage you to contact Developer Support for general programming advice and feedback about potential concurrency gains that you may expect.
General Tips
If you ever access the Visualize API from multiple threads, it becomes imperative to diligently check for errors and exceptions. For example, one of your threads could try to use a Database object (such as a segment or graphical primitive) that no longer exists. Be sure to always check for HPS::IOException when interacting with Database objects. If you wish to synchronize the Database to ensure that all internally queued events have been processed, you would call HPS::Database::Synchronize.
Language-Specific Notes
Data Type Differences Between C++ and C#
In order to simplify the interface, prevent bounding errors, and provide a general convenience, all C++ array types have been
typedef’d as STLvector. In C#, however, this distinction is meaningless as arrays are supported at a higher level by the language itself. The general naming convention in C# is to drop theArraysuffix in favor of simply defining these types as arrays. Equivalent examples are provided below:
    PointArray pointArray;
    SegmentKeyArray ska;
    GlyphElementArray gea;
HPS.Point[] pointArray;
HPS.SegmentKey[] ska;
HPS.GlyphElement[] gea;
Some Visualize functions accept a
size_tparameter. As C# does not usesize_t, you should useulongin its place. While this will result in some waste in 32-bit Windows, it will enable addressing very large arrays in 64-bit systems.
C# “is” Equality Checks
Performing is equality checks on C# objects returned by HPS is only valid for types which contain virtual functions that HPS may invoke. For example, operators will be cached as they have many virtual functions such as OnMouseMove which HPS may invoke. Thus, pushing an operator, popping it, then comparing this using is to the original object will work as expected. However, when you supply a class like HPS::ShellKey (that has no virtual functions) to an HPS interface and then retrieve it, is will not return true even if == or Equals evaluates to true.
Deleting Objects in C#
In Visualize, C# wrappers own a memory reference for each C++ object they are referencing. When the C# objects are garbage collected (or when Dispose() is called), it frees the C++ memory it allocated. This does NOT remove the key from the scene graph, it just removes the memory the C# wrapper allocated.
If you want to delete the key from the scene graph you need to call the Delete() method. Generally, there is no need to call Dispose() manually, as the C# garbage collector will take care of that for you. However, calling Dispose() manually can be beneficial in certain situations. For example, imagine you are creating and destroying many temporary C# objects quickly in a tight loop. Calling Dispose() allows these C# objects to have some partial deterministic destruction, which should result in lower memory usage.
Initialization of Certain Structures in C#
In C++, HPS::SimpleCuboid and ``HPS::SimpleSphere are initialized to be invalid. In C#, HPS.SimpleCuboid and HPS.SimpleSphere are initialized to zero-sized geometry centered at the origin.
Float Functions
Unlike in C++, the C# HPS.Float.Equals function does not have an implementation for arrays.
Show Functions
C++ Show functions may not set the value of output parameters if the Show function fails. C# Show functions will always assign a value to out parameters, even if the Show fails.
Protected C++ Members Not Available in C#
In the C++ API, certain classes contain member variables with the protected access modifier. These member variables cannot be directly accessed in the C# API, although in most cases their values can be manipulated via public getters/setters or constructors.
One example is the mouse_trigger variable from the HPS::Operator class, which can be directly accessed in C++ but can only be accessed via getters and setters in the C# version of that class.
Using WPF with C#
HPS.D3DImageCanvas is the canvas class you should employ for using C# with WPF (please see this page for usage details). Please note that regardless of which driver interface you are using, d3dcompiler_XX.dll MUST be distributed with your application (if it doesn’t already exist in the execution environment) when using C# with WPF.
Rendering Fast Synchronous Updates When Using D3DImageCanvas
When submitting many synchronous updates quickly while using a HPS.D3DImageCanvas, it is possible that some of the intermediate updates will not be rendered by WPF. This happens when the underlying D3DImage does not get displayed by the WPF renderer before Visualize has rendered the next frame or frames. If it is important for every update to be rendered to the screen, this problem can be sidestepped by dispatching updates on the WPF render thread directly, in your application code. This can be done as follows:
// _win is of type MainWindow
_win.Dispatcher.Invoke(System.Windows.Threading.DispatcherPriority.Render, new Action(delegate()
{
        GetCanvas().UpdateWithNotifier().Wait();
}));
Miscellaneous Notes
Edges vs. Lines
Visualize allows access to object attributes using the associated attribute control. It should be noted that lines and edges are completely different geometric entities, and thus are handled differently. In Visualize, an edge is a part of any facetted geometry, such as shells, meshes, NURBS surfaces, circles, ellipses, spheres, and cylinders. Edge attributes are controlled using the HPS::EdgeAttributeControl, which is available from the HPS::SegmentKey.
Lines are parts of non-faceted geometry such as line segments, NURBS curves, and arcs. Line attributes are controlled using the HPS::LineAttributeControl, which is available from the SegmentKey.
Default Rotation Units
When supplying a rotation value to an Visualize function, the default unit is degrees, not radians.
Error Handling
In addition to normal runtime exceptions issued by the client application, Visualize will issue errors and exceptions of its own as conditions dictate. Ideally, your application would respond to the errors as appropriate to the situation, and Visualize provides a way to do this using an error handling mechanism that you can customize. Errors and warnings are issued through the event handling system, which is detailed along with exceptions in a separate section.
