Markers
The simplest geometric primitive in HOOPS Visualize is a marker, which is used to represent a point in space. With one exception, markers are two-dimensional geometry with the marker always oriented to face the camera, but can be positioned anywhere in 3D space.
A marker is visually represented by a marker symbol, or glyph, which is a segment-level attribute. A set of default glyphs are provided.
The default marker symbol is a small filled circle, and the default marker visibility setting is off (see this section for instructions on enabling marker visibility). The marker symbol is set using HPS::MarkerAttributeControl::SetSymbol as demonstrated in this snippet:
    // set the marker symbol (optional)
    mySegmentKey.GetMarkerAttributeControl().SetSymbol("myMarkerName");

    // insert a marker at the origin
    mySegmentKey.InsertMarker(Point(0, 0, 0));
// set the marker symbol (optional)
mySegmentKey.GetMarkerAttributeControl().SetSymbol("myMarkerName");

// insert a marker at the origin
mySegmentKey.InsertMarker(new Point(0, 0, 0));
Like other geometry, markers can be inserted using a HPS::MarkerKit. However, the benefit to doing this is limited as there is only one parameter to set, the position. It should be noted that a segment’s active marker symbol is also used to draw geometry vertices for shells and meshes.
When possible, Visualize will use hardware paths to draw markers. However, this means we sometimes run into the situation where the hardware has a maximal size for hardware markers - any markers larger than this are shrunk to the hardware maximum. This setting should be left at the default value of Marker::DrawingPreference::Fastest in all cases unless such a problem is directly seen, in which case Marker::DrawingPreference::Nicest can be used to ensure markers are drawn properly. As this incurs a performance cost, we recommend only setting Nicest at the segment where the too-large markers live, and to set Fastest in all other places.
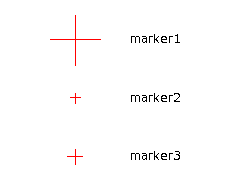
Marker Size
Marker size is controlled by calling HPS::MarkerAttributeControl::SetSize. Note the default size is fixed - the marker will not change size due to camera or modelling matrix changes. If no marker size-unit parameter is given when calling HPS::MarkerAttributeControl::SetSize, the marker is linearly scaled by the default marker size. Note that several of the marker size-units will result in ‘view-dependent’ sizing, where the marker size will change as the camera or modelling matrices change.
For example, to set the marker size to 5 pixels, use the HPS::Marker::SizeUnits::Pixels enum. To scale the marker in world coordinates, use HPS::Marker::SizeUnits::WorldSpace.
    // since markers are segment-level attributes, the size examples below must go in different segments
    HPS::SegmentKey segKey1 = mySegmentKey.Down("marker1", true);
    HPS::SegmentKey segKey2 = mySegmentKey.Down("marker2", true);
    HPS::SegmentKey segKey3 = mySegmentKey.Down("marker3", true);

    // if second parameter to SetSize is omitted, the marker is scaled relative to its default size
    segKey1.GetMarkerAttributeControl().SetSize(5).SetDrawingPreference(HPS::Marker::DrawingPreference::Fastest);
    HPS::MarkerKey markerKey1 = segKey1.InsertMarker(Point(0, 0.10f, 0));

    // marker2 is 10 pixels in size
    segKey2.GetMarkerAttributeControl()
        .SetSize(10, HPS::Marker::SizeUnits::Pixels)
        .SetDrawingPreference(HPS::Marker::DrawingPreference::Fastest);
    HPS::MarkerKey markerKey2 = segKey2.InsertMarker(Point(0, 0, 0));

    // marker3 is 0.1 world space units in size
    segKey3.GetMarkerAttributeControl()
        .SetSize(0.1f, HPS::Marker::SizeUnits::WorldSpace)
        .SetDrawingPreference(HPS::Marker::DrawingPreference::Fastest);
    HPS::MarkerKey markerKey3 = segKey3.InsertMarker(Point(0, -0.10f, 0));
// since markers are segment-level attributes, the size examples below must go in different segments
HPS.SegmentKey segKey1 = mySegmentKey.Down("marker1", true);
HPS.SegmentKey segKey2 = mySegmentKey.Down("marker2", true);
HPS.SegmentKey segKey3 = mySegmentKey.Down("marker3", true);

// if second parameter to SetSize is omitted, the marker is scaled relative to its default size
segKey1.GetMarkerAttributeControl().SetSize(5).SetDrawingPreference(Marker.DrawingPreference.Fastest);
HPS.MarkerKey markerKey1 = segKey1.InsertMarker(new HPS.Point(0, 0.35f, 0));

// marker2 is 10 pixels in size
segKey2.GetMarkerAttributeControl().SetSize(10, HPS.Marker.SizeUnits.Pixels).SetDrawingPreference(Marker.DrawingPreference.Fastest);
HPS.MarkerKey markerKey2 = segKey2.InsertMarker(new HPS.Point(0, 0, 0));

// marker3 is 0.1 world space units in size
segKey3.GetMarkerAttributeControl().SetSize(0.1f, HPS.Marker.SizeUnits.WorldSpace).SetDrawingPreference(Marker.DrawingPreference.Fastest);
MarkerKey markerKey3 = segKey3.InsertMarker(new HPS.Point(0, -0.35f, 0));
Marker size is controlled using the ``MarkerAttributeControl``
NOTE: The “Dot” marker symbol is a special case and cannot be resized.
In the code snippet above, an enum HPS::Marker::DrawingPreference has been applied to the markers’ attributes. When possible, Visualize will use hardware paths to draw markers. However, this means we sometimes run into the situation where the hardware has a maximal size for hardware markers - any markers larger than this are shrunk to the hardware maximum.
This setting should be left at the default value of HPS::Marker::DrawingPreference::Fastest in all cases unless markers are appearing smaller than desired on certain hardware, in which case HPS::Marker::DrawingPreference::Nicest can be used to ensure markers are drawn at the proper size. Because this incurs a performance cost, we recommend only setting HPS::Marker::DrawingPreference::Nicest at the segment where the oversize markers live, and to set HPS::Marker::DrawingPreference::Fastest in all other places.
Editing Markers
As with other geometry, markers can be modified after insertion by using the marker’s key. However, the actions available for modifying a marker are limited:
    // ... continuing from the above example
    markerKey2.SetPoint(Point(-0.25f, 0, 0));

    // delete a marker
    someOtherMarkerKey.Delete();
// ... continuing from the above example
markerKey2.SetPoint(new HPS.Point(-0.25f, 0, 0));

// delete a marker
someOtherMarkerKey.Delete();
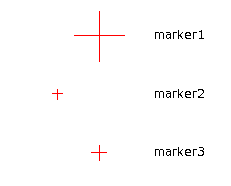
‘marker2’ has been edited using the code above
Marker Color and Visibility
Marker color is controlled at the segment level using the HPS::MaterialMappingControl (for a discussion on materials, see this section). To toggle the visibility of markers, use the HPS::VisibilityControl of the segment key:
    mySegmentKey.GetVisibilityControl().SetMarkers(false); // turn off markers
    mySegmentKey.GetVisibilityControl().SetMarkers(true); // turn on markers

    // sets marker color to red
    mySegmentKey.GetMaterialMappingControl().SetMarkerColor(RGBColor(1, 0, 0));
mySegmentKey.GetVisibilityControl().SetMarkers(false); // turn off markers
mySegmentKey.GetVisibilityControl().SetMarkers(true);  // turn on markers

// sets marker color to red
mySegmentKey.GetMaterialMappingControl().SetMarkerColor(new HPS.RGBAColor(1, 0, 0));
Other Considerations When Using Markers
For applications that require markers in a grid pattern, it is possible to insert multiple markers using a mesh with face and edge visibility turned off. This technique is slightly more efficient in terms of space, and produces identical results. The mesh primitive is discussed here.
If you have inserted a large number of markers into your scene (on the order of 10,000 or more), we suggest that you explore using vertex markers as an alternative way to represent your data. This approach will result in more efficient rendering and lower memory usage.
