Lighting Algorithms
In 3D graphics, it can be difficult to accurately represent curved surfaces, as any curved surface is necessarily tessellated into planar facets. Lighting interpolation causes facetted objects such as shells, meshes, and NURBS to be displayed as if they were smooth, curved surfaces. Visualize can only perform lighting interpolation if there is at least one light in the scene. There are three types of lighting interpolation: Gouraud, Phong, and Flat. If lighting interpolation is not enabled, then Flat lighting will be performed, which causes each facet to have a single uniform color.
Interpolation Algorithms
Gouraud Lighting
The Gouraud lighting algorithm computes the light at each vertex, and then interpolates that value across the face. This is the default lighting method when a light is present. Gouraud lighting is almost always accelerated by underlying 3D hardware. It has some shortcomings, where specular highlights may not be rendered accurately, and ‘phantom’ triangle artifacts can appear, revealing the underlying triangulation of the model. If you are using Gouraud lighting and you are seeing these artifacts, one solution is to increase the tessellation of the model. However, rendering is slowed by models of high tessellation, therefore, if you find you are compensating for lighting inaccuracies in this way, consider using Phong lighting.
Phong Lighting
The Phong lighting algorithm computes the light on a per-pixel basis. This results in more accurate display of curved surfaces, and enhances the display of specular highlights. Phong lighting is computationally intensive, and has typically not been used for interactive scenes. If the GPU does not support Phong lighting, Visualize will fall back to software rendering.
The following are some key points about hardware Phong lighting support:
It should be used only in cases where the light follows the camera or objects are rotated using modelling matrices. If end users are able to position themselves to see specular highlights from grazing angles on the surface, bad artifacts can appear.
Phong lighting has a fairly small amount of initialization overhead per update, which is based on the number of Visualize subwindows and the number of unique gloss values. If scenes contain multiple gloss values and/or subwindows, the overhead can add up.
Use of spotlights will cause Visualize to fall back to software rendering. Only distant lights are compatible with hardware Phong support.
With a large model and a single distant light, we have found Phong lighting incurs a performance penalty of about 10% when compared to Gouraud lighting, but the improved quality is usually worth the trade-off.
Transparent materials will reduce rendering speed.
The specular color of materials will be ignored. Only the light’s specular color will be honored. For the purposes of hardware Phong lighting, the material’s specular color is assumed to be pure white.
Flat Lighting
Flat lighting is the least sophisticated lighting algorithm available in Visualize. It does no smoothing, rather, the shade of each facet is computed based on the angle between the facet surface normal and the direction of the light. This is the option to choose if you prefer performance over quality, although depending on the scene, the result could be only nominally better than having no lighting at all. Specular highlights are typically not drawn accurately, and the model’s perceived realism suffers in a general way.
All the lighting methods are enabled using the HPS::LightingAttributeControl. You can even set different lighting interpolation methods for different parts of the scene.
    // enables Gouraud (default)
    mySegmentKey.GetLightingAttributeControl().SetInterpolationAlgorithm(HPS::Lighting::InterpolationAlgorithm::Gouraud);

    // enables Phong
    mySegmentKey.GetLightingAttributeControl().SetInterpolationAlgorithm(HPS::Lighting::InterpolationAlgorithm::Phong);

    // enables flat shading
    mySegmentKey.GetLightingAttributeControl().SetInterpolationAlgorithm(HPS::Lighting::InterpolationAlgorithm::Flat);
// enables Gouraud (default)
mySegmentKey.GetLightingAttributeControl().SetInterpolationAlgorithm(HPS.Lighting.InterpolationAlgorithm.Gouraud);

// enables Phong
mySegmentKey.GetLightingAttributeControl().SetInterpolationAlgorithm(HPS.Lighting.InterpolationAlgorithm.Phong);

// enables flat shading
mySegmentKey.GetLightingAttributeControl().SetInterpolationAlgorithm(HPS.Lighting.InterpolationAlgorithm.Flat);
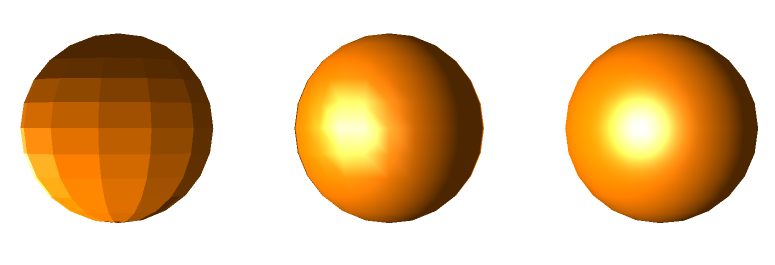
A sphere rendered with flat (left), Gouraud (center), and Phong (right) lighting
Hemispheric Ambient Lighting
To create a photo-realistic effect in 3D scenes, Visualize uses a combination of lighting algorithms to help determine the color of each pixel. To approximate the global illumination in a scene, Visualize takes into account direct light sources as well as indirect sources of light. In real-time 3D graphics, the calculation used to determine the contribution from indirect sources of light can be extremely expensive. An more efficient way to approximate this number is through ambient lighting.
Although ambient lighting is subtle relative to direct lighting, the addition of ambient lighting can create a significantly more realistic effect in a 3D scene. Visualize gives you the ability to create an ambient effect in a scene via the following steps. The ambient lighting model used assumes that light coming from below would pick up some of the ground color as it is reflected. As a result, it would be a different color than ambient light coming from above. Thus, Visualize provides the ability to set the “ambient up” color separate from the “ambient down” color as seen in the sample code below.
    mySegmentKey.GetMaterialMappingControl().SetAmbientLightUpColor(RGBAColor(1, 0, 0));
    mySegmentKey.GetMaterialMappingControl().SetAmbientLightDownColor(RGBAColor(0, 0, 1));
mySegmentKey.GetMaterialMappingControl().SetAmbientLightUpColor(new HPS.RGBAColor(1, 0, 0));
mySegmentKey.GetMaterialMappingControl().SetAmbientLightDownColor(new HPS.RGBAColor(0, 0, 1));

Using this setting, Visualize determines that the ambient lighting component would be light brown for a point whose surface normal is directly opposite to the defined up vector. One the other hand, if the surface normal is the same as the up vector, the ambient lighting component would be blue. Any point with surface normals in between would get a ambient term that is interpolated between blue and light brown. The sample code below sets the up vector directly into the y direction.
Eye-Dome Lighting
Eye-dome lighting is a shading technique used to improve depth perception. This lighting method is non-photorealistic and is commonly used when visualizing point clouds. Normally, when you want to apply a lighting effect to a point cloud, you would have to set a normal for each vertex in the cloud. This is not only tedious, but requires significant memory resources. Eye-dome lighting is designed to solve this problem. To enable eye-dome lighting, simply enable it as a post-process effect:
windowKey.GetPostProcessEffectsControl().SetEyeDomeLighting(true, 60.0f, 1.2f);
windowKey.GetPostProcessEffectsControl().SetEyeDomeLighting(true, 60.0f, 1.2f);
Note that eye-dome lighting is a window-level attribute that is intended to be used only with point clouds. However, if your scene includes both point cloud data and facetted data, you would typically want to disable the effect for the facetted data. As a post-processing effect, eye-dome lighting can be disabled for a segment sub-tree using:
mySegmentKey.GetVisualEffectsControl().SetPostProcessEffectsEnabled(false);
mySegmentKey.GetVisualEffectsControl().SetPostProcessEffectsEnabled(false);
Please note that the above call will disable all post-processing effects. This is one of the limitations of using eye-dome lighting with both point clouds and facetted data.
If you are seeing banding artifacts or other graphical anomalies when using eye-dome lighting for point cloud data, adjusting the ‘strength’ parameter down may help to improve the image quality. However, this will also result in detail reduction. The effect of eye-dome lighting can be seen below:
A point cloud model with eye-dome lighting

The same point cloud model without lighting
