Data Model
Introduction
With HOOPS Publish, you can create interactive documents with separate data and view layers.
For instance, data can be stored in a data table, which can be bound later to widgets like a scroll table or a list box.
The relationship between different data tables can also be used to define dynamic behavior inside a PDF to update what’s displayed in a widget whenever a particular event (such as a mouse-click selection) occurs elsewhere in the PDF.
The following sections describe more specifically how this works.
Creating a Data Table
A Data Table is a table data structure that stores an array of pointers to A3DUTF8Char strings:
struct {
    A3DInt32 uNbRow;
    A3DInt32 uNbCol;
    A3DUTF8Char** m_ppcTexts;
    A3DUns16 m_usStructSize;
} A3DPDFDataTableData;
It can be used to store content to be displayed in any field or high-level widget: text fields, list boxes, buttons, scroll tables, etc.
To display the following items in a list box, define a table with five rows:

The content displayed in a particular widget can change depending on the selection on another widget. In this example, the information displayed in the Required Parts list box is updated depending on which item is selected in the Procedure Steps list box.
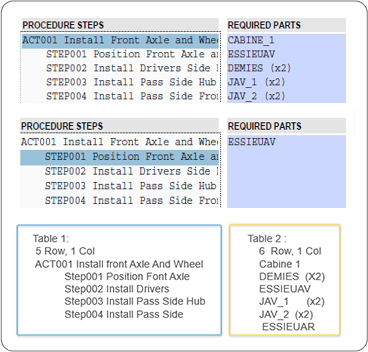
In this case, Table 2 is used to define all the content that can potentially be displayed in the Required Parts list box.
Setting a Relationship Between Tables
In the previous sample, clicking on an item in the Procedure Steps widget dynamically populates the data in the Required Parts listbox.
To define that, a relationship table must be set:
struct {
    A3DPDFDataTableData *pTable1;
    A3DPDFDataTableData *pTable2;
    A3DInt32 m_iSizeMap;
    A3DPDFMapIndexData *m_pMapIndexes;
    A3DUns16 m_usStructSize;
} A3DPDFDataRelationshipData;
This table will define a relationship (a data mapping) between Table 1 and Table 2, describing what will be displayed from Table 2 whenever an item in Table 1 is selected:
Binding a Data Table
Once the data tables have been created, they need to bind to widgets that are used to display their content. This is done using BindToTable functionality, which can be applied to:
TextField
ScrollTable
ListBox
DropDownList
ViewCarousel
DataFilter
3DNodeScene
3DViewList
Defining a Widget Behavior on Interaction
Finally, a behavior type must be defined to describe how widgets will be updated when an item is selected in another source widget. In the following example, the data in the Required Parts listbox will be updated after a Procedure Step is selected. To choose if the relevant data (as defined with the Data Relationship table) will be isolated (Fig 1) or highlighted (Fig 2), the function A3DPDFWidgetSetTargetBehaviour must be used:
<table cellspacing="30">
    <tr>
        <td>
        <p><strong><em>Isolated</em></strong><br><img src="../_static/images/DefiningActions1.png"></p><br>
        <div align="left" style="text-align:left;">
            A3DPDFWidgetSetTargetBehaviour(pListBox_ProcedureStep, pListBox_Requiredpart, kA3DPDFDataIsolate);
        </div>
    </td>
    <td>
        <p><strong><em>Highlighted</em></strong><br><img src="../_static/images/DefiningActions2.png"></p><br>
        <div align="left" style="text-align:left;">
                A3DPDFWidgetSetTargetBehaviour(pListBox_ProcedureStep, pListBox_Requiredpart, kA3DPDFDataHighlight);
        </div>
        </td>
    </tr>
</table>
Three types of behaviour can be defined:
Isolate
Highlight
Selected
Setting up highlight properties
On PDF files generated with datamodel API, customers can set up properties on highlighting behaviour on 3d scene. With this, the customer has to write some javascript at document level (i.e. generally on the UI widgets on a page) to set the highlight properties.
The javascript required is very simple and looks like this:
getHighlightManagerFor3DAnnot().setHighlightMode(_TS3D_HIGHLIGHTMODE.ISOLATE);
getHighlightManagerFor3DAnnot is a function defined like follows:
getHighlightManagerFor3DAnnot() // by default, takes the first 3d annot on first page getHighlightManagerFor3DAnnot(pageIndex, annotIndex) // to specify the page index and 3d annot index on the page getHighlightManagerFor3DAnnotWithId(annotuuid) // is to be used when we know the uuid generated for the 3d annot
Following properties are supported by using set methods:
. setHighlightColor(r,g,b) : r g b are red green blue values in [0-1] (default: red) . setLevelOpacity(dLevelOpacity) : percentage of opacity applied in transparency mode, in [0-1] (default 0.2) . setIsBlinking(bIsBlinking) : boolean, if true the highlighted nodes are blinking . setBlinkNumber(iBlinkNumber) : number of times the nodes are blinking (default: 3) . setBlinkPeriod(iBlinkPeriod) : duration of blink in ms (default: 300) . setHighlightMode(eHighlightMode) : set highlight modes with following values:
_TS3D_HIGHLIGHTMODE.ISOLATENODES
_TS3D_HIGHLIGHTMODE.COLORNODES_AND_TRANSPARENCY
_TS3D_HIGHLIGHTMODE.ISOLATENODES_COLORFACES_AND_TRANSPARENCY
_TS3D_HIGHLIGHTMODE.COLORNODES
. setEnableAutoFit(bEnableAutoFit) : boolean, if true automatically fits the scene to the highlighted nodes
Miscellaneous
For a working example of how interaction between 3D annotations and the documents can be set up, please see the DemoDataModel sample (only available for HOOPS Publish Advanced customers).
