Visualization: Create a Custom Navigation Handler to Support a Custom Navigation Scheme
The cee::vis::Camera has an input handler that handles user input (mouse and keyboard events) and manipulates the camera based on these events. This is used to move the camera around the scene to inspect the model.
HOOPS Envision for Desktop provides two default Input Handlers:
cee::vis::CameraInputHandlerZoom: Envision style zoom navigation. This is the default navigation handler.cee::vis::CameraInputHandlerWalk: Envision style walk navigation.
In this tutorial we will show how to create a custom navigation scheme by subclassing the
cee::vis::CameraInputHandler.
Note
This tutorial expect the application to have a correctly configured cee::vis::View
in place. See the demo applications on how to set up a cee::vis::View in your application.
Create the custom input handler
Create a class that derives from cee::vis::CameraInputHandler and override the two following methods:
class MyInputHandler : public cee::vis::CameraInputHandler
{
protected:

    // Determine the navigation type from the given input state
    // Out custom scheme uses the left mouse button for navigation (reserving the right for e.g. context menu).
    // - Left button + CTRL = PAN
    // - Left button + Shift = Rotate
    // - Left button + CTRL and Shift = Zoom
    // - Mouse wheel = zoom
    virtual NavigationType  navigationTypeFromInputState(cee::vis::MouseButtons mouseButtons, cee::vis::KeyboardModifiers keyboardModifiers) const
    {
        if (mouseButtons == cee::vis::LeftButton && keyboardModifiers == cee::vis::ControlModifier)
        {
            return PAN;
        }
        else if (mouseButtons == cee::vis::LeftButton && keyboardModifiers == cee::vis::ShiftModifier)
        {
            return ROTATE;
        }
        else if ((mouseButtons == cee::vis::LeftButton) && (keyboardModifiers == (cee::vis::ControlModifier | cee::vis::ShiftModifier)))
        {
            return ZOOM;
        }

        return NONE;
    }

    // Zoom for the mouse wheel
    virtual NavigationType wheelNavigationType() const
    {
        return CameraInputHandler::ZOOM;
    }
};
The navigationTypeFromInputState() method should
return the wanted navigation type (PAN, ROTATE, WALK, ZOOM) based on the mouse and keyboard input state.
The wheelNavigationType() determines the use of the mouse
wheel. Usually WALK or ZOOM.
Use the custom input handler
Use of the new input handler by setting it as the input handler for the current camera.
    // Setup the camera to use our own custom navigation input handler
    getTutorialView()->camera().setInputHandler(new MyInputHandler);
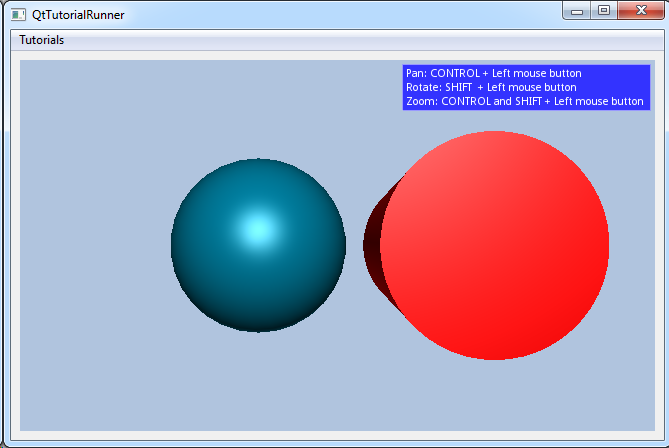
Then, create a model to demonstrate the new navigation scheme. Here we use the GeometryModel.
    // Add a sphere with default color
    cee::PtrRef<cee::geo::Part> spherePart = new cee::geo::Part(cee::geo::DataGenerator::createSphere(cee::Vec3d(4.0, 2.0, 1.0), 1.0, 30).get());
    geometryModel->addPart(spherePart.get());

    // Add a red cylinder
    cee::PtrRef<cee::geo::Part> cylinderPart = new cee::geo::Part(cee::geo::DataGenerator::createCylinder(cee::Vec3d(6.0, 2.0, 1.0), 0.8, 0.0, cee::Vec3d(0,0,1), 3, 50).get());
    cylinderPart->settings().addEffect(new cee::geo::EffectColor(cee::Color3f(1,0,0)));
    geometryModel->addPart(cylinderPart.get());

    // Add model to view. Ensure that old models are removed first
    gcView->removeAllModels();
    gcView->addModel(geometryModel.get());

    // Create a text box to explain the custom navigation scheme
    cee::PtrRef<cee::vis::OverlayTextBox> textBox = new cee::vis::OverlayTextBox(cee::vis::Font::createNormalFont().get());
    textBox->setText("Pan: CONTROL + Left mouse button\nRotate: SHIFT  + Left mouse button\nZoom: CONTROL and SHIFT + Left mouse button");
    textBox->setSizeToFitText();
    textBox->setBorderWidth(1);
    gcView->overlay().addItem(textBox.get(), cee::vis::OverlayItem::TOP_RIGHT, cee::vis::OverlayItem::VERTICAL);

    cee::BoundingBox bb = gcView->boundingBox();
    gcView->camera().fitView(bb, cee::Vec3d(0, 0, -1), cee::Vec3d(0, 1, 0));
    gcView->camera().inputHandler()->setRotationPoint(bb.center());

    gcView->requestRedraw();
See the complete source code here:
Visualization: Create a Custom Navigation Handler to Support a Custom Navigation Scheme