Basic Introduction to Scripting
These short examples show the basic building blocks of SpinFire Insight scripting. Each one is a few lines long, so you can copy it into the script editor, run it and see what happens. No programming experience with SpinFire is needed. If you have never written a script, read Before You Start first.
For short beginner scripts that each do one complete job, see Basic Sample Scripts. For longer, ready-to-run scripts, see Advanced Sample Scripts. For the full list of functions, see the Function Index.
Note
You need a licensed copy of SpinFire Insight to run these examples.
Before You Start
What is a script? A script is a short list of instructions written in Python. SpinFire runs the instructions in order, so you can repeat a task, such as rotating a model or saving a file, with one click.
How to run a script
Open a model in SpinFire Insight. Some examples need a 2D workspace instead. The first line of each example tells you which.
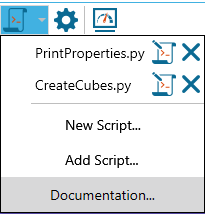
Click the Scripting icon on the 3D toolbar and choose New Script….
Open View > Python.NET Console. Results (everything you
print) and error messages appear here.Paste an example into the editor and click Run.
For more detail, see Python Scripting: Beyond the Basics.
Built-in help. The script menu has a Documentation item that opens the scripting reference inside SpinFire Insight.
The few Python ideas used on this page
import spinfirescript as sfsloads SpinFire’s scripting functions. Every example starts with it. After that, you call a function by writingsfs.in front of its name, for examplesfs.ZoomFit().Anything after a
#is a comment. Python ignores it. The examples use comments to explain each step.print(...)writes a value to the Python.NET Console. Most SpinFire functions return a message that says whether the call worked, so printing the result is the easiest way to check.Python uses indentation (the spaces at the start of a line) to group lines. In a
forloop, the indented lines are the ones that repeat. Keep the indentation exactly as shown when you copy an example.A list in square brackets, such as
[0, 0, 0], holds several values. SpinFire uses lists for coordinates and for the path to an item in the model tree.
Tip
If something doesn’t work, check the console first. It shows the error message and the line that caused it. See Common Problems at the end of this page.
Your First Script
The smallest useful script prints a message from SpinFire. It needs no model.
1import spinfirescript as sfs
2
3print("Hello from SpinFire")
If the text appears in the console, the editor and console are working. Now try the examples below.
The examples
Get the Physical Properties of Items
This example reads the physical properties of the model and prints them to the console. Physical properties are values such as mass, volume and surface area. The Message field holds the readable result.
Usage
GetPhysicalProperties()
Parameters
None. The function reports on the current selection.
Example: list the physical properties of the model
1# First open a 3D model to execute this script.
2# Open the Python.NET console panel to see the result.
3import spinfirescript as sfs
4
5sfs.SelectItem([0])                       # select the whole model
6propertiesData = sfs.GetPhysicalProperties()
7print(propertiesData)
8print(propertiesData.Message)
What happens
SelectItem([0])selects the model.[0]is the path to the first item in the model tree.GetPhysicalProperties()measures whatever is selected.The two
printlines show the result in the console.
Try it: change [0] to the path of a single part, for example [0, 1], to measure just that part.
Rotate the Entire Assembly
This example selects the model and rotates it around each axis, ten times. The axes are the usual X, Y and Z.
Usage
RotateSelectedAssemblyItems(axis, degrees)
Parameters
axis: the axis to rotate around:
sfs.Axis.X,sfs.Axis.Yorsfs.Axis.Z.degrees: the amount to rotate, in degrees.
Example: rotate the model around X, Y and Z
1# First open a 3D model to execute this script.
2import spinfirescript as sfs
3
4for i in range(0, 10):                    # repeat the indented lines 10 times
5    sfs.SelectItem([0])                   # select the whole model
6    sfs.RotateSelectedAssemblyItems(sfs.Axis.X, 30)
7    sfs.RotateSelectedAssemblyItems(sfs.Axis.Y, 20)
8    sfs.RotateSelectedAssemblyItems(sfs.Axis.Z, 45)
9    sfs.ClearSelectedItems()              # deselect before the next round
What happens
for i in range(0, 10):repeats the indented lines below it ten times.Each round selects the model, rotates it three times (30, 20 and 45 degrees) and then clears the selection.
Note
The rotation changes the model in your workspace. Close the model without saving, or reopen it, to go back to the original position.
Insert a 2D Line
This example draws lines in a 2D workspace. It draws a black line and a randomly coloured line on each pass through the loop, and makes each pair thicker than the last.
Usage
InsertLine(startPoint, endPoint, colorText, width)
Parameters
startPoint: the start of the line as a list. In a 2D workspace this is
[x, y]; in a 3D workspace it is[x, y, z].endPoint: the end of the line, in the same form as
startPoint.colorText: the colour as a text string in the form
"#AARRGGBB", where each pair of characters is a hexadecimal number from00toFF:
AAis the alpha channel (FFis fully opaque)
RRis the red channel
GGis the green channel
BBis the blue channelFor example,
"#FF000000"is opaque black and"#FFFF0000"is opaque red.width: the line width, a number greater than 0.
See geometry.py — Geometry Module for the full signature, including the optional
updateCanvasargument.
Example: draw lines in a 2D workspace
 1# First open a 2D workspace to execute this script.
 2import spinfirescript as sfs
 3import random
 4
 5for i in range(1, 10):
 6    # Build a random colour: "#FF" (opaque) plus six random hex digits
 7    newColor = "#FF" + ''.join([random.choice('0123456789ABCDEF') for j in range(6)])
 8    y = (i + (i * 4)) * -1                # move each pair of lines further down
 9    sfs.InsertLine([0, y], [50, y], "#FF000000", i)
10    sfs.InsertLine([100, y], [150, y], newColor, i)
What happens
Each pass of the loop works out a new
yposition, so the lines stack down the page.The first line is always black. The second line gets a random colour.
The loop counter
iis also the width, so the lines get thicker as they go down.
Insert a 3D Polyline
A polyline is a line made of several connected segments. This example draws one through three 3D points.
Usage
InsertPolyline([[x1, y1, z1], [x2, y2, z2], …], colorText, width)
Parameters
points: a list of points. Each point is a list of three coordinates,
[x, y, z].colorText: the colour as a text string in the form
"#AARRGGBB"(see Insert a 2D Line above).width: the line width, a number greater than 0.
Example: draw a polyline through three points
1# First open a 3D workspace to execute this script.
2import spinfirescript as sfs
3
4print(sfs.InsertPolyline([[0, 0, 0], [50, 50.5, -70], [100, 75, 83.7]], "#FFAA0000", 2))
What happens: SpinFire draws a dark red polyline through the three points, and the console shows a message that confirms it. Coordinates are in the model’s units.
Import a Model
This example imports another file into the workspace that is already open.
Usage
ImportFile(file path)
Parameters
file path: the full path of the file to import. Use forward slashes (
/) in the path, as shown below.
Example: import a file
1# First open a 2D or 3D workspace to execute this script.
2import spinfirescript as sfs
3
4print(sfs.ImportFile("C:/temp/TestCube.CATPart"))
Change the path to a file that exists on your computer. If the path is wrong, the console shows a message instead of importing the file.
Save to an ACT3D File
This example saves the workspace to an ACT3D file, SpinFire’s own format.
Usage
SaveFile(file path)
Parameters
file path: the full path of the ACT3D file to create. Use forward slashes (
/).
Example: save the workspace
1# First open a 2D or 3D workspace to execute this script.
2import spinfirescript as sfs
3
4print(sfs.SaveFile("C:/temp/new.ACT3D"))
Note
The folder in the path (C:/temp here) must already exist. By default, SaveFile does not replace a file that already has that name.
Common Problems
- Nothing happens, or the console shows an error about a missing module.
Scripts only run inside SpinFire’s script editor. They do not run from a normal Python window.
- An error mentions “indentation”.
Lines inside a
forloop must start with the same number of spaces. Re-copy the example and keep the spaces.- A function reports it “failed” or could not find an item.
Print the return value, as the examples do. The message usually says what went wrong, for example a wrong item path or a file that does not exist.
- The example needs a 2D (or 3D) workspace.
The comment on the first line of each example says which. Open the right kind of workspace before you run it.
- Paths with backslashes don’t work.
Use forward slashes (
C:/temp/file.ACT3D), or put anrin front of the string (r"C:\temp\file.ACT3D").
Next Steps
Try changing the numbers in each example and run it again. It is the quickest way to learn what each value does.
Work through Python Scripting: Beyond the Basics.
Read and run the short scripts in Basic Sample Scripts, starting with Basic 01.
Run the ready-made scripts in Advanced Sample Scripts, starting with Sample 01.
Look up any function in the Function Index or the module pages.