Textures
Creating and Assigning a Texture to a Node
A common technique to improve the visual appearance of a model and make it look more realistic is the use of textures. Often textures will be part of an imported model but then can also be authored directly through libsc or created on the fly via the HOOPS Web Viewer API.
In this chapter, we will be discussing the various HOOPS Web Viewer API’s for creating and applying textures to a model and the texture options they support.
Creating a new texture is a two-step process. First, you need to create an image by passing a UInt8Buffer array containing the raw image data in one of the ImageFormat to the createImage function. After the image has been created you can then set it as a texture on a node in the model tree:
    var imageOptions = {
        format: Communicator.ImageFormat.Png,
        data: new Uint8Array(imagedata),
    };

    hwv.model.createImage(imageOptions).then(function (imageId) {
        hwv.model.setNodesTexture([nodeid], {
            imageId: imageId,
        });
    });
The createImage function takes a second optional parameter which is called the “thumbnail” image. This should be a low-resolution and uncompressed image which will be used while the main image is decoded. Supplying this thumbnail image only makes sense if the main image is in a format that requires decoding (PNG, JPG).
Sources for Image Data
There are various ways to retrieve image data in a web browser. Below are two examples.
- Fetching an image residing on the server via an HTTP Request
    var p = new Promise<XMLHttpRequest>(function (resolve, reject) {
        var request = new XMLHttpRequest();

        request.open("GET", "test.png", true);
        request.responseType = "arraybuffer";
        request.onload = function () {
            if (request.readyState === 4) {
                if (request.status === 200) {
                    resolve(request);
                }
            }
        };
        request.onerror = function (event) {
            reject(event);
        };
        request.send();
    });

    p.then(function (request: XMLHttpRequest) {
        var imageOptions = {
            format: Communicator.ImageFormat.Png,
            data: new Uint8Array(request.response),
        };
        hwv.model.createImage(imageOptions).then(function (imageId) {
            hwv.model.setNodesTexture([nodeid], {
                imageId: imageId,
            });
        });
    });
In the above example, we download an image called test.png via an HTTP request and pass the response directly to the createImage function.
- Fetching an image from a canvas
    var BASE64_MARKER = ";base64,";

    function convertDataURIToBinary(dataURI) {
        var base64Index = dataURI.indexOf(BASE64_MARKER) + BASE64_MARKER.length;
        var base64 = dataURI.substring(base64Index);
        var raw = window.atob(base64);
        var rawLength = raw.length;
        var array = new Uint8Array(new ArrayBuffer(rawLength));

        for (var i = 0; i < rawLength; i++) {
            array[i] = raw.charCodeAt(i);
        }
        return array;
    }

    var canvas = document.getElementById("imagecanvas") as HTMLCanvasElement;
    var data = canvas.toDataURL("image/png");

    var img = convertDataURIToBinary(data);

    imageOptions = {
        format: Communicator.ImageFormat.Png,
        data: img,
    };
    hwv.model.createImage(imageOptions).then(function (imageId) {
        hwv.model.setNodesTexture([nodeid], {
            imageId: imageId,
            modifiers: Communicator.TextureModifier.Decal,
        });
    });

    var imageId;
In the case above we are converting the content of a canvas to a binary image blob and then use it to create an image and its associated texture in HOOPS Visualize Web. This approach can be used to apply dynamically generated content (e.g. an SVG JS library rendering into a canvas object) to geometry in the HOOPS Web Viewer.
Removing a Texture from a Mesh
To remove a texture from a node you can call unsetNodesTexture.
hwv.model.unsetNodesTexture([nodeid]);
Texture Options
When applying a texture to a node with the unsetNodesTexture functions various options determine how the texture is applied to a mesh. The important ones are the tiling and matrix options which give you a lot of control over how the texture stretches over the surface of the mesh. You can also set the “decal” texture modifier which in combination with supplying a texture with transparent areas combines the texture with the original color of the mesh. This modifier is not currently supported when working with PBR materials.
For more details on TextureOptions, options follow this TextureOptions.
    var textureMatrix = new Communicator.Matrix();
    textureMatrix.setScaleComponent(10, 10, 10);

    hwv.model.setNodesTexture([nodeid], {
        imageId: imageId,
        matrix: textureMatrix,
        tiling: Communicator.TextureTiling.Repeat,
    });
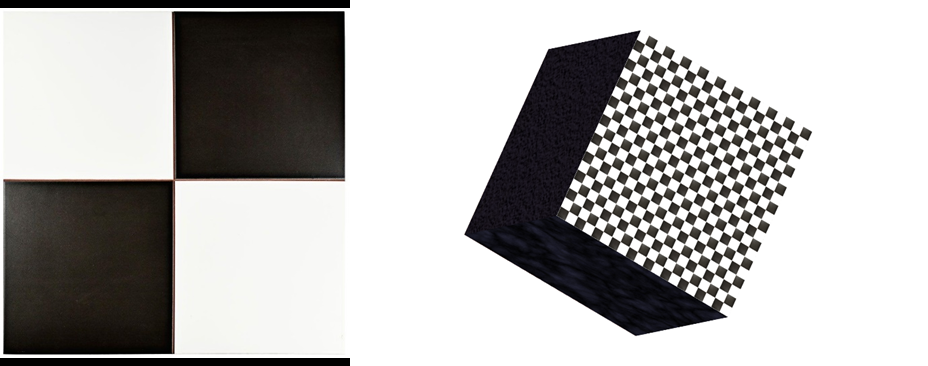
The above code creates a checkerboard pattern on the mesh by tiling the supplied image (left) via a texture matrix with a scale factor and using the repeat tiling option.
Texture Coordinates
It is important to note that you can only apply textures to meshes which contain texture coordinates as the HOOPS Web Viewer currently does not provide any automatic texture coordinate generation functionality. This will often not be the case for imported CAD models. If you still want to apply textures to those meshes you need to generate texture coordinates yourself and replace the original mesh. See the Meshes Programming Guide for more information.
Other Considerations
HOOPS Visualize Web also supports environment textures though those can currently only be created via the libsc authoring API or during CAD import. For more information on authoring models please see the Authoring Programming Guide for more information.

