CAD Views
Overview
The term “CAD Views” in HOOPS Visualize Web refers to a particular representation of a 3D-scene defined by the aggregate of the following states:
- Camera
- Cutting planes
- Entity visibility
- Entity color
- Entity position
A CAD view will often be associated with various PMI elements denoting model dimensions or other properties with parts not relevant to the current view hidden. A series of CAD views could also comprise a work-instruction by moving parts to different locations and adding text labels and other information for each step.
CAD views are either imported from CAD models via HOOPS Converter or can be authored directly via libsc or in the HOOPS Web Viewer.
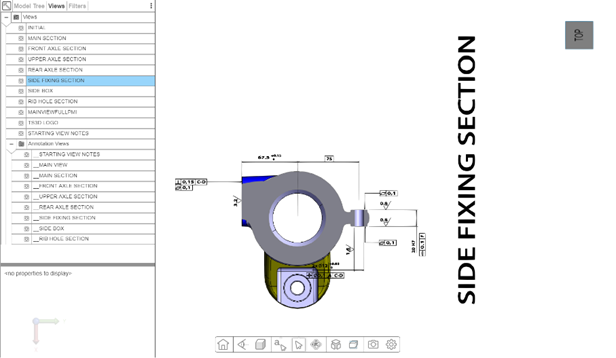
Example of a CAD view that activates a specific camera and cutting plane and enables various PMI elements.
Each CAD View is referenced via a nodeid. To query all CAD views in a model, you can use the function getCadViewMap, which returns a map associating the name of the CAD view with its ID.
hwv.model.getCadViewMap();
Result for landinggear contained in the package:
- 427: “__STARTING VIEW NOTES # Annotation View”
- 429: “__MAIN VIEW # Annotation View”
- 431: “__MAIN SECTION # Annotation View”
- 433: “__FRONT AXLE SECTION # Annotation View”
- 435: “__UPPER AXLE SECTION # Annotation View”
- 437: “__REAR AXLE SECTION # Annotation View”
- 439: “__SIDE FIXING SECTION # Annotation View”
- 441: “__SIDE BOX # Annotation View”
- 443: “__RIB HOLE SECTION # Annotation View”
- 444: “INITIAL”
- 445: “MAIN SECTION”
- 446: “FRONT AXLE SECTION”
- 447: “UPPER AXLE SECTION”
- 448: “REAR AXLE SECTION”
- 449: “SIDE FIXING SECTION”
- 450: “SIDE BOX”
- 451: “RIB HOLE SECTION”
- 452: “MAINVIEWFULLPMI”
- 453: “TS3D LOGO”
- 454: “STARTING VIEW NOTES”
Activating a CAD View
To activate a CAD view via the HOOPS Web Viewer UI, simply switch to the Views tab in the Model Tree UI and activate the desired CAD View.
To activate a specific CAD view programmatically, simply pass its NodeId to the activateCadView function as seen below.
If the CAD view contains a camera definition the camera of the scene will transition to its new location as soon as this function is called and all entities will be set to the various states listed above (visibility, color, position).
The second parameter of this function defines the transition time to the new camera in milliseconds.
hwv.model.activateCadView(449);
Creating a new CAD View
You can create a new CAD view from scratch in the HOOPS Web Viewer with the createCadView function though you are responsible for saving those CAD Views when the viewing session ends. Creating your own CAD views in the client is an advanced topic we will not be discussing here in detail. If you simply want to store a specific camera orientation and assign redline and other markup elements to it we suggest using the markup manager discussed in the Markup Basics Programming Guide for that purpose.
hwv.model.createCadView(hwv.model.getAbsoluteRootNode(), "New View", hwv.view.getCamera());

