Geometry and Texture Creation
Summary
In this section, we will learn how to create new geometry and textures from scratch and apply textures to a mesh.
Concepts
- Geometry creation
- Texture creation
- Applying textures to a mesh
Starting the Web Viewer with an empty model
The models we have been using up to this point in the tutorial do not have texture coordinates, so we will create our own geometry to apply textures to. Remove the model from the viewer constructor parameters. It should now look like this:
hwv = new Communicator.WebViewer({
  containerId: "viewer",
});
Creating the cube mesh geometry
Now we will create the geometry of a cube to apply textures to. Add the createCubeMeshData function below to the material.mjs file we created in Section 7. Color and Transparency:
async createCube(position, size, faceColor) {
        const cubeMeshData = this.createCubeMeshData(position, size);
        const meshId = await this._hwv.model.createMesh(cubeMeshData);
        const meshInstanceData = new Communicator.MeshInstanceData(
                meshId, new Communicator.Matrix(), "texture-cube", faceColor
        );

        const nodeId = await this._hwv.model.createMeshInstance(meshInstanceData);
        return nodeId;
}

createCubeMeshData(pos, size) {
        const p0 = new Communicator.Point3(pos.x, pos.y, pos.z);
        const p1 = new Communicator.Point3(pos.x + size, pos.y, pos.z);
        const p2 = new Communicator.Point3(pos.x + size, pos.y + size, pos.z);
        const p3 = new Communicator.Point3(pos.x, pos.y + size, pos.z);
        const p4 = new Communicator.Point3(pos.x, pos.y + size, pos.z + size);
        const p5 = new Communicator.Point3(pos.x + size, pos.y + size, pos.z + size);

        const p6 = new Communicator.Point3(pos.x + size, pos.y, pos.z + size);
        const p7 = new Communicator.Point3(pos.x, pos.y, pos.z + size);
        const triangles = [p0, p2, p1, p0, p3, p2, p2, p3, p4, p2, p4, p5, p1, p2,
                p5, p1, p5, p6, p0, p7, p4, p0, p4, p3, p5, p4, p7, p5, p7, p6, p0,
                p6, p7, p0, p1, p6, ];

        const positions = [];
        triangles.forEach((point) => {
          positions.push(point.x, point.y, point.z);
        });

        const uvs = [
          0, 0, 1, 1, 1, 0, 0, 0, 0, 1, 1, 1, 0, 0, 0, 1, 1, 1, 0, 0, 1, 1, 1, 0, 0,
          0, 0, 1, 1, 1, 0, 0, 1, 1, 1, 0, 0, 0, 0, 1, 1, 1, 0, 0, 1, 1, 1, 0, 0, 0,
          0, 1, 1, 1, 0, 0, 1, 1, 1, 0, 0, 0, 1, 1, 1, 0, 0, 0, 0, 1, 1, 1,
        ];

        const normals = [
                0, 0, -1, 0, 0, -1, 0, 0, -1, 0, 0, -1, 0, 0, -1, 0, 0, -1, 0, 1, 0, 0, 1,
                0, 0, 1, 0, 0, 1, 0, 0, 1, 0, 0, 1, 0, 1, 0, 0, 1, 0, 0, 1, 0, 0, 1, 0, 0,
                1, 0, 0, 1, 0, 0, -1, 0, 0, -1, 0, 0, -1, 0, 0, -1, 0, 0, -1, 0, 0, -1, 0,
                0, 0, 0, 1, 0, 0, 1, 0, 0, 1, 0, 0, 1, 0, 0, 1, 0, 0, 1, 0, -1, 0, 0, -1,
                0, 0, -1, 0, 0, -1, 0, 0, -1, 0, 0, -1, 0,
        ];

        const meshData = new Communicator.MeshData();
        meshData.addFaces(positions, normals, undefined, uvs);
        meshData.setFaceWinding(Communicator.FaceWinding.CounterClockwise);
        return meshData;
}

async loadImage(filename) {
        const p = new Promise((resolve, reject) => {
                const request = new XMLHttpRequest();
                request.open(`GET`, filename, true);
                request.responseType = `arraybuffer`;
                request.onload = function () {
                        if (request.readyState === 4) {
                                if (request.status === 200) {
                                        resolve(request);
                                }
                        }
                };
                request.onerror = function (event) {
                        reject(event);
                };
                request.send();
        });

        const request = await p;
        const imageOptions = {
                format: Communicator.ImageFormat.Png,
                data: new Uint8Array(request.response),
        };
        return this._hwv.model.createImage(imageOptions);
}

setNodeTexture(nodeId, imageId) {
        if (nodeId !== null) {
                const textureOptions = {
                        imageId: imageId,
                        modifiers: Communicator.TextureModifier.Decal,
                };
                this._hwv.model.setNodesTexture([nodeId], textureOptions);
        }
}

async initializeTextures() {
        const bricksImageId = await this.loadImage("images/bricks.png");
        const nebulaImageId = await this.loadImage("images/nebula.png");
        const texturedImageId = await this.loadImage("images/textured.png");
        const bricksElement = document.getElementById("bricks");
        const nebulaElement = document.getElementById("nebula");
        const texturedElement = document.getElementById("textured");
        bricksElement.onclick = () => {
                this.setNodeTexture(this.getSelectedNodeId(), bricksImageId);
        };
        nebulaElement.onclick = () => {
                this.setNodeTexture(this.getSelectedNodeId(), nebulaImageId);
        };
        texturedElement.onclick = () => {
                this.setNodeTexture(this.getSelectedNodeId(), texturedImageId);
        };
}
The function createCubeMeshData takes a position and size, and creates a MeshData object. This object stores the positions of the faces that make up the cube, the normal for the faces, and the UV texture mapping data.
The cube is made up of 6 sides, each side consisting of 2 triangles to make a square. p0 – p7 are the 8 vertices of the cube that we use to make each triangle. For readability, we first create an array called triangles which list each point, before adding the x, y, and z values into an array called positions.
The UV values correspond to the vertices that make up each triangle. For each vertex, there is a corresponding 2d coordinate. Ex (p0 -> (0,0), p2 -> (1,1), p1 -> (1,0), etc).
The normals correspond to the direction of the face of the cube that the vertices are on. For example, the first face of the cube is in the Z plane, and it’s normal is (0, 0, -1). Each vertex will have a corresponding normal.
The face winding depends on the order of the vertices that make up the triangles. In this example, the triangles are created using a counter-clockwise face winding.
Create a cube
Now, let’s add the following code to material.js:
async function createCube(position, size, faceColor) {
        const cubeMeshData = createCubeMeshData(position, size);
        const meshId = await hwv.model.createMesh(cubeMeshData);
        const meshInstanceData = new Communicator.MeshInstanceData(
                meshId,
                new Communicator.Matrix(),
                "texture-cube",
                faceColor
        );
        const nodeId = await hwv.model.createMeshInstance(meshInstanceData);
        return nodeId;
}
The function createCube will create a new MeshInstanceData and render it to the scene. Let’s breakdown what this function is doing step-by-step.
First, we will call createCubeMeshData which returns a MeshInstanceData object. Then, we will use the:js:class:~wv.MeshData object to create a mesh, which will return a MeshId. Once we have a MeshId, we will use it to create a MeshInstanceData object.
When we create our MeshInstanceData object, we will specify a mesh id, identity matrix, instance name, and face color.
The createMeshInstance function takes a MeshInstanceData object as a parameter. We will call the function to create an instance of the cube in the scene.
The MeshInstanceData constructor takes the following optional parameters:
- meshId:
MeshIdof the mesh to instantiate - matrix: a
Matrixthat will be applied to this instance - instanceName: a name that will be visible when querying the model hierarchy
- faceColor: the
Colorfor faces of this instance - lineColor: the
Colorfor lines of this instance - pointColor: the
Colorfor points of this instance - creationFlags:
additional optionsthat can be used to alter the behavior of this instance
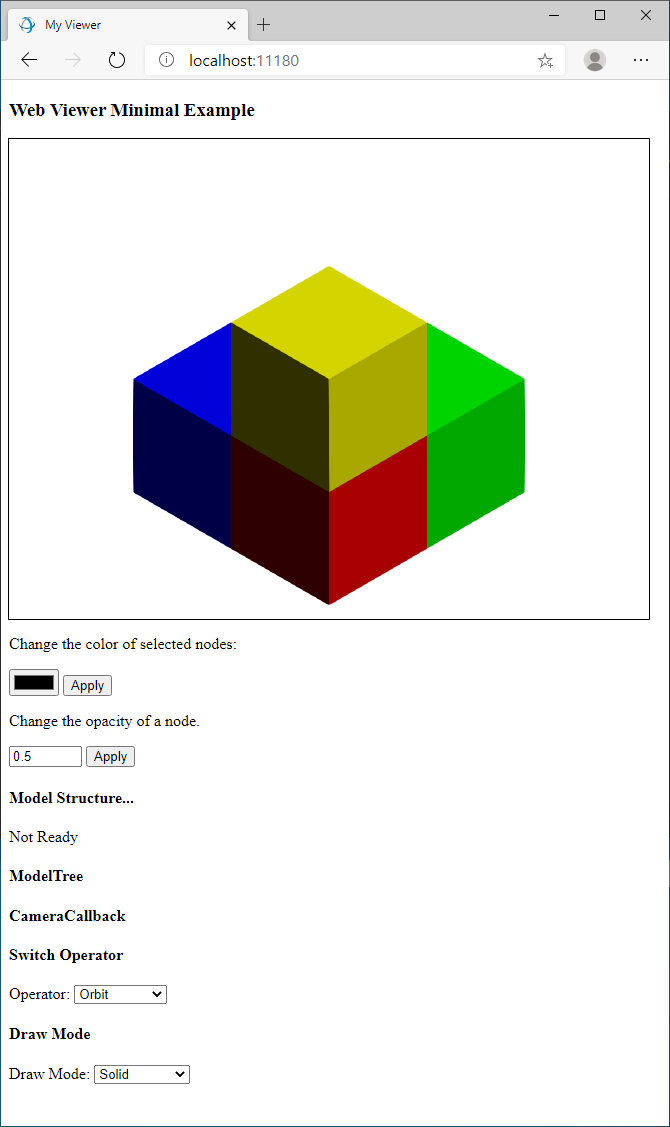
Creating multiple cubes
Now that we have functions to create the geometry, we need to call them. In the HTML page, after we start the HOOPS Web Viewer, we add the following code to the modelStructureReady callback. When the callback function is triggered, it will be safe to create the geometry. The following code will create four cubes in red, green, blue, and yellow colors. It will then set the view orientation to ISO, which will change the camera to see all the geometry we created.
hwv.setCallbacks({
        modelStructureReady: async () => {
                await materialManager.createCube(
                        new Communicator.Point3(0,0,0),
                        10,
                        Communicator.Color.red()
                );
                await materialManager.createCube(
                        new Communicator.Point3(10,0,0),
                        10,
                        Communicator.Color.green()
                );
                await materialManager.createCube(
                        new Communicator.Point3(0,10,0),
                        10,
                        Communicator.Color.blue()
                );
                await materialManager.createCube(
                        new Communicator.Point3(0,0,10),
                        10,
                        Communicator.Color.yellow()
                );
                await hwv.view.setViewOrientation(Communicator.ViewOrientation.Iso);
                materialManager.initializeTextures(hwv);
        }
});
Loading images
Before we apply any textures, we first need to load the images. We will add the loadImage() function to the same JS file to load an image.
async function loadImage(filename) {
        const p = new Promise((resolve, reject) => {
                const request = new XMLHttpRequest();
                request.open(`GET`, filename, true);
                request.responseType = `arraybuffer`;
                request.onload = function () {
                        if (request.readyState === 4) {
                                if (request.status === 200) {
                                        resolve(request);
                                }
                        }
                };
                request.onerror = function (event) {
                        reject(event);
                };
                request.send();
        });
        const request = await p;
        const imageOptions = {
                format: Communicator.ImageFormat.Png,
                data: new Uint8Array(request.response),
        };
        return hwv.model.createImage(imageOptions);
}
The loadImage function makes an XMLHttpRequest to fetch the data for an image in an array buffer. The contents of the array buffer are then used to create a Uint8Array as part of an ImageOptions object, which also contains the image format. The ImageOptions object is then used as a parameter for the createImage() function, which returns an ImageId.
The returned ImageId can then be used to apply a texture to a part.
Setting textures
Now we will add the setNodeTexture() function to the same JS file and use it to set the texture on a node.
function setNodeTexture(nodeId, imageId) {
        if (nodeId !== null) {
                const textureOptions = {
                        imageId: imageId,
                        modifiers: Communicator.TextureModifier.Decal
                };
                hwv.model.setNodesTexture([nodeId], textureOptions);
        }
}
The setNodeTexture() function takes a NodeId and an ImageId and calls the setNodesTexture function which takes an array of type NodeId and a TextureOptions object. There are two options we will set, imageId and modifiers.
We then call setNodesTexture with an array containing a single ~wv.NodeId and our desired options. The texture will then be applied to the part.
Copying images
We will need some images to load as textures. Create an images folder at the top level of your application’s directory. Copy the images from the package at web_viewer/examples/images/textures to the new images folder. There should be three textures: bricks.png, nebula.png, and textured.png.
Creating the UI
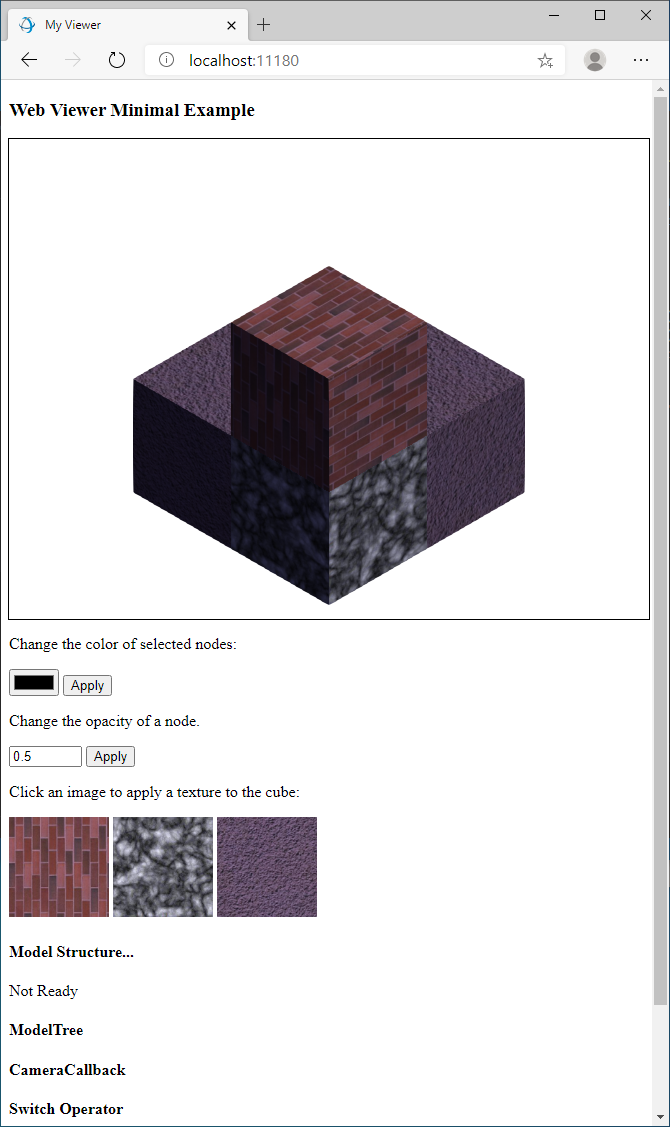
Add the following HTML inside at the end of the buttons div after the viewer. We will use these images to set a texture on a selected node when the image is clicked.
<div id="textures">
        <div>
                Click an image to apply a texture to the cube:
                <img id="bricks" src="images/bricks.png" width="100px" height="100px">
                <img id="nebula" src="images/nebula.png" width="100px" height="100px">
                <img id="textured" src="images/textured.png" width="100px" height="100px">
        </div>
</div>
Connect UI to texture logic
Now, we will add code to load the images and apply a texture when one of the images is clicked. Add the following function to the top of the HTML script above window.onload. We will then call this function from the modelStructureReady callback:
async function initializeTextures () {
        const bricksImageId = await loadImage("images/bricks.png");
        const nebulaImageId = await loadImage("images/nebula.png");
        const texturedImageId = await loadImage("images/textured.png");

        const bricksElement = document.getElementById("bricks");
        const nebulaElement = document.getElementById("nebula");
        const texturedElement = document.getElementById("textured");

        bricksElement.onclick = () => {
                setNodeTexture(getSelectedNodeId(), bricksImageId);
        }
        nebulaElement.onclick = () => {
                setNodeTexture(getSelectedNodeId(), nebulaImageId);
        }
        texturedElement.onclick = () => {
                setNodeTexture(getSelectedNodeId(), texturedImageId);
        }
}
Initialize the textures
At the end of the modelStructureReady callback, call the initializeTextures function. This will load the images and prepare the HTML images for activating the textures when clicked.
initializeTextures();
Loading the application
Load the application. Select a cube, then an image, and the selected texture will be applied.