
Selection and picking
One of the most common methods to interact with the 3D model in the Web Viewer is the process of selection. In short, selection is the process of highlighting one or more entities in the 3D window generally based on some form of user interaction. Often this will involve clicking on a specific entity or dragging a selection rectangle across the 3D window but a selection can also originate from highlighting a node in the model tree UI or other events external to the Web Viewer.
Picking
When selecting entities in the 3D window it is important to distinguish the process of “picking” from the actual selection of the object. The Web Viewer supports multiple ways to “pick” which essentially means analytically calculating which objects are under a given cursor location or within a certain 2D and 3D area. The results of this computation can then be used to perform the actual selection, which involves grouping and visually highlighting the entities that have been picked. However, the result of a picking operation does not have to lead to a selection. In our measurement operators, for example, we pick on an object to identify the 3D pick location on the mesh and then use that to define the start- and endpoints to measure between.
Pick from point selection
The simplest form of picking is to pick a specific 2D location in the 3D window.
        var view = hwv.view;
        const selectionManager = hwv.selectionManager;
        var config = new Communicator.PickConfig();
        config.allowFaces = true;
        config.allowLines = true;
        config.allowPoints = true;
        var node;
        view.pickFromPoint(new Communicator.Point2(800, 500), config).then(function (
            selectionItem,
        ) {
            node = selectionItem.getNodeId();
            selectionManager.add(selectionItem);
        });
In this snippet, we initialize and populate a PickConfig object to store a variety of options that will be passed to the pick function. Those options influence the result of the picking operation and determine which entities and subentities will be considered.
In the above call to pickFromPoint, we’ve passed an arbitrary 2D coordinate in pixel space as a parameter. Using this canvas location, the function will heuristically determine which mesh node and subelements within that mesh node (point, face, or line) to pick. Generally, it will return the entity and subentity closest to the camera within the 2D tolerance defined in the PickConfig object.
The function pickFromPoint, as well as all other picking functions, are asynchronous, meaning that they return a promise which usually returns one or more selected entities as SelectionItem objects. In the above example, we are passing the returned SelectionItem object directly to the SelectionManager to highlight the selected entity by adding it to the selection list.
See below for all the picking related functions in the Web Viewer:
beginScreenSelectByAreabeginSphereSelectionpickAllFromPointpickAllFromRaypickFromPointpickFromRay
All those functions have equivalent functions that also perform a selection of the returned entities. We will discuss those functions in the following sections but keep in mind that you can perform these functions independently of a selection as well.
Selection
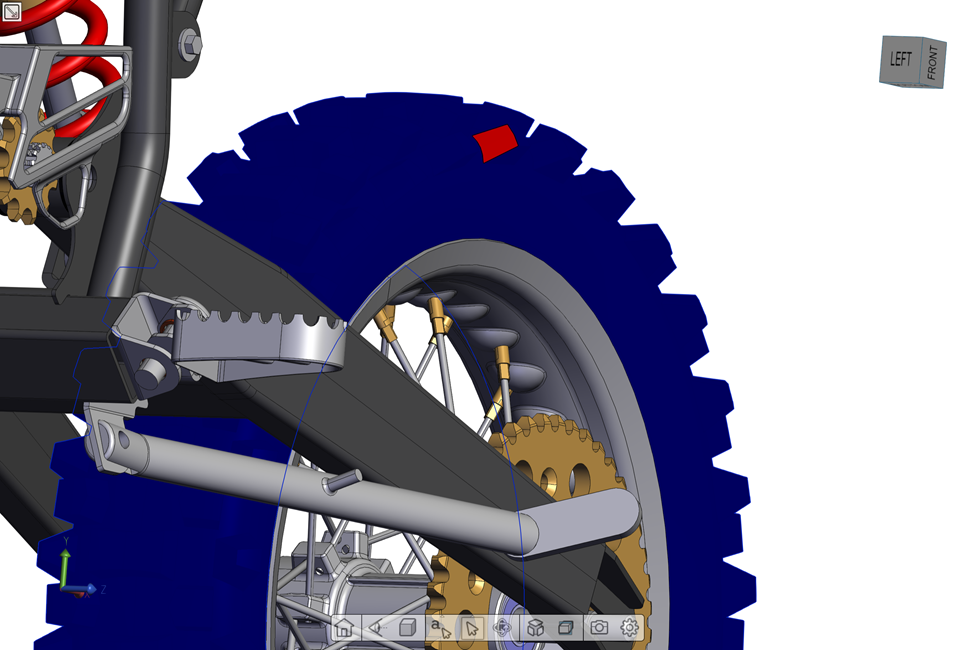
The SelectionManager class is responsible for handling selection in the Web Viewer. It primarily manages a list of “selected” entities and ensure that those are visually distinguished in the 3D window. There are various methods on the SelectionManager that define the visual appearance of the highlighted entities but in general, they will be “tinted” with a specified color and drawn with an outline that is visible even if the geometry is hidden.
A selected entity can either be a node in the model tree that has children and is not directly associated with any geometry or a leaf node in the tree containing mesh geometry. If it’s the former, then all geometry that is part of the descendants of that node will be highlighted. If it’s a leaf node, then the SelectionItem can also contain a reference to the closest face, edge or point of the associated mesh. If a non-leaf node is already selected, it is not possible to add any of its descendants to the SelectionManager.
In the code below we are setting the color of the selected mesh to blue and the color of the selected element within that mesh (either face or edge) to red.
hwv.SelectionManager.setNodeSelectionColor(Communicator.Color.createFromFloat(0.0, 0.0, 0.5));
hwv.SelectionManager.setNodeElementSelectionColor(Communicator.Color.createFromFloat(1, 0, 0));
Select single node
The following snippet shows how to use the SelectionManager class to select a specific node in the model:
        const selectionManager = hwv.selectionManager;
        selectionManager.setNodeElementSelectionColor(Communicator.Color.green());
        selectionManager.setNodeElementSelectionHighlightMode(
            Communicator.SelectionHighlightMode.HighlightAndOutline,
        );
        selectionManager.setNodeElementSelectionOutlineColor(
            Communicator.Color.createFromFloat(0.0, 1.0, 0.0),
        );
        selectionManager.selectNode(10, Communicator.SelectionMode.Toggle);
After specifying a few properties about our selection appearance, we can use the selectNode function of the SelectionManager to specify a nodeId from our model, which will be highlighted when the function is executed.
The selectNode function can either add the node to the selection list, toggle its selection state or replace an existing selection based on the SelectionMode parameter of the function.
The selectNode function is a convenient way to select based on a single nodeId but in a lot of cases you want to select based on a SelectionItem returned from one of the pick functions. In general, the SelectionItem not only contains a nodeId but also the face and edge of the model that should be selected.
Events
Each type of selection generates a selectionArray event that gets passed a list of js:class:wv.Event.NodeSelectionEvent objects.
In the function below we register the selectionArray callback with a function that iterates over all selected entities and retrieves each nodeId.
    hwv.setCallbacks({
        selectionArray: function (selections) {
            if (selections.length > 0) {
                for (const selectionEvent of selections) {
                    var selection = selectionEvent.getSelection();
                    var nodeid = selection.getNodeId();
                }
            }
        },
    });
Selection operator
A common way to implement selection in the Web Viewer is to simply use the wv.Operators.SelectionOperator. By default, the wv.Operators.SelectionOperator is enabled in the Web Viewer’s operator stack. The operator stack also includes any other currently active operators and is accessible via the wv.OperatorManager object.
The default behavior of the wv.Operators.SelectionOperator is to highlight the part associated with a selection. CTRL+clicking will select multiple parts. To cancel the selection, click on an empty part of the scene. Alternatively, you can enable single-entity toggle mode in this way:
hwv.selectionManager.setSingleEntityToggleModeEnabled(true)
This setting will enable you to CTRL+click on a selected part to deselect it.
A PartId can be retrieved from the selection event data using the getNodeId function.
    var partIds = [];
    myViewer.selectionManager.each(function (selectionItem) {
        partIds.push(selectionItem.getNodeId());
    });
It is important to note that in each of these selection event data objects, the PartId is retrieved by calling the getNodeId function (a PartId is a type of nodeId – see the FAQs for more info).
There are a few different types of selection events, each with their own data objects (e.g., line, face, point, and part selection objects). To find out more about each, please see the API Reference for the Selection class and the wv.SelectionType class.
Area and volume selection
Select by area
The beginScreenSelectByArea method in the SelectionManager class offers an easy way to select objects within a two-dimensional area of the screen. Simply define the bounds of your selection with two points on the screen, and pass that information along with a configuration object to the function:
        var view = hwv.view;
        var model = hwv.model;
        const selectionManager = hwv.selectionManager;
        var k = 0.5;
        var screenMin = new Communicator.Point2(-k, -k);
        var screenMax = new Communicator.Point2(+k, +k);
        var pixelDim = view.getCanvasSize();
        var pixelMin = new Communicator.Point2(
            Math.floor(((screenMin.x + 1) / 2) * pixelDim.x),
            Math.floor(((screenMin.y + 1) / 2) * pixelDim.y),
        );
        var pixelMax = new Communicator.Point2(
            Math.floor(((screenMax.x + 1) / 2) * pixelDim.x - 1),
            Math.floor(((screenMax.y + 1) / 2) * pixelDim.y - 1),
        );
        var conf = new Communicator.IncrementalPickConfig();
        conf.mustBeFullyContained = true;
        selectionManager
            .beginScreenSelectByArea(pixelMin, pixelMax, conf)
            .then(function (handle) {
                var loop = function (stillProcessing) {
                    if (!stillProcessing) {
                        return Promise.resolve(null);
                    }
                    return selectionManager.advanceIncrementalSelection(handle).then(loop);
                };
                return loop(true).then(function () {
                    return selectionManager.endIncrementalSelection(handle);
                });
            })
            .then(function () {
                return true;
            });
In this snippet, we initialize and populate an object for IncrementalPickConfig to store selection options that will be passed to the selection function. This configuration is simply the default settings, except the setting mustBeFullyContained, which we’ve set to true to specify that no objects that are partially outside of the selection area should be contained within our selection results.
The function beginScreenSelectByArea returns a promise, which resolves into another function that recursively iterates through the model’s entities by calling advanceIncrementalSelection until there are no more parts to select, at which point it returns false to stop the iteration.
The result of this process is that our SelectionManager instance now contains an array of NodeSelectionItem that can be accessed via methods in the SelectionManager class, such as getResults.
Ray drill selection
Also, part of the SelectionManager class, the beginRayDrillSelection function uses a ray origin and box radius to create a frustum that will drill deep into the model (as opposed to selecting the first non-occluded item, as in pickFromPoint).
Like beginScreenSelectByArea, beginRayDrillSelection uses an incremental process, iterating through the model’s instances and aggregating the results:
        var view = hwv.view;
        const selectionManager = hwv.selectionManager;
        var screenPos = new Communicator.Point2(0, 0);
        var pixelDim = view.getCanvasSize();
        var pixelPos = new Communicator.Point2(
            Math.floor(((screenPos.x + 1) / 2) * pixelDim.x),
            Math.floor(((screenPos.y + 1) / 2) * pixelDim.y),
        );
        var pixelBoxRadius = 3;
        var conf = new Communicator.IncrementalPickConfig();
        conf.allowFaces = true;
        conf.allowLines = false;
        conf.allowPoints = false;
        selectionManager
            .beginRayDrillSelection(pixelPos, pixelBoxRadius, conf)
            .then(function (handle) {
                var loop = function (stillProcessing) {
                    if (!stillProcessing) {
                        return Promise.resolve(null);
                    }
                    return selectionManager.advanceIncrementalSelection(handle).then(loop);
                };
                return loop(true).then(function () {
                    return selectionManager.endIncrementalSelection(handle);
                });
            })
            .then(function () {
                return true;
            });
In this example, we’re setting our ray in the middle of the canvas and passing that 2D point to beginRayDrillSelection, along with other configuration settings in the PickConfig object.
The result of this process is that our SelectionManager instance now contains an array of NodeSelectionItem objects that can be accessed via methods in the SelectionManager class, such as getResults.
The pixelBoxRadius setting specifies the proximity around the ray for selecting parts (the higher the value, the more inclusive the selection).
The recursive pattern used to aggregate the selection items is effectively the same as discussed in the section above for the beginScreenSelectByArea function.
Note that ray drill selection is actually selection by volume since the ray origin and the box radius you provide are used to create a frustum which is then intersected with the model to determine the selection results. This has the consequence that the NodeSelectionItem returned by advanceIncrementalSelection will not have selection positions attached to them, since they were not selected at a single point. This is also the case for all other volume selections.
Polyhedron selection
Below is a sample of volume selection using the beginConvexPolyhedronSelection function from the SelectionManager class. Here we’re defining a volume by creating a box with six planes:
        var selectionManager = hwv.selectionManager;
        var createPlane = function (px, py, pz, nx, ny, nz) {
            var p = new Communicator.Point3(px, py, pz);
            var n = new Communicator.Point3(nx, ny, nz);
            return Communicator.Plane.createFromPointAndNormal(p, n);
        };
        var conf = new Communicator.IncrementalPickConfig();
        var center = new Communicator.Point3(0, 0, 0);
        var x = 300;
        var y = 200;
        var z = 150;
        var planes = [
            createPlane(+x, 0, 0, -1, 0, 0),
            createPlane(-x, 0, 0, +1, 0, 0),
            createPlane(0, +y, 0, 0, -1, 0),
            createPlane(0, -y, 0, 0, +1, 0),
            createPlane(0, 0, +z, 0, 0, -1),
            createPlane(0, 0, -z, 0, 0, +1),
        ];
        selectionManager
            .beginConvexPolyhedronSelection(planes, center, conf)
            .then(function (handle) {
                var loop = function (stillProcessing) {
                    if (!stillProcessing) {
                        return Promise.resolve(null);
                    }
                    return selectionManager.advanceIncrementalSelection(handle).then(loop);
                };
                return loop(true).then(function () {
                    return selectionManager.endIncrementalSelection(handle);
                });
            })
            .then(function () {
                return true;
            });
Our first step is to define a function to create our planes. In this case, we’re using createFromPointAndNormal to create our planes, therefore, it’s only required that we provide a single point and a normal.
Once the planes have been defined, we simply need to pass them to beginConvexPolyhedronSelection along with the heuristicOrigin field for calculating distances for ordering our results. Often, this will be the center of the volume you’ve defined, and in this case, we’re using the origin, although other values may be preferred.
The recursive pattern used to aggregate the selection items is effectively the same as discussed in the section above for the beginScreenSelectByArea function.

