Floorplan 2D
The 2D Floorplan (or simply “floorplan”) is a pre-built tool to aid navigation in BIM models by drawing the floorplan in an overlay. For more info on overlays, see the Overlays Programming Guide article and review the overlay example code in the package located at web_viewer/deprecated/examples/.
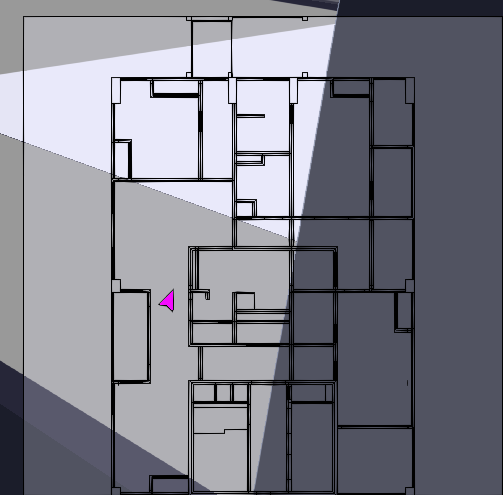
By default, the floorplan will activate on walk in models that have IFC data, such as in the arboleda model that is included in the HOOPS Visualize Web package, as pictured above. The avatar (a pink arrow by default) represents the current camera position and direction. The lines represent walls and other geometry on the current floor. A separate floorplan is generated for each floor in the model, and when moving between floors the overlay will display the floor that the camera is currently on. The floorplans are generated automatically from the IFC data when one is requested for the first time. As long as your model has IFC data, a floorplan can be generated.
The floorplan is controlled by the FloorplanManager, which is a member of the floorplanManager. You can verify if the floorplan is currently active with: isActive.
Configuration
The following settings can be configured in the FloorplanConfig object:
- Overlay position
- Background color and opacity
- Avatar color and opacity
- Border color and opacity
- Avatar outline color
- Avatar scale
- Avatar mesh
- Scale and zoom
- Camera tracking
- Floorplan orientation
- Auto activation mode
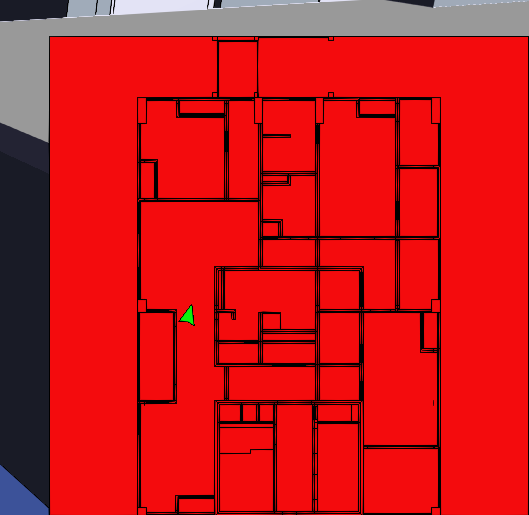
Changing background and avatar color
The following code snippet demonstrates a common workflow to update a floorplan’s configuration by:
- Get the
FloorplanConfigobject - Update configuration values
- Set the updated configuration with the
FloorplanManager
// Get current configuration to preserve any other changes
let floorplanConfig = hwv.floorplanManager.getConfiguration();

// Update the Background color+opacity and Avatar color
floorplanConfig.backgroundColor = Communicator.Color.red();
floorplanConfig.backgroundOpacity = 1.0;
floorplanConfig.avatarColor = Communicator.Color.green();

// Set the new configuration with the FloorplanManager
hwv.floorplanManager.setConfiguration(floorplanConfig);
Camera tracking
Setting the floorplan to track the camera will cause the avatar to be centered in the overlay, and the floorplan will move around it as you move through the model. It is important to note that while not tracking the camera the floorplan will always fit the size of the overlay, zoom and scale will not be taken into account.
Floorplan orientation
Setting north-up as the orientation will cause the floorplan to always point north, and the avatar rotates within it, while setting avatar-up as the orientation will cause the floorplan to rotate around the avatar.
Auto activation mode
The auto activation mode determines when the floorplan will be displayed. The following FloorplanAutoActivation options may be selected:
BimWalk: Default. The floorplan will be displayed if a BIM model is loaded and the walk operator is active. The floorplan will be deactivated if the walk operator is deactivated.Bim: The floorplan will be activated if a BIM model is loadedNever: The floorplan will not be activated automatically.
Note
If Never is set while the floorplan is already active, the floorplan will remain active. Use the FloorplanManager to activate or deactive a floorplan.
Avatar mesh
The avatar node can be replaced with custom geometry. The following snippet replaces the arrow with a blue square:
const vertexData = [
        -1, -1, 0,
        -1,  1, 0,
         1, -1, 0,
         -1,  1, 0,
          1,  1, 0,
          1, -1, 0
];

const normalData = [
        0, 0, 1,
        0, 0, 1,
        0, 0, 1,
        0, 0, 1,
        0, 0, 1,
        0, 0, 1
];

const meshData = new Communicator.MeshData();
meshData.setFaceWinding(Communicator.FaceWinding.Clockwise);
meshData.addFaces(vertexData, normalData);

const meshId = await hwv.model.createMesh(meshData);
const meshInstanceData = new Communicator.MeshInstanceData(meshId);
meshInstanceData.setFaceColor(Communicator.Color.blue());
const nodeId = await hwv.model.createMeshInstance(meshInstanceData);

let floorplanConfig = hwv.floorplanManager.getConfiguration();
floorplanConfig.customAvatar = nodeId;
hwv.floorplanManager.setConfiguration(floorplanConfig);
Find more information about mesh creation in our Mesh Programming Guide.
Floorplan operator
The FloorplanOperator allows you to use the floorplan to navigate the model by clicking and dragging on the overlay. By default, you can click and drag the avatar to move the camera around the model to match where the avatar is located. You can change this behavior to simply clicking a point on the overlay and have the camera snap to it by calling restrictToAvatar(false) on the FloorplanOperator operator.
hwv.operatorManager.getOperator(Communicator.OperatorId.Floorplan).restrictToAvatar(false);

