
Setting up the Viewers
Summary
In this chapter, we will walk through setting up two web viewers – one to display the full assembly of our configured model and one to give a preview view of a selected component.
Concepts
- Instantiating and starting the Web Viewers
- Setting callbacks
- Configuring additional Web Viewer options
Create the Main Entry Point
Inspect the app.js file in the src/js folder. The app.js file contains our main application logic, as well as manages the setup and handling of our WebViewer object.
To better organize our code, we will be breaking up our code and using the external module approach for this development. We will be using the ES6 class syntax to encapsulate functionality. Let us start by making the main class in our app.js file. This is where we will instantiate our viewer and build our application through composition from other objects we will create later. Right now, we will just leave the class and constructor blank and return to it.
class main {
        constructor() {

        }
} // End main class
Start the WebViewer Objects
As discussed in the Building A Basic Application tutorial, HOOPS Visualize Web requires that the DOM content and structure be loaded before trying to instantiate any WebViewer objects, since they will look for a <div> ID to populate. Because of this, we will instantiate our main class within the onload browser event callback, once all the DOM content has been loaded.
import '../css/tutorial-configurator.css';

// Application logic will begin once DOM content is loaded
window.onload = () => {
        const app = new main();
};

class main {
        constructor() {
        }
} // End main class
At this point, you are welcome to run npm run build on the command line to start our webpack server and serve the front end framework that we have provided. You can leave the development server running, and it will update your front end as we write more code. You should see something like this before writing any additional JavaScript:
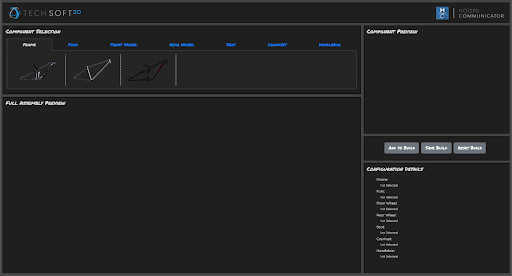
Because we have provided the HTML and styling, we should see the <div> element present that we can instantiate our WebViewers into. We will use these <div> IDs when setting up our viewer.
<div id="component-preview" class="comp-container">
        <div id="comp-viewer"></div>
        <div id="component-preview-label" class="comp-label">Component Preview</div>
</div>

<div id="canvas" class="comp-container">
        <div id="viewer"></div>
        <div id="viewer-label" class="comp-label">Full Assembly Preview</div>
</div>
We can see that the <div> IDs we are interested in are called viewer and comp-viewer. We will do the same procedure documented in the Building A Basic Application tutorial to instantiate an empty viewer. We will instantiate with empty viewers since we do not know which model the user will want to load. Go ahead and write the following code in the constructor of your main class, using the viewer and comp-viewer <div> IDs.
class main {

        constructor() {

           // Instantiate the assembly viewer
           this._viewer = new Communicator.WebViewer({
                 containerId: "viewer",
                 empty: true,
                 enginePath: "https://cdn.jsdelivr.net/gh/techsoft3d/hoops-web-viewer@latest",
           });

           // Instantiate the component viewer
           this._compViewer = new Communicator.WebViewer({
                 containerId: "comp-viewer",
                 empty: true,
                 enginePath: "https://cdn.jsdelivr.net/gh/techsoft3d/hoops-web-viewer@latest",
           });

        } // End main constructor

} // End main class
If you look back at your web application, you will see nothing has changed. This is because we have not yet started the viewer - we only instantiated it. We could store the viewers in an array and use the map() function, like in the Additive Manufacturing tutorial, but since we do not have too much to set on the component viewer, we will simply explicitly start them both.
this._viewer.start();
this._compViewer.start();
Again, you may be wondering why nothing has changed – don’t worry, we haven’t loaded a model yet (you can specify a model when instantiating the viewer, but we elected not to).
Create the WebViewer Callback Skeletons
The next step is to setup the callbacks on the WebViewer. If you are unfamiliar with basic callback usage in HOOPS Visualize Web, or need a refresher, please review the callbacks section of the Building A Basic Application tutorial. For our application, we are interested in two main callbacks – modelStructureReady and selectionArray.
Because we want to load a model to the scene after we have instantiated and started the viewers, we need to wait for the modelStructureReady callback to fire, or else we will get an error to trying to access the Model class too quickly. Since models are going to be loaded when the user clicks on a component, we want to ensure those UI components cannot be triggered before the modelStructureReady callback is fired, or else we will get a model load failure. By default, these anchor elements have no reference, so clicking them should not initiate any unwanted behavior. We will set up the behavior of these anchors later in this tutorial.
this._viewer.setCallbacks({
        sceneReady: () => {
                // Set background color for viewers
                // Enable nav cube and axis triad
                // Enable backfaces
        },
        selectionArray: (selectionEvents) => {
                // Reserved for later use
        }
}); // end callbacks
From the comments, you can see we will be performing several steps in the modelStructureReady callback.
When the modelStructureReady callback is fired, we should be able to add some additional elements to our scene, like a navigation cube and axis triad. By default, you can access the navigation cube and axis triad via the View object in the WebViewer We will retrieve these objects, enable them, and move the navigation cube from its default position to the lower right corner of the scene.
// Additional viewer options
this._viewer.view.getAxisTriad().enable();
this._viewer.view.getNavCube().enable();
this._viewer.view.getNavCube().setAnchor(Communicator.OverlayAnchor.LowerRightCorner);
In addition, we will spice up our viewers by adding a colored background consistent with our UI theme. This is as simple as calling setBackgroundColor on the View object.
You can specify a single background color, or make a gradient from top to bottom by providing two colors. We will choose to make the gradient.
// Background color for viewers
this._viewer.view.setBackgroundColor(new Communicator.Color(33, 33, 33), new Communicator.Color(175, 175, 175));
Lastly, we will be working with many independent models from multiple sources. It is impossible to say whether our model data vertices were constructed appropriately (hopefully they were), but to ensure the rendering is complete, we will enable rendering of the backfaces. This ensures that any culling based on the orientation of vertices will not result in missing facets in our model. For the model data we have provided, for example, one model is displayed with missing triangles if we do not enable this option (rotating the camera 180 degrees around the model would display these faces, but then the previously displayed faces would disappear as they are now being viewed from behind). This is because the model author did not consistently construct the model faces. When enabling the backfaces, we can see both sides of the face from any camera angle.
this._viewer.view.setBackfacesVisible(true);
With this, our model structure ready callback for the main viewer should be complete.
modelStructureReady: () => {
        // Background color for viewers
        this._viewer.view.setBackgroundColor(new Communicator.Color(33, 33, 33), new Communicator.Color(175, 175, 175));

        // Additional viewer options
        this._viewer.view.setBackfacesVisible(true);
        this._viewer.view.getAxisTriad().enable();
        this._viewer.view.getNavCube().enable();
        this._viewer.view.getNavCube().setAnchor(Communicator.OverlayAnchor.LowerRightCorner);
},
We can perform the same desired operations on the component viewer, though we do not need the nav cube and axes in this viewer.
this._compViewer.setCallbacks({
        sceneReady: () => {
                // Background color for viewers
                this._compViewer.view.setBackgroundColor(new Communicator.Color(33, 33, 33), new Communicator.Color(175, 175, 175));
                this._compViewer.view.setBackfacesVisible(true);
        },
})
We will use the selectionArray callback later to add additional functionality to our scene.

