User Guide
Using the Product
Default Translations
Default Translation – via the Unified Interface
The Unified Interface can be started via the Start Menu – if a shortcut was added during installation.
Alternatively, the Unified Interface can be run via a Windows Explorer selection in:
<UI_installation_directory>\bin\Unified_Interface.cmd
The following interface will be launched:
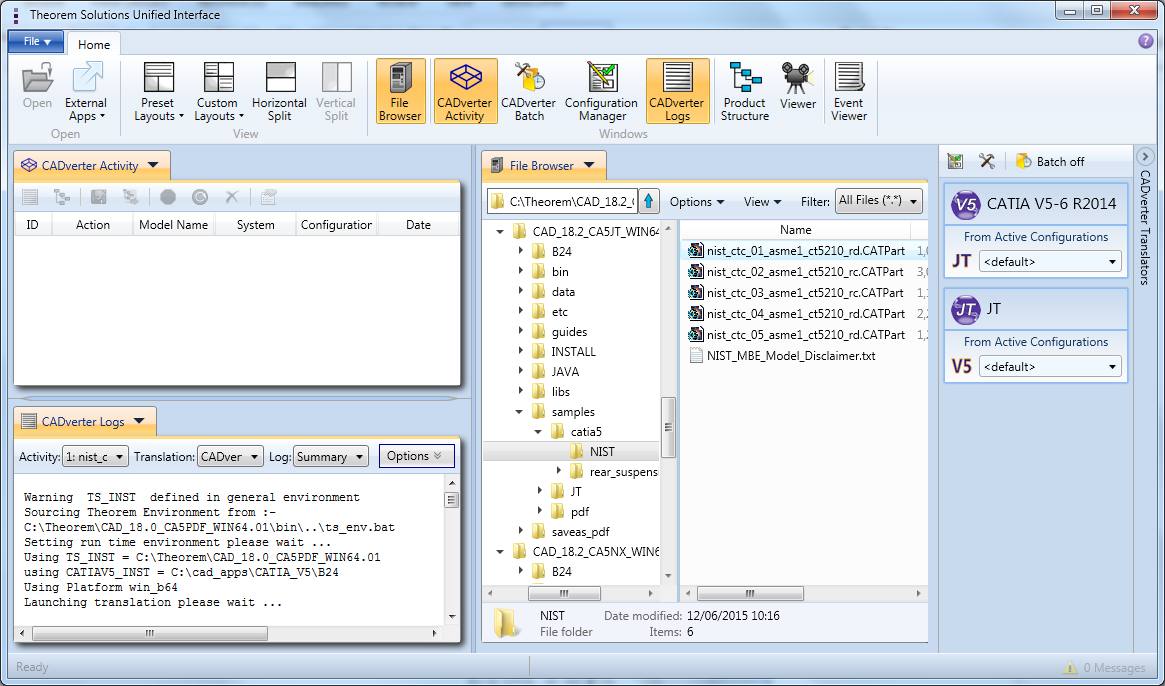
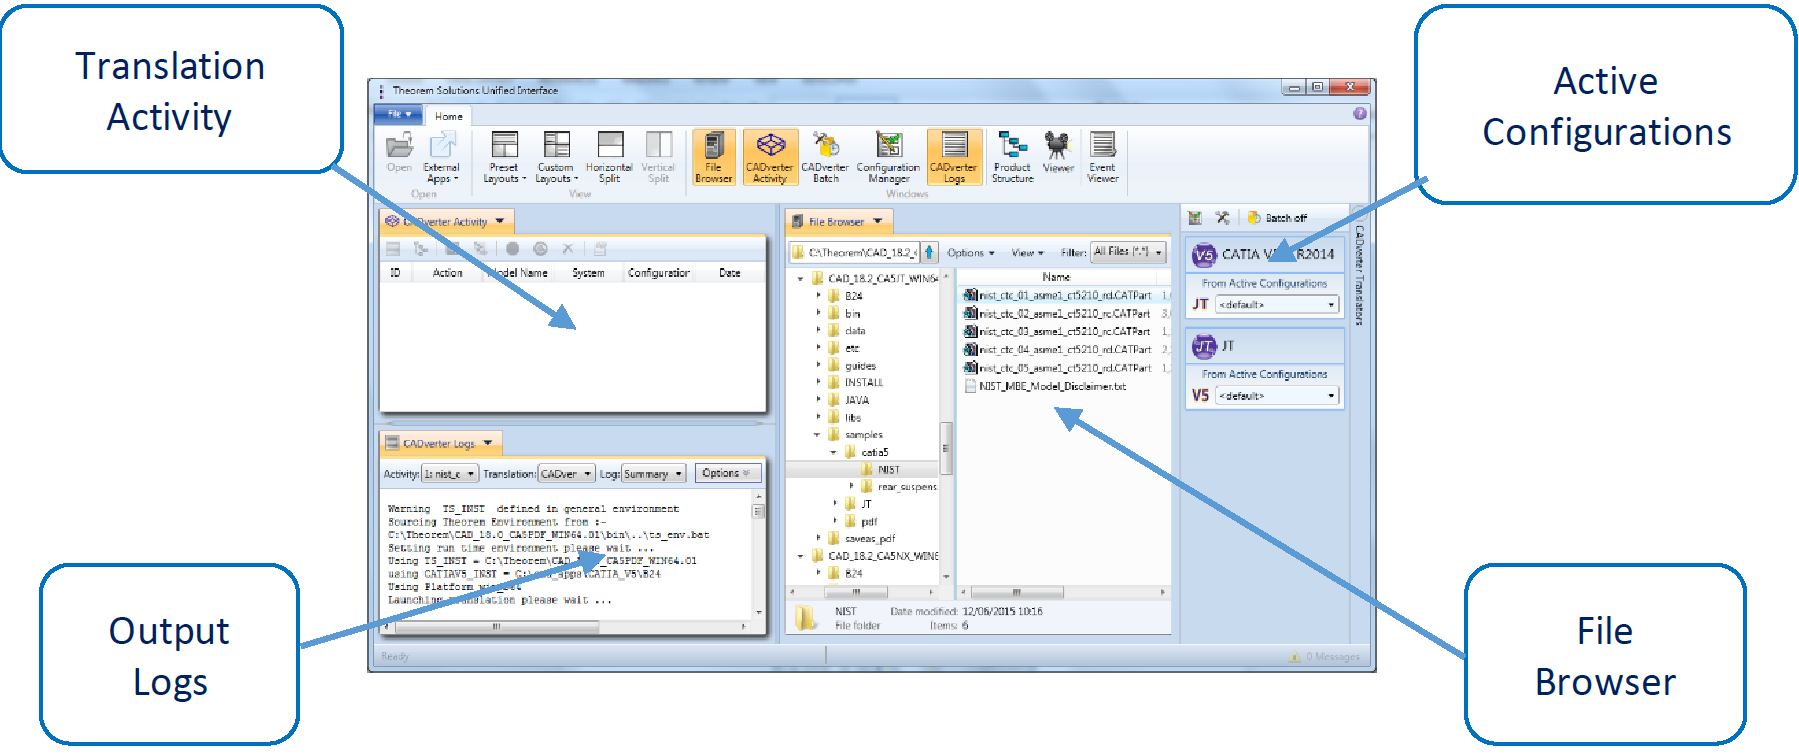
The default layout is split into 4 primary areas, which can be altered to the users prefer:
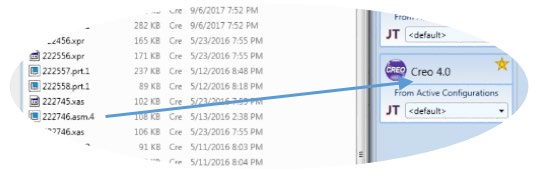
The simplest way to translate from Creo to JT is to drag a file from the file Browser Pane on to the Active Configurations for the translation you require.
On completion, the Unified Interface will display the activity information and details from the log file created during the translation, if requested, in the Translation Activity and Output Log panes, respectively.
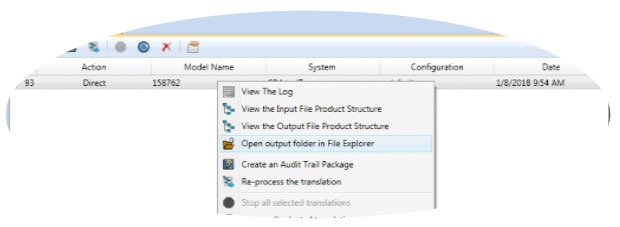
The generated output data can be located by selecting the translation from the Activity pane and opening the output folder:
Default Translation – via the Command Line
Running a translation via the command line can be carried out via the cad_run.cmd file located in the <installation_directory>\bin directory. The format of the command is as follows when translating from Creo to JT:
<Translator_installation_directory>\bin\cad_run.cmd CR[X]_JT –i <input_file> -o <output_file>
The format of the command is as follows when translating from JT to Creo:
<Translator_installation_directory>\bin\cad_run.cmd JT_CR[X] –i <input_file> -o <output_file>
Note
Replace the [X] seen in the example with the version of CREO you are using E.g. for CREO 6 change to CR6.

The example above will translate a CREO sample file provided within the installation and produce the following output to the target location. In this case:
C:\Temp\alternator.prt
Translator Customization
The Theorem translator allows the information that is read from the source system and written to the target system to be tailored via a set of user specified arguments. Commonly used arguments are supported via the Unified Interface, with Advanced Arguments being described within this document for use in the Unified Interface or via the Command Line invocation.
Common Options for Creo to JT
Within the Configuration Manager panel of the Unified Interface, arguments that can be specified when publishing Creo data into JT are grouped into the following areas:
Creo Read – Those arguments that affect how data is read from JT
JT Write – Those arguments that affect how the data is written to JT
General – Those arguments that are common to ALL Publishing activities regardless of source data
CREO Read Arguments
The image below shows the Creo Read arguments that are available, with their default settings:
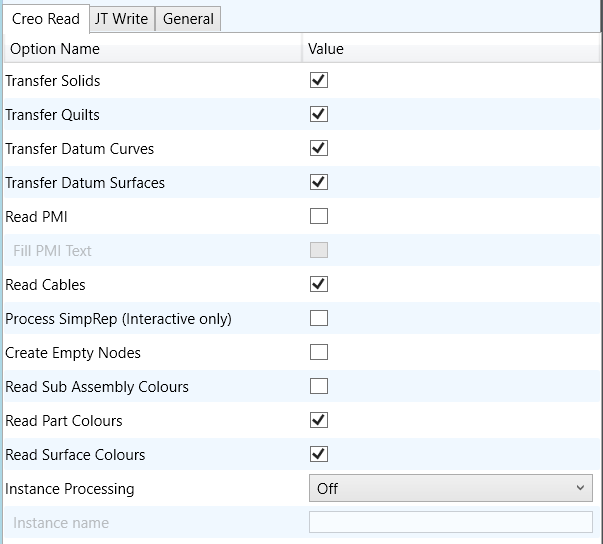
Each of these options is described below:
Option |
Description |
|---|---|
Transfer Solids |
Enables solid processing. (Default is on).
Command Line Syntax:
-
no_solids – to Disable |
Transfer Quilts |
Enables quilt processing. (Default is on).
Command Line Syntax:
-
no_quilts – to Disable |
Transfer Datum Curves |
Enables Datum Curve processing. (Default is on).
Command Line Syntax:
-
no_datum_curves – to Disable |
Transfer Datum Surfaces |
Enables Datum Surface processing. (Default is on).
Command Line Syntax:
-
no_datum_surfaces – to Disable |
Read PMI |
Enables reading of PMI. (Default is off).
Command Line Syntax:
-
read_pmi |
Fill PMI Text |
Enabled when ‘Read PMI’ is selected. Improves the quality of PMI,
but increases output size and processing time. (Default is off)
Command Line Syntax:
-
fill_pmi_text |
Read Cables |
Enables the reading of Cable data from Creo. (Default is off). Note
that in the Creo Configuration Editor, the setting display_thick_cables
should be set to yes.
Command Line Syntax:
-
read_cables |
Process Simprep |
Enables the reading of a specified Simplified Representation. This is
only available when processing data interactively and using the
option via the Configuration Manager.
Command Line Syntax:
-
process_simprep |
Create Empty Nodes |
If a part is missing, create an empty leaf node for it. (Default is off)
Command Line Syntax:
-
create_empty_part |
Read Sub Assembly Colours |
Read colour information set on sub-assembly level (Default is off)
Command Line Syntax:
-
sub_assy_colours-
sub_assy_colours_off (default) |
Read Part Colours |
Read colour information set on parts. (Default is on)
Command Line Syntax:
-
part_colours (default)-
part_colours_off |
Read Surface Colours |
Read colour information set on surfaces. (Default is on)
Command Line Syntax:
-
surface_colours (default)-
surface_colours_off |
Instance Processing |
Process a defined instance. Contains 3 options:
(Not to be used in conjunction with Process Specified Instance).
(Default is off).
- Off
- List all instances in log file - List all instances of Family table
to the progress file.
Command Line Syntax
-
instance LIST_ALL- Process Specified Instance – Only process the specified
instance. The Text Box Instance Name will become active.
Command Line Syntax
-
instance [instance_name] |
Instance Name |
Enter the instance name to process. Only activates when ‘Process Specified Instance’ selected. |
JT Write Arguments
The image below shows the JT Write arguments that are available, with their default settings:

Each of these options is described below:
Option |
Description |
|---|---|
Config File |
Allows a JT configuration file to be specified.
Please see JT Configuration File for a full description of the JT config file format.
Command Line Syntax
-
-z [path_to_file] |
Creo to JT General Arguments
The image below shows the General arguments that are available, with their default settings:
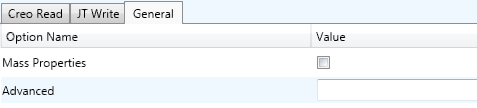
Each of these options is described below:
Option |
Description |
|---|---|
Mass Properties |
Mass properties (volume/area CofG) are read and any applied
materials, using this option, in cases where a part has multiple
solids, volume and area values are summed, but CofG data is
invalid.
Command Line Syntax
-
mprops |
Advanced |
Allows any of the Command Line Advanced arguments documented to be passed to the Unified Interface invocation. |
Command Line Advanced Arguments
Any of the advanced arguments can be added to the Command Line Invocation or to the General->Advanced field when run from within the User Interface.
Creo to JT Advanced Arguments
Creo Read Argument |
Description |
|---|---|
pmi_pcurves |
Store non planar PMI graphics (leaders not in the plane of the annotation) |
unique_occ |
Read multiple occurrences, eg support for occurrence PMI associations |
read_assy_pmi |
reads PMI in lower level assembly parts |
ignore_std_views |
Disable reading views with standard names (TOP, LEFT, etc). |
ignore_view_list <file> |
supply a list of view names to be ignored |
no_exploded_views |
Disables exploded views. |
part_level_views |
Default: off
Enable the processing of Part Level Views within an assembly.
|
part_level_views_moved |
Process part level views and move into assembly space, such that only one part instance’s views are displayed. |
part_level_pmi |
Default: off
Enable the processing of PMI on parts within an assembly.
|
view_part_name |
Uses the part name in the view names to help identify the views when selected in Creo |
views_geom_exploded <on | off | hybrid | hybrid2> |
Default: hybrid
Geometry grouped into assembly nodes for views is by default
done on a view bases, which re-uses geometry where possible.
This option creates a node for every item of geometry so that the
views can hide/show them in the views. This can (depending upon
the data and views) reduce the resulting file size and shorten the
translation time.
exploded - off - create a node per view with all geometry / wire
etc for that view
explode - on - create nodes for very solid / wireframe etc that can
be referenced by views
hybrid (default) - mixture of explode on/off - solids being
exploded and wireframe grouped (best compromise)
hybrid2 - as hybrid with points also grouped
|
JT Write Argument |
Description |
|---|---|
Parasolid Tolerant Modelling |
A secondary option to be used when Brep Type = XT Brep (Theorem)
output is specified. Enables Parasolid tolerant modelling. Default is ON
Command Line Syntax
-
nopstolmodel – to turn off |
Factor |
Specify the factor level of Parasolid Tolerant Modelling when turned on.
Default is 3.
Command Line Syntax
-
pstolmodel 3 |
Sew Parasolid Bodies |
A secondary option to be used when Brep Type = XT Brep (Theorem)
output is specified. Enables the sewing of Parasolid bodies. Default is ON
Command Line Syntax
-
nosew – to turn off |
Tolerance |
Specify the tolerance for the sew command above. Default is 0.01.
Command Line Syntax
-
pssew 0.01 |
Incremental Sewing |
Enables incremental sewing when used with Sew Parasolid Bodies.
Default is ON.
Command Line Syntax
-
no_sew_increm – to turn off |
Split Discontinuous Surfaces |
A secondary option to be used when Brep Type = XT Brep (Theorem)
output specified. Splits discontinuous surfaces. Default is OFF.
Command Line Syntax
-
brep_prep – to turn on-
no_brep_prep – to turn off |
Force body creation (No check of Parasolid entities) |
A secondary option enabled when XT Brep (Theorem) output specified.
Removes the checking of Parasolid entities. Default is ON.
Command Line Syntax
-
nocheck – (force body creation without checking = Default)-
check – (doesn’t force the body creation - Parasolid checking is enabled) |
Fix Degenerate Edges |
A secondary option to be used when Brep Type = XT Brep (Theorem)
output specified. On face create failure, check and fix any degenerate
edges. Default is ON.
Command Line Syntax
-
fix_degen-
no_fix_degen – to turn off |
Specify a Face Edge Tolerance |
A secondary option to be used when Brep Type = XT Brep (Theorem)
output specified. Specify an edge tolerance to be used when creating
faces. Default is ON.
Command Line Syntax
- Please see Edge Tolerance below
|
Edge Tolerance |
A secondary option used with Specify a Face Edge Tolerance where the
tolerance value is assigned. Default is 0.000006.
Command Line Syntax
-
face_edge_tol 0.000006 |
Fix small features in solids |
A secondary option to be used when Brep Type = XT Brep (Theorem)
output specified. Remove small edges, sliver and spike faces from solid
bodies. Default is OFF.
Command Line Syntax
-
ps_fix_small – to turn on-
no_ps_fix_small - default |
Fix small features in open solids |
A secondary option to be used when Brep Type = XT Brep (Theorem)
output specified. Remove small edges, sliver and spike faces from open
solids. Default is OFF.
Command Line Syntax
-
ps_fix_osol – to turn on-
no_ps_fix_osol - default |
Simplify Geometry |
A secondary option to be used when Brep Type = XT Brep (Theorem)
output specified. Simplify Geometry. Default is OFF.
Command Line Syntax
-
simplify_solids – to turn on |
Verbose Report |
Defines the report. Default is ‘Config File setting’
Command Line Syntax
- Config File Setting: Default
- No:
-VerboseReporting false- Yes:
-VerboseReporting true |
Output Units |
Output unit definition. Default is ‘Config File setting’
Command Line Syntax
- Config File Setting: Default
- As Input:
-OutputUnits <inputUnits>- Millimeters:
-OutputUnits mm- Centimeters:
-OutputUnits cm- Meters:
-OutputUnits m- Inches:
-OutputUnits inches- Feet:
-OutputUnits feet- Yards:
-OutputUnits yards |
Structure Output Type |
Specifies the type of assembly structure to be output. Default is JT.
Selectable options are:
- JT: Default
- PLMXML ( with external references to JT files)
- STEP BOM ( with external references to JT files)
Command Line Syntax
- JT: Default
- PLMXML: <See PLMXML Ref Type>
- STEP BOM:
write_stepbom |
PLMXML Reference Type |
Only active if a Structure Type of PLMXML is selected.
Selectable options are:
1. PLMXML referencing JT Parts in the same folder
2. PLMXML in addition to the JT Assembly File
Command Line Syntax
- 1:
plmxml_only- 2:
write_plmxml |
PLMXML Property Mapping File |
Allows a Property Mapping file to be selected. Only active if a
Structure Type of PLMXML is selected. (See Property Mapping Files for the file
format)
Command Line Syntax
-
plmxml_prop_map_file [File]Note! When this option is unset, the file
“plmxml_property_mapping.txt” in the ‘data\jt folder’ will be used
as the mapping file. This file contains lines with mappings that are
mandatory for certain downstream applications and mappings to
remove attributes used solely in the translation process. Therefore
it is a good idea to start with a copy of this file when creating a
new mapping file.
|
Brep Type |
Specifies the BREP type in the resultant JT Files. Default is XT Brep.
Selectable options are:
- JT Brep
- XT Brep (Theorem)
- JT Brep (JT Open)
Command Line Syntax
- JT Brep: Default
- XT Brep (Theorem):
xt_brep no_fixup- JT Brep (JT open):
jt_xt_brep |
Explode Solids to Faces |
A secondary option enabled when XT Brep (Theorem) output specified.
Explodes solids to faces. Default is OFF.
Command Line Syntax
-
split_brep |
Brep Wireframe |
Store wireframe on JT Brep. Default is YES.
Command Line Syntax
- Yes: Default
- No (Tessellated):
no_brep_wire |
Produce Tessellated Output |
Convert Brep data directly to facetted data. Default is OFF
Command Line Syntax
-
tess_output |
Expand Part |
Process multi-solid parts as an assembly. Default is OFF.
Command Line Syntax
-
expand_part |
Reuse Solids |
Used with Expand Part to re-use existing solids. Default is OFF.
Command Line Syntax
-
reuse_solids |
CAD Property Mapping File |
A file containing a list of CAD properties and information on how they
are mapped to the JT file. Not used by default.
Command Line Syntax
-
cad_prop_map_file [File] |
JT to Creo Advanced Arguments
JT Read Option |
Description |
|---|---|
Small Curves |
Report Small curves as errors. (default OFF)
Command Line Syntax
-
small_curves (to enable) |
Extend Nurb Surfaces |
Extends NURBS surfaces beyond face limits for curve projection
(default state)
Command Line Syntax
-
no_extend_nurb -(Don’t extend NURBS surfaces to face limits)-
extend_nurb <int> - (trims NURBS surfaces to <int> * 0.0001 face extents in u and v) |
Remove Groups |
Remove Group entities into assembly structure. (default OFF)
Command Line Syntax
-
remove_groups (to enable) |
Use Ref Name |
Uses file name from input system to name files (default OFF)
Command Line Syntax
-
use_ref_name (to enable) |
Re-tessellate Brep Data |
Allows Brep data to be re-tessellated to create a link between the faces
in the Brep and the tessellated representation. There is a choice
between processing just the tessellated form or both the tessellated
and Brep forms with the links between them. Default is ‘Off’.
Command Line Syntax
- On – Re-tessellate Brep Data:
tess_brep- On – Re-tessellate and Read Brep Data:
tess_and_read_brep |
Read as Bounding Boxes |
This option allows the user to read the JT file as a very light weight
bounding box representation, with each solid having its own bounding
box.
This option may be useful when the part’s details are not of interest, as
much as the physical space, the part occupies.
Command Line Syntax
-
bounding_box |
Exclude small solids (by absolute value) |
Exclude solids that have bounding boxes smaller than value. Default is
OFF.
Command Line Syntax
-
bb_exclude_value |
Exclude small solids (by bounding box fraction) |
This option allows the user to exclude small solids from the JT read, the
excluded solids being smaller than a specified fractional size of the
overall bounding box of the part.
Command Line Syntax
-
bounding_box_frac [value] |
Exclude parts File for bounding box checks |
This option allows the user to supply an input file containing a list of JT
parts, one per line. The parts specified in the file will be excluded from
the checks to remove small solids. This option is used in conjunction
with the “Exclude Small Solids” options.
Command Line Syntax
-
bb_exclusion_file '[path_to_file] |
Creo Write Option |
Description |
|---|---|
Collapse Assembly Structure |
If the Input CAD data contains any assembly structure, then by default
assembly structure will be created in the Output CAD format. Running
this option causes the assembly structure to be “exploded” into a flat
single component file.
Command Line Syntax
-
noditto |
Group All Geometry |
Creo default is to create one part per Solid body. This option will allow
all Geometry to be written into one part.
Command Line Syntax
-
mult_feat_on-
mult_feat_off (default) |
Group Open Solids into a Single Creo Part |
This option will allow all “Open Solid” (Quilt) Geometry to be written
into one part.
Command Line Syntax
-
mult_open_on-
mult_open_off (default) |
Group Closed Solids into a Single Creo Part |
This option will allow all “Closed Solid” Geometry to be written into one
part.
Command Line Syntax
-
mult_brep_on-
mult_brep_off (default) |
JT Configuration File
Introduction
A configuration file contains the settings for your translations. The configuration file can be specified using the command line option –config or -z.
If this is not supplied the following directories will be searched in the specified order for the named configuration files : (TS_INST = Installed directory)
tess.config in the directory where the translator is run
tess.config in TS_INST\etc directory
Two example config files are provided in the TS_INST\etc directory, a
The JT configuration file contains various sections, each containing different settings based on the section.
The Setup Section
The setup options in the configuration file define how your files are translated. The setup section is the first part of the configuration file and contains a series of standard translator options.
To edit setup options
Open an existing configuration file with a text editor.
Edit the configuration file options listed in the table below.
Save the configuration with a .config extension
Option name |
Keywords |
Example |
|---|---|---|
EAITranslator |
EAITranslator { |
EAITranslator { |
OutputDirectory |
“path to directory” |
OutputDirectory = “/home/<user>/” |
CommonPartsPath |
“path to directory” |
CommonPartsPath= “/myaccount/jtparts/” |
chordalOption |
“RELATIVE”, “ABSOLUTE” |
chordalOption = “RELATIVE” |
structureOption |
“PER_PART”, “MONOLITHIC”, “FULL_SHATTER” |
structureOption = “MONOLITHIC” |
WriteWhichFiles |
“ALL”, “ASSEMBLY_ONLY”, “PARTS_ONLY” |
WriteWhichFiles = “ALL” |
compression |
true, TRUE, false, FALSE |
compression = true |
advCompression |
true, TRUE, false, FALSE |
advcompression = true |
advCompressionLevel |
any number |
advCompressionLevel = 0.0 |
JtFileFormat |
Any JT file version |
JtFileFormat = “95” |
triStripOpt |
true, TRUE, false, FALSE |
triStripOpt = false |
seamSewing |
true, TRUE, false, FALSE |
seamSewing = true |
seamSewingTol |
any number |
seamSewingTol = 0.001 |
includeBrep |
true, TRUE, false, FALSE |
includeBrep = true |
IncludeGeom |
true, TRUE, false, FALSE |
includeGeom = true |
autoXtBrep |
true, TRUE, false, FALSE |
autoXtBrep = false |
brepPrecision |
“SINGLE”, “DOUBLE” |
brepPrecision = “SINGLE” |
autoNameSanitize |
true, TRUE, false, FALSE |
autoNameSanitize = true |
nameSanitizeMacro |
Macro name |
nameSanitizeMacro = “” |
updateChangedPartsOnly |
true, TRUE, false, FALSE |
updateChangedPartsOnly = false |
verboseReporting |
true, TRUE, false, FALSE |
verboseReporting = false |
writeAsciiAssembly |
true, TRUE, false, FALSE |
writeAsciiAssembly = false |
singlePartsNoAssem |
true, TRUE, false, FALSE |
singlePartsNoAssem = false |
autoLowLODgeneration |
true, TRUE, false, FALSE |
autoLowLODgeneration = true |
smartLODgeneration |
true, TRUE, false, FALSE |
smartLODgeneration = true |
numLODs |
any integer |
numLODs = 3 |
includeULP |
PASSTHROUGH |
includeULP = “PASSTHROUGH” |
ulpPrecision |
any number |
ulpPrecision = 0.001 |
close brace |
} |
} |
The Level of Detail Section
The level of detail section of the configuration file contains the tessellation and simplification information for each level of detail in the file.
This section consists of several sets of level of detail (LOD) information, and the number of these sets depends on the number you specified on the numLODs line in the configuration file.
To edit level of detail options
Open an existing configuration file in a text editor.
Edit the configuration file options listed below.
Save the configuration with a .config extension
Option name |
Keywords |
Example |
|---|---|---|
LOD |
LOD “lod number” { |
LOD “1” { |
Level |
any integer |
Level = 1 |
Chordal |
any number |
Chordal = 0.001 |
Angular |
any number |
Angular = 25 |
Length |
any number |
Length = 1 |
FeatureSuppression |
any integer |
FeatureSuppression = 0 |
Simplify |
any number |
Simplify = 0.60 |
AdvCompressionLevel |
any number |
AdvCompressionLevel = 0.0 |
ULP |
True / false |
ULP = false |
close brace |
} |
} |
The Filter Section
The filter section of the configuration file contains the filename and metadata filtering information. Edit this section if you want to change how the translator sanitizes filenames and filters metadata keys.
To edit filter options
Open an existing configuration file with a text editor.
Edit the configuration file options from the table below.
Save the configuration with a .config extension
Option name |
Keywords |
Example |
|---|---|---|
Filter |
Filter { |
Filter { |
FilenameSanitizeSet |
“string of characters” |
FilenameSanitizeSet = “abc123.” |
FilenameSanitizeSetAdd |
“string of characters” |
FilenameSanitizeSetAdd = “4l” |
FilenameSanitizeSetDelete |
“string of characters” |
FilenameSanitizeSetDelete = “c” |
MetadataKey |
“string of characters” |
MetadataKey = “metadata key to exclude” |
close brace |
} |
} |
The Metadata section
The metadata section sets which metadata to attach to all parts, assemblies and nodes of the model.
Note
Be sure to add these options to the configuration file in pairs: one line to define the metadata key and one line to define the metadata value.
To edit metadata options
Open an existing configuration file (.CONFIG) in a text editor.
Edit the configuration file options shown in the table below.
Save the configuration with a .config extension
Option name |
Keywords |
Example |
|---|---|---|
Metadata |
Metadata { |
Metadata { |
AddToParts |
“string of characters” |
AddToParts = “<metadata key>”
AddToParts = “<metadata value>”
|
AddToAssemblies |
“string of characters” |
AddToAssemblies = “<metadata key>”
AddToAssemblies = “<metadata value>”
|
AddToAllNodes |
“string of characters” |
AddToAllNodes = “<metadata key>”
AddToAllNodes = “<metadata value>”
|
close brace |
} |
} |
Property Mapping Files
Property mapping files are required for CAD property Mapping and PLMXML Property Mapping
A Property Mapping File is a comma separated text file containing information of how CAD properties from the source system will be mapped into the target file.
The format is as follows:
Lines beginning with a “#” are treated as comment lines and are ignored.
Any space characters will be treated as part of the item
Lines containing a mapping must contain 6 items separated by 5 commas
The six items are :-
Item |
Description |
|---|---|
Source name |
The attribute name in the Source System |
Target name |
The attribute name in the Target File |
Data derived from |
0 - Do not convert
1 - Use the source value as given
6 - Use the source value as given and hide the property
Note! Value 6 For CAD Mapping Files ONLY (Not PLMXML)
|
Default Value |
Not currently used |
Value Type |
Not currently used |
Default Units |
Not currently used |
An Example of a mapping file is shown below:-
# Mapping from input attribute name to Target property name
#
# Line Format:-
# Source name,Target name,Data derived from,Default Value,Value Type,Default Units
#     Data derived from:-
#     0 - Do not convert
#     1 - Use the source values as given
#     6 - Use the source value as given and hide the property
#
_ActivateBOM,NULL,0,0,,
_LastModifier,NULL,0,0,,
_Maturity,NULL,0,0,,
_PrdVersion,NULL,0,0,,
_ReferenceTimeStamp,NULL,0,0,,
_Responsible,NULL,0,0,,
COG M,ud_CAD_CENTER_OF_GRAVITY,1,0,,
COMPONENTS PRINCIPAL AXES ,NULL,0,0,,
DENSITY Kg/M^3,NULL,0,0,,
INERTIA MATRIX KgM2,ud_CAD_MOMENT_OF_INERTIA,1,0,,
INERTIA VOLUME M^3,ud_CAD_VOLUME,1,0,,
INERTIA WET AREA M^2,ud_CAD_SURFACE_AREA,1,0,,
MASS Kg,ud_CAD_MASS,1,0,,
PRINCIPAL MOMENTS KgM^2,NULL,0,0,,
FILESAVETIME,File Last Modified,1,0,,
LOCALE,LOCALE,1,0,,
Masterdata Version,Masterdata Version,1,0,,
Material Details,Material Details,1,0,,
PART_NUMBER,PART_NUMBER,1,0,,
MPARTNAME,Source Model Name,1,0,,
Source,SourceName,1,0,,