Creating a report template
The concept with the Report component is creating your own templates using ordinary Word/PowerPoint documents. Insert dummy images/models/tables/text/charts and tag these with a snapshot type and a snapshot index. Create a repository of snapshots matching the template. Feed both repository and template file to a generator and it will produce a report for you with all the dummy objects replaced with actual simulation data.
MS Office templates
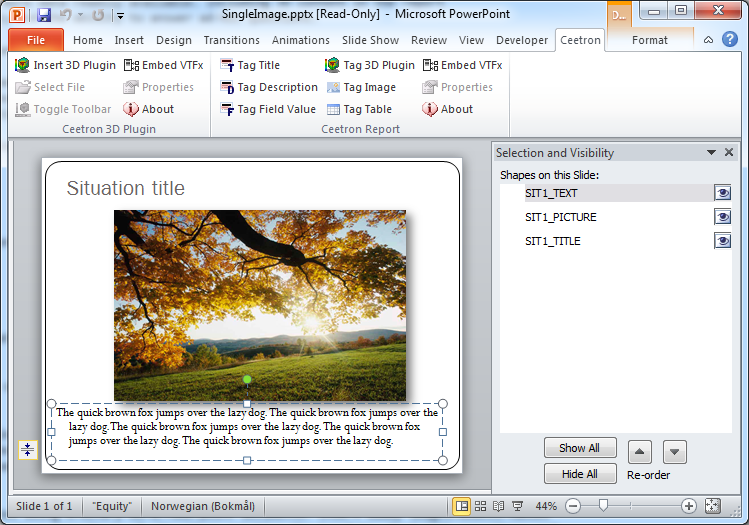
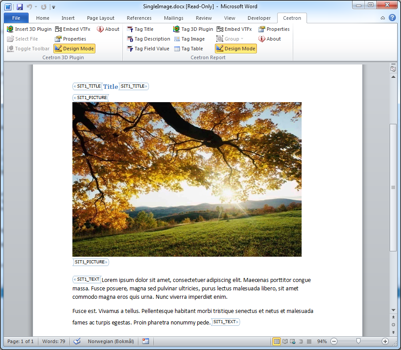
In the screenshots below, you can see very simple Word and PowerPoint templates with the tagged objects showing. (Please note that these tag names are invisible for normal usage and is only shown when you open the ‘Selection and Visibility’ pane in PowerPoint and toggle the ‘Design Mode’ button in Word.) All tags can be set using native Word/PowerPoint, but to simplify the template creation, Ceetron provides a Report Addin for Microsoft Office that creates the tags for you.


In MS Word we utilize content controls as placeholders for the tags that are used to replace content in a template with “real data” from a simulation. A content control is a start and end tag that will wrap around your selected object. This will show as a thin frame around the object and only be visible when the cursor is inside a content control or, for text, hovers over it. Otherwise the text or image will appear as normal. The user can remove this at any time with clicking on the control and select “Remove content control”. Content controls will not be visible when printing. Content controls can be added to existing objects or be inserted as empty content controls. So you can build your report template from scratch with empty controls, or you can use an existing report and select text or images and insert controls around them.
Controls have a TAG property where we can insert a tag name that will tell us what to replace this control with when creating the final report.
In PowerPoint there are no content controls. Instead we use Shape names. The syntax for tagging is the same as for Word. To access the Shape names, select the Home tab in PowerPoint. At the end of the ribbon you’ll see the “Editing” section. Click the “Select” button and “Selection and Visibility” panel will appear. Here you can set and change the Shape names (tags) for this slide.
It’s worth noticing that all tags are kept in the produced report so the newly created report can actually be reused as a template.
To enable 3D integration directly into Word and PowerPoint, you will need to install Ceetron 3D Plugin.
Once you have installed Ceetron 3D Plugin and Ceetron Report Office Addins, you will get an additional pane in Word and PowerPoint. This pane contains two groups, “Ceetron 3D Plugin” for managing embedded 3D models into your document and “Ceetron Report” for tagging your document for usage with the Ceetron Report component.
Using the Office addin
The addins for Word and PowerPoint is almost identical.


Tag Title: Inserts necessary tags and dummy text to insert the title from a snapshot at the location of the cursor in the current presentation.
Tag Description: Inserts necessary tags and dummy text to insert the description from a snapshot at the location of the cursor in the current presentation.
Tag Field Values: Inserts necessary tags and dummy text to insert field values from a snapshot at the location of the cursor in the current presentation. The user can select which field value to use from a drop-down list. NOT IMPLEMENTED YET
Tag 3D Plugin: Inserts an instance of the Ceetron 3D Plugin with associated tags at the location of the cursor in the current presentation.
Tag Image: Inserts a picture with associated tags at the location of the cursor in the current presentation. The inserted picture will scale itself to fit within the width and height of your default image, but keep its aspect ratio to avoid distortion.
Tag Table: Inserts a 4x3 table with associated tags at the location of the cursor in the current presentation. Table will be resized to fit the snapshot content in the generated report.
Embed VTFx: Embeds VTFx files used in the 3D Plugin object into the Presentation file. Note, this only applies to VTFx files used in the template. When a 3D model is inserted from the Ceetron Report component interface, you can control if the newly inserted VTFx should be embedded or not by setting
ReportCreatorPowerPoint::setEmbedVTFx().Group: Word only. Tags a section of the document as a group, which means all generic tags within this group will be rolled out for all suitable snapshots. Read more about generic groups on Topic: Tag behavior and syntax. To use this button, select a part of the document and then press the button.
Design Mode: Word only. The Design Mode is an existing Word feature enabling the user to se the tags of Content Controls which is what the Report component use to tag snapshot data. This button is available under the “Developer” tab in Word, but we have put it in the Report addins too for convenience.
When you click one of the Tag-buttons in the Report pane, a small dialog will appear where you can specify the snapshot index (or set it generic). When you click ok, an object of the desired type is inserted into the active PowerPoint slide or at the mouse cursor for a word document. Remember that you can see all existing tags (and manually tag objects) in the ‘Selection and Visibility’ pane in PowerPoint (Home->Editing->Select->Selection Pane) or by toggling the “Design Mode” button for Word.
For Word, you can also select an image/text/table and press the corresponding Tag-button in the ribbon pane. It will then use your selection instead of inserting new dummy text/graphics.
HTML templates
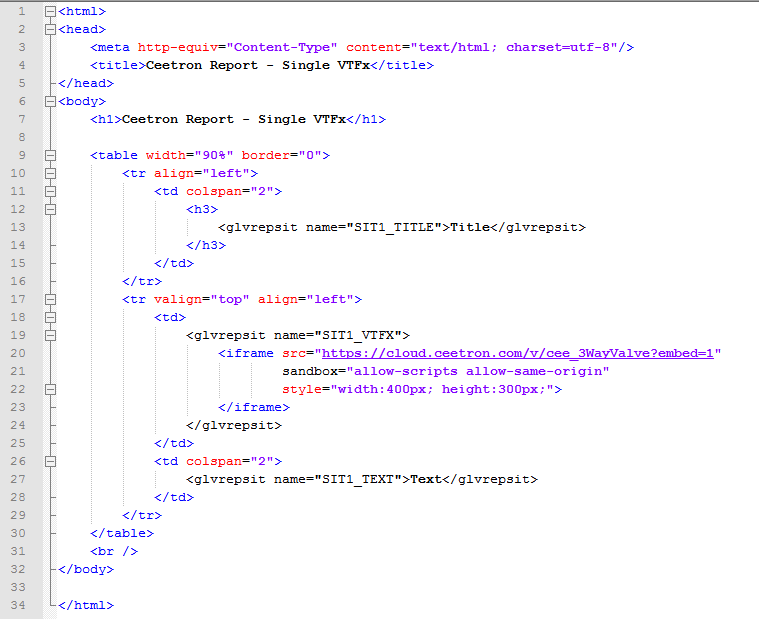
For tagging in HTML template documents we have introduced a proprietary tag that will be identified by the Report component, and the template content will be replaced by “real simulation data”. The proprietary tag is “glvrepsit”, with a “name” parameter that is used in the same manner as tagging in MS Word and MS PowerPoint. The tag is used the following way:
<glvrepsit name="SIT_TITLE">Title</glvrepsit>
Static tags in HTML
A static tag will map the tagged object to one specific snapshot in the repository. The tag contains object type and an index that tells which snapshot to get data from. For instance, “SIT3_PICTURE” will replace the tagged picture with the picture from the snapshot number 3 in the repository.
Example tags for objects to be replaced from snapshot 1:
<glvrepsit name="SIT1_TITLE">Title</glvrepsit>
<glvrepsit name="SIT1_TEXT">Description</glvrepsit>
<glvrepsit name="SIT1_VTFX">3D Object</glvrepsit>
<glvrepsit name="SIT1_PICTURE">Picture</glvrepsit>
<glvrepsit name="SIT1_TABLE">Table</glvrepsit>
<glvrepsit name="SIT1_$<field value>">Field value</glvrepsit> (e.g., SIT1_$DATABASE_NAME)
Generic tags in HTML
Generic tags are used when you just specify the tag type without a snapshot index. This means that this part of the document should be duplicated times and each duplicate will map to one snapshot in the repository. For HTML reports, generic tags must be within a Group tag. This group will then be duplicated so that there is one copy for each active snapshot in the repository.
Example tags for generic objects to be replaced:
<glvrepsit name="SIT_TITLE">Title</glvrepsit>
<glvrepsit name="SIT_TEXT">Description</glvrepsit>
<glvrepsit name="SIT_VTFX">3D object</glvrepsit>
<glvrepsit name="SIT_PICTURE">Picture</glvrepsit>
<glvrepsit name="SIT_TABLE">Table</glvrepsit>
<glvrepsit name="SIT_$<field value>">Field value</glvrepsit> (e.g., SIT_$DATABASE_NAME)
Group tag in HTML
If you want a part of the document to be repeated for multiple snapshots, you can use the group tag. Put the group tag around the part of the document you want duplicated.
<glvrepgroup></glvrepgroup>
Note: Use generic tags within groups! The index will be inserted upon generation to match each snapshot. If a tag with an index is found inside a group, the tag will remain static for each instance of the group.
