Lights
HOOPS treats scenes with lights in them differently from the way it treats scenes without lights.
Unlit Scenes
If you do not insert any lights at all into a scene, then the scene is unlit. In this case, the color of each object is just the color of that object’s net color attribute (which is the diffuse color attribute). For example, if you set the color attribute of an object to green, then that object will be green. Objects are not shaded, so a green object is uniformly green - it will not be lighter on one side or on top where the light hits it (because there are no lights).
Unlit scenes look flat. This effect might be just what you want, such as for a scene that only contains lines, or for charts and graphs. If you want any degree of realism, however, you will want to light your scene.
Lit Scenes
If a scene contains any lights, then HOOPS performs lighting calculations for all the objects in the scene. The color of each object will then depend not only on that object’s color, but also on the amount and color of the light falling on it. Thus, inserting the first light into a scene can sometimes make the scene look darker, because the sides of objects facing away from the light source will be darker than before.
HOOPS supports three kinds of light sources: distant lights, local lights, and spotlights.
If all you want to do is provide diffuse light to a scene, so that HOOPS draws objects brighter on one side than on the other to convey a sense of depth, then you probably want a distant light. To insert a distant light, you can use
HC_Insert_Distant_Light(x, y, z);
In the case of a distant light, the arguments x, y, and z are not the location of the light source in space. Instead, they indicate a vector direction for all light rays ([x, y, z] –> [0, 0, 0]). The vector magnitude is ignored. The light source acts as though it were infinitely far away - the light rays are all parallel to one another, and the light intensity does not drop off with distance. For those reasons, different points with the same direction yield the same result (e.g. [1, 1, 1] is equivalent to [2.5, 2.5, 2.5] which is also equivalent to [3000, 3000, 3000]).
Less frequently used are local lights and spotlights, which are inserted via Insert_Local_Light and Insert_Spot_Light. Spotlights have a useful feature in that their location can be specified in camera relative units (lights are normally in object relative units, like other geometry). For example, you can “mount” a spot light on your camera.
A note regarding usage of spotlights: Set_Driver_Options("spotlight interpolation") allows for control of the light interpolation across polyhedra when spotlights are used. The setting “spotlight interpolation = pixel” helps ensure smoother rendering and is the default. Setting “spotlight interpolation = vertex ” can speed up rendering but will only look good on finely tessellated polyhedra.
Local Lights and Graduated Shading
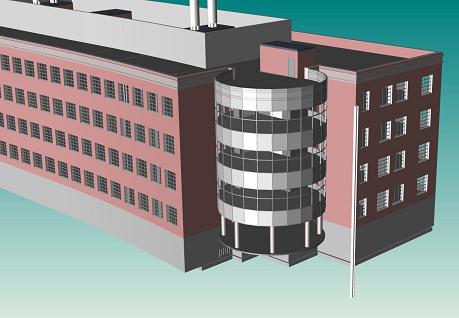
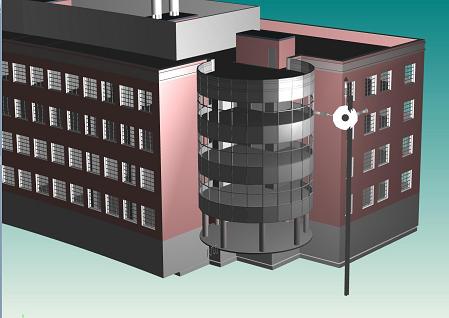
It may be desirable to render the scene with ‘graduated shading’, where the brightness of objects changes in relation to a varying light vector. The HOOPS ‘local’ light can be used to achieve this result, since a local light is an omni-directional light source, (whereas a ‘distant’ light acts as though it were infinitely far away, with light rays all parallel to one another).
|
|
The image on the left contains a distant light, while the one on the right contains a local light. Notice the ‘graduated’ shading on the floors and exterior panels in the image on the right.
Lights as Geometry
HOOPS treats lights as geometry, whereas it treats cameras as attributes. What would happen if lights were treated as attributes? If a light was an attribute, then it would inherit like any other attribute. A light would be inherited by, and so would illuminate only,geometry contained in segments below it in the database hierarchy. To light the entire scene, we would have to insert all our lights into the driver-instance segment (typically, “?Picture”). That, in turn, would make it difficult to use a color attribute to change the color of one light in a scene, because objects in the same segment must all have the same attributes. If we placed two lights in separate segments, so that we could change one light’s color, then each light would be at the root of a separate subtree, and thus would not illuminate the same scene.
Instead, it makes more sense to treat lights as geometry. Then, a light is part of the entire scene, rather than just a part of the segments underneath it in the tree. A light illuminates all other geometry in the same scene (that is, all geometry under the same driver-instance segment), whether it is placed in the root segment of the scene or is buried somewhere down in the depths of the scene tree. Thus, we can have multiple lights in the same scene, each with different attributes.
Light Attributes
The main attributes affecting lights are color and visibility. A light inherits its color just like any geometry. The “lightness” of the color controls the brightness of the light. For example, to set the color of a light to red, you can use
    HC_Open_Segment("");
    HC_Insert_Distant_Light(5.0, 5.0, -5.0);
    HC_Set_Color("lights=red");
    HC_Close_Segment();
If you want to create a scene with multiple lights of different colors, you must put the lights into separate segments, each with a different light color. Setting the light color affects only lights in the current segment or in its children (since the light color is inherited).
You can turn lights on and off by setting the visibility of lights on and off. In addition, turning off the visibility of light prevents lights elsewhere in the same scene from shining on any geometry in this part of the tree. For example, consider the segment tree in the following figure:
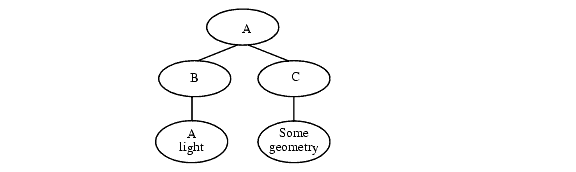
A graphics database containing a light.
If you issue the following command on segment B:
HC_Set_Visibility("lights=off");
…then you effectively turn off the light in B. But if you issue the same command on segment C, then you prevent the light in segment B from shining on the geometry in segment C. If you issue the following command on segment B,
HC_Set_Color("lights=red");
…you change the color of the light in B, and so affect the color of the light illuminating the geometry in segment C. But if you issue the same command on segment C, it has no effect on anything (unless there is a light in segment C).
Camera Relative Lights
When the camera changes, lights behave like any other piece of geometry. Their insertion point and direction are based on object-space coordinates, and those coordinates do not change when the camera changes. This means that if a light happens to be shining down the direction of the camera target vector, a highlight will be present on the ‘front’ of all visible geometry, and the highlight will move as the camera moves. Therefore, if the camera moves to the other side of the object, the object will be dark, since the camera is now viewing the ‘dark side of the moon’, so to speak.
It is frequently desirable to have the highlights remain visible on objects even as the camera moves. This of course can be controlled directly by the developer, by moving the lights of interest after the camera changes. However, this requires having special code that gets executed every time the camera changes. Instead of the developer manually moving the light, you can use a feature called ‘camera relative lights’. This is an option applied to lights which tell them to essentially ‘follow the camera’. Their position will automatically get updated as the current camera changes. This is enable by calling Set_Geometry_Options and attaching the “camera relative” option to the light geometry(s) of interest. For example, lets say we have a light referred to by the variable ‘light_key’. We would make it a camera relative light by calling:
HC_Set_Geometry_Options(light_key, "camera relative");

