The PMI Classes
Overview
The collection of PMI classes provided by HOOPS is meant to simplify managing PMI or GD&T data in a HOOPS scene graph. Classes are provided for inserting, modifying and querying datums, dimensions, feature control frames, notes and roughness features. There is also a facility for dealing with generic PMI, meant to allow managing GD&T which doesn’t conform to the any of the other types provided. Additionally, the PMI classes provide a means of creating views associated with PMI entities created via the classes.
Datum Entities
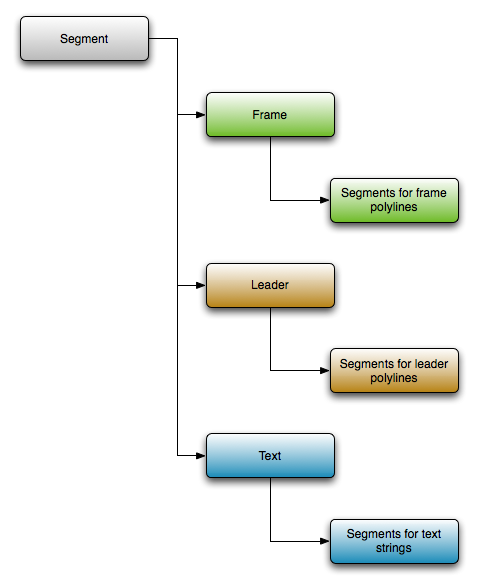
The PMI classes for the various entity types all work in fundamentally the same way. As a canonical example, we will demonstrate usingthe classes to create a datum identifier. All PMI entities require a segment key which will be used to hold the associated geometry andmetadata associated with that entity. The default constructors all use an INVALID_KEY as the segment key, and if an actual key is not providedduring construction then the classes will ignore any values set on them, since there is no place to store the data. When constructed witha valid segment key, the DatumEntity (or any other PMI entity) will create some or all of the following segment structure, depending onwhat values the user decides to set:
Once constructed, the user can proceed to call the appropriate functions to set up the DatumEntity for their dataset. To make this instancea datum identifier, they would need to call the SetDatumType function, construct a frame and pass it to SetFrame, create a polyline array andpass it to SetLeaderLines and create a String array and pass it to SetLabels. For example, this could be done like this:
HC_KEY datum_key = INVALID_KEY;

HC_Open_Segment_By_Key(m_pHView->GetModelKey());
{
        HC_Open_Segment("pmi_segment");
        {
                HC_Set_Heuristics("exclude bounding");
                HC_Set_Visibility("off");

                datum_key = HC_KCreate_Segment("datum_segment");
        }
        HC_Close_Segment();
}
HC_Close_Segment();

PMI::DatumEntity datum(datum_key);

datum.SetDatumType(PMI::Datum::Identifier);

PMI::String labels[1];
labels[0] = PMI::String("D");

PMI::TextAttributes label_attributes[1];
label_attributes[0].SetInsertionPoint(0, 0, 0);
label_attributes[0].SetFontSize(6);
label_attributes[0].SetFontName("TS3D");
label_attributes[0].SetRGBColor(1, 1, 1);

PMI::Orientation orientation;
orientation.SetXComponent(1, 0, 0);
orientation.SetYComponent(0, 1, 0);
orientation.SetZComponent(0, 0, 1);
orientation.SetOriginComponent(0, -20, 0);

label_attributes[0].SetOrientation(orientation);

datum.SetLabels(1, labels, label_attributes);

PMI::Point frame_points[] = { PMI::Point(-1, -22, 0), PMI::Point(7, -22, 0),
        PMI::Point(7, -12, 0), PMI::Point(-1, -12, 0), PMI::Point(-1, -22, 0) };
unsigned int n_frame_points = sizeof(frame_points) / sizeof(PMI::Point);

PMI::Polyline frame_polyline;
frame_polyline.SetPoints(n_frame_points, frame_points);
frame_polyline.SetRGBColor(1, 1, 1);

PMI::Frame frame;
frame.SetPolylines(1, &frame_polyline);

datum.SetFrame(frame);

PMI::Point leader_points_1[] = { PMI::Point(3, -12, 0), PMI::Point(3, -2, 0) };
unsigned int n_leader_points_1 = sizeof(leader_points_1) / sizeof(PMI::Point);

PMI::Point leader_points_2[] = { PMI::Point(5, -2, 0), PMI::Point(1, -2, 0),
        PMI::Point(3, -4, 0), PMI::Point(5, -2, 0) };
unsigned int n_leader_points_2 = sizeof(leader_points_2) / sizeof(PMI::Point);

PMI::Polyline leader_polylines[2];
leader_polylines[0].SetPoints(n_leader_points_1, leader_points_1);
leader_polylines[0].SetRGBColor(1, 1, 1);
leader_polylines[1].SetPoints(n_leader_points_2, leader_points_2);
leader_polylines[1].SetRGBColor(1, 1, 1);

datum.SetLeaderLines(2, leader_polylines);

HC_Open_Segment_By_Key(m_pHView->GetModelKey());
{
        HC_Set_Visibility("text, lines");
        HC_Include_Segment_By_Key(datum.GetSegmentKey());
}
HC_Close_Segment();
The above code will create a datum identifier that looks like this:

A majority of the other PMI entity classes (i.e., DimensionEntity, GenericEntity, NoteEntity, and RoughnessEntity) work in an analogous manner to the DatumEntity example above. The primary manner in which they differ is in allowing the user to set and get metadata specific to their particular entity type.
Feature Control Frame Entities
The FeatureControlFrameEntity works in basically the same way as the other entity classes, however due to the well-defined nature of feature control frame specification, the functions for creating a FCF are slightly different.
For example, a feature control frame could be create like this:
HC_KEY fcf_key = INVALID_KEY;

HC_Open_Segment_By_Key(m_pHView->GetModelKey());
{
        HC_Open_Segment("pmi_segment");
        {
                HC_Set_Heuristics("exclude bounding");
                HC_Set_Visibility("off");

                fcf_key = HC_KCreate_Segment("fcf_segment");
        }
        HC_Close_Segment();
}
HC_Close_Segment();

PMI::FeatureControlFrameEntity fcf(fcf_key);

PMI::TextAttributes text_attributes;
text_attributes.SetFontName("TS3D");
text_attributes.SetFontSize(6);
text_attributes.SetInsertionPoint(0, 0, 0);
text_attributes.SetRGBColor(1, 1, 1);

PMI::Orientation orientation;
orientation.SetOriginComponent(-72, 2, 0);
text_attributes.SetOrientation(orientation);

fcf.SetToleranceType(PMI::Tolerance::Cylindricity, text_attributes);

orientation.SetOriginComponent(-56, 2, 0);
text_attributes.SetOrientation(orientation);

fcf.SetDiameterModifierType(PMI::DiameterModifier::SphericalDiameter, text_attributes);

orientation.SetOriginComponent(-40, 2, 0);
text_attributes.SetOrientation(orientation);

fcf.SetZoneToleranceMagnitude(PMI::String("15.23"), text_attributes);

orientation.SetOriginComponent(-16, 2, 0);
text_attributes.SetOrientation(orientation);

fcf.SetFirstZoneModifierType(PMI::ZoneModifier::StatisticalTolerance, text_attributes);

orientation.SetOriginComponent(2, 2, 0);
text_attributes.SetOrientation(orientation);

fcf.SetSecondZoneModifierType(PMI::ZoneModifier::ProjectedToleranceZone, text_attributes);

orientation.SetOriginComponent(16, 2, 0);
text_attributes.SetOrientation(orientation);

fcf.SetProjectedMagnitude(PMI::String("2.13"), text_attributes);

PMI::String datum_labels[3] = { "A", "B", "E-F" };
PMI::DatumModifier::Type datum_modifiers[3] = { PMI::DatumModifier::MaximumMaterialCondition,
        PMI::DatumModifier::None, PMI::DatumModifier::RegardlessOfFeatureSize };

PMI::TextAttributes label_attributes[3] = { text_attributes, text_attributes, text_attributes };
PMI::TextAttributes modifier_attributes[3] = { text_attributes, text_attributes, text_attributes };

orientation.SetOriginComponent(40, 2, 0);
label_attributes[0].SetOrientation(orientation);
orientation.SetOriginComponent(48, 2, 0);
modifier_attributes[0].SetOrientation(orientation);

orientation.SetOriginComponent(64, 2, 0);
label_attributes[1].SetOrientation(orientation);
orientation.SetOriginComponent(0, 0, 0); // absence of anything to display for datum modifier means orientation is meaningless
modifier_attributes[1].SetOrientation(orientation);

orientation.SetOriginComponent(73, 2, 0);
label_attributes[2].SetOrientation(orientation);
orientation.SetOriginComponent(0, 0, 0); // absence of anything to display for datum modifier means orientation is meaningless
                                                                                 // however, metadata is still stored in the segment to note that the datum modifier
                                                                                 // is regardless of feature size
modifier_attributes[2].SetOrientation(orientation);

fcf.SetDatumReferences(3, datum_labels, label_attributes, datum_modifiers, modifier_attributes);

PMI::Frame frame;
PMI::Polyline frame_polylines[5];
PMI::Point frame_points[] = { PMI::Point(-74, 11, 0), PMI::Point(89, 11, 0),
        PMI::Point(89, -2, 0), PMI::Point(-74, -2, 0), PMI::Point(-74, 11, 0) };

frame_polylines[0].SetPoints(5, frame_points);
frame_polylines[0].SetRGBColor(1, 1, 1);

frame_points[0] = PMI::Point(-58, 11, 0);
frame_points[1] = PMI::Point(-58, -2, 0);

frame_polylines[1].SetPoints(2, frame_points);
frame_polylines[1].SetRGBColor(1, 1, 1);

frame_points[0] = PMI::Point(36, 11, 0);
frame_points[1] = PMI::Point(36, -2, 0);

frame_polylines[2].SetPoints(2, frame_points);
frame_polylines[2].SetRGBColor(1, 1, 1);

frame_points[0] = PMI::Point(62, 11, 0);
frame_points[1] = PMI::Point(62, -2, 0);

frame_polylines[3].SetPoints(2, frame_points);
frame_polylines[3].SetRGBColor(1, 1, 1);

frame_points[0] = PMI::Point(71, 11, 0);
frame_points[1] = PMI::Point(71, -2, 0);

frame_polylines[4].SetPoints(2, frame_points);
frame_polylines[4].SetRGBColor(1, 1, 1);

frame.SetPolylines(5, frame_polylines);

fcf.SetFrame(frame);

HC_Open_Segment_By_Key(m_pHView->GetModelKey());
{
        HC_Set_Visibility("text, lines");
        HC_Include_Segment_By_Key(fcf.GetSegmentKey());
}
HC_Close_Segment();
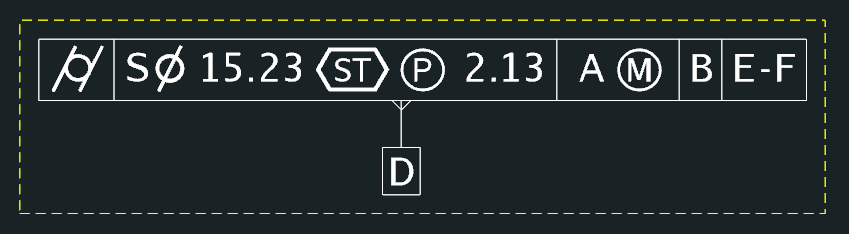
The above code will create a feature control frame which looks like this:

This example demonstrates using all of the various components of the FeatureControlFrameEntity class, however the user can elect to only set those portions of the feature control frame which are needed for their application.
View Entities
Views represent a collection of PMI entities which have an optionally associated camera, name and frame. They are designed to work in conjunction with PMI entities created by the other PMI classes.
For example, if you wanted to create a view associated with the DatumEntity and FeatureControlFrameEntity created in the previous sections, you could do something like this:
HC_KEY view_key = INVALID_KEY;

HC_Open_Segment_By_Key(m_pHView->GetModelKey());
{
        HC_Set_Visibility("text, lines");
        view_key = HC_KCreate_Segment("view_segment");
}
HC_Close_Segment();

PMI::ViewEntity view(view_key);

view.SetName(PMI::String("View Sample"));

PMI::Point cam_pos(8.043264f, -1.880911f, 457.188080f);
PMI::Point cam_tar(8.043264f, -1.880911f, 0.0f);
PMI::Point cam_upv(0.0f, 1.0f, 0.0f);
float cam_f_w = 129.312317f;
float cam_f_h = 129.312317f;

view.SetCamera(cam_pos, cam_tar, cam_upv, cam_f_w, cam_f_h, "orthographic");

PMI::Polyline frame_polyline;
PMI::Point points[] = { PMI::Point(-78, -26, 0), PMI::Point(93, -26, 0),
        PMI::Point(93, 15, 0), PMI::Point(-78, 15, 0), PMI::Point(-78, -26, 0) };
unsigned int n_points = sizeof(points) / sizeof(PMI::Point);

frame_polyline.SetPoints(n_points, points);
frame_polyline.SetRGBColor(1, 1, 0);
frame_polyline.SetLinePattern("- -");

PMI::Frame frame;
frame.SetPolylines(1, &frame_polyline);

view.SetFrame(frame);

PMI::Entity entities[2] = { datum, fcf };

view.SetAssociatedEntities(2, entities);
The above code will create a view that looks like this:
Restoring Entities
Since the PMI classes store all geometry and metadata in the HOOPS scene graph, if you want to re-create an entity instance from an existing segment (for instance, after the original instance fell out of scope, or on importing a scene graph which contains PMI entities), you need to look for the presence of a user option in the segment originally passed in when creating a piece of PMI. Using this, you can determine the type of PMI entity originally created and create an appropriate object which will then allow you to set or get the relevant data for that piece of PMI.
For example, the logic for making this determination might look like this:
HC_KEY key = /* segment key representing potential PMI segment */;

PMI::Entity * entity = 0;
HC_Open_Segment_By_Key(key);
{
        if (HC_Show_Existence("user options = pmi_type"))
        {
                char type[64] = { "" };

                HC_Show_One_User_Option("pmi_type", type);

                if (streq(type, "datum"))
                        entity = new PMI::DatumEntity(key);
                else if (streq(type, "dimension"))
                        entity = new PMI::DimensionEntity(key);
                else if (streq(type, "fcf"))
                        entity = new PMI::FeatureControlFrameEntity(key);
                else if (streq(type, "generic"))
                        entity = new PMI::GenericEntity(key);
                else if (streq(type, "note"))
                        entity = new PMI::NoteEntity(key);
                else if (streq(type, "roughness"))
                        entity = new PMI::RoughnessEntity(key);
                else
                        assert(0);
        }
}
HC_Close_Segment();

/* perform necessary operations with the entity */

delete entity;
Deleting Entities
In the event you want to delete portions of an existing PMI entity, this is done by setting those components with the appropriate unknown or empty values.
For example, if we wanted to unset the tolerance type, projected magnitude and datum references for the feature control frame created earlier, we would do this:
PMI::TextAttributes dummy_text_attributes;

fcf.SetToleranceType(PMI::Tolerance::Unknown, dummy_text_attributes);
fcf.SetZoneToleranceMagnitude("", dummy_text_attributes);
fcf.SetDatumReferences(0, 0, 0, 0, 0);
The above code would result in a feature control frame which looks like this:

In the event you want to delete the entire piece of PMI, in addition to deleting the entity instance (or having it fall out of scope) you should delete the segment used to create the entity. Once this segment is deleted, any entity which references that segment key will no longer function, and result in errors getting generated by HOOPS if you do try to set any values on it. If you don’t delete the segment, even if the instance gets destructed, the geometry will remain in the scene graph.

