Color
Color has many different uses in computer graphics. For example, some applications use smooth shading to display pseudo-realistic scenes containing continuous color; other applications use a few discrete colors just to distinguish objects or for highlighting. Many applications, of course, use some amount of both.
Computer graphics hardware varies widely in how it supports color, all the way from devices (such as printers) that support only black and white (but at high resolution), through gray-scale devices, through 8-bit frame buffers that can display 256 colors at a time, all the way to full-color frame buffers that support 24 or even 32 bits of color per pixel. In addition, different operating systems and window systems support different methods of color specification.
Although HOOPS/3dGS provides default values for color, normally you will want to change some of the defaults. For example, the default color for all kinds of geometry (including text, lines, polygons, meshes, and shells) is black. Although this default may be suitable for text and lines, for polygons you will normally want some color, and for meshes and shells you probably will want not only some color, but also lights illuminating the colored surfaces.
Managing Resources
HOOPS distinguishes between physical and logical (virtual) resources. For example, a hardware color map on an 8-bit frame buffer is a physical (in this case hardware) resource that may or may not be accessible to the programmer. HOOPS also provides color maps (through the Set_Color_Map command), but it is important to realize that HOOPS color maps are completely distinct from physical color maps. In particular, it is perfectly reasonable to use a HOOPS color map on a graphics device that has no hardware color map (such as a 24-bit-per-pixel frame buffer).
Colors in HOOPS are logical resources. For example, consider an application that sets the color of an object to “dark red”. The same application can be run on many different physical platforms. On a platform that supports 24 bits of color per pixel, the color “dark red” will be drawn directly. On a computer that supports 8 bits of color per pixel with a hardware color map, the color “dark red” might be allocated to physical slot 42 in the color map, and the object set to color 42. Alternatively (on the same 8-bit hardware), the system might draw the color “dark red” by dithering between red and black pixels. HOOPS will even draw the color “dark red” on a black-and-white device, such as a laser printer (although it will draw the color as dark gray).
Color Specification
HOOPS supports several different methods of specifying colors. As an application writer, you can choose the method that is most appropriate to your application, or you can give the choice to the user of your application. Colors in HOOPS are specified by name, value, index, or fractional index.
Different kinds of geometry can have different color attributes, even if they are in the same segment. For example, the following command sets the text color to brown, and the line color to red:
HC_Set_Color("text=brown, lines=red");
You can set separate color attributes on edges, faces, markers, lines (including polylines), text, and lights. You can also set a face-contrast color, which is used for patterned faces of polygons (see the Set_Face_Pattern command). In addition, you can set color attributes on windows (used as the background color for the window) and window contrast (used for the window frame and any window-background pattern). See the Set_Color command for more information.
If you do not specify the kind of geometry, then HOOPS sets the color on all kinds of geometry. For example, the following three commands are equivalent:
    HC_Set_Color("red");
    HC_Set_Color("geometry = red");
    HC_Set_Color("faces=edges=markers=lines=text=red");
Color by Value
Often, it is impractical to set a color using a color name. For example, if an application lets the user choose a color by moving three sliders, we would like to be able to set the resulting color by specifying three numeric values. There are two ways to specify a color numerically in HOOPS: via Set_Color with a text string containing the numbers, or via Set_Color_By_Value. You can set a color by value using the ::Set_Color command by formatting the numeric value into a string. For example, the following three commands are equivalent:
    HC_Set_Color("red");
    HC_Set_Color("R=1.0 G=0.0 B=0.0");
    HC_Set_Color("H=0.0 I=0.5 C=1.0");
You can also set colors using HLS and HSV space in the same way. If you want to avoid formatting the color into a string, you can use the ::Set_Color_By_Value command:
HC_Set_Color_By_Value("", "HIC", 0.0, 0.5, 1.0);
The second argument defines the color space in which the three numeric arguments are defined. Valid spaces are RGB, HLS, HSV, and HIC.
The first argument allows you to specify on what kind of geometry the color is to be set. If it is left blank, as it is in the example of Set_Color_By_Value, then the color is set on all geometry.
Alternatively, colors can be set on a single kind of geometry. For example, the following two commands are identical:
    HC_Set_Color("lines=red");
    HC_Set_Color_By_Value("lines", "RGB", 1.0, 0.0, 0.0);
One limitation of the Set_Color_By_Value command is that you cannot set material properties such as specular color, transmission, or gloss color. To do that, you must format the color as a string and use the Set_Color command - for example,
HC_Set_Color("specular = (R=0.8 G=0.9 B=0.5)");
Note that the parentheses around the color specification are optional. For more information, see the Set_Color command in the HOOPS/3dGS Reference Manual.
Color by Index
A color index is an index into a HOOPS color map. To set colors by index, you first need to create a color map, using the Set_Color_Map command. Note that HOOPS treats a color map as an attribute. Thus, color maps inherit (just like any attribute), and different segments can have different color-map attributes associated with them.
A color map is just an array of colors. The first color in the array has index 0. You can specify the colors in a color map by name, using the Set_Color_Map command, or by value, using the Set_Color_Map_By_Value command. Once a color-map attribute has been set on a segment (or inherited from a parent), you can specify colors by index - for example,
    HC_Set_Color_Map("red, blue, green, white, black");
    HC_Set_Color_By_Index("lines", 0);
These two commands set the line color to be the color at index 0, which is red in the color map.
Setting color by index through a color map is useful in a few situations: for setting colors by object type, for specifying images, and for sharing colors between windows.
You can use a color map to set colors by object. For example, a window system could define the window frames to be color 0, the window background color to be color 1, and the text to be color 2. This arrangement allows you to change the color scheme by loading a new color map.
A more common use for color maps is for the definition of images, with the Insert_Image command. Colors in an image can be specified as 8 or 16 bit numbers, which are indices into the current color map. (Images can also be specified with RGB colors, which do not use a color map). Color maps can also be used to define the colors in texture maps. See the Insert_Image and Define_Texture commands in the HOOPS/3dGS Reference Manual for more information.
A more subtle use of color maps is to allow two application windows to share colors, and thus to avoid color flashing on platforms with a limited number of total colors. For example, on a system with an 8-bit frame buffer, there are only 256 colors available. In HOOPS, colors are allocated by the driver, so, if your application creates two application windows by creating two driver instances, each driver instance will try to allocate colors in the hardware color map. If each window contains a scene that uses more than 128 colors, then the window system will need to switch between color maps when the input focus changes from one window to the other. This switch will cause the colors to be wrong in the window that is out of focus. You can avoid this problem by using the same color map for both windows (by setting the color-map attribute on the driver that is the parent of both driver instances, or on the root segment), and then assigning colors to the scene from the color map (using Set_Color_By_Index). See this section for more information.
Using color maps can limit the range of color available in your scene. However, HOOPS offers a simple option to increase flexibility. In defining a color map, an index value can be set to “*”. When referenced, this entry’s value in color map will then be inherited from the segment in which the geometry resides. In the sample code below, we use this feature in the color map to create the flags of Italy and France in our scene.
    HC_Open_Segment_By_Key(model_key);

    // Creating a color map with a flexible value in the first entry
    HC_Set_Color_Map("*, white, red");

    HC_Open_Segment("");
    // Creating a shell that is a rectangle with three vertical partitions
    int pcount, flist_count;
    pcount = 8;
    flist_count = 15;
    HPoint pts[8];
    int faces[15] = {4, 0, 1, 6, 7, 4, 1, 2, 5, 6, 4, 2, 3, 4, 5};

    pts[0].Set(0, 0, 0);
    pts[1].Set(1, 0, 0);
    pts[2].Set(2, 0, 0);
    pts[3].Set(3, 0, 0);
    pts[4].Set(3, 2, 0);
    pts[5].Set(2, 2, 0);
    pts[6].Set(1, 2, 0);
    pts[7].Set(0, 2, 0);

    HC_KEY shell_key = HC_KInsert_Shell(pcount, pts, flist_count, faces);

    // We set the local color to be blue
    HC_Set_Color("faces=blue");
    HC_Open_Geometry(shell_key);
    for (int i = 0; i < 3; i++) {
        HC_Open_Face(i);
        // when the face color is set the wild card entry in the color map,
        // it will render the first partition in blue creating the flag of France.
        HC_Set_Color_By_Index("faces", i);
        HC_Close_Face();
    }
    HC_Close_Geometry();

    HC_Open_Segment("");
    // We use the same shell by referencing it
    HC_Reference_Geometry_By_Key(shell_key);
    // By setting the local color to green, we override what is inherited
    // Thus rendering the flag of Italy
    HC_Set_Color("faces=green");
    HC_Translate_Object(-5, -5, 0);
    HC_Close_Segment();

    HC_Close_Segment();
    HC_Close_Segment();
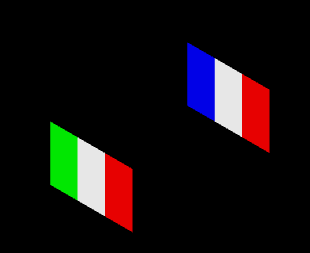
This image shows how the use of * in as color map entry can render the flags of Italy and France as described in the sample code above.
Color by Fractional Index
You need to set colors by fractional index in only a few situations. The most common use for fractional color indices is for false-color images. For example, consider a map where you want to false color the map based on elevation. The lowest elevations (between 0 and 4000 feet) will be green, gradually changing to brown (4000 to 8000 feet), then white at the highest elevations (greater than 8000 feet). To color the map, we create a color map with the desired colors:
HC_Set_Color_Map("green, brown, white");
In this color map, green is color 0, brown is color 1, and white is color 2. You can use a fractional index to interpolate colors between the colors in the color map. For example, the color with index 1.5 is a mixture of brown and white.
Assuming that the map is a mesh, you can set colors on the mesh vertices by opening the mesh (via Open_Mesh), opening the vertex on which you want to set a color (via Open_Vertex), and then setting the color on the vertex via Set_Color_By_FIndex. The Set_Color_By_FIndex command takes a floating-point value for the index.
HC_Set_Color_By_FIndex("faces", elevation / 4000.0);
For convenience, you can use the MSet_Vertex_Colors_By_FIndex command to set multiple vertex colors with a single command.
To produce a contour plot - where the colors change abruptly, rather than gradually, between elevations - you can turn off the “color interpolation” rendering option. See the HOOPS/3dGS Reference Manual entries for the “color interpolation” and “color index interpolation” rendering options, under Set_Rendering_Options, and the Set_Color_By_FIndex command, for more information.
Color by Name
Possibly the most intuitive way to specify a color in HOOPS is by name. For example, the following are valid HOOPS color specifications:
    HC_Set_Color("green");
    HC_Set_Color("brownish red");
    HC_Set_Color("light lavender-mulberry");
The set of valid color names and their numeric definitions are specified in the chapter on system start-up.
You can mix two colors by specifying their names separated by a hyphen (as in “lavender-mulberry”). Colors are mixed in hue, intensity, chromaticity (HIC) space; thus, HOOPS mixes “blue-green” by averaging 240, 0.5, 1.0 and 120, 0.5, 1.0, giving 180, 0.5, 1.0 (which is the same as cyan).
Averaging in HIC color space is complicated by the fact that hue values are modulo 360 (the hue 360 is the same as the hue 0). The average value of two hues is found in the most reasonable way, so that the average of the hue values 10 and 350 is 0, rather than 180.
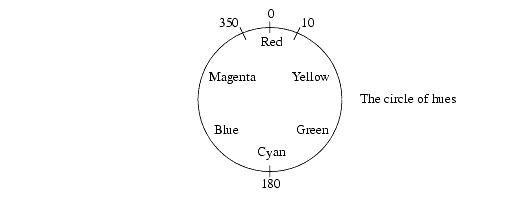
Color mixing of hues.
Note that, if two colors to be averaged are complimentary (are on opposite sides of the color circle - such as red and cyan, or blue and yellow), then there are two possible hues that are halfway in-between them; HOOPS is free to pick either one.
HOOPS uses the HIC color space to mix colors for two reasons. First, we want to mix colors in a hue-based space (rather than RGB or CMY), so that we mix the hues by averaging their values (in degrees), rather than by averaging three primaries. Thus, when two fully saturated colors are mixed, the resulting color is also fully saturated (mixing in RGB space would tend to produce muddy colors). Second, of the possible hue-based color spaces, HIC is the only one where the maximum permissible value for saturation does not depend on either the lightness (as it does in HLS) or value (as it does in HSV).
Mixing two colors by separating them using a hyphen combines them evenly (50-50). For example, the color “black-white” is gray. HOOPS also allows you to mix colors in other proportions, by using “-er” and “-ish” forms. For example, the color “greener blue” is 35-percent green and 65-percent blue, and “greenish blue” is 20-percent green and 80-percent blue. The legal “-er” and “-ish” colors are defined in the chapter on system start-up in the HOOPS/3dGS Reference Manual.
Use of white and black to modify other colors is so common that, in addition to the “-er” forms “whiter” and “blacker” and the “-ish” forms “whitish” and “blackish”, there are several synonyms. For example, instead of “blacker” you can use “dimmer”, “dim”, “darker”, or “dark”; instead of “whiter” you can use “brighter”, “bright”, “lighter”, or “light”.
Complex color names are parsed from right to left. Thus, the name “light lavender-mulberry” is a whiter form of lavender-mulberry (rather than light lavender mixed with mulberry). Color descriptions can be as complex as you like.
To mix two colors evenly, you separate them with a hyphen; if you leave out the hyphen, the left color completely replaces the right color (and HOOPS issues a warning message). For example, the color “white gold” is white, and “red mahogany” is red. Mixing two colors in this way (without a hyphen) is useful when you are mixing user-defined color names that specify only certain material properties.
Note that many colors (approximately one-half of them) have two words in their name (for example, colors such as “burnt sienna”, “lemon yellow”, “moose brown”, and “jungle green”), but there are also many colors that appear to be mixtures (for example, “blue green”, “orange yellow”, “red violet”, and “green yellow”). These colors are considered to be single colors, rather than mixtures. These two-word color names can be confusing, because separating two color names without a hyphen will cause an error if the resulting color name is not one of the standard Crayola colors. All the legal color names are defined in the chapter on system-startup in the HOOPS/3dGS Reference Manual.
You can add new color names to the names that HOOPS knows (including new “-er” and “-ish” forms) using the Define_Color_Name command. You can also change the definitions of existing color names.
Material Properties
So far we have treated color as a single quantity. However, the perceived color of an object is determined by a complex interaction between the object’s material and one or more light sources. In HOOPS Visualize, color is made up of “four material properties”, called “diffuse”, “specular”, “gloss”, and “emission”. When lights are present in a scene, Visualize computes the appearance of each pixel in an object as a function of these four properties and the light sources (including the ambient light).
The diffuse color of an object is the color that the object appears to have when illuminated with a soft, diffuse light. The diffuse color of an object is what we normally think of as the object’s color. The default diffuse color is black. The following command sets the “diffuse color” of the faces in a segment to blue:
HC_Set_Color("faces = (diffuse=blue)");
The specular color of an object is the color of any shiny reflections from a light source. The default specular color is white. The following command sets the diffuse color of the faces to red, and the ref Set_Color_faces_specular “specular color” to pink:
HC_Set_Color("faces = (diffuse=red, specular=pink)");
The gloss of an object is a single numeric value that represents how shiny or polished the object is. Gloss affects the size and brightness of the specular reflection. Normally, gloss varies from 1.0 to 30.0, with 30.0 being an especially shiny surface with a small bright specular highlight. The default value for gloss is 5.0. The following command raises the ref Set_Color_faces_gloss “glossiness” of the faces, but lowers the intensity of the specular reflection:
HC_Set_Color("faces = (gloss=20, specular=gray)");
The “transmission” color is the color of the light passing through an object. The default value for transmission is black, which describes a completely opaque object; a value of white would be a completely transparent object. Other colors are possible; for example, a transmission color of red describes an object that is transparent to red light, but is opaque to green and blue light.
Material properties in HOOPS apply to only surfaces (such as meshes, shells and NURBS surfaces). If a material is applied to an object other than a surface (such as lines, markers, or text), only the diffuse component is used. The only exception to this rule is that the edges and markers of a shell or a mesh are affected by the full material properties set on the shell or mesh. The edges and markers of a shell or mesh use the same material properties as the faces, however.
Also note that there are no solid objects in HOOPS (a solid object such as a cube is represented by its boundary surfaces), so the transmission color modifies the light passing through a surface, rather than through a solid object, as you might expect.
Default Material Properties
When you set the color of an object as a single component, you are setting the diffuse component of the color. Therefore, the following two commands are equivalent:
    HC_Set_Color("faces=blue");
    HC_Set_Color("faces = (diffuse=blue)");
When you set only the diffuse material property, then the other three components, since they have not been set, inherit (like any attribute) from the parent segment.
Named Materials
The Define_Color_Name command can be used to give names to colors, and, because a color can contain material properties, so can a defined color name. For example,
    HC_Define_Color_Name("shiny brass", "", "", "diffuse=orange, specular=yellow, gloss=10");
    HC_Set_Color("shiny brass");

    HC_Define_Color_Name("plastic", "plasticer", "plasticish", "diffuse=white, specular=white");
Color names for materials can be mixed, just like any other color names. For example, if you separate two names with a hyphen, they are mixed 50-50. Mixing is done on a component-by-component basis, and only those components that the two names have in common are mixed. For example, “plasticish shiny brass” mixes the diffuse and specular colors, but leaves alone the gloss value of shiny brass.
Recall that, when you separate two color names with a space, the left color completely replaces the right color. This rule for combining colors is not particularly useful for simple colors; for materials, however, you can use this rule to replace individual components. For example, consider the following definition for the color “water”:
HC_Define_Color_Name("water", "watery", "wet", "diffuse=light blue, transmission=blue");
The color “green water” replaces the diffuse component of water with green, but leaves the transmission component of water alone (the specular and gloss components are inherited). As another example, the following definition of “clear” has only a transmission component:
HC_Define_Color_Name("clear", "clearer", "clearish", "transmission=white");
The color “clear shiny brass” replaces the transmission component of “shiny brass” with the transmission component from “clear”, leaving alone the diffuse, specular, and gloss components.
Set_Explicit_Color
Set_Color allows users to specify a variety of color and texture information. However, in some cases, the Set_Color API can create some cumbersome strings. For instance, when dealing with textures which are modulating underlying colors, the strings are often unwieldy and can even be ambiguous. To set complex color and texture information use Set_Explicit_Color. Instead of using the syntax described in Set_Color, users can explicitly specify color attenuation and texture information for geometry and individual channels and sub-channels separately.
For example, the following two lines of code sets the faces in the current segment to red by a simple called to Set_Explicit_Color. Note that there is no string formatting required.
    float rgb100[3] = {1, 0, 0};
    HC_Set_Explicit_Color("faces", "diffuse", rgb100, "", "");
Set_Explicit_Color can set a variety of color and texture information for the specified geometry like Set_Color. For example, the code sample below sets the faces of the current segment to red and assigns the texture, BrickPat, as well.
    HC_Define_Local_Texture("BrickPat", "source = brick, parameterization source = natural");
    HC_Set_Explicit_Color("faces", "diffuse", rgb100, "BrickPat", "");
A variety of channels can be manipulated using Set_Explicit_Color including material properties like specular, gloss and transmission. In the following example, the sample code sets the specular color for faces to green.
    float rgb010[3] = {0, 1, 0};
    HC_Set_Explicit_Color("faces", "specular", rgb010, "", "");
This function can also set environment mapping options for faces. For example, the following code sample sets a sphere’s color to blue, it’s environment to the sphere_bar texture and then sets the mirror color to gray.
    float rgb5[3] = {0.5f, 0.5f, 0.5f};
    HC_Set_Explicit_Color("faces", "diffuse color", rgb5, "", "");
    HC_Set_Explicit_Color("faces", "environment", "", "sphere_bar", "");
    HC_Set_Explicit_Color("faces", "mirror", rgb5, "", "");
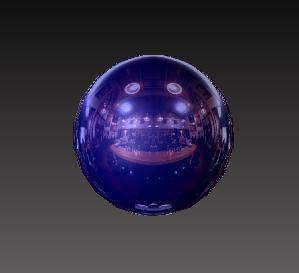
The effects of setting the environment and mirror values on a sphere.
In HOOPS, faces can have multiple textures layered on top of one another. Each layer can also have a color property. In the following example, Set_Explicit_Color can be used to create two subchannels that are layered onto a sphere. In the first subchannel which is identified as “diffuse=0”, the Set_Explicit_Color function sets a brick texture and assigns a green color to it. On top of that layer is a second channel identified as “diffuse=1”. The Set_Explicit_Color function assigns the WickerDecal texture to this subchannel along with the color red.
    HC_Define_Local_Texture("WickerDecal", "source = wicker, parameterization source=world, decal");
    HC_Set_Explicit_Color("faces", "diffuse=0", rgb010, "BrickPat", "");
    HC_Set_Explicit_Color("faces", "diffuse=1", rgb100, "WickerDecal", "");
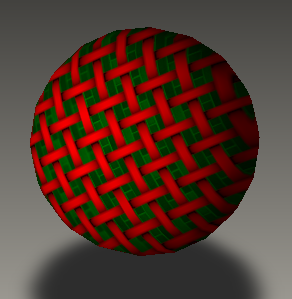
The effects of assigning multiple textures faces.
Mapped Color
Most of the issues encountered when dealing with color occur when colors are a scarce resource. When you have a 24-bit frame buffer, colors are free and plentiful, so you can set any object to any color, and you can do lighting and smooth shading without concern. When you have an 8-bit frame buffer with a color map, however, your hardware can display only 256 colors at a time. Furthermore, window systems allow more than one application to be active at a time, so your application probably will be competing with other applications for the hardware color map. Even if yours is the only application running, the window system usually allocates a few dozen colors, so your application will typically have somewhat less than 256 colors with which to play.
Regular Colors versus Fixed Colors
There are two ways that HOOPS allocates colors in the hardware color map in a mapped-color system. HOOPS calls these regular-color and fixed-color allocation, for historical reasons.
Regular Colors
Regular colors are colors that are created directly from a HOOPS color attribute. For example, if you set the color attribute of a segment to red, and that color is used directly to color an object in the scene, then the color red is a regular color. Regular colors are allocated dynamically in the hardware color map. Each time that HOOPS is about to update the display, it makes a pass through the graphics database and determines all the regular colors that it needs to allocate in the hardware color map.
For example, if you draw a pie chart that contains black lines and pie segments that are red, blue, orange, and green, all on a white background, then HOOPS will allocate six colors in the hardware color map. If you then add a magenta pie segment to the pie chart and update the display, HOOPS will allocate an additional slot in the hardware color map for magenta.
When regular colors are used, there is a one-to-one correspondence between each unique color in your scene and the colors allocated in the hardware color map. The allocation in the color map can change for each update of the display.
The advantage of regular color allocation is that colors are represented accurately. The disadvantage is that each unique color uses a slot in the color map. If your scene contains more regular colors than there are slots available in the hardware color map, HOOPS will signal an error.
Fixed Colors
Fixed colors are used by colors that do not correspond to specific color attributes in the graphics database. For example, if lighting is enabled (because a light was inserted into the graphics database), then the color of a face is determined both by what the face’s color attribute is, and by how much light falls on the face from the light source. Thus, a scene might contain many objects that have the same color attribute, but that are rendered using different colors.
Consider a simple scene containing a red cube that is lit by a single light. If a face is lit directly by the light source (or has a specular reflection, as when Phong lighting is used), then the face will be light red in color, whereas faces that are facing away from the light will be a much darker red. If Gouraud shading (color interpolation) is enabled, then each face of the cube will be smoothly shaded, requiring hundreds or even thousands of colors.
When lighting or smooth shading is enabled, there is no way for HOOPS to know what colors are needed in advance, so, instead of allocating colors dynamically (as it does for regular colors), HOOPS allocates a fixed set of colors in the color map, with the colors spread out evenly in color space. For example, HOOPS might allocate 125 slots in the hardware color map, and assign colors to the slots to create a color cube with five shades for each of the red, green, and blue axes.
For each color to be displayed, the closest color in the fixed color map is found. Of course, the closest color in the color map might not be particularly close, since we are using 125 colors to draw a palette of over 16 million colors. HOOPS uses dithering to reduce these color errors.
The advantages of fixed color allocation are that any color can be drawn, and that the color map is allocated statically (the number of colors that HOOPS allocates in the hardware color map does not depend on the number of color attributes in the database). The disadvantages are that colors are not drawn accurately, and that dithering is required.
Regular Color Allocation in the Color Map
As we stated earlier, in a mapped color system, ‘regular’ colors are allocated dynamically, each time that the display is updated. Thus, the number of regular colors allocated in the color map can change from one display update to the next. If a scene contains more regular colors than there are available slots in the hardware color map, HOOPS will signal an error.
There are several ways that you can affect the number of slots available for regular colors. If your scene requires a fixed color map, then you can control the number of slots taken up using the “fixed colors” driver option. By making the fixed color map small, you can free up more slots for regular colors.
A second way that you can control the number of slots taken up by regular colors is through the use of the “color consolidation” driver option. At update time, HOOPS makes a pass through the database to determine how many color slots to allocate in the hardware color map for regular colors. If two colors are relatively close together, then HOOPS can consolidate them into a single color. By default, HOOPS consolidates colors that differ by less than one part in 64 in red, green, and blue. You can make this number either larger or smaller. For more information, see the “color consolidation” driver option in Set_Driver_Options.
Note that, if you turn off color consolidation (by setting the “no color consolidation” driver option), then colors will share color-map entries only when they are exactly equal. Determining whether two colors are equal can be complicated by the fact that HOOPS uses floating-point numbers to specify colors, and system color-maps entries contain integers. If you are not careful, then two colors that appear to be equal might be allocated separate slots in the color map, because of the inaccuracies of floating-point arithmetic.
A third way to control the allocation of colors is through the use of the “number of colors” driver option. Normally, you use this option to restrain HOOPS to using fewer colors than it normally would. This option is useful if your application wants to allocate colors in the color map other than the ones used by HOOPS. HOOPS will signal an error if the number of fixed and regular colors exceeds the value that you set using the “number of colors” driver option.
Also useful is the “first color” driver option, which tells HOOPS not to use a specified number of slots in the color table. See the Set_Driver_Options command for more information.
HOOPS has a problem that can affect the allocation of hardware color-map slots. HOOPS determines the number of regular colors to allocate during a pass through the database at update time. HOOPS is smart about this allocation - for example, only color attributes that affect visible objects are allocated.
There is one case, however, when a color slot can get allocated for a regular color that is never actually used to draw anything. This problem occurs if a color attribute is set on a segment, and that color affects only objects that HOOPS draws using the fixed color map (such as objects that your application draws using lighting, smooth shading, or color interpolation). For example, if you draw a lit red cube, by setting the red color attribute on the segment containing the cube, a (single) slot in the hardware color map will be allocated for the color “red”, even though that color is not used (because HOOPS will draw the lighted faces using the fixed color map). Currently, the only way to work around this problem is to set the colors on the individual vertices of a shell or mesh (rather than as color attributes on an entire segment).
The “Use Color Map ID” Driver Option
Even if the hardware color map does not run out of available slots, there is another problem that can be visually disconcerting to the users of an application. When your user is running a window system that allows more than one application to run at a time, the running applications compete for system resources, including the hardware color map. For example, say that the user is running two separate HOOPS applications. Both applications are allocating slots in the hardware color map. If the total number of colors allocated by both applications, plus any colors used by the operating (or window) system, is less than the total number of slots in the hardware color map, then both applications can share the same hardware color map. But if both applications allocate more than one-half of the available slots, the operating system will respond by swapping hardware color maps when you switch from one application to the other. Unfortunately, whichever application does not have the input focus (is not running in the foreground) will have its colors drawn incorrectly. Although this color flashing is not fatal, it can be disconcerting and annoying to the user. Thus, it is to your advantage as an application programmer to treat color-map entries as a scarce resource, and to allocate as few as possible.
Note that, even if you are running only a single HOOPS application, if that application creates more than one driver instance (output window), then these driver instances will compete for hardware color-map slots. In this case, there is another way to reduce the number of color-map slots allocated. As we discussed in earlier, you can set a HOOPS color map above the two driver instances in the segment tree, and then use Set_Color_By_Index to set regular colors. This trick enables the two driver instances to share colors, and avoids competition for hardware color-map slots.
Alternatively, for applications that create more than one output window containing HOOPS output, you can use the “use colormap ID” driver option to share color maps between the windows. Normally, separate driver instances allocate their own color maps, and compete with each other for color-map slots. When you use the “use colormap ID” driver option, you take total control of and responsibility for the color map. Details of how to allocate color maps vary from platform to platform. The HOOPS/3dGS Platform and Device Guide contains more information about the use of the “use colormap ID” driver option.
When you allocate regular colors out of a shared HOOPS color map in two separate driver instances, the operating system switches the hardware color map when you change focus from one window to another, but, since both windows use the same colors, allocated in the same positions in the hardware color map, the user will not notice the switch.
Color Tweaking
HOOPS has several defaults that it uses to display colors. In some cases, however, these defaults do not result in the best color rendition. The following subsections cover defaults that you might want to override to get better looking color output.
Gamma Correction
Gamma correction is the process of correcting for non-linearities in CRT displays. Without gamma correction, colors can look too dark. HOOPS, by default, does gamma correction on the colors in a scene before it displays them. Recently, however, many graphics cards have begun doing gamma correction in hardware, so gamma correction might be applied twice, which would make the colors look washed out. You can turn off HOOPS gamma correction using the “no gamma correction” driver option. See the ::Set_Driver_Options command for more information.
To determine whether your graphics card does gamma correction, look for a system utility routine that allows you to adjust the gamma correction of the monitor. Lacking that, look in the documentation for the graphics card. If all else fails, draw a scene using HOOPS, and then draw it with HOOPS gamma correction off, and see which looks better.
Ambient Light
Ambient light is a constant amount of light that illuminates everything in a scene. Its main purpose is make sure that objects that are facing away from any light source are not completely dark. The default value for the ambient light is “dark gray” (R = 0.325, G = 0.325, B = 0.325). This value is fairly light, but it was chosen such that scenes would not be overly dark when a single light source is used. Unfortunately, this value can result in washed-out colors. If you are lighting a scene using multiple light sources, or want a darker look, you will want to reduce the amount of ambient light in your scene.
Ambient light is normally set at the window level, with the ::Set_Color command. The following command reduces the amount of ambient light:
HC_QSet_Color("?Picture", "ambient light = (H=0, S=0, V=0.1)");
Note that ambient lighting applies only when there is at least one light source in your scene.
Light Scaling
When a scene contains lights, the color of each object in the scene is a function of the light falling on that object from each light source. The light from each light source is additive, which can cause a problem if there is more than one light source in a scene. Consider a scene containing a single gray polygon. If this polygon is illuminated by a single white light source that is directly in front of it, it will be rendered correctly as medium gray. If an additional white light source is added that also illuminates the polygon, the two light sources add, and the polygon will be rendered as white (or close to white). If a third light source is added (which also illuminates the polygon), then the polygon will have an intensity of 1.5, which will get clipped down to 1.0.
To avoid this problem, HOOPS scales the color values in a scene depending on the number of light sources. For example, if a scene contains three light sources, HOOPS would scale all colors by one-third. Thus, our polygon, which had an intensity value of 1.5 when illuminated by three lights, will be scaled to 0.5 (which is medium gray).
The algorithm that HOOPS uses for light scaling is slightly more complicated, because it takes into account the color of the lights. The RGB values of all lights in a scene are added together, and whichever of R, G, or B is greater is used as the scale value. Thus, if you have three lights - one red, one blue, and one green - the scale factor will only be 1.0, instead of 3.0. In addition, HOOPS treats the value for ambient light as a light source in this calculation.
Light scaling in HOOPS minimizes the clipping of color values, even in worst-case scenes. In most scenes that contain multiple light sources, however, objects are not illuminated by all light sources in the scene. Consider a scene containing a cube and six distant lights, each light shining directly at one face of the cube. Even though there are six lights, no face of the cube will be illuminated by more than one light at the same time. In this case, the HOOPS value for light scaling will be excessive, and the scene will appear too dark.
Or consider a scene with 20 narrow-beam spot lights, each of which is aimed at a separate object (like those in an art gallery). In this case, the colors in the scene will be scaled by 0.05, and, since no object is illuminated by more than one light, no object can be brighter than 0.05, resulting in an almost completely black scene.
The only way to avoid this problem is to set the value for light scaling explicitly, using the “light scaling” driver option. For example, the following command sets the light scaling to 1.0:
HC_Set_Driver_Options("light scaling = 1.0");
Remember that driver options must be set on a driver instance (such as “?Picture”).
When you set light scaling explicitly, you need to take into account the lights’ number, colors, positions, and types (distant, local, or spot). Also note that you can purposely set the light scaling too low, which will cause color values greater than 1.0 to be clamped at 1.0. This clamping is not an error; if done excessively, however, it can cause scenes to appear washed out.
Multiple Color Problems
Excessive gamma correction and ambient light can make a scene too bright, whereas light scaling can make a scene too dark. Do these problems cancel out each other? Unfortunately, they do not. In fact, they do not always apply at the same time. In a scene that does not contain any light sources, only gamma correction can be a problem (and only if your graphics card also does gamma correction). Even in a scene with multiple light sources, which suffers from both too much ambient light and excessive light scaling, these problems do not cancel out each other. Instead, the result is muddy, washed-out colors, with no deep blacks or bright whites. You will be able to see everything in the scene, but it might not be a pretty sight! If you care about accurate and pleasing colors, the only solution is to correct each problem separately.
Overriding Internal Color
Certain geometry, such as glyphs, lines, markers, and PBR materials may have an internal color associated with them. An internal color is one that is embedded at the geometry level. As such, setting color at the segment level will have no effect. For these cases, Visualize offers the ability to override this color using Set_Rendering_Options. Once enabled, normal color settings would override the geometry’s normal color. For example, to override the colors for geometry in a specific segment, you would do something like the following:
HC_Open_Segment("override");
{
        HC_Set_Rendering_Options("override internal color, attribute lock=color");
        HC_Set_Color("cyan");
}
Edge Lighting
Normally, HOOPS calculates lighting on both faces and edges of shells and meshes (it will even calculate lighting on markers associated with shells and meshes, if markers are visible). When there are lights in a scene, and faces are visible, it is normally to your advantage to turn off the visibility of edges, so that lighting calculations are not done on them. Assuming that the edges are the same color as the faces, turning off edge visibility will not make any difference in the resulting output image. On many systems - especially systems with special hardware for performing lighting calculations on faces - turning off edge visibility can result in dramatically faster rendering times.
If there are no lights in a scene, and the faces of a shell or mesh are all the same color, then it will be difficult to see the boundaries between faces unless you leave on the visibility of edges, and set the edges to a color different from that of the faces. For example, when displaying a red geodesic dome, you can set the edge color to black to make the structure of the dome visible. In this case, you want the edges to be visible, but you probably do not want lighting calculations to be done on them, so you can turn off lighting calculations on the edges with the following command:
HC_Set_Visibility("lights = (edges=off)");
Another technique to make individual faces visible is to apply a pattern, or a texture map, to the faces. In this case, you would probably will want to turn off edge visibility, whether or not you have any lights in the scene.
Color Map Animation
Color map animation is a trick that is sometimes used to do simple animation. An example of this kind of animation is a marquee selection tool, which draws a two-color dashed rectangle around a selected area and animates edges of the rectangle such that the boundary appears similar to the marching lights on a movie marquee. Rather than redraw the rectangle over and over to animate it, a faster approach is to draw a single rectangle made up of segments of four different colors. Each color has a different index in the hardware color map, as shown here:
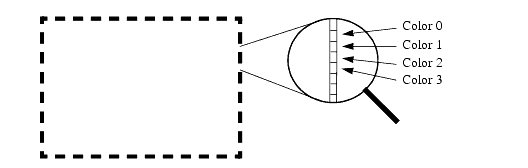
Color-map animation of a marquee.
We can then animate the rectangle simply by changing the values in the color map. First, we assign the color black to the colors with indices 0 and 1, and white to the colors with indices 2 and 3. We wait a short time, then change the color map so that color indices 1 and 2 are black, whereas 0 and 3 are white. We change the color map twice more, until the colors are back to their original configuration. The rectangle will then appear to be made up of segments that move around the rectangle clockwise, with no redrawing required.
Even though HOOPS is device independent, and so does not provide direct access to the hardware color map, you can perform color-map animation using the Modify_Color_Map command in HOOPS. You create a HOOPS color map, using the Set_Color_Map command, containing four colors. Recall that a HOOPS color map is not the same as the hardware color map. You then draw the rectangle, setting the colors of each segment using the Set_Color_By_Index command.
Note that this technique will work on any platform - even a platform that does not have a hardware color map (such as a 24-bit frame buffer). Of course, without a hardware color map, HOOPS will have to redraw the rectangle for each step of the animation, but that will look fine on a platform that supports double buffering. You can determine whether your platform has a hardware color map, and whether it is capable of double buffering, by using the Show_Device_Info command.

