Selecting Objects
In general, most user input, including button presses and mouse events, will be handled by the window system and your application, and will not involve HOOPS/3dGS at all. The main exception to this rule is when you wish to select objects in the HOOPS/3dGS database. This is also referring to as picking or hit-testing. HOOPS/3dGS provides a routine, called Compute_Selection, whose arguments define a ray/rectangle/volume in space. HOOPS/3dGS will calculate which objects are intersected by the selection ray/volume and return them to the user.
Compute_Selection Usage
The image below shows the path of a selection event as the input starts out as a location event from the window system. The application receives the location event and calls Compute_Selection with the location. Compute_Selection does a hit test against the 3D objects in the database and and places items in a queue so they may be examined one at a time.
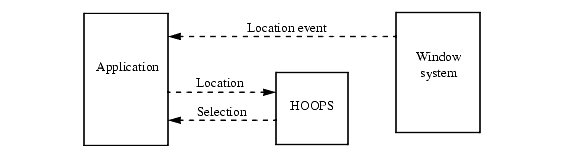
Selection process with a window system.
The default selection algorithm utilized by Compute_Selection and its variants does not ignore objects which are obscured by other objects, but will return the list of objects that are intersected by the selection ray/volume. It also sorts the objects from back to front (in viewpoint space) so that the object foremost in the view will be on top of the list. If it is desirable to only select on objects that are not obscured by other objects, then the default selection algorithm can be instructed to perform a ‘visual’, frame-buffer based post-process of the selected items to remove obscured items from the selection list. This is discussed here.
When geometry is selectable (in addition to windows), and more than one selectable object was within the circle defined by the selection proximity, you can iterate through the objects in the selection list by using the Find_Related_Selection command. This command sets the current event to be the next-best selection, and can be called multiple times. The number of items in the selection list is controlled by the Set_Heuristics_related_selection_limit “related selection limit” heuristic. For example, if the related selection limit is set to 5, HOOPS/3dGS will select the first 5 items it encounters, and then stop searching for selected items.
The various Show_Selection routines (discussed in this section) can be used to retrieve information about each selection item. The value of the ‘action’ argument passed into Compute_Selection is compared against the selectability attribute setting as testing proceeds.
You can use the ‘selection proximity’ driver option to control how HOOPS/3dGS selects objects when using Compute_Selection. The selection proximity is the radius, in centimeters, of a circle around the selection position. Any object (whose selectability is on) inside this circle is selected. If more than one selectable object is inside this circle, the one closest to the selection position is selected, and the objects in the selection list are ordered based on their proximity. If no object falls within the selection-proximity circle, and HOOPS subwindows are selectable, then the window is returned as the selected item.
Here is a typical programming sequence that computes a selection and does something with each of the selected items (in pseudo-C):
if (HC_Compute_Selection (...) > 0) do
{
        HC_Show_Selection_Element (...)
        /*... process item... */
}
while (HC_Find_Related_Selection())
Selection Types
There are several other ways to control which objects are selected. For example, an interaction technique that many applications use to select multiple objects in a scene is to have the user sweep out a rectangular area of the screen with the mouse; all objects that fall entirely or partially within this area are selected. This kind of pick is called a marquee pick. A variation of this technique uses an arbitrarily drawn area, rather than a rectangular one; this kind of pick is called a lasso pick. A third, less common variation uses a polyline drawn by the user, and selects any object that is touched by the polyline; this kind of pick is called a fence pick. HOOPS/3dGS also supports selection by volume, where the user can define a rectangular selection box. You can perform these kinds of selections using the following HOOPS commands:
- By_Area(display, start_seg, action, left, right, bottom, top)
- By_Polygon(display, start_seg, action, pcount, points)
- By_Polylin(display, start_seg, action, pcount, points)
- By_Volume(display, start_seg, action, left, right, bottom, top, hither, yon)
- By_Shell(action, start_seg, point_count, points, face_list_length, face_list)
- By_Ray(action, start_seg, start, direction)
Note that the trailing “e” in Polyline is missing because the length of the command name exceeded C calling conventions at the time the function was written.
For more detailed usage information about the above functions, refer to the entry for Compute_Selection in the HOOPS/3dGS Reference Manual.
Collision Detection
It is sometimes necessary to find out if objects intersect with each other. This is commonly referred to as collision or clash detection. Detecting intersections between shells is implemented in HOOPS/3dGS as just another form of selection.
Using Compute_Selection_By_Shell or Compute_Selection_By_Key, the user can provide either the definition of a shell or the key of an existing shell to HOOPS/3dGS, which returns any faceted items below “start_segment” that intersect with it (faceted items include shells, meshes, NURBS surfaces, circles, ellipses, polygons and polycylinders). The selection process is subject, as usual, to selectability attributes. The return value indicates whether or not there was at least one thing selected. The inputs are somewhat similar to the other Compute_Selection variants, in that it contains an “action”, a “start_segment” and a description of the rules by which to select. The “action”, and “start_segment” parameters behave exactly as in the other variants. However, the selection is always performed in world space, (which is how Compute_Selection_By_Volume behaves when passed a null driver) so there is no need for driver or locater parameters. If any transform needs to be applied to the points, it must be applied before calling Compute_Selection_By_Shell. Sometimes, it is useful to have a bit more flexibility when determining what to consider a ‘collision’. HOOPS provides the function Compute_Selection_By_Shell_With_Options in order provide this additional level of flexibility. This function takes all the same parameters as Compute_Selection_By_Shell and an additional ‘options’ string which lets you specify the following values:
- A ‘tolerance’ value in ORU (object relative units). The ‘tolerance’ determines by how much two shells can intersect yet still not be considered as “clashing”. The default tolerance is 0 but it can be set to any floating point greater than 0 as well.
- A ‘clearance’ value in ORU, which defines how far away a shell can be from the input shell and still be regarded as clashing. (If “clearance” is specified, any “tolerance” setting will be ignored.
Performance Considerations
Behind the scenes, the collision detection calculation involves a reorganized representation of the scene to maximize performance. Building that reorganization can, depending on the data, take a non-trivial amount of time. Therefore, during a sequence of interactive calls, we want to keep that data around between computations. The functions Begin_Shell_Selection and End_Shell_Selection can be used for this purpose. For example, let’s say we wanted to repeatedly detect collisions as an object was moving through the scene. We would call Begin_Shell_Selection when the mouse went down, repeatedly call Compute_Selection_By_Shell while the object was moving, and then call End_Shell_Selection when the mouse went up.
If it is only interesting to know if there is a collision (as opposed to what collides) a substantial performance improvement can be achieved by setting the “related selection limit” to zero in Set_Heuristics. This will cause the computation to halt as soon as the first intersection is encountered.
If the shell used for intersection also happens to reside below “start_seg”, be sure to move it away or turn off selectability in its parent segment. While on the subject of selectability settings, note that the default selectability is off for any segment that is not under a driver. Thus, if calculations are done from non-driver segments, selectability would need to be turned on for this function to have any possibility of selecting anything.
A reference example of usage of this functionality is contained in the HOOPS/MVO class called HOpObjectClash (defined in HOpObjectClash.h and implemented in HOpObjectClash.cpp). It is derived from the HOpObjectTranslate class which provides functionality for translating selected objects. HOpConstructRectangle performs interactive collision detection by implementing the following methods:
HOpObjectClash::OnLButtonDowncallsBegin_Shell_Selection().HOpObjectClash::OnLButtonDownAndMovecallsCompute_Selection_By_Shellfor each of the shells in the selection list. If a segment key was in the selection list, then all the shells in that segment will be used to perform the selection. Selected objects are then highlighted by calling theHSelectionSet::Selectmethod.HOpObjectClash::OnLButtonUpcallsEnd_Shell_Selection()and deselects all the items.
It can be computationally costly to repeatedly perform collision detection as an object moves through a scene when the primary goal is to find if the moving object will collide with a particular object. One way to efficiently detect a collision is to pass the key to the moving object and the direction of its path as well as the distance to Compute_Swept_Shell. This function sweeps the existing shell along a given trajectory to create a shell that contains the swept volume. You can pass the newly created shell as a parameter to Compute_Selection_By_Shell to detect a collision across the entire area of the original shell’s path.
In Compute_Swept_Shell, the swept path is defined by a vector. If you want to define a path that changes directions and rotation for your selection event, use Compute_Swept_Shell_Along_Path. This function lets you define a path by passing a list of matrices that contain both absolute rotational and translational elements. Be sure that the first matrix in the list defines the initial position of the shell. As a result, the number of sweeps, the third parameter in Compute_Swept_Shell_Along_Path, is equal to one less than the number of matrices in the your list. Note that if your primary goal is to perform a selection, instead of calling Compute_Swept_Shell_Along_Path and then Compute_Selection_By_Shell, you can simply use Compute_Selection_By_Swept_Shell which automatically calculates the volume that your shell creates as it moves along the specified path and then performs collision detection with the volume against the specified area of the segment tree.
Also note that if the swept shell completely encompasses the object you want to test the collision with, Compute_Selection_By_Shell and Compute_Selection_By_Swept_Shell will not consider that a collision. For such a case, Compute_Shell_Enclosure is a more useful function.
Computing Collisions With Multiple Moving Objects
Repeatedly performing collision detection can be costly, especially with multiple moving objects in a scene. Not only would you have to perform a collision detection between each moving object and the static environment, but you’d also have to check each moving object against all other moving objects. Each selection action would force Visualize to rebuild its internal selection environment, wasting time and resources.
HOOPS Visualize solves this problem by allowing nested selections. When you nest a selection, Visualize will cache its internal selection environment. The cache can be referenced by child selections instead of being rebuilt from scratch. This results in a significant performance improvement for continuous collision operations.
The following code segment demonstrates how this operation is performed. There are two moving objects arm1 and arm2, which are tested against the static environment. Notice the nested HC_Begin_Shell_Selection statements:
    int CollDetected1 = 0;
    int CollDetected2 = 0;
    int CollDetected3 = 0;

    // Just use an identity matrix for this example code
    float mat[16] = {1, 0, 0, 0, 0, 1, 0, 0, 0, 0, 1, 0, 0, 0, 0, 1};

    /* Open the segment that contains the primary model, i.e. the part of it that doesn't change */
    HC_Open_Segment_By_Key(environmentKey);

    HC_Begin_Shell_Selection();

    /* Test for collisions between arm1 and the environment. During the first call to Compute_Selection_By_Key, Visualize will
     * create an internal BSP tree associated with the unchanging scene */
    CollDetected1 = HC_Compute_Selection_By_Key("v, related selection limit = 0", ".", arm1Key, mat);
    (void)CollDetected1;

    /* Test for collisions between arm2 and the environment. The BSP tree used in the previous call will be reused, since the
     * Compute_Selection_By_Key is being performed using the same segment. */
    CollDetected2 = HC_Compute_Selection_By_Key("v, related selection limit = 0", ".", arm2Key, mat);
    (void)CollDetected2;

    /* You could continue to test for collisions between arm1 (or arm2) and the 'environmentKey' again. Visualize will not need to
     * rebuild its internal BSP tree for the 'environmentKey', since it will remain cached. */

    /* The following call to Compute_Selection_By_Key has a different segment (../arm2), and would destroy the previous BSP tree.
     * The nested call the Begin_Shell_Selection prevents this. */
    HC_Begin_Shell_Selection();
    /* Test for collisions between arm1 and arm2. This creates a new environment for 'arm2' */
    CollDetected3 = HC_Compute_Selection_By_Key("v, related selection limit = 0", "../arm2", arm1Key, mat);
    (void)CollDetected3;

    HC_End_Shell_Selection(); /* discard the environment for 'arm2', restoring the environment associated with 'environmentKey' */

    HC_End_Shell_Selection(); /* discard the environment associated with 'environmentKey' */

    HC_Close_Segment();
Intersection Polylines
HOOPS/3dGS can return the polylines of intersection between the faces in two shells. This would typically be called after you have determined that two shells intersect (using Compute_Selection_By_Shell as outlined above). The function Compute_Intersect_Polyline accepts arrays that denote the points/face-list for 2 shells, and returns a set of polylines. If you cannot guarantee that the polyline storage arrays passed into Compute_Intersect_Polyline are big enough, then you should first call the function Show_Intersect_Polyline_Size to determine the size of the polyline arrays. This function will instead do the calculation of the polylines, and then Compute_Intersect_Polyline will return the cached data.
Point Cloud Inspection
Within the family of selection functions, HOOPS offers a set of services that aid in point cloud inspection. For a given point cloud, a user might want to perform comparisons with the dataset against CAD models. Three useful functions for this activity are Compute_Points_On_Shell, Compute_Points_Inside_Shell and Compute_Points_Distance_From_Shell. Compute_Points_On_Shell is the simplest and most straightforward function. It determines if the points in a dataset lie on the surface of a given shell. For this function, you can pass a tolerance value as a criteria for considering eligible points.
Compute_Points_Inside_Shell not only determines whether a set of points is inside the volume of a shell as its name indicates, it can also calculate if the points are on or outside the shell as well. Like Compute_Points_On_Shell, Compute_Points_Inside_Shell also takes a tolerance value but it receives it as part of the options string parameter. The options parameter lets you also determine if the results array will return the identity of the face closest to a point in the dataset. Note that this function is designed for shells which define a closed volume.
A common calculation performed with a point cloud created from a 3D scan of a manufactured part is to measure geometric differences between it and the CAD model. For this case, HOOPS provides the Compute_Points_Distance_From_Shell function. This function takes parameters similar to Compute_Points_Inside_Shell. However, tolerance is a parameter separate from the options string. The options parameters lets you indicate which algorithm, grid or octree, to use in the computation. The function populates the results parameter with the closest distance between a point in the dataset and the surface of the given shell. Points that fall outside of the tolerance value receive a -1. The returned information can be use to generate a color map that visualizes the deviations between the manufactured part, represented by the point cloud, and the CAD model.
|
|
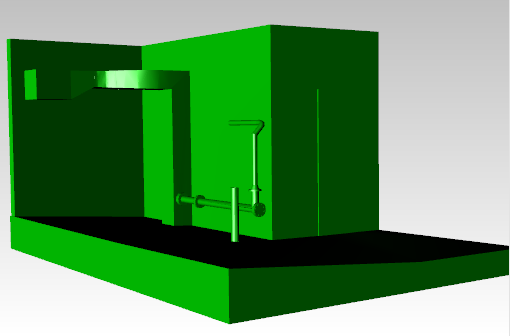
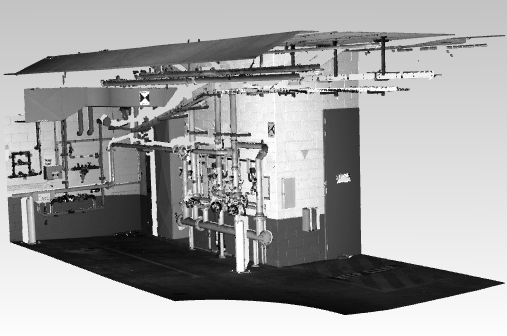
The figure shows a model of a parking garage on the left and a point cloud representation on the right.
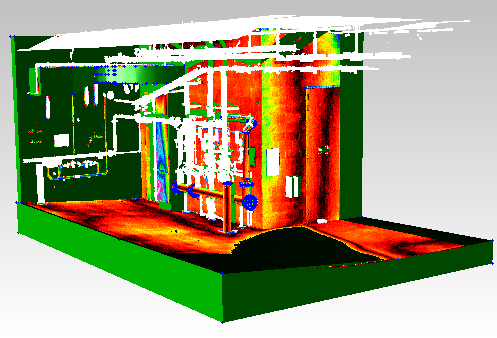
The figures show a rendering of the model and point cloud with a color map displaying the deviation between the model and point cloud data.
If you are performing multiple Compute functions on the same shell data, then we recommend thatyou do this within the context of Begin_Shell_Selection and End_Shell_Selection. This will tell HOOPS to cache the spatial sorting so that HOOPS does not need to recalculate it for each call to a Compute function.
Selection Distance Calculations
Two functions exist which help the user to write collision detection operations. Show_Selection_Source_Element can be used in conjunction with Compute_Selection_Distance_By_Shell to find the vectors and distances between a shell and another piece of geometry in the scene.
Accessing Information About Selected Objects
Selection events contain a large amount of information about the selected object. Consequently, there are several HOOPS/3dGS commands that you can use to return information from a selection event. These commands are valid only when a selection is current.
Segment Information
The Show_Selection command returns the name of the segment that was selected (or that contains the selected geometry). Show_Selection returns only the simple name of the selected segment, rather than the full path name. If your database has multiple segments with the same simple name, this name can be ambiguous. To identify the selected segment unambiguously, you can use Show_Selection_Pathname (which returns the fully qualified path name of the segment), or Show_Selection_Keys (which returns the key for the selected segment, and all its parents). Note that, because of include segments, the path to a selected segment can be complicated. See the HOOPS/3GS Reference Manual entries for Show_Selection_Pathname and Show_Selection_Keys, for more information.
Geometry Information
The Show_Selection_Element and Show_Selection_Elements commands return the key of the object that was selected, and further information about what was selected. If more than one kind of object is selectable, you can determine which kind was selected using the Show_Key_Type command. The Show_Selection_Element command also returns three integers, whose value depends on what kind of object was selected. For example, if a text string was selected, then these integers return the index of the character in the string that was selected. For a polyline, these integers return the line segment that was selected. For a shell or a mesh, these integers return the edge and face that were selected. Likewise, appropriate information is returned for polygons, markers, images, arcs, circles, and so on.
Additionally, the Compute_Selection routines will compute the list of faces in selected shells and meshes, as well as the line segments in polylines. This extended data can be accessed by using the routine Show_Selection_Elements(). The amount of extra ‘sub-entity’ information that is computed can be controlled by setting the “internal selection limit” heuristic. (This is similar to the “related selection limit” heuristic discussed above, but deals with the sub-entities). The amount of sub-entity selections can be individually controlled for shells, meshes and polylines. For example, let’s say you were selecting by area and wanted HOOPS to return all the faces in selected shells and meshes, but not perform ‘internal selections’ on anything else. It may be tempting to set “no internal selection limit”, butHOOPS would compute the selected subentities for ALL geometry that was selected, which would involve more work than is necessary. To limit HOOPS’ computation, you could set the following to have HOOPS avoid sub-entity selection for any polylines in the scene:
HC_Set_Heuristics("internal selection limit = (shells = 1000, polyline = 0)");
Location Information
The Show_Selection_Position command returns cursor (mouse) coordinates in 3D. This command returns two sets of coordinates: one in the coordinate space of the application window where the pick occurred, and one in the local modeling-coordinate space of the selected segment (or of the segment containing the selected geometry). The z value of the selection position gives the intersection of the picked object with the ray from the current viewpoint (defined by the camera attribute on the selected segment) through the cursor location on the screen. See the Show_Selection_Position command for more information.
Selectability Attribute
You can control which objects are selectable using the Set_Selectability command to modify the ‘selectabililty’ attribute. Selectability inherits like a normal attribute, so if selectability is turned on in a segment for a specific kind of object, then it is on in all subsegments, unless the selectability for that kind of object is explicitly turned off in a subsegment.
By default, selectability is enabled for HOOPS subwindows, so a selection event always returns a segment (which has the window attribute set). To enable a specific kind of geometry to be picked, you need to enable its selectability explicitly. For example, the following command allows lines (and polylines) to be selected in the database:
HC_QSet_Selectability("?Picture", "lines");
You can enable selection of all kinds of geometry by specifying “everything” in the Set_Selectability command. You can also control whether an object will return a selection event based on the ‘action’ filter. The value of the ‘action’ is compared to the ‘action’ argument passed into the Compute_Selection_XXX functions. By default, geometry is selectable only if it is visible, but this requirement too can be changed.
Selectability of Culled Objects
Since culled objects are not visible, a user would normally not expect them to be selectable. However, you have the ability to control whether culled objects are selectable using the “selection culling” heuristic.
Selection and culling use different internal mechanics. Therefore, if selection culling is disabled, HOOPS Visualize will still consider culled objects when processing a selection event. As a result, the user could end up highlighting culled geometry, suddenly making it appear visually in the scene or as an entry in selection results. Selection culling may be used with the following types of culling:
- view frustum
- maximum extent
- hard extent
- max distance
- view volume
- subpixel
- vector
    // distance-culled objects will not be selectable
    HC_Set_Heuristics("selection culling=max distance");

    // vector-culled objects will not be selectable
    HC_Set_Heuristics("selection culling=vector");

    // disables selection culling
    HC_Set_Heuristics("selection culling=no max distance");
Note that selection culling does not work with backplane culling, which uses different internal logic. For information on how to use selection with backplane culling, see our section about selectability of backplane-culled geometry.
Visual and Analytic Selection
The default selection algorithm will perform an analytic selection. Analytic selection will project a ray or volume into the selection space and select intersecting geometry. As such, it will consider objects that may be obscured by other objects. In some situations, this can give unwanted results. For example, if you are using hidden surface removal with faces and edges visible, and select slightly to the side of the front-most visible edge of a cube, it’s possible that the ‘best’ edge returned by HOOPS Visualize will be the back side edge, even though it is obscured. This is because Visualize fires a ray through the scene, and the ray may end up directly hitting the backside edge or coming closest to it.
To avoid this scenario, you can instruct the system to use the visual selection algorithm. Visual selection will do post-processing to remove items from the selection list if they are obscured in the current view by another object in the scene. This selection mode is enabled by setting the “visual selection” heuristic:
HC_Set_Heuristics("visual selection = on");
Be aware that visual selection is a more complex algorithm than analytic selection and therefore requires more processing time. However, the benefit is that only items that are visible on the screen will be selected. If aperture selection is used, the selected items are sorted based on proximity and items with equal proximity will be further z-sorted. If area-selection is used, then proximity is ignored (everything in the area is considered) and the selection list is z-sorted.
Selection Level
For complex scenes, a selection event can return a large number of objects after a hit test. HOOPS provides the ability to limit selection hierarchically via the “selection level” option in HC_Set_Heuristics. The different selection levels are entity, geometry, segment and segment tree. The default value is “entity” which directs HOOPS to return the specific object that was detected. The “geometry” option is a synonym for the “entity” option.
Sometimes this level of precision is not desirable. For complex scenes like those often found in CAD drawings, you might want to limit selection to a segment higher on the tree. In this case,setting the “selection level” to “segment” or “segment tree” can simplify the amount of processing on selection event. When the “selection level” is set to “segment”, HOOPS directs the selection event to return the owning segment of the selected item. Setting the “selection level” to “segment tree” directs the selection event to climb up the segment tree to find the subtree that owns the selected item. So if the “selection level” of segment X is set to “segment tree”, whenever an item in a node anywhere under segment X is selected, the selection event will return segment X as the selected object.
Detail Selection and Edge-Biasing
You can force the HOOPS Visualize selection processor to honor line and edge weights, which means that both the pattern and the weight of a line/edge will affect its selectability. This is controlled by setting the “detail selection” option of Set_Heuristics:
HC_Set_Heuristics("detail selection = on");
Strategy For Selecting Unweighted Edges
If you are not using weighted edges, there is an edge-biasing concept which can make edges more easily selectable. Let’s consider the case where an application is in a mode where both edges and faces can be highlighted by the user. If we are looking at a cube and select a location on a face that is very close to an edge (but not directly on it), the face will be the closest selected object since it’s a direct hit. Since unweighted edges are typically quite thin, it will be very difficult to select on the closest edge. To give a bias to edges, your selection logic could perform selections using a small proximity, scan all the items in the selection list, and if there are any edges in the list, only highlight those.

