Fundamentals
Database - HDB
A single HDB object should be created and initialized within a startup function of your application.
Example:
void initialize_my_app_data()
{
        m_pHoopsDB = new HDB;
        m_pHoopsDB->Init();
}
When your application is ready to terminate, you should destroy the HDB object before the end of the application’s main function (or, if created in a DLL/share library, before the library is unloaded). If you try to destroy HDB after that point, you may experience undefined behavior.
Model - HBaseModel
The HBaseModel class encapsulates a logical grouping of graphical information known as a model. The model is accessed by a key that represents a segment found in the include library segment in the HOOPS database. When HBaseModel is instantiated, a new segment is created in the include library. To directly create and/or modify graphical information for the model, call HBaseModel::GetModelKey to access its root segment. You can also load information about a model by importing a file using the HBaseModel::Read method. HOOPS/MVO can import a wide variety of file formats. When you have finished constructing and enhancing your model, you can save this informtion to a file using HBaseModel::Write which can export to many commonly used file formats. The following code snippet shows how you can create an instance of HBaseModel and load information into it:
// Creating new instance of a model
HBaseModel *modelPlane = new HBaseModel();

// Loading in model information
modelPlane->Read("ModelPlane.hsf");

// Getting Model Key
HC_KEY model_key = modelPlane->GetModelKey();

HC_Open_Segment_By_Key (model_key);
        // Creating a wireframe effect
        HC_Set_Visibility("faces=off, edges=on");
HC_Close_Segment();

// Saving the model to a file
modelPlane->Write("WireframeModelPlane.hsf");
Creating a Custom Model Object
The following code is the interface for a sample model class called HMyModel, derived from HBaseModel. It adds a custom Read function to support reading of ‘FOO’ files, in addition to relying on the base classes’ ability to read HMF files:
#include "HBaseView.h"

class HMyModel : public HBaseModel
{

public:
        HMyModel();

        void Read(const char * FileName);
        void ReadFooFile(const char * FileName);
};
The following provides an example of the application-specific Read function for the custom Model object. Note that it calls the base classes’ Read function to handle reading of HMF files, since they can be read by HBaseModel::Read:
int MyModel::Read(const char * FileName)
{
        char extension[120];

        // read the file into the model object's model segment
        HC_Open_Segment_By_Key(m_ModelKey);

          extension[0]=0;
          HC_Parse_String(FileName,".",-1,extension);
          strlwr(extension);

          if  (streq(extension,"foo"))
                // bogus function for discussion purposes
                ReadFooFile(FileName);
          else if  (streq(extension,"hmf"))
                // call base class method to read an HMF file
                HBaseModel::Read(FileName);
          else
                return (1); // unknown file type

        HC_Close_Segment();

        return(0);
}
View - HBaseView
To display a model in HOOPS, you include it in a scene which can be viewed via an output device. The HBaseView class encapsulates all the information associated with the presentation of a scene. Under the HOOPS/MVO architecture, a model can have multiple views but a view can only be associated with one model. The most common approach is a one to one mapping between a GUI widget object and an instance of HBaseView. Each HBaseView object generally should be created and initialized in a startup function associated with each view. In this example, HMyBaseView (a simple class derived from HBaseView) is instantiated, associated with a GUI widget, and initialized:
void InitialViewUpdate()
{

        m_pHView = new HMyBaseView( hmodel, NULL, NULL, NULL, (long) m_hWnd, (long)(HPALETTE)*(GetPalette()));
        m_pHView->Init();
}
The HBaseView constructor requires a pointer to the HBaseModel object associated with the view. It also has a variety of other optional arguments, including the window handle of the native GUI window, and the native GUI palette. The window handle is internally passed to HOOPS, which will draw into the user-specified window rather than creating a new one. For a diagram of the underlying HOOPS segment structure, refer to the section on the HOOPS MVO classes.
When HBaseView is initialized, it creates a new segment under a driver instance segment. This segment contains all the information about the model and other elements in the scene such as lighting, rendering modes, camera settings and window attributes.
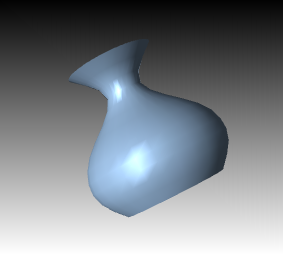
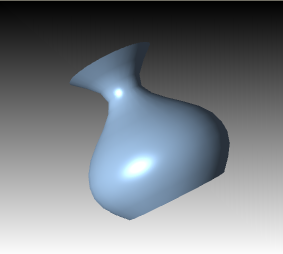
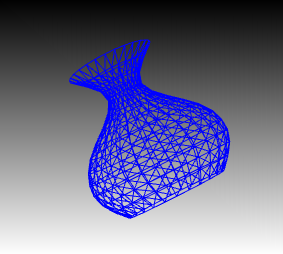
Rendering Modes
One element to consider when displaying a scene is how it should be rendered. For a photorealistic effect, you can choose from a variety of lighting interpolation methods like Gouraud or Phong. In some situations, it might make sense to show just the wireframe of your model. With HBaseView class, you can seamlessly move between different rendering modes using the HBaseView::SetRenderMode method. You also choose one of the methods that start with Render like HBaseView::RenderPhong or HBaseView::RenderShadedWireframe.
|
|
|
Gouraud, Phong, and wireframe rendering of an urn.
Camera Settings
HBaseView has a set of camera methods that lets you control the viewpoint for a scene. When setting the initial parameters for HBaseView, you can use HBaseView::SetInitialCamera to specify the camera coordinates when the scene is first displayed. During the session, you can always return to this initial camera position via the HBaseView::ZoomToInitialCamera method. This method moves the camera from its current position to the coordinates you specifed in HBaseView::SetInitialCamera. By default, as the camera changes position, the lights follow it. If you want the lighting position to remain constant, call HBaseView::SetLightFollowsCamera and pass false. The viewpoint change can be rendered as an instanteous change or with a smooth transition where the user sees the camera pan and zoom to the new location. By default, all camera changes are instanteous. To choose a smooth transition, call HBaseView::SetSmoothTransition and pass true. Once you have turned on smooth transition, you can set the transition time by calling HBaseView::SetSmoothTransitionDuration.
General camera control can be accomplished via the HBaseView::SetCamera method. You can either pass an HCamera object which encapsulates information like position, field and target or pass attributes individually. HBaseView also has methods for the most common camera movements. For instance, HBaseView::ZoomToExtents resets the camera such that the view contains the extents of the scene. To prevent the camera from zooming in too closely, you can use the HBaseView::SetZoomLimit. If you want more control when zooming to a specific part of the scene, HBaseView offers a group of methods that begin with “Fit”. For instance, HBaseView::FitWorld is used by HBaseView::ZoomToExtents for calculating the exact camera position. Other fit methods include HBaseView::FitSegment and HBaseView::FitSelection.
Another useful camera control method is HBaseView::SetViewMode. This method lets you easily move between different axis planes like the XY plane or YZ plane. You can also specify custom view planes defined as front, back, left, right using the HBaseView::SetViewAxis method.
Axis Triad
The camera methods in HBaseView update the camera position programmatically. However, most applications also let the end-user control the camera interactively. HBaseView allows the user manipulate the camera with the mouse via a built-in axis triad. To enable the axis triad, call HBaseView::SetAxisMode() passing an AxisMode. You can simply pass AxisMode::AxisOn or one of the other variations available. Once the axis is enabled, HBaseView will render an axis triad at the bottom left corner of the view. The axis triad consists of three orthogonal arrows emanating from a center point and represent the X, Y and Z axes. When the user moves the axis triad with mouse, HBaseView responds by updating the view accordingly. HBaseView handles a number of mouse events related to the axis triad including mouse movement and double-clicking.
|
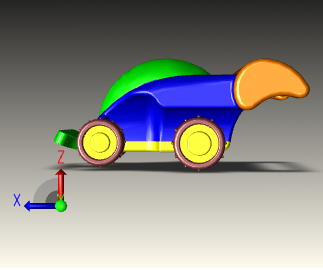
|
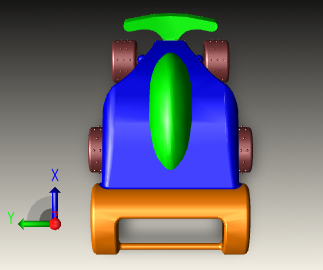
|
Three views of a toy car model with the axis triad used for navigation and orientation.
Interactivity and Selection
HBaseView offers a representation of a scene but it also has the capabilities to manage extensive interactivity through its relationship with operators. When the mouse, keyboard or any input device is employed, HBaseView captures these events and dispatches them to the current operator such as HOpSelectAperture which selects object based ona single mouse click. The following code sample shows how you can set the current operator for a view:
m_pHView->SetOperator(new HOpSelectAperture(m_pHView));
Once the selection operator is activated as the current operator, it interacts with the view updating information about which items are selected and deselected. HBaseView manages the selection process via HSelectionSet.
Creating a Custom View Object
The following code is the interface for a sample view class called HMyView, derived from HBaseView. It adds a custom Init function along with some sample members:
#include "HBaseView.h"

class HMyView : public HBaseView
{

        public:
                HMyView(HBaseModel *model, char *alias = null, char *driver_type = null,
                                        char *instance_name = null, long window_handle = 0, long colormap = 0);

                long m_parts_seg;
                int  m_parts_num;
                long m_construction_segment_key;

                void Init();
};
The following provides an example of the application-specific Init function for the custom View object. Note that it calls the base class’ Init, and creates a custom selection set object as well:
void HMyView::Init()
{
        // call base's init function first to setup the default HOOPS segment
        // hierarchy for the view
        HBaseView::Init();
        m_parts_seg = 0;
        m_parts_num = 0;
        m_construction_segment_key = 0;

        // create our app-specific Selection object and initialize
        m_pSelection = new HMySelectionSet();
        m_pSelection->Init();
}
Operators - HBaseOperator
The HBaseOperator class is the base for classes which handle user input and operate on the scene. HBaseOperator creates a mapping between user input and interaction logic by handling GUI events such as mouse movements and key presses. To construct a custom operator, create a class that derives from HBaseOperator and then implement the virtual methods that handle user events like mouse movements and key presses. For instance, if you want to create an operator that inserts a marker into the scene when the user presses the left mouse button, your operator would implement the OnLButtonDown method. The following code sample shows how this can be done:
class HOpCreateMarker : public HBaseOperator
{
public:

        HOpCreateMarker(HBaseView* view, int DoRepeat = 0, int DoCapture = 1);
        ...
        virtual int OnLButtonDown(HEventInfo &hevent);
        virtual HBaseOperator * Clone();
};

int HOpCreateMarker::OnLButtonDown(HEventInfo &event)
{
        HPoint pos = event.GetMouseWorldPos();
        HC_Open_Segment_By_Key(GetView()->GetModelKey());
                HC_Set_Visibility("markers=on");
                HC_Insert_Marker(pos.x,pos.y,pos.z);
                GetView()->Update();
        HC_Close_Segment();
        return(HOP_READY);
}
Creating and Setting an Operator
You can have any number of operators on hand. However, to use them in a scene, you must create an instance of the operator and then attach it to a view using HBaseView::SetOperator. This method registers the operator with the event manager which allows it to receive dispatched events. The following code sample shows how to set the current operator on a view:
m_pHView->SetOperator(new HOpCameraOrbit(m_pHView));
In addition to letting you create custom operators, HOOPS/MVO is also seeded with a number of prebuilt operators. They generally fall into the following categories:
- Camera Manipulation operators for panning, zooming, or orbiting the camera. These include
HOpCameraOrbit,HOpCameraZoom, andHOpCameraPan. - Object Creation operators for creating and inserting objects in the database. These include
HOpCreateCircle,HOpCreateCylinder,HOpCreateSphere, andHOpCreateCuttingPlane. - Object Manipulation operators for translating and rotating objects. These include
HOpObjectRotate,HOpObjectTranslate, andHOpObjectAnnotate. - Selection operators for picking objects. These include
HOpSelectPolygonandHOpSelectPolyline. - Markup operators - for creating notes in the scene. These include
HOpMarkupAnnotate,HOpMarkupCircle, andHOpMarkupMeasure.
Creating a Custom Operator Object
While the HOOPS/MVO prebuilt operators provide common methods of modifying the camera, manipulating objects, or selecting geometry, your application will likely require additional application-specific operators and/or UI specification. If the Model/View/Operator paradigm is used for developing a proof-of-concept, prototype, or final application, custom operators should be derived from HBaseOperator.
The following code is the interface for a sample operator class called HOpPanCamera, derived from HBaseOperator. It implements the methods that handle left mouse button events:
#include "HBaseOperator.h"

class HOpCameraPan : public HBaseOperator
{

        public:
                HOpCameraPan(HBaseView* view, int DoRepeat=0, int DoCapture=1);
                ~HOpCameraPan();
                void GetName(char *name);

                int OnLButtonDown (HEventInfo &event);
                int OnLButtonDownAndMove(HEventInfo &event);
                int OnLButtonUp (HEventInfo &event);
}
The following code provides an example of the application-specific event handling functions for the custom HOpCameraPan operator. Note that an HEventInfo object, discussed in detailed in this section, is passed into each function:
// left button went down
int HOpCameraPan::OnLButtonDown(HEventInfo &event)
{

        if (m_pView->GetModel()->GetBhvBehaviorManager()->IsPlaying() &&
                        m_pView->GetModel()->GetBhvBehaviorManager()->GetCameraUpdated())
                return (HOP_OK);

        if (!m_bOpStarted)
                m_bOpStarted = true;

        m_ptNew = event.GetMouseWorldPos();

        m_ptFirst.x = m_ptNew.x;
        m_ptFirst.y = m_ptNew.y;
        m_ptFirst.z = m_ptNew.z;


        return (HOP_OK);
}

// left button is down and has moved
int HOpCameraPan::OnLButtonDownAndMove(HEventInfo &event)
{
        HPoint delta, camera,target;

        if (!m_bOpStarted)
        return HBaseOperator::OnLButtonDownAndMove(event);

        m_ptNew = event.GetMouseWorldPos();

        delta.x = m_ptNew.x - m_ptFirst.x;
        delta.y = m_ptNew.y - m_ptFirst.y;
        delta.z = m_ptNew.z - m_ptFirst.z;

        HC_Open_Segment_By_Key (m_pView->GetSceneKey());

                HC_Show_Net_Camera_Target (&target.x, &target.y, &target.z);
                HC_Show_Net_Camera_Position (&camera.x, &camera.y, &camera.z);

                HC_Set_Camera_Target (target.x - delta.x, target.y - delta.y, target.z - delta.z);
                HC_Set_Camera_Position (camera.x - delta.x, camera.y - delta.y, camera.z - delta.z);

        HC_Close_Segment();

        m_pView->CameraPositionChanged();

        m_pView->Update();
        return (HOP_OK);
}


// left button has come up
int HOpCameraPan::OnLButtonUp(HEventInfo &event)
{
        if(!m_bOpStarted)
                return HBaseOperator::OnLButtonDownAndMove(event);

        m_bOpStarted = false;
        m_pView->CameraPositionChanged(true, true);

        return(HOP_READY);
}
Selection Sets - HSelectionSet
One of the most common operations in a 3D-based application is selection. HOOPS/MVO provides high-level selection capabilities in HBaseView via the HSelectionSet class. For a given view, thereis one HSelectionSet object used for maintaining selected items. This class manages a list of items which have been marked as selected. When an item is added to the selection set, HSelectionSet highlights the item based on the highlight mode. Prebuilt selection operators such as HOpSelectArea and HOpSelectAperture will utilize the HSelectionSet object associated with HBaseView.
Selection Level
There are various parameters that you can set on HSelectionSet to control selection behavior. One of the most important of these is selection level. When you set the selection level, you determine the level of selection granularity that can occur. The selection level is controlled via the method HSelectionSet::SetSelectionLevel, which accepts one of the enumerated HSelectLevel options as an argument. The default selection level is ‘segment’, which is the least specific level, and results in the HSelectionSet class to store selected HOOPS/3dgs segments as it’s selected items. (Note that if a ‘segment’ is highlighted, that implies that everytihng in that segment and it’s segment subtree will be highlighted.) When you set the selection level to HSelectLevel::HSelectEntity, selection items will include HOOPS/3dgs graphical primitives such as shells, spheres and meshes. There are two additional selection levels that allow you to select parts of shells. The first is HSelectLevel::HSelectRegion which will let you select predefined regions in a shell. The second is HSelectLevel::HSelectSubentity which allows you to select faces, vertices and edges. By default, when you set the selection level to subentity, selection includes faces, vertices and edges. However, you can limit the selectability for faces, vertices and edges via the HSelectionSet::SetSubentityFaceSelection, HSelectionSet::SetSubentityVertexSelection and HSelectionSet::SetSubentityEdgeSelection methods, respectively.
Selection Processing Control
Once you have set the selection level to the desired granularity, be sure to call the associated method HBaseView::SetViewSelectionLevel. This method sets a HOOPS/3dGS heuristic that determines how much selection processing HOOPS/3dGS will perform. If the HSelectionSet’s selection level is set to HSelectLevel::HSelectEntity, HSelectLevel::HSelectSubentity or HSelectLevel::HSelectRegion, you should call HBaseView::SetViewSelectionLevel and pass HViewSelectionLevel::HSelectionLevelEntity. If you have set HSelectionSet’s selection level to HSelectLevel::HSelectSegment, you should call HBaseView::SetViewSelectionLevel and pass HViewSelectionLevel::HSelectionLevelSegment. Setting the ViewSelectionLevel in conjunction with your HSelectionSet’s selection level is crucial for optimal performance and accuracy. If your application seems to be suffering from poor performance or inaccuracies during selection, please check that both the HSelectionSet’s selection level and the ViewSelectionLevel are in sync.
HSelectionSet Methods
To add items to the HSelectionSet class, you can use the set of Select methods. Primarily, selection at the application level is triggered by a user event like a mouse button being depressed. When the event is dispatched a selection operator like HOpSelectAperture or HOpSelectArea will perform a hit test based on event information. Using one of the compute selection methods available in HOOPS/3dGS, the operator determines the set of items eligible for selection. Based on the selection level criteria of HSelectionSet, eligible items are added to the HSelectionSet via the Select methods. If the item to be selected is segment or a piece of geometry, one of the variants of HSelectionSet::Select is called. If item is a shell and the selection level is region, HSelectionSet::SelectRegion is called. If the item is shell and the selection level is subentity, HSelectionSet::SelectSubentity is called. Multiple faces, vertices and edges can be selected in one call to HSelectionSet::SelectSubentity. The parameters for this method are very similar to the results of Show_Selection_Elements. Thus minimal processing needs to be done before calling the select method.
A model with some edges highlighted. This effect was achieved via the subentity selection level setting in ``HSelectionSet``.
If you want to clear some of all of the selection list, call HSelectionSet::DeSelectAll or HSelectionSet::DeSelectSubentity. To remove an individual item from the selection list, you can use one of the HSelectionSet::DeSelect methods.
The selection list can also be directly managed via the HSelectionSet methods. The following code demonstrates how the various HSelectionSet methods might be used. It implements a selection policy based on the state of the Control and Shift keys:
// handle control, shift and no_key cases
if (event.Control())
{
        // if selected, deselect, else select
        if (selection->IsSelected(key, incl_count, incl_keys))
                selection->DeSelect(key, incl_count, incl_keys, true);
        else
                selection->Select(key, incl_count, incl_keys,true);
}
else if (!(selection->IsSelected(key, incl_count, incl_keys)))
        selection->Select(key, incl_count, incl_keys, true);
Highlighting
Currently, the supported highlight modes include conditional style highlighting, quick moves reference highlighting and inverse transparency. The first and default mode is HSelectionHighlightMode::HighlightDefault which provides basic highlighting for an object based on a set of predetermined conditions. The HSelectionHighlightMode::HighlightQuickmoves mode, on the other hand, provides a more efficient way to highlight by creating a reference object to stand in for the actual object. Thus any modifications do not require a full update to the segment structure. In both cases, the behavior that the end user sees in primarily the same. HSelectionSet can be extended to support other sophisticated highlighting modes and styles that may better suit your application.
Inverse Transparency Highlighting
When the highlight mode is set to HSelectionHighlightMode::InverseTransparency, highlighting behaves in a different way than in the previously discussed modes. The selected item remains the same while all other objects in the scene become transparent. You can control the level of transparency by using HSelectionSet::SetHighlightTransparency and passing a value from 0 to 1 where 0 is opaque. The default transparency is set to 0.9. For the best visual results, we suggest that you set the highlighting to render in gray scale by using HSelectionSet::SetGrayScale.
A model with inverse transparency highlighting mode and grayscale in effect.
Dynamic Highlighting
When dynamic highlighting is enabled via the HBaseView::SetDynamicHighlighting method, HOOPS/MVO automatically highlights any geometric entities that lie underneath the cursor. This behavior is similar to the “focus follows mouse” found on UNIX versus the “focus follows click” on Microsoft or Apple operating systems.
In addition to this highly interactive behavior mode, dynamic highlighting offers the ability to highlight only specific regions within a shell. To enable this capability, you need to get the highlight selection set from HBaseView with a call to HBaseView::GetHighlightSelection. Then call HSelectionSet::SetSelectionLevel and pass HSelectLevel::HSelectRegion as seen in the following code sample:
//enabling dynamic highlighting
m_pHView->SetDynamicHighlighting(true);

//set the correct heuristic for all hit test computations
m_pHView->SetViewSelectionLevel(HViewSelectionLevel::HSelectionLevelEntity);

//enable highlighting of individual regions in a shell
HSelectionSet *highlightSelectionSet = m_pHView->GetHighlightSelection();
highlightSelectionSet->SetSelectionLevel(HSelectLevel::HSelectRegion);
Dynamic highlighting is off by default.

