Leader Lines
Anchored leader lines have a number of applications, but they’re especially useful for text annotations. In this tutorial, we’ll use the ShapeKit class to build a simple text annotation with an anchored leader line that points to a vertex on a cube. Before we begin, be sure that you’ve set the namespace declaration in your code (“using namespace HPS;” in C++ or “using HPS;” in C#).
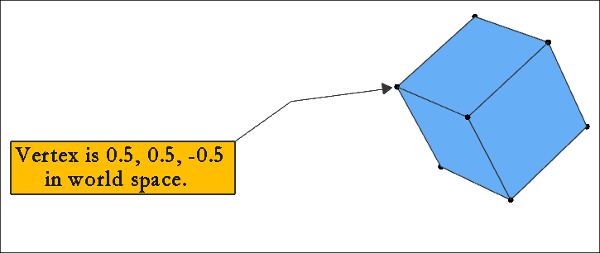
A textbox with a leader line pointing to a vertex on a cube
5.1 Set Up the Scene
Let’s start off by setting up a basic scene (including colors, font size, handedness, and camera position) and creating a portfolio where we’ll store definitions that our segments will access throughout this program.
    // basic window settings, including font size and color
    myWindowKey.GetMaterialMappingControl()
        .SetWindowColor(RGBColor(1, 1, 1))
        .SetWindowContrastColor(RGBColor(1, 1, 1))
        .SetFaceColor(RGBColor(1, 0.75f, 0))
        .SetEdgeColor(RGBColor(0.2f, 0.2f, 0.2f))
        .SetLineColor(RGBColor(0.2f, 0.2f, 0.2f));
    myWindowKey.GetVisibilityControl().SetLeaderLines(true).SetEdges(true);
    myWindowKey.GetTextAttributeControl()
        .SetBackground(true)
        .SetSize(24, Text::SizeUnits::Points)
        .SetAlignment(Text::Alignment::Center, Text::ReferenceFrame::WorldAligned, Text::Justification::Center);
    myWindowKey.GetDrawingAttributeControl().SetWorldHandedness(Drawing::Handedness::Left);
    myWindowKey.GetMaterialMappingControl().SetWindowColor(RGBAColor(1.0f, 1.0f, 1.0f));
    myWindowKey.GetCameraControl().SetPosition(Point(8, -4, 10));
    myWindowKey.GetCameraControl().SetProjection(HPS::Camera::Projection::Perspective);

    // add a portfolio to the window
    HPS::PortfolioKey portfolio = Database::CreatePortfolio();
    myWindowKey.GetPortfolioControl().Push(portfolio);
myWindowKey.GetMaterialMappingControl().SetWindowColor(new RGBAColor(1, 1, 1)).SetWindowContrastColor(new RGBAColor(1, 1, 1))
    .SetFaceColor(new RGBAColor(1, 0.75f, 0)).SetEdgeColor(new RGBAColor(0.2f, 0.2f, 0.2f)).SetLineColor(new RGBAColor(0.2f, 0.2f, 0.2f));
myWindowKey.GetVisibilityControl().SetLeaderLines(true).SetEdges(true);
myWindowKey.GetTextAttributeControl().SetBackground(true).SetSize(24, Text.SizeUnits.Points)
    .SetAlignment(Text.Alignment.Center, Text.ReferenceFrame.WorldAligned, Text.Justification.Center);
myWindowKey.GetDrawingAttributeControl().SetWorldHandedness(Drawing.Handedness.Left);
myWindowKey.GetMaterialMappingControl().SetWindowColor(new RGBAColor(1.0f, 1.0f, 1.0f));
myWindowKey.GetCameraControl().SetPosition(new HPS.Point(8, -4, 10));
myWindowKey.GetCameraControl().SetProjection(HPS.Camera.Projection.Perspective);

// add a portfolio to the window
HPS.PortfolioKey portfolio = HPS.Database.CreatePortfolio();
myWindowKey.GetPortfolioControl().Push(portfolio);
5.2 Insert a Cube
Next we’ll insert a basic cube and position it at the point (0, 1, 0) in world space. This is the object that the leader line will be pointing to. (The code for creating a cube is outside the scope of this discussion, but you can find a sample of the InsertCube function in the Appendix below.)
    // this is the cube that our leader line will be pointing to
    HPS::SegmentKey cubeSegmentKey = myWindowKey.Subsegment();
    cubeSegmentKey.GetMaterialMappingControl().SetFaceColor(RGBColor(0.4f, 0.68f, 0.96f));
    cubeSegmentKey.GetVisibilityControl().SetEdges(true);

    // insert the cube at [0,1,0]
    HPS::ShellKey myShellKey = InsertCube(cubeSegmentKey, Point(0, 1, 0), 1.0f);
// this is the cube that our leader line will be pointing to
HPS.SegmentKey cubeSegmentKey = myWindowKey.Subsegment();
cubeSegmentKey.GetMaterialMappingControl().SetFaceColor(new RGBAColor(0.4f, 0.68f, 0.96f));
cubeSegmentKey.GetPortfolioControl().Push(portfolio);
cubeSegmentKey.GetVisibilityControl().SetEdges(true);

// insert the cube at [0,1,0]
HPS.ShellKey myShellKey = InsertCube(cubeSegmentKey, new HPS.Point(0, 1, 0), 1.0f);
5.3 Define the Annotation Shape
Our textbox will be in the shape of a rectangle, so we’ll create a rectangle by defining each of the four vertices with a ShapePoint. A rectangle is, of course, a polygon, so we’ll add these vertices to a PolygonShapeElement that will serve as the background element on top of which our annotation text will be positioned.
    // create a segment for the rectangle where the text will be placed
    HPS::SegmentKey rectangleSegmentKey = myWindowKey.Subsegment();

    // define the vertices of the textbox rectangle
    HPS::ShapePoint leftBottom(-1, -1);
    HPS::ShapePoint leftTop(-1, 1);
    HPS::ShapePoint rightBottom(1, -1);
    HPS::ShapePoint rightTop(1, 1);

    HPS::ShapePoint textBoxRectanglePoints[4] = {leftBottom, rightBottom, rightTop, leftTop};

    // use a PolygonShapeElement to contain our textbox rectangle
    HPS::PolygonShapeElement rectangleBackgroundShape(4, textBoxRectanglePoints);
// create a segment for the rectangle where the text will be placed
HPS.SegmentKey rectangleSegmentKey = myWindowKey.Subsegment();

// define the vertices of the textbox rectangle
HPS.ShapePoint leftBottom = new HPS.ShapePoint(-1, -1);
HPS.ShapePoint leftTop = new HPS.ShapePoint(-1, 1);
HPS.ShapePoint rightBottom = new HPS.ShapePoint(1, -1);
HPS.ShapePoint rightTop = new HPS.ShapePoint(1, 1);

HPS.ShapePoint [] textBoxRectanglePoints = { leftBottom, rightBottom, rightTop, leftTop };

// use a PolygonShapeElement to contain our textbox rectangle
HPS.PolygonShapeElement rectangleBackgroundShape = new HPS.PolygonShapeElement(textBoxRectanglePoints);
5.4 Define Leader Line Anchor and Intermediate Points
Next, we’ll create an AnchorShapeElement for our leader line and set the anchor point to the top right of our textbox rectangle. We’ll also create an intermediate point where the leader line will bend (see the image at the beginning of this tutorial for reference).
    // set the anchor at the top right vertex of our textbox rectangle
    HPS::AnchorShapeElement lineAnchor(rightTop);

    // define the intermediate point where the leader line will bend
    HPS::ShapeCoordinate intermediatePoint_1(1.5f, 2.5f);
    HPS::ShapePointArray intermediatePoints;
    intermediatePoints.push_back(ShapePoint(intermediatePoint_1.x, intermediatePoint_1.y));

    // and set the intermediate point
    lineAnchor.SetIntermediatePoints(intermediatePoints);
// set the anchor at the top right vertex of our textbox rectangle
HPS.AnchorShapeElement lineAnchor = new HPS.AnchorShapeElement(rightTop);

// define the intermediate point where the leader line will bend
HPS.ShapeCoordinate intermediatePoint_1 = new HPS.ShapeCoordinate(1.5f, 2.5f);
HPS.ShapePoint[] intermediatePoints = { new HPS.ShapePoint(intermediatePoint_1.x, intermediatePoint_1.y) };

// and set the intermediate point
lineAnchor.SetIntermediatePoints(intermediatePoints);
5.5 Define a ShapeKit and Add Text
A ShapeKit object will contain our rectangle shape along with the anchor and intermediate points of our leader line. We’ll add the ShapeKit to our portfolio, insert our text into the rectangle segment, and define the coordinates where the leader line will point.
    // add our textbox background and line anchors to a ShapeKit
    HPS::ShapeKit rectangle_shape;
    HPS::ShapeElement rectangle_elements[] = {rectangleBackgroundShape, lineAnchor};
    rectangle_shape.SetElements(2, rectangle_elements);

    // define the rectangle_shape in our portfolio and add to the rectangle segment
    portfolio.DefineShape("anchored_leader_line_rectangle", rectangle_shape);
    rectangleSegmentKey.GetTextAttributeControl().SetBackground("anchored_leader_line_rectangle");

    // create a TextKey and insert the text into it
    HPS::TextKey rectangle_text =
        rectangleSegmentKey.InsertText(HPS::Point(2, -2, 0), "Vertex is 0.5, 0.5, -0.5\nin world space.");
    rectangle_text.SetColor(RGBColor(0.1, 0.1, 0.1)).SetFont("stroked").SetBold(true).SetSize(26, HPS::Text::SizeUnits::Points);

    // put an outline around the text box
    rectangleSegmentKey.GetEdgeAttributeControl().SetWeight(2, HPS::Edge::SizeUnits::Pixels);

    // define where the leader line will point, just a little bit offset from the cube vertex of 0.5, 0.5, -0.5
    HPS::Point leader_line_position(0.47f, 0.5f, -0.57f);
    rectangle_text.SetLeaderLine(leader_line_position);
// add our textbox background and line anchors to a ShapeKit
HPS.ShapeKit rectangle_shape = new HPS.ShapeKit();
HPS.ShapeElement [] rectangle_elements = { rectangleBackgroundShape, lineAnchor };
rectangle_shape.SetElements(rectangle_elements);

// define the rectangle_shape in our portfolio and add to the rectangle segment
portfolio.DefineShape("anchored_leader_line_rectangle", rectangle_shape);
rectangleSegmentKey.GetTextAttributeControl().SetBackground("anchored_leader_line_rectangle");

// create a TextKey and insert the text into it
HPS.TextKey rectangle_text = rectangleSegmentKey.InsertText(
    new HPS.Point(2, -2, 0), "Vertex is 0.5, 0.5, -0.5\nin world space.");
rectangle_text.SetColor(
    new RGBAColor(0.1f, 0.1f, 0.1f)).SetFont("stroked").SetBold(true).SetSize(26, HPS.Text.SizeUnits.Points);

// put an outline around the text box
rectangleSegmentKey.GetEdgeAttributeControl().SetWeight(2, HPS.Edge.SizeUnits.Pixels);

// define where the leader line will point, just a little bit offset from the cube vertex of 0.5, 0.5, -0.5
HPS.Point leader_line_position = new HPS.Point(0.47f, 0.5f, -0.57f) ;
rectangle_text.SetLeaderLine(leader_line_position);
5.6 Create the Leader Line
Our leader line will be a solid line, so we’ll define it using a SolidLinePatternElement and add it to a LinePatternParallelKit, which we can later add to our portfolio and access in our segments.
    // create the line
    HPS::SolidLinePatternElement slpe;
    slpe.SetColor(HPS::RGBColor(0.2f, 0.2f, 0.2f));
    HPS::LinePatternParallelKit lppk;
    lppk.SetBody(slpe);
// create the line
HPS.SolidLinePatternElement slpe = new SolidLinePatternElement();
slpe.SetColor(new RGBAColor(0.2f, 0.2f, 0.2f));
HPS.LinePatternParallelKit lppk = new LinePatternParallelKit();
lppk.SetBody(slpe);
5.7 Add the Arrowhead
The arrowhead of our leader line is a simple triangle glyph. Define the glyph in the portfolio and give it a name. Then create a GlyphLinePatternElement to set the attributes of the glyph.
    // define the glyph for the leader line arrow as a triangle
    // and give it a little offset so it doesn't overlap
    portfolio.DefineGlyph("anchored_leader_line_triangle",
                          HPS::GlyphKit::GetDefault(Glyph::Default::SolidTriangleRight).SetOffset(HPS::GlyphPoint(127, 0)));

    // create a glyph line pattern element
    HPS::GlyphLinePatternElement glyph_pattern;

    // use SetSize function to control size of glyph
    glyph_pattern.SetSize(15, HPS::LinePattern::SizeUnits::Pixels);
    glyph_pattern.SetSource("anchored_leader_line_triangle");
    glyph_pattern.SetInsetBehavior(HPS::LinePattern::InsetBehavior::Trim);

    // set glyph as the endcap of the line, and define the weight of the line
    lppk.SetEndCap(glyph_pattern);
    lppk.SetWeight(1, HPS::LinePattern::SizeUnits::Pixels);
// define the glyph for the leader line arrow as a triangle
// give it a little offset so it doesn't overlap with the cube
HPS.GlyphKit glyphKit = new HPS.GlyphKit();
glyphKit = HPS.GlyphKit.GetDefault(HPS.Glyph.Default.SolidTriangleRight).SetOffset(new HPS.GlyphPoint(127, 0));

portfolio.DefineGlyph("anchored_leader_line_triangle", glyphKit);

// create a glyph line pattern element
HPS.GlyphLinePatternElement glyph_pattern = new HPS.GlyphLinePatternElement();

// use SetSize function to control size of glyph
glyph_pattern.SetSize(15, HPS.LinePattern.SizeUnits.Pixels);
glyph_pattern.SetSource("anchored_leader_line_triangle");
glyph_pattern.SetInsetBehavior(HPS.LinePattern.InsetBehavior.Trim);

// set glyph as the endcap of the line, and define the weight of the line
lppk.SetEndCap(glyph_pattern);
lppk.SetWeight(1, HPS.LinePattern.SizeUnits.Pixels);
5.8 Bringing It All Together
Add the line pattern parallel kit to a line pattern kit using the SetParallels function. Then, we’ll define the line pattern in our portfolio, where it can be accessed by our rectangle segment key.
    // create a line pattern kit, define it in the portfolio, and set in the rectangle segment
    HPS::LinePatternKit lpk;
    lpk.SetParallel(lppk);
    portfolio.DefineLinePattern("myLinePattern", lpk);
    rectangleSegmentKey.GetLineAttributeControl().SetPattern("myLinePattern");
    rectangleSegmentKey.GetVisibilityControl().SetLines(true); // ensure lines visible
// create a line pattern kit, define it in the portfolio, and set in the rectangle segment
HPS.LinePatternKit lpk = new HPS.LinePatternKit();
lpk.SetParallel(lppk);
portfolio.DefineLinePattern("myLinePattern", lpk);
rectangleSegmentKey.GetLineAttributeControl().SetPattern("myLinePattern");
rectangleSegmentKey.GetVisibilityControl().SetLines(true); // ensure lines visible
Your scene is now complete and should match the image at the start of this tutorial. This is just a simple demonstration of the annotation and leader line features. Feel free to expand the program by adding multiple leader lines and intermediate points or by trying out different shapes for your annotations.
Appendices
Full source code for this program is available here, including the program described above and a function for creating a cube from a Shell object.
    //! [basic_setup]
    // basic window settings, including font size and color
    myWindowKey.GetMaterialMappingControl()
        .SetWindowColor(RGBColor(1, 1, 1))
        .SetWindowContrastColor(RGBColor(1, 1, 1))
        .SetFaceColor(RGBColor(1, 0.75f, 0))
        .SetEdgeColor(RGBColor(0.2f, 0.2f, 0.2f))
        .SetLineColor(RGBColor(0.2f, 0.2f, 0.2f));
    myWindowKey.GetVisibilityControl().SetLeaderLines(true).SetEdges(true);
    myWindowKey.GetTextAttributeControl()
        .SetBackground(true)
        .SetSize(24, Text::SizeUnits::Points)
        .SetAlignment(Text::Alignment::Center, Text::ReferenceFrame::WorldAligned, Text::Justification::Center);
    myWindowKey.GetDrawingAttributeControl().SetWorldHandedness(Drawing::Handedness::Left);
    myWindowKey.GetMaterialMappingControl().SetWindowColor(RGBAColor(1.0f, 1.0f, 1.0f));
    myWindowKey.GetCameraControl().SetPosition(Point(8, -4, 10));
    myWindowKey.GetCameraControl().SetProjection(HPS::Camera::Projection::Perspective);

    // add a portfolio to the window
    HPS::PortfolioKey portfolio = Database::CreatePortfolio();
    myWindowKey.GetPortfolioControl().Push(portfolio);
    //! [basic_setup]

    //! [insert_cube]
    // this is the cube that our leader line will be pointing to
    HPS::SegmentKey cubeSegmentKey = myWindowKey.Subsegment();
    cubeSegmentKey.GetMaterialMappingControl().SetFaceColor(RGBColor(0.4f, 0.68f, 0.96f));
    cubeSegmentKey.GetVisibilityControl().SetEdges(true);

    // insert the cube at [0,1,0]
    HPS::ShellKey myShellKey = InsertCube(cubeSegmentKey, Point(0, 1, 0), 1.0f);
    //! [insert_cube]

    //! [create_textbox]
    // create a segment for the rectangle where the text will be placed
    HPS::SegmentKey rectangleSegmentKey = myWindowKey.Subsegment();

    // define the vertices of the textbox rectangle
    HPS::ShapePoint leftBottom(-1, -1);
    HPS::ShapePoint leftTop(-1, 1);
    HPS::ShapePoint rightBottom(1, -1);
    HPS::ShapePoint rightTop(1, 1);

    HPS::ShapePoint textBoxRectanglePoints[4] = {leftBottom, rightBottom, rightTop, leftTop};

    // use a PolygonShapeElement to contain our textbox rectangle
    HPS::PolygonShapeElement rectangleBackgroundShape(4, textBoxRectanglePoints);
    //! [create_textbox]

    //! [create_line_anchor]
    // set the anchor at the top right vertex of our textbox rectangle
    HPS::AnchorShapeElement lineAnchor(rightTop);

    // define the intermediate point where the leader line will bend
    HPS::ShapeCoordinate intermediatePoint_1(1.5f, 2.5f);
    HPS::ShapePointArray intermediatePoints;
    intermediatePoints.push_back(ShapePoint(intermediatePoint_1.x, intermediatePoint_1.y));

    // and set the intermediate point
    lineAnchor.SetIntermediatePoints(intermediatePoints);
    //! [create_line_anchor]

    //! [create_shapekit]
    // add our textbox background and line anchors to a ShapeKit
    HPS::ShapeKit rectangle_shape;
    HPS::ShapeElement rectangle_elements[] = {rectangleBackgroundShape, lineAnchor};
    rectangle_shape.SetElements(2, rectangle_elements);

    // define the rectangle_shape in our portfolio and add to the rectangle segment
    portfolio.DefineShape("anchored_leader_line_rectangle", rectangle_shape);
    rectangleSegmentKey.GetTextAttributeControl().SetBackground("anchored_leader_line_rectangle");

    // create a TextKey and insert the text into it
    HPS::TextKey rectangle_text =
        rectangleSegmentKey.InsertText(HPS::Point(2, -2, 0), "Vertex is 0.5, 0.5, -0.5\nin world space.");
    rectangle_text.SetColor(RGBColor(0.1, 0.1, 0.1)).SetFont("stroked").SetBold(true).SetSize(26, HPS::Text::SizeUnits::Points);

    // put an outline around the text box
    rectangleSegmentKey.GetEdgeAttributeControl().SetWeight(2, HPS::Edge::SizeUnits::Pixels);

    // define where the leader line will point, just a little bit offset from the cube vertex of 0.5, 0.5, -0.5
    HPS::Point leader_line_position(0.47f, 0.5f, -0.57f);
    rectangle_text.SetLeaderLine(leader_line_position);
    //! [create_shapekit]

    //! [line_pattern]
    // create the line
    HPS::SolidLinePatternElement slpe;
    slpe.SetColor(HPS::RGBColor(0.2f, 0.2f, 0.2f));
    HPS::LinePatternParallelKit lppk;
    lppk.SetBody(slpe);
    //! [line_pattern]

    //! [add_arrowhead]
    // define the glyph for the leader line arrow as a triangle
    // and give it a little offset so it doesn't overlap
    portfolio.DefineGlyph("anchored_leader_line_triangle",
                          HPS::GlyphKit::GetDefault(Glyph::Default::SolidTriangleRight).SetOffset(HPS::GlyphPoint(127, 0)));

    // create a glyph line pattern element
    HPS::GlyphLinePatternElement glyph_pattern;

    // use SetSize function to control size of glyph
    glyph_pattern.SetSize(15, HPS::LinePattern::SizeUnits::Pixels);
    glyph_pattern.SetSource("anchored_leader_line_triangle");
    glyph_pattern.SetInsetBehavior(HPS::LinePattern::InsetBehavior::Trim);

    // set glyph as the endcap of the line, and define the weight of the line
    lppk.SetEndCap(glyph_pattern);
    lppk.SetWeight(1, HPS::LinePattern::SizeUnits::Pixels);
    //! [add_arrowhead]

    //! [wrap_up]
    // create a line pattern kit, define it in the portfolio, and set in the rectangle segment
    HPS::LinePatternKit lpk;
    lpk.SetParallel(lppk);
    portfolio.DefineLinePattern("myLinePattern", lpk);
    rectangleSegmentKey.GetLineAttributeControl().SetPattern("myLinePattern");
    rectangleSegmentKey.GetVisibilityControl().SetLines(true); // ensure lines visible
    //! [wrap_up]
            //! [basic_setup]

myWindowKey.GetMaterialMappingControl().SetWindowColor(new RGBAColor(1, 1, 1)).SetWindowContrastColor(new RGBAColor(1, 1, 1))
    .SetFaceColor(new RGBAColor(1, 0.75f, 0)).SetEdgeColor(new RGBAColor(0.2f, 0.2f, 0.2f)).SetLineColor(new RGBAColor(0.2f, 0.2f, 0.2f));
myWindowKey.GetVisibilityControl().SetLeaderLines(true).SetEdges(true);
myWindowKey.GetTextAttributeControl().SetBackground(true).SetSize(24, Text.SizeUnits.Points)
    .SetAlignment(Text.Alignment.Center, Text.ReferenceFrame.WorldAligned, Text.Justification.Center);
myWindowKey.GetDrawingAttributeControl().SetWorldHandedness(Drawing.Handedness.Left);
myWindowKey.GetMaterialMappingControl().SetWindowColor(new RGBAColor(1.0f, 1.0f, 1.0f));
myWindowKey.GetCameraControl().SetPosition(new HPS.Point(8, -4, 10));
myWindowKey.GetCameraControl().SetProjection(HPS.Camera.Projection.Perspective);

// add a portfolio to the window
HPS.PortfolioKey portfolio = HPS.Database.CreatePortfolio();
myWindowKey.GetPortfolioControl().Push(portfolio);
//! [basic_setup]

//! [insert_cube]
// this is the cube that our leader line will be pointing to
HPS.SegmentKey cubeSegmentKey = myWindowKey.Subsegment();
cubeSegmentKey.GetMaterialMappingControl().SetFaceColor(new RGBAColor(0.4f, 0.68f, 0.96f));
cubeSegmentKey.GetPortfolioControl().Push(portfolio);
cubeSegmentKey.GetVisibilityControl().SetEdges(true);

// insert the cube at [0,1,0]
HPS.ShellKey myShellKey = InsertCube(cubeSegmentKey, new HPS.Point(0, 1, 0), 1.0f);
//! [insert_cube]

//! [create_textbox]
// create a segment for the rectangle where the text will be placed
HPS.SegmentKey rectangleSegmentKey = myWindowKey.Subsegment();

// define the vertices of the textbox rectangle
HPS.ShapePoint leftBottom = new HPS.ShapePoint(-1, -1);
HPS.ShapePoint leftTop = new HPS.ShapePoint(-1, 1);
HPS.ShapePoint rightBottom = new HPS.ShapePoint(1, -1);
HPS.ShapePoint rightTop = new HPS.ShapePoint(1, 1);

HPS.ShapePoint [] textBoxRectanglePoints = { leftBottom, rightBottom, rightTop, leftTop };

// use a PolygonShapeElement to contain our textbox rectangle
HPS.PolygonShapeElement rectangleBackgroundShape = new HPS.PolygonShapeElement(textBoxRectanglePoints);
//! [create_textbox]

//! [create_line_anchor]
// set the anchor at the top right vertex of our textbox rectangle
HPS.AnchorShapeElement lineAnchor = new HPS.AnchorShapeElement(rightTop);

// define the intermediate point where the leader line will bend
HPS.ShapeCoordinate intermediatePoint_1 = new HPS.ShapeCoordinate(1.5f, 2.5f);
HPS.ShapePoint[] intermediatePoints = { new HPS.ShapePoint(intermediatePoint_1.x, intermediatePoint_1.y) };

// and set the intermediate point
lineAnchor.SetIntermediatePoints(intermediatePoints);
//! [create_line_anchor]

//! [create_shapekit]
// add our textbox background and line anchors to a ShapeKit
HPS.ShapeKit rectangle_shape = new HPS.ShapeKit();
HPS.ShapeElement [] rectangle_elements = { rectangleBackgroundShape, lineAnchor };
rectangle_shape.SetElements(rectangle_elements);

// define the rectangle_shape in our portfolio and add to the rectangle segment
portfolio.DefineShape("anchored_leader_line_rectangle", rectangle_shape);
rectangleSegmentKey.GetTextAttributeControl().SetBackground("anchored_leader_line_rectangle");

// create a TextKey and insert the text into it
HPS.TextKey rectangle_text = rectangleSegmentKey.InsertText(
    new HPS.Point(2, -2, 0), "Vertex is 0.5, 0.5, -0.5\nin world space.");
rectangle_text.SetColor(
    new RGBAColor(0.1f, 0.1f, 0.1f)).SetFont("stroked").SetBold(true).SetSize(26, HPS.Text.SizeUnits.Points);

// put an outline around the text box
rectangleSegmentKey.GetEdgeAttributeControl().SetWeight(2, HPS.Edge.SizeUnits.Pixels);

// define where the leader line will point, just a little bit offset from the cube vertex of 0.5, 0.5, -0.5
HPS.Point leader_line_position = new HPS.Point(0.47f, 0.5f, -0.57f) ;
rectangle_text.SetLeaderLine(leader_line_position);
//! [create_shapekit]

//! [line_pattern]
// create the line
HPS.SolidLinePatternElement slpe = new SolidLinePatternElement();
slpe.SetColor(new RGBAColor(0.2f, 0.2f, 0.2f));
HPS.LinePatternParallelKit lppk = new LinePatternParallelKit();
lppk.SetBody(slpe);
//! [line_pattern]


//! [add_arrowhead]
// define the glyph for the leader line arrow as a triangle
// give it a little offset so it doesn't overlap with the cube
HPS.GlyphKit glyphKit = new HPS.GlyphKit();
glyphKit = HPS.GlyphKit.GetDefault(HPS.Glyph.Default.SolidTriangleRight).SetOffset(new HPS.GlyphPoint(127, 0));

portfolio.DefineGlyph("anchored_leader_line_triangle", glyphKit);

// create a glyph line pattern element
HPS.GlyphLinePatternElement glyph_pattern = new HPS.GlyphLinePatternElement();

// use SetSize function to control size of glyph
glyph_pattern.SetSize(15, HPS.LinePattern.SizeUnits.Pixels);
glyph_pattern.SetSource("anchored_leader_line_triangle");
glyph_pattern.SetInsetBehavior(HPS.LinePattern.InsetBehavior.Trim);

// set glyph as the endcap of the line, and define the weight of the line
lppk.SetEndCap(glyph_pattern);
lppk.SetWeight(1, HPS.LinePattern.SizeUnits.Pixels);
//! [add_arrowhead]

//! [wrap_up]
// create a line pattern kit, define it in the portfolio, and set in the rectangle segment
HPS.LinePatternKit lpk = new HPS.LinePatternKit();
lpk.SetParallel(lppk);
portfolio.DefineLinePattern("myLinePattern", lpk);
rectangleSegmentKey.GetLineAttributeControl().SetPattern("myLinePattern");
rectangleSegmentKey.GetVisibilityControl().SetLines(true); // ensure lines visible
//! [wrap_up]
Source Code for InsertCube Function
static HPS::ShellKey InsertCube(HPS::SegmentKey segmentKey, HPS::Point center, float size)
{
    HPS::PointArray baseVertices;
    baseVertices.resize(24);

    float halflength = size / 2;
    baseVertices[0] = HPS::Point(-halflength + center.x, -halflength + center.y, halflength + center.z);
    baseVertices[1] = HPS::Point(halflength + center.x, -halflength + center.y, halflength + center.z);
    baseVertices[2] = HPS::Point(halflength + center.x, halflength + center.y, halflength + center.z);
    baseVertices[3] = HPS::Point(-halflength + center.x, halflength + center.y, halflength + center.z);
    baseVertices[4] = HPS::Point(-halflength + center.x, -halflength + center.y, -halflength + center.z);
    baseVertices[5] = HPS::Point(halflength + center.x, -halflength + center.y, -halflength + center.z);
    baseVertices[6] = HPS::Point(halflength + center.x, halflength + center.y, -halflength + center.z);
    baseVertices[7] = HPS::Point(-halflength + center.x, halflength + center.y, -halflength + center.z);

    HPS::PointArray vertices;
    vertices.resize(24);

    int tmpList[] = {0, 1, 2, 3, 1, 5, 6, 2, 5, 6, 7, 4, 4, 7, 3, 0, 3, 2, 6, 7, 0, 4, 5, 1};

    for (int i = 0; i < 24; i++)
        vertices[i] = baseVertices[tmpList[i]];

    int flist[] = {4, 0, 1, 2, 3, 4, 4, 5, 6, 7, 4, 8, 9, 10, 11, 4, 12, 13, 14, 15, 4, 16, 17, 18, 19, 4, 20, 21, 22, 23};

    HPS::IntArray faceList;
    faceList.resize(30);
    for (int i = 0; i < 30; i++)
        faceList[i] = flist[i];

    return segmentKey.InsertShell(vertices, faceList);
}
protected ShellKey InsertCube(SegmentKey segmentKey, Point center, float size)
{
float halflength = size / 2;

Point[] pointArray = { new Point(-halflength + center.x, -halflength + center.y, halflength + center.z),
                        new Point(halflength + center.x, -halflength + center.y, halflength + center.z),
                        new Point(halflength + center.x, halflength + center.y, halflength + center.z),
                        new Point(-halflength + center.x, halflength + center.y, halflength + center.z),

                        new Point(-halflength + center.x, -halflength + center.y, -halflength + center.z),
                        new Point(halflength + center.x, -halflength + center.y, -halflength + center.z),
                        new Point(halflength + center.x, halflength + center.y, -halflength + center.z),
                        new Point(-halflength + center.x, halflength + center.y, -halflength + center.z)
                        };

int[] faceList = { 4, 0, 1, 2, 3, 4, 1, 5, 6, 2, 4, 5, 6, 7, 4, 4, 4, 7, 3, 0, 4, 3, 2, 6, 7, 4, 0, 4, 5, 1 };

return segmentKey.InsertShell(pointArray, faceList);
}

