
Rendering Effects
HOOPS Visualize Desktop makes several rendering effects available for when it is necessary to create an image of very high visual quality. In this tutorial, we’ll use a model of a turbine engine to demonstrate reflection planes, two types of shadowing, and bloom. This tutorial will make use of the Sandbox application. For C++ users, the mfc_sandbox project is where you’ll want to start from. CHPSView::OnUserCodeX function is where you’ll want to place your code if you’d like to follow along with this tutorial. C# users will use the wpf_sandbox application - you’ll place the code in DemoUserCommand**X**::Execute.
3.1 Load the Turbine Model
The first step after building and running the sandbox is to load the turbine model file. That file can be found in the samples/data directory in your HOOPS Visualize Desktop installation. This is an HSF file, so it can be loaded natively by HOOPS Visualize Desktop. Load it into the sandbox using the sandbox’s main menu.
Alternatively, you can programmatically load the file. To do this, first decide which segment you’ll load the model into, and get a reference to it. For this tutorial we will use the model segment:
HPS::SegmentKey modelSegmentKey = GetCanvas().GetFrontView().GetAttachedModel().GetSegmentKey();
HPS.SegmentKey modelSegmentKey = GetCanvas().GetFrontView().GetAttachedModel().GetSegmentKey();
Then, load the model using the following code. Replace mySegmentKey with what ever segment key you’ve decided to use:
    HPS::Stream::ImportNotifier notifier;

    try {
        HPS::Stream::ImportOptionsKit importOptionsKit;
        importOptionsKit.SetSegment(mySegmentKey);

        notifier = HPS::Stream::File::Import(filename, importOptionsKit);

        // pauses this thread until the HSF is finished loading
        notifier.Wait();
    }
    catch (HPS::IOException const& e) {
        // handle exception
    }
HPS.Stream.ImportNotifier notifier = new HPS.Stream.ImportNotifier(); ;

try
{
    HPS.Stream.ImportOptionsKit importOptionsKit = new HPS.Stream.ImportOptionsKit();
    importOptionsKit.SetSegment(mySegmentKey);

    notifier = HPS.Stream.File.Import(filename, importOptionsKit);

    // pauses this thread until the HSF is finished loading
    notifier.Wait();
}
catch (HPS.IOException)
{
    // handle exception
}
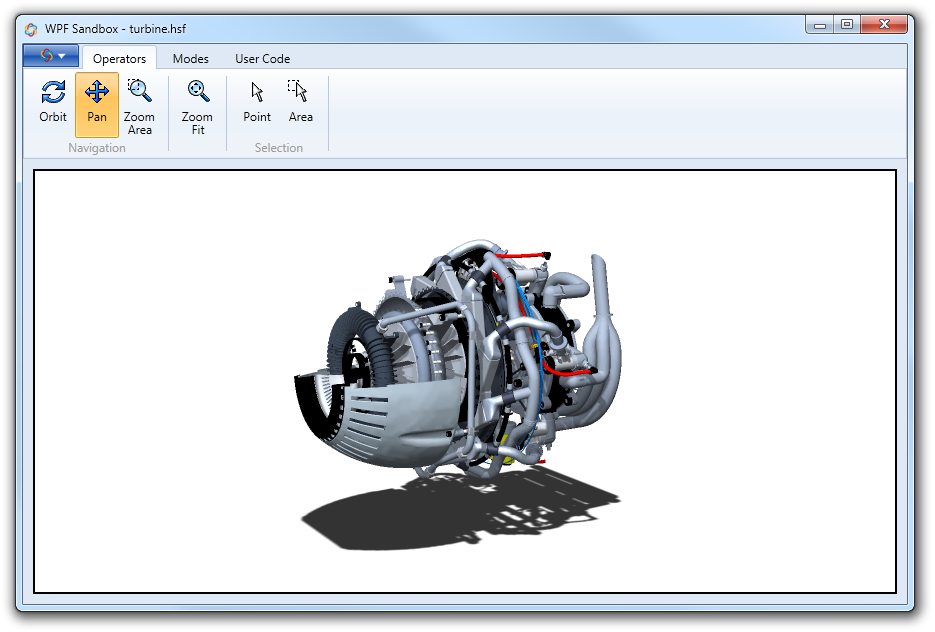
More on loading HSFs can be found in section 9.1 of the Programming Guide. After loading is complete, you should see the following image:
The default view of the turbine engine
Notice the turbine doesn’t look great at the moment. We’ll fix that in the next section.
3.2 Add a reflection plane and lighting
The turbine looks flat because there are no lights in the scene, therefore, no lighting calculations are being performed. In the next code snippet, we’ll add a light using InsertDistantLight.
Another interesting change you can apply with relative ease is a reflection plane. Planes are specified in SetSimpleReflectionPlane using the geometric equation of a plane:
Ax + By + Cz + D = 0
Additional options for the reflected image are also available - such as opacity, blurring, fading, and attenuation. We will also add lighting so the model appears more realistic. Place the following code into one of the UserCode or DemoUserCommand methods to activate it after the model is loaded.
    modelSegmentKey.GetVisualEffectsControl().SetSimpleReflection(true, 0.5f, 1U, false, 0, 2.0f);

    // parameters are equation of a plane
    modelSegmentKey.GetVisualEffectsControl().SetSimpleReflectionPlane(HPS::Plane(0, 1, 0, 0.375f));

    // add lighting
    modelSegmentKey.InsertDistantLight(HPS::Vector(1, 1, -1));
modelSegmentKey.GetVisualEffectsControl().SetSimpleReflection(true, 0.5f, 1U, false, 0, 2.0f);

// parameters are equation of a plane
modelSegmentKey.GetVisualEffectsControl().SetSimpleReflectionPlane(new HPS.Plane(0, 1, 0, 0.375f));

// add lighting
modelSegmentKey.InsertDistantLight(new HPS.Vector(1, 1, -1));
Finally, don’t forget to redraw the scene using GetCanvas().Update().
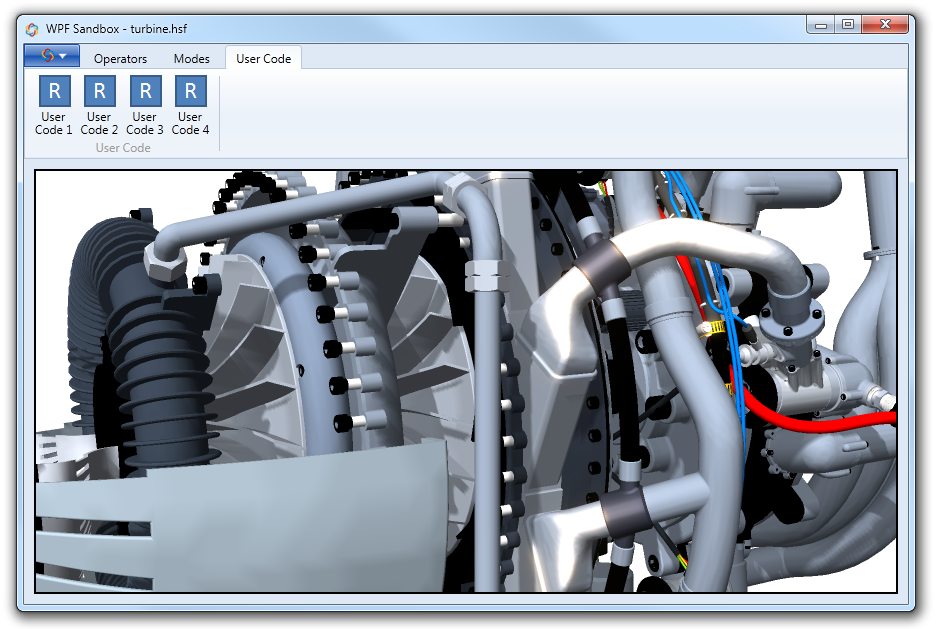
After rotating the model using the orbit operator (its in the ribbon control of the application), the resulting image should look like the one below:

The turbine engine with a reflection plane. Note that the window background has been changed to white for clarity.
As with all extra rendering effects, additional processing time is required to achieve the resulting image. Always keep in mind the balance between rendering quality and performance, especially when dealing with complex scenes.
3.3 Shadows
In this section, we’ll apply a drop shadow as well as shadow maps to the turbine model. Since a drop shadow doesn’t normally look good with a reflection plane, we’ll disable it to focus on shadows. The first type of shadowing we’ll enable is shadow maps. Shadow maps allow the faces of geometry to cast a shadow over any type of geometry that is affected by a light. The first step is to enable shadowing in the segment, then we’ll set the shadow map parameters:
    modelSegmentKey.GetVisibilityControl().SetShadows(true);
    modelSegmentKey.GetVisualEffectsControl().SetShadowMaps(true, 16, 2048, true, true);
modelSegmentKey.GetVisibilityControl().SetShadows(true);
modelSegmentKey.GetVisualEffectsControl().SetShadowMaps(true, 16, 2048, true, true);

Here, you can see some of the parts in the foreground are casting shadows over the geometry behind it.
Next, we’ll enable drop shadows. Drop shadows are called simple shadows in HOOPS Visualize Desktop because the effect is highly constrained. First, the simple shadow can only be cast on a flat plane. Secondly, the shadow can only be generated from a single light source. For most engineering applications, however, the simple shadow creates an adequate effect.
    mySegmentKey.GetVisualEffectsControl().SetSimpleShadow(true); // enables simple shadows
    mySegmentKey.GetVisualEffectsControl().SetSimpleShadowPlane(
        HPS::Plane(0, 1, 0, 0.425f)); // sets the plane where the shadows are projected
    mySegmentKey.GetVisualEffectsControl().SetSimpleShadowColor(HPS::RGBAColor(0.2f, 0.2f, 0.2f)); // color of the shadow
    mySegmentKey.GetVisualEffectsControl().SetSimpleShadowLightDirection(HPS::Vector(0, 1, 0)); // light direction
modelSegmentKey.GetVisualEffectsControl().SetSimpleShadow(true);                                 // enables simple shadows
modelSegmentKey.GetVisualEffectsControl().SetSimpleShadowPlane(new HPS.Plane(0, 1, 0, 0.425f));  // sets the plane where the shadows are projected
modelSegmentKey.GetVisualEffectsControl().SetSimpleShadowColor(new RGBAColor(0.2f, 0.2f, 0.2f)); // color of the shadow
modelSegmentKey.GetVisualEffectsControl().SetSimpleShadowLightDirection(new Vector(0, 1, 0));    // light direction
The turbine with shadow maps and a simple shadow
3.4 Bloom
Another effect that can improve the visual quality of a rendering is bloom. Bloom occurs when an intensely bright light reflects off of a shiny surface. The light appears to bleed out into the surrounding air. Bloom is only available in the shader-based drivers such as DirectX11 and OpenGL2. Bloom is enabled using the HPS::PostProcessEffectsKit.
    HPS::PostProcessEffectsKit ppek;
    ppek.SetBloom(true, 10.0f); // enables bloom. strength can be set from 0 to 10, (default is 1)

    myWindowKey.SetPostProcessEffects(ppek);

    ppek.SetBloom(false); // disables bloom
HPS.PostProcessEffectsKit ppek = new HPS.PostProcessEffectsKit();
ppek.SetBloom(true, 10.0f);  // enables bloom. strength can be set from 0 to 10

myWindowKey.SetPostProcessEffects(ppek);

ppek.SetBloom(false);       // disables bloom
The shiny parts of the turbine create an interesting effect when bloom is enabled
3.5 Texturing
For the highest amount of visual quality, you’ll also want to add textures. Applying textures to a model as complex as the turbine is beyond the scope of this tutorial, but an image is provided to demonstrate it. You can find the textured model in the samples/data directory in your HOOPS Visualize Desktop installation. More information on textures can be found in the textures section of the Programming Guide and in Tutorial 2: Applying materials.
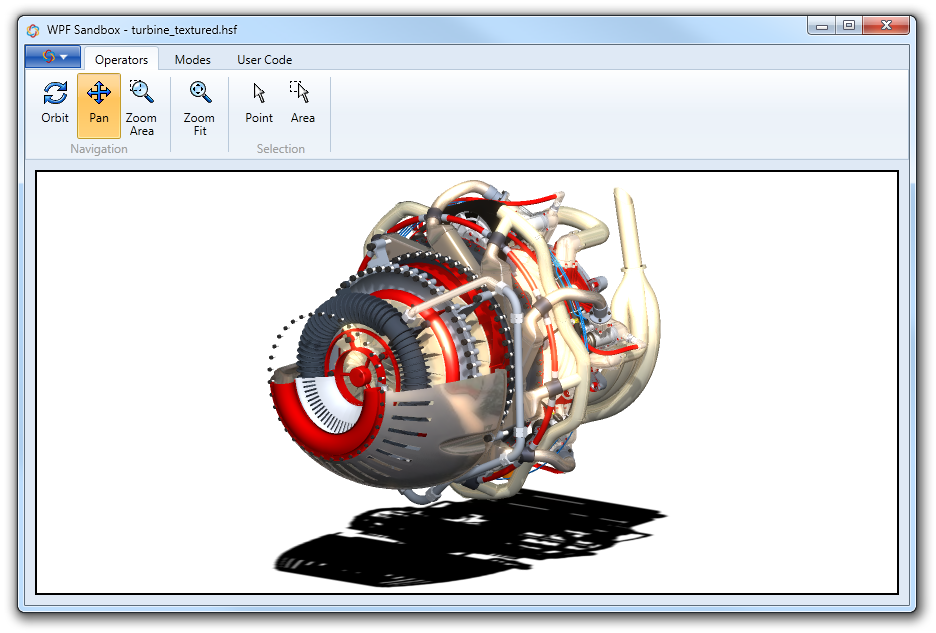
The turbine with textures applied

