Overlays
During interactive input, it is important to quickly provide feedback to the user. Consider what happens when drawing a polyline selection box to define a zoom area. To define the box, we need to draw a polyline, and during each subsequent mouse move, erase the polyline and redraw it. Another example of interaction would be to highlight or move a piece of geometry. This involves making a change to the geometry and redrawing it. If the application was required to redraw the entire scene after each change, it could greatly diminish performance.
HOOPS Visualize Desktop contains support for a drawing attribute called ‘overlays’ which allow minor modifications to be performed quickly. You can set this option on any segment containing geometry that you expect will be changing rapidly. The overlay setting tells HOOPS Visualize Desktop to draw this geometry such that it can be erased and redrawn without the rest of the scene being disturbed. If changes have ONLY occurred within segments that have the ‘overlay’ drawing attribute specified, then only the geometry in those segments will be redrawn on each update.
An important consideration when using the fixed framerate render mode is that important geometry may not be drawn in situations where the renderer is not fast enough to render that geometry before starting on the next frame. This can be confusing for the user, especially if the important geometry is the focus of his operation. For example, it may be desirable to always have the selected item, the axis triad, or a legend bar be drawn on every update.
Overlays solve this problem by telling HOOPS Visualize Desktop to always draw overlay segment geometry on every update. This has the effect of ensuring overlaid items are drawn as they would be when used with a timed update that otherwise would have skipped the item. Additionally, geometry in overlay segments is never culled.
HOOPS Visualize Desktop offers three approaches to choose from when using overlays, described below:
Normal Overlay
This overlay option is useful in the selection box scenario described above. This option works by drawing geometry on top of the rendered scene, regardless of the actual z-values of the geometry. The image below clearly shows how objects in the background are simply overdrawn on top of other geometry.
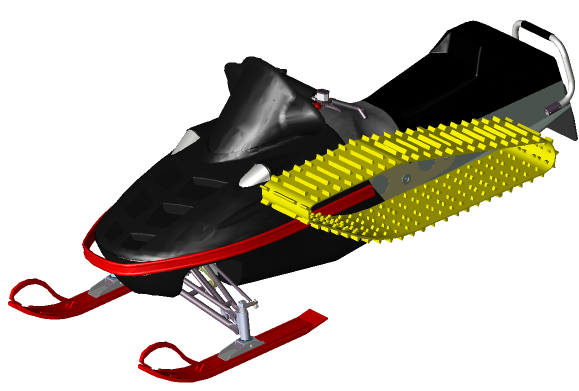
Normal overlay mode. The snowmobile track is not z-sorted.
Overlay With Z-Values
This option causes the overlay items to be drawn in their actual 3D location, rather than overdrawn on the scene, and enables transformation and editing of geometry in a large scene in true 3D without redrawing everything. This allows the developer to greatly enhance the way the end-user interacts with individual pieces of geometry, particularly if there is a lot of geometry in the scene.
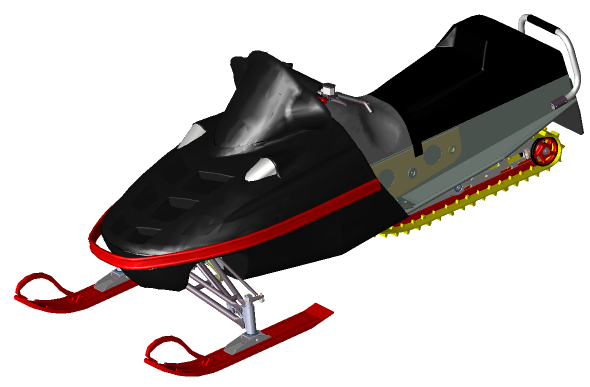
Overlay with Z mode respects the z-buffer. Note the snowmobile track is drawn behind the body, in its proper place.
Performance depends on whether underlying hardware acceleration is available, and how many objects are being drawn in the overlay. Additionally, if the overlay-with-z items are edited or moved, the next update will consist of a full update (subsequent updates will only require redrawing the overlay items).
Overlay “In Place”
The InPlace overlay option becomes useful when you are using a highlight style to overlay geometry and that style contains transparency. In this situation, the overlay geometry is not drawn - the highlight itself is drawn in its place. Using this method incurs a small performance penalty relative to the other overlay options. If you are not using a transparent highlight style, this option will have no visible effect.
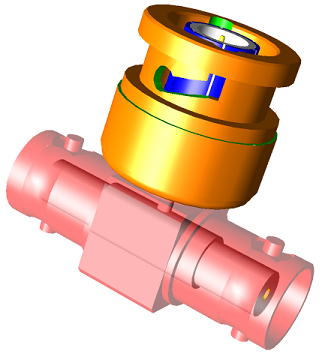
The model’s bottom tube has a transparent highlight style, using the “InPlace” overlay setting.
Regardless of which overlay setting you are using, they are all enabled similarly:
    mySegmentKey.GetDrawingAttributeControl().SetOverlay(HPS::Drawing::Overlay::Default);

    mySegmentKey.GetDrawingAttributeControl().SetOverlay(HPS::Drawing::Overlay::WithZValues);

    mySegmentKey.GetDrawingAttributeControl().SetOverlay(HPS::Drawing::Overlay::InPlace);
mySegmentKey.GetDrawingAttributeControl().SetOverlay(HPS.Drawing.Overlay.Default);

mySegmentKey.GetDrawingAttributeControl().SetOverlay(HPS.Drawing.Overlay.WithZValues);

mySegmentKey.GetDrawingAttributeControl().SetOverlay(HPS.Drawing.Overlay.InPlace);
When using overlays with a highlight style, you should set the overlay with the highlight options kit, not in the style itself. If both the highlight options kit and highlight style define different overlay settings, the result is undefined. Since all geometry residing in segments with the overlay setting will be redrawn on every update, the amount of geometry drawn in this mode should be kept to a minimum. This setting should typically only be used for the following types of geometry:
- temporary geometry, such as the selection box or similar ‘handle’ or ‘grips’ geometry that is changing as you construct or edit something.
- geometry that is being temporarily highlighted, unhighlighted, edited, or moved. HOOPS Visualize Desktop highlighting support is covered in a previous section and will automatically utilize overlay capabilities.
To disable overlays, call HPS::DrawingAttributeControl::SetOverlay with a parameter of HPS::Drawing::Overlay::None.
Limitations
When providing visual feedback, using overlays will provide better performance than not using overlays. However, the scene may not render correctly when used with transparency. Only disabling overlays will guarantee a correct picture when transparency is in the scene - but this requires a full update.
Summary
In summary, HPS::Drawing::Overlay::WithZValues should generally be used when you wish to interact with or edit objects in 3D space within a complex scene. HPS::Drawing::Overlay::Default should generally be used for providing visual feedback during user interaction - not when drawing geometry that is part of the model.

