Animation
Beginning with |HPSTHEN| 2021 SP1, HOOPS Visualize Desktop has the ability to perform simple animations. These animations can be used to demonstrate how assemblies fit together, better show complex parts within a single view, demonstrate how an object changes over time, and more.
As the developer, you have a certain amount of control over the complexity and structure of your own scenes, and HOOPS Visualize Desktop will render frames as fast as the hardware is able. However, please note that while the application can perform simple animations reasonably well, it is first and foremost an engineering visualization engine. High performance, computationally intensive animation involving a large amount of geometry and post-processing is theoretically possible, but is not the goal of the animation API. It follows that such performance should not necessarily be expected. If you require this capability, please contact support to determine the best options for your project.
HOOPS Visualize Desktop has several different properties that can be animated, including scale, rotation, translation, camera, color, and opacity.
All animations are associated with HPS::View and HPS::Model. These objects are part of the view hierarchy, which must be used when working with animation.
Programmatically speaking, animations are composed of a number of objects which describe how the animation changes over time. From lowest level to highest, these objects are arranged as follows:
Keyframes > KeyframeArray > Sampler > Animation > AnimationControl
- Keyframes. Like in traditional animation, a keyframe defines start and end points of an animation, or portion of an animation. In HOOPS Visualize Desktop, there are a number of different keyframe types, depending on what kind of animation you’re creating. These are further explained below.
- KeyframeArray. A collection of keyframes the sampler will use to create the animation.
- Sampler. Samples an animation based on keyframes in order to interpolate between the scene’s start and end state.
- Animation. Uses a sampler to create one or more animation channels, which describe what kind of animation will be occurring in the scene. Scale operations will use a scale channel, rotation animations will use a rotation channel, etc. Created from a
HPS::Modelobject. - AnimationControl. Used to conduct playback of animations. Created by and associated with the
HPS::View.
In the next section, we’ll look at how these parts fit together.
Linear Translation Example
Let’s take a look at a short code example. This snippet creates a translation animation which moves the model along the X axis.
        // get a reference to the objects in the view hierarchy
        Canvas canvas = HPS::Factory::CreateCanvas(windowKey);
        View view = HPS::Factory::CreateView();
        Model model = HPS::Factory::CreateModel();

        canvas.AttachViewAsLayout(view);
        view.AttachModel(model);

        // specify the attributes of your keyframes, and when they should occur in the animation
        // in this case, we are starting at a translation of [0, 0, 0] and ending it at [-5, 0, 0]
        VectorKeyframe vectorKeyframe1(0, Vector(0, 0, 0));
        VectorKeyframe vectorKeyframe2(4, Vector(-5, 0, 0));

        // the VectorKeyframeArray simply collects all over our keyframes for this animation
        VectorKeyframeArray keyframeArray;
        keyframeArray.push_back(vectorKeyframe1);
        keyframeArray.push_back(vectorKeyframe2);

        // we set the animation type (in this case, it is a linear animation) in
        // the VectorSampler and add the keyframes from the previous step
        VectorSampler vectorSampler;
        vectorSampler.SetInterpolation(HPS::Sampler::InterpolationType::Linear);
        vectorSampler.AddKeyframes(keyframeArray);

        // using the SprocketPath and a channel, we complete the Animation object
        SprocketPath sprocketPath(canvas);
        Animation animation = model.CreateAnimation("translation");
        animation.AddTranslationChannel("translationChannel", sprocketPath.GetKeyPath(), vectorSampler);

        // access the AnimationControl for the View we want to conduct playback on and supply the Animation from the previous step
        AnimationControl animationControl = view.GetAnimationControl();
        animationControl.SetAnimation(animation);
        animationControl.SetMillisecondsPerTick(1000);
        animationControl.Play();
// get a reference to the objects in the view hierarchy
Canvas canvas = HPS.Factory.CreateCanvas(windowKey);
View view = HPS.Factory.CreateView();
Model model = HPS.Factory.CreateModel();

canvas.AttachViewAsLayout(view);
view.AttachModel(model);

// specify the attributes of your keyframes, and when they should occur in the animation
// in this case, we are starting at a translation of [0, 0, 0] and ending it at [-5, 0, 0]
VectorKeyframe vectorKeyframe1 = new VectorKeyframe(0, new Vector(0, 0, 0));
VectorKeyframe vectorKeyframe2 = new VectorKeyframe(5, new Vector(-5, 0, 0));

// the VectorKeyframeArray simply collects all over our keyframes for this animation
VectorKeyframe[] keyframeArray = new VectorKeyframe[2];
keyframeArray[0] = vectorKeyframe1;
keyframeArray[1] = vectorKeyframe2;

// we set the animation type (in this case, it is a linear animation) in
// the VectorSampler and add the keyframes from the previous step
VectorSampler vectorSampler = new VectorSampler();
vectorSampler.SetInterpolation(HPS.Sampler.InterpolationType.Linear);
vectorSampler.AddKeyframes(keyframeArray);

// using the a keypath from  and a channel, we complete the Animation object
SprocketPath sprocketPath = new SprocketPath(canvas);
Animation animation = model.CreateAnimation("translation");
animation.AddTranslationChannel("translationChannel", sprocketPath.GetKeyPath(), vectorSampler);

// get the AnimationControl associated with the view we want execute playback on
// and ensure that each tick of our animation occurs at 1 second intervals
AnimationControl animationControl = view.GetAnimationControl();
animationControl.SetAnimation(animation);
animationControl.SetMillisecondsPerTick(1000);
animationControl.Play();
Looking over this code, you may infer by the class names that we are preparing a linear animation using two vector objects. This means the keyframes will be timed in a linear fashion along a straight line. Let’s break this code down to explain more about what’s happening.
View hierarchy references. The first part of the code is simply getting references to the various view hierarchy objects we’ll need for the subsequent sections - HPS::Canvas, HPS::View, HPS::Model. Depending on your window framework, this might be slightly different from what is shown, but the concept is the same.
Building keyframes. The first piece of the animation, creating the keyframes, is simple. We have two keyframes - a start and an end - and we want to translate uniformly between them. The first parameter indicates the “tick” at which that keyframe will be reached (more on ticks later). The Vector parameters are describing the translation amount. So in this code, we are starting at a position of [0, 0, 0] and ending at a position of [-5, 0, 0]. If, for example, you wanted to translate in a third direction, simply add another keyframe with a new position.
Collecting keyframes. The next code block is simply adding all keyframes of our animation into a collection which will be used in the next step.
Sampler. The next task is to run the keyframe array through the sampler. Notice that we are using VectorKeyframe, so we must use HPS::VectorSampler (other animation types will use different keyframe and sampler objects). Here is where we set the animation to Linear (other interpolation options include Constant, SphericalLinear, and Spline).
Animation. The HPS::Animation object is created using the HPS::Model that you want to animate (for more on Models and Views, see this page). In this example, we are only animating the model’s translation, so we add a single translation channel using AddTranslationChannel. The name “translationChannel” is only an identifier - you can use any name you find convenient.
The second parameter is a HPS::KeyPath, which points to the segment that will be affected by this animation. In this code snippet, we only have a single unambiguous hierarchy: Canvas > Layout > View > Model, so we can simply animate the entire canvas as a HPS::SprocketPath. However, if you have multiple views, models, or parts of models that you want to animate independently, you will need to be more specific with your HPS::KeyPath, specifying your keys down to the individual segment (see the API docs for SprocketPath). Lastly, we add the sampler from the previous step.
Additional channels can be created to animate different aspects of the model, or to combine multiple animations in a single model. See the Other Animation Types section for an example of combining two animations.
AnimationControl. The HPS::AnimationControl object is referenced from the HPS::View object you’re working with and is used to conduct playback of this animation.
Before playback is conducted you must first supply the animation(s) to the AnimationControl. In our example, we are running the animation over 4000 milliseconds. We are also setting the milliseconds-per-tick value to 1000. This means that each “tick” of the animation will take one second, although this can be adjusted to your requirements. The HPS::AnimationControl object also allows you to start, stop, resume, and wait on the animation.
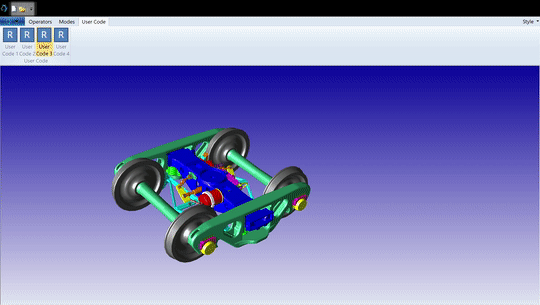
The result of the animation is as follows:

Please note the code sample above does not load a model. If you intend to run the sample code in this section, be sure to load a model before you execute.
Rotation Animations
Animated rotations rely on quaternions to describe the rotation. As such, we’ll need to use animation objects that can handle quaternion rotation. Although the objects are built in slightly different ways, the fundamental structure of the animation remains the same. We’ll get a reference to the view hierarchy, specify keyframes, specify a rotation, and add this data to an HPS::Animation object.
        // get a reference to the objects in the view hierarchy
        Canvas canvas = HPS::Factory::CreateCanvas(windowKey);
        View view = HPS::Factory::CreateView();
        Model model = HPS::Factory::CreateModel();

        canvas.AttachViewAsLayout(view);
        view.AttachModel(model);

        // specify the rotations we'll be using for this animation
        Quaternion original_rotation(1, 0, 0, 0);
        Quaternion rotated_90 = HPS::Quaternion::ComputeRotation(90, 0.0f, 0.0f);
        Quaternion rotated_180 = HPS::Quaternion::ComputeRotation(180, 0.0f, 0.0f);
        Quaternion rotated_270 = HPS::Quaternion::ComputeRotation(270.0f, 0.0f, 0.0f);
        Quaternion rotated_360 = HPS::Quaternion::ComputeRotation(360, 0.0f, 0.0f);

        // the QuaternionKeyframeArray simply collects all over our keyframes for this animation
        QuaternionKeyframeArray rotationKeyframesArray;
        rotationKeyframesArray.emplace_back(0, original_rotation);
        rotationKeyframesArray.emplace_back(1, rotated_90);
        rotationKeyframesArray.emplace_back(2, rotated_180);
        rotationKeyframesArray.emplace_back(3, rotated_270);
        rotationKeyframesArray.emplace_back(4, rotated_360);

        // we set the animation type (in this case, it is a linear animation) in
        // the QuaternionSampler and add the keyframes from the previous step
        QuaternionSampler rotation_sampler;
        rotation_sampler.SetKeyframes(rotationKeyframesArray);
        rotation_sampler.SetInterpolation(Sampler::InterpolationType::SphericalLinear);

        // using the SprocketPath and a channel, we complete the Animation object
        SprocketPath sprocketPath(canvas);
        Animation animation = model.CreateAnimation("rotation");
        animation.AddRotationChannel("rotationChannel", sprocketPath.GetKeyPath(), rotation_sampler);

        // access the AnimationControl for the View we want to conduct playback on and supply the Animation from the previous step
        // the AnimationControl is set to run this animation over four seconds (4000 ms)
        AnimationControl animationControl = view.GetAnimationControl();
        animationControl.SetAnimation(animation);
        animationControl.SetMillisecondsPerTick(1000);
        animationControl.Play();
// get a reference to the objects in the view hierarchy
Canvas canvas = HPS.Factory.CreateCanvas(windowKey);
View view = HPS.Factory.CreateView();
Model model = HPS.Factory.CreateModel();

canvas.AttachViewAsLayout(view);
view.AttachModel(model);

// specify the rotations we'll be using for this animation
Quaternion original_rotation = new Quaternion(1, 0, 0, 0);
Quaternion rotated_90 = HPS.Quaternion.ComputeRotation(90, 0.0f, 0.0f);
Quaternion rotated_180 = HPS.Quaternion.ComputeRotation(180, 0.0f, 0.0f);
Quaternion rotated_270 = HPS.Quaternion.ComputeRotation(270.0f, 0.0f, 0.0f);
Quaternion rotated_360 = HPS.Quaternion.ComputeRotation(360, 0.0f, 0.0f);

// the QuaternionKeyframeArray simply collects all over our keyframes for this animation
QuaternionKeyframe[] rotationKeyframesArray = new QuaternionKeyframe[5];
rotationKeyframesArray[0] = new QuaternionKeyframe(0, original_rotation);
rotationKeyframesArray[1] = new QuaternionKeyframe(1, rotated_90);
rotationKeyframesArray[2] = new QuaternionKeyframe(2, rotated_180);
rotationKeyframesArray[3] = new QuaternionKeyframe(3, rotated_270);
rotationKeyframesArray[4] = new QuaternionKeyframe(4, rotated_360);

// we set the animation type (in this case, it is a linear animation) in
// the QuaternionSampler and add the keyframes from the previous step
QuaternionSampler rotation_sampler = new QuaternionSampler();
rotation_sampler.SetKeyframes(rotationKeyframesArray);
rotation_sampler.SetInterpolation(Sampler.InterpolationType.SphericalLinear);

// using the SprocketPath and a channel, we complete the Animation object
SprocketPath sprocketPath = new SprocketPath(canvas);
Animation animation = model.CreateAnimation("rotation");
animation.AddRotationChannel("rotationChannel", sprocketPath.GetKeyPath(), rotation_sampler);

// access the AnimationControl for the View we want to conduct playback on and supply the Animation from the previous step
AnimationControl animationControl = view.GetAnimationControl();
animationControl.SetAnimation(animation);
animationControl.SetMillisecondsPerTick(1000);
animationControl.Play();
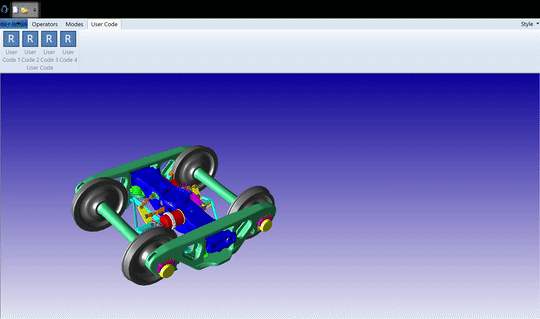
Again, you’ll have to load the model in a separate step. The result of this animation is a 360 degree rotation:
You may have noticed that the model isn’t quite spinning around the center of the model. By default, rotations will rotate around the target segment’s origin point, which might not be inside the model itself. If you want to rotate about something other than the segment center point, you must make use of both a translation and rotation. There are many ways to create that transformation, but let’s imagine you have a matrix that represents the full transformation you want to occur for some target at tick X. You could use HPS::MatrixKit::Decompose to get a translation, rotation, and scale from that matrix, then make a keyframe for each of those values that occur at tick X and append them to their respective channel’s keyframe arrays. The transformation variables like scale, translation, and rotation are decomposed in the animation channels so that they can be directly interpolated using the preferences of the sampler.
Combining Animations
We’ve looked at how animations work in general, and we’ve discussed how simple translation and rotation animations work. Since we already have the code for both animations, combining the two can be easily done. All that is needed is to add a rotation channel with the new rotation sampler to the original HPS::Animation object. The complete code sample is as follows:
        // get a reference to the objects in the view hierarchy
        Canvas canvas = HPS::Factory::CreateCanvas(windowKey);
        View view = HPS::Factory::CreateView();
        Model model = HPS::Factory::CreateModel();

        canvas.AttachViewAsLayout(view);
        view.AttachModel(model);

        // First, let's build the scale animation with the scale channel
        VectorKeyframe vectorKeyframe1(0, Vector(1, 1, 1));
        VectorKeyframe vectorKeyframe2(1, Vector(2, 2, 2));

        VectorKeyframeArray keyframeArray;
        keyframeArray.push_back(vectorKeyframe1);
        keyframeArray.push_back(vectorKeyframe2);

        VectorSampler vectorSampler;
        vectorSampler.SetInterpolation(HPS::Sampler::InterpolationType::Linear);
        vectorSampler.AddKeyframes(keyframeArray);

        SprocketPath sprocketPath(canvas);
        Animation animation = model.CreateAnimation("combined");
        animation.AddScaleChannel("scaleChannel", sprocketPath.GetKeyPath(), vectorSampler);

        // Now, specify the rotation animation
        Quaternion original_rotation(1, 0, 0, 0);
        Quaternion rotated_forward = HPS::Quaternion::ComputeRotation(0.0f, 90.0f, 0.0f);

        QuaternionKeyframeArray rotation_keyframes;
        rotation_keyframes.emplace_back(0, original_rotation);
        rotation_keyframes.emplace_back(2, rotated_forward);

        QuaternionSampler rotation_sampler;
        rotation_sampler.SetKeyframes(rotation_keyframes);
        rotation_sampler.SetInterpolation(Sampler::InterpolationType::Linear);

        // add the rotation channel to the animation
        animation.AddRotationChannel("rotationChannel", sprocketPath.GetKeyPath(), rotation_sampler);

        AnimationControl animationControl = view.GetAnimationControl();
        animationControl.SetAnimation(animation);
        animationControl.SetMillisecondsPerTick(1000);
        animationControl.Play();
// get a reference to the objects in the view hierarchy
Canvas canvas = HPS.Factory.CreateCanvas(windowKey);
View view = HPS.Factory.CreateView();
Model model = HPS.Factory.CreateModel();

canvas.AttachViewAsLayout(view);
view.AttachModel(model);

// First, let's build the scale animation with the scale channel
VectorKeyframe vectorKeyframe1 = new VectorKeyframe(0, new Vector(1, 1, 1));
VectorKeyframe vectorKeyframe2 = new VectorKeyframe(1, new Vector(2, 2, 2));

VectorKeyframe[] keyframeArray = new VectorKeyframe[2];
keyframeArray[0] = vectorKeyframe1;
keyframeArray[1] = vectorKeyframe2;

VectorSampler vectorSampler = new VectorSampler();
vectorSampler.SetInterpolation(HPS.Sampler.InterpolationType.Linear);
vectorSampler.AddKeyframes(keyframeArray);

SprocketPath sprocketPath = new SprocketPath(canvas);
Animation animation = model.CreateAnimation("combined");
animation.AddScaleChannel("scaleChannel", sprocketPath.GetKeyPath(), vectorSampler);

// Now, specify the rotation animation
Quaternion original_rotation = new Quaternion(1, 0, 0, 0);
Quaternion rotated_forward = HPS.Quaternion.ComputeRotation(0.0f, 90.0f, 0.0f);

QuaternionKeyframe[] rotation_keyframes = new QuaternionKeyframe[2];
rotation_keyframes[0] = new QuaternionKeyframe(0, original_rotation);
rotation_keyframes[1] = new QuaternionKeyframe(2, rotated_forward);

QuaternionSampler rotation_sampler = new QuaternionSampler();
rotation_sampler.SetKeyframes(rotation_keyframes);
rotation_sampler.SetInterpolation(Sampler.InterpolationType.Linear);

// add the rotation channel to the animation
animation.AddRotationChannel("rotationChannel", sprocketPath.GetKeyPath(), rotation_sampler);

AnimationControl animationControl = view.GetAnimationControl();
animationControl.SetAnimation(animation);
animationControl.SetMillisecondsPerTick(1000);
animationControl.Play();
The combined animation:
Animating Color
Other animations types are created in a similar way - you would just need to use different objects to build the animation. For example, to animate color, you would use a set of HPS::RGBColorKeyframe, HPS::RGBColorKeyframeArray, and HPS::RGBColorSampler. The same HPS::Animation class from previous examples accepts the color keyframes and will work based on the sampler you provide.
You can also use a color channel to animate subentities. Faces, lines, edges, and markers may be animated by using the HPS::Animation::AddColorChannel function and specifying a HPS::ChannelColorUsageArray value. If no color channel entity value is specified, it will default to Faces.
Below is an example of animating the face color. This sample changes the face color gradually from black to red to purple:
        // specify the attributes of your keyframes, and when they should occur in the animation
        // in this case, we are starting at a color of black, then red, and ending at purple
        RGBColorKeyframe colorKeyframe1(0, RGBColor(0, 0, 0));
        RGBColorKeyframe colorKeyframe2(2, RGBColor(1, 0, 0));
        RGBColorKeyframe colorKeyframe3(4, RGBColor(1, 0, 1));

        // the VectorKeyframeArray simply collects all over our keyframes for this animation
        RGBColorKeyframeArray keyframeArray;
        keyframeArray.push_back(colorKeyframe1);
        keyframeArray.push_back(colorKeyframe2);
        keyframeArray.push_back(colorKeyframe3);

        // we set the animation type (in this case, it is a linear animation) in
        // the VectorSampler and add the keyframes from the previous step
        RGBColorSampler colorSampler;
        colorSampler.SetInterpolation(HPS::Sampler::InterpolationType::Linear);
        colorSampler.AddKeyframes(keyframeArray);

        HPS::ChannelColorUsageArray ccua[1];
        ccua->push_back(HPS::ChannelColorUsage::Face);

        // using the SprocketPath and a channel, we complete the Animation object
        SprocketPath sprocketPath(canvas);
        Animation animation = model.CreateAnimation("color");
        animation.AddColorChannel("colorChannel", sprocketPath.GetKeyPath(), colorSampler, *ccua);

        // access the AnimationControl for the View we want to conduct playback on and supply the Animation from the previous step
        AnimationControl animationControl = view.GetAnimationControl();
        animationControl.SetAnimation(animation);
        animationControl.SetMillisecondsPerTick(1000);
        animationControl.Play();
// specify the attributes of your keyframes, and when they should occur in the animation
// in this case, we are starting at black, changing to red, then purple
RGBColorKeyframe colorKeyframe1 = new RGBColorKeyframe(0, new RGBColor(0, 0, 0));
RGBColorKeyframe colorKeyframe2 = new RGBColorKeyframe(2, new RGBColor(1, 0, 0));
RGBColorKeyframe colorKeyframe3 = new RGBColorKeyframe(4, new RGBColor(1, 0, 1));

// the RGBColorKeyframeArray simply collects all over our keyframes for this animation
RGBColorKeyframe[] keyframeArray = new RGBColorKeyframe[3];
keyframeArray[0] = colorKeyframe1;
keyframeArray[1] = colorKeyframe2;
keyframeArray[2] = colorKeyframe3;

// we set the animation type (in this case, it is a linear animation) in
// the RGBColorSampler and add the keyframes from the previous step
RGBColorSampler colorSampler = new RGBColorSampler();
colorSampler.SetInterpolation(HPS.Sampler.InterpolationType.Linear);
colorSampler.AddKeyframes(keyframeArray);

ChannelColorUsage[] ccua = new ChannelColorUsage[1];
ccua[0] = HPS.ChannelColorUsage.Face;

// using the SprocketPath and a channel, we complete the Animation object
SprocketPath sprocketPath = new SprocketPath(canvas);
Animation animation = model.CreateAnimation("color");
animation.AddColorChannel("colorChannel", sprocketPath.GetKeyPath(), colorSampler, ccua);

// access the AnimationControl for the View we want to conduct playback on and supply the Animation from the previous step
AnimationControl animationControl = view.GetAnimationControl();
animationControl.SetAnimation(animation);
animationControl.SetMillisecondsPerTick(1000);
animationControl.Play();
Multiple subentities may also be animated using the same Animation. If, for example, you wanted to animate faces, lines, edges, markers, or any combination of these, simply specify that in the ChannelColorUsageArray. For example:
ccua->push_back(HPS::ChannelColorUsage::Edges);
ccua->push_back(HPS::ChannelColorUsage::Lines);
ccua->push_back(HPS::ChannelColorUsage::Markers);
ccua[0] = HPS.ChannelColorUsage.Edges;
ccua[1] = HPS.ChannelColorUsage.Lines;
ccua[2] = HPS.ChannelColorUsage.Markers;
Animating Scale
To animate scale, you would build the animation in the same way as the translation example (see above), using HPS::VectorKeyframe and associated classes. In this case, the keyframe values represent scale rather than position. And instead of adding a translation channel, you would add a scale channel using HPS::Animation::AddScaleChannel. Here’s an example of code that scales a model by 300%:
        // get a reference to the objects in the view hierarchy
        Canvas canvas = HPS::Factory::CreateCanvas(windowKey);
        View view = HPS::Factory::CreateView();
        Model model = HPS::Factory::CreateModel();

        canvas.AttachViewAsLayout(view);
        view.AttachModel(model);

        VectorKeyframe vectorKeyframe1(0, Vector(1, 1, 1));
        VectorKeyframe vectorKeyframe2(1, Vector(3, 3, 3));

        VectorKeyframeArray keyframeArray;
        keyframeArray.push_back(vectorKeyframe1);
        keyframeArray.push_back(vectorKeyframe2);

        VectorSampler vectorSampler;
        vectorSampler.SetInterpolation(HPS::Sampler::InterpolationType::Linear);
        vectorSampler.AddKeyframes(keyframeArray);

        SprocketPath sprocketPath(canvas);
        Animation animation = model.CreateAnimation("scale");
        animation.AddScaleChannel("scaleChannel", sprocketPath.GetKeyPath(), vectorSampler);

        AnimationControl animationControl = view.GetAnimationControl();
        animationControl.SetAnimation(animation);
        animationControl.SetMillisecondsPerTick(1000);
        animationControl.Play();
// get a reference to the objects in the view hierarchy
Canvas canvas = HPS.Factory.CreateCanvas(windowKey);
View view = HPS.Factory.CreateView();
Model model = HPS.Factory.CreateModel();

canvas.AttachViewAsLayout(view);
view.AttachModel(model);

VectorKeyframe vectorKeyframe1 = new VectorKeyframe(0, new Vector(1, 1, 1));
VectorKeyframe vectorKeyframe2 = new VectorKeyframe(1, new Vector(3, 3, 3));

VectorKeyframe[] keyframeArray = new VectorKeyframe[2];
keyframeArray[0] = vectorKeyframe1;
keyframeArray[1] = vectorKeyframe2;

VectorSampler vectorSampler = new VectorSampler();
vectorSampler.SetInterpolation(HPS.Sampler.InterpolationType.Linear);
vectorSampler.AddKeyframes(keyframeArray);

SprocketPath sprocketPath = new SprocketPath(canvas);
Animation animation = model.CreateAnimation("scale");
animation.AddScaleChannel("scaleChannel", sprocketPath.GetKeyPath(), vectorSampler);

AnimationControl animationControl = view.GetAnimationControl();

animationControl.SetAnimation(animation);
animationControl.SetMillisecondsPerTick(1000);
animationControl.Play();
Other Animation Types
Supported animation types, keyframes, and the samplers they work with are listed in the following table:
| Animation type | Associated keyframe | Associated sampler |
|---|---|---|
| Camera position | HPS::PointKeyframe | HPS::PointSampler |
| Camera target | HPS::PointKeyframe | HPS::PointSampler |
| Camera up vector | HPS::VectorKeyframe | HPS::VectorSampler |
| Color | HPS::RGBColorKeyframe | HPS::RGBColorSampler |
| Opacity | HPS::FloatKeyframe | HPS::FloatSampler |
| Rotation | HPS::QuaternionKeyframe | HPS::QuaternionSampler |
| Scale | HPS::VectorKeyframe | HPS::VectorSampler |
| Translation | HPS::VectorKeyframe | HPS::VectorSampler |
Interpolation Types
So far, all of our examples have used linear interpolation, however, there are a few other options available if you require them:
| Interpolation type | Description |
|---|---|
HPS::Sampler::InterpolationType::Constant |
Will not interpolate your model between keyframes. Instead, the model abruptly changes state to the next keyframe. |
HPS::Sampler::InterpolationType::Linear |
Interpolates between keyframes in a steady manner. |
HPS::Sampler::InterpolationType::SphericalLinear |
Currently used just for rotation animations. Can be used as a smoother way to interpolate quaternions - commonly referred to as ‘slerp’. |
HPS::Sampler::InterpolationType::Spline |
HOOPS Visualize Desktop will compute a spline between keyframes that will be used to affect the animation. |
The next section illustrates how the interpolation types change the result. It will also demonstrate how to animate specific segments rather than the entire scene.
Animating Specific Segments
Below is an example showing the difference between constant and linear interpolation of a color animation. It’s also an example of how to animate different segments in the same scene. We’ve created some sample geometry - two cylinders which each exist in separate segments. These cylinders are using the same keyframes and colors, but use different interpolation types. Also note how the HPS::KeyPath objects are built from leaf to root, specifying two individual segments that we want to animate independent of the rest of the scene. This is different from previous examples, where we used the HPS::KeyPath parameter to simply animate all geometry in the canvas as a whole:
        // get a reference to the objects in the view hierarchy
        Canvas canvas = HPS::Factory::CreateCanvas(windowKey);
        View view = HPS::Factory::CreateView();
        Model model = HPS::Factory::CreateModel();

        canvas.AttachViewAsLayout(view);
        view.AttachModel(model);

        // set attributes for edge color and visibility
        model.GetSegmentKey().GetMaterialMappingControl().SetEdgeColor(RGBColor(0, 0, 0));
        model.GetSegmentKey().GetVisibilityControl().SetEdges(true);

        // create segment for constant transition geometry
        SegmentKey constantTransitionKey = model.GetSegmentKey().Down("constant", true);
        constantTransitionKey.InsertCylinder(Point(1, 1, 1), Point(2, 2, 2), 0.85f);
        constantTransitionKey.GetMaterialMappingControl().SetFaceColor(RGBColor(1, 0, 0));

        // create segment for smooth transtion geometry
        SegmentKey smoothTransitionKey = model.GetSegmentKey().Down("smooth", true);
        smoothTransitionKey.InsertCylinder(Point(4, 4, 4), Point(5, 5, 5), 0.85f);
        smoothTransitionKey.GetMaterialMappingControl().SetFaceColor(RGBColor(1, 0, 0));

        // creating KeyPath for constant transtion segment
        KeyPath constantKeyPath;
        constantKeyPath.Append(constantTransitionKey);
        constantKeyPath.Append(model.GetSegmentKey());
        constantKeyPath.Append(view.GetSegmentKey());
        constantKeyPath.Append(canvas.GetWindowKey());

        // creating KeyPath for smooth transition segment
        KeyPath smoothKeyPath;
        smoothKeyPath.Append(smoothTransitionKey);
        smoothKeyPath.Append(model.GetSegmentKey());
        smoothKeyPath.Append(view.GetSegmentKey());
        smoothKeyPath.Append(canvas.GetWindowKey());

        // center the geometry in the view
        view.FitWorld();
        canvas.Update();

        // set up keyframes for our transitions
        RGBColorKeyframe colorKeyframe1(0, RGBColor(0, 0, 1));
        RGBColorKeyframe colorKeyframe2(1, RGBColor(1, 1, 0));
        RGBColorKeyframe colorKeyframe3(2, RGBColor(0, 1, 1));
        RGBColorKeyframe colorKeyframe4(3, RGBColor(1, 1, 0));
        RGBColorKeyframe colorKeyframe5(4, RGBColor(0, 0, 1));

        // keyframes go into array
        RGBColorKeyframeArray colorKeyframeArray;
        colorKeyframeArray.push_back(colorKeyframe1);
        colorKeyframeArray.push_back(colorKeyframe2);
        colorKeyframeArray.push_back(colorKeyframe3);
        colorKeyframeArray.push_back(colorKeyframe4);
        colorKeyframeArray.push_back(colorKeyframe5);

        // set up color sampler for constant transitions
        RGBColorSampler colorSamplerConstant;
        colorSamplerConstant.SetInterpolation(HPS::Sampler::InterpolationType::Constant);
        colorSamplerConstant.AddKeyframes(colorKeyframeArray);

        // set up color sampler for smooth transitions
        RGBColorSampler colorSamplerSmooth;
        colorSamplerSmooth.SetInterpolation(HPS::Sampler::InterpolationType::Linear);
        colorSamplerSmooth.AddKeyframes(colorKeyframeArray);

        // create an animation object.
        // note that a single animation object contains both channels
        Animation animation = model.CreateAnimation("color");
        animation.AddColorChannel("colorChannel1", constantKeyPath, colorSamplerConstant);
        animation.AddColorChannel("colorChannel2", smoothKeyPath, colorSamplerSmooth);

        AnimationControl animationControl = view.GetAnimationControl();
        animationControl.SetAnimation(animation);
        animationControl.SetMillisecondsPerTick(1000);
        animationControl.Play();
// get a reference to the objects in the view hierarchy
Canvas canvas = HPS.Factory.CreateCanvas(windowKey);
View view = HPS.Factory.CreateView();
Model model = HPS.Factory.CreateModel();

canvas.AttachViewAsLayout(view);
view.AttachModel(model);

// set attributes for edge color and visibility
model.GetSegmentKey().GetMaterialMappingControl().SetEdgeColor(new RGBAColor(0, 0, 0));
model.GetSegmentKey().GetVisibilityControl().SetEdges(true);

// create segment for constant transition geometry
SegmentKey constantTransitionKey = model.GetSegmentKey().Down("constant", true);
constantTransitionKey.InsertCylinder(new Point(1, 1, 1), new Point(2, 2, 2), 0.85f);
constantTransitionKey.GetMaterialMappingControl().SetFaceColor(new RGBAColor(1, 0, 0));

// create segment for smooth transtion geometry
SegmentKey smoothTransitionKey = model.GetSegmentKey().Down("smooth", true);
smoothTransitionKey.InsertCylinder(new Point(4, 4, 4), new Point(5, 5, 5), 0.85f);
smoothTransitionKey.GetMaterialMappingControl().SetFaceColor(new RGBAColor(1, 0, 0));

// creating KeyPath for constant transtion segment
KeyPath constantKeyPath = new KeyPath();
constantKeyPath.Append(constantTransitionKey);
constantKeyPath.Append(model.GetSegmentKey());
constantKeyPath.Append(view.GetSegmentKey());
constantKeyPath.Append(canvas.GetWindowKey());

// creating KeyPath for smooth transition segment
KeyPath smoothKeyPath = new KeyPath();
smoothKeyPath.Append(smoothTransitionKey);
smoothKeyPath.Append(model.GetSegmentKey());
smoothKeyPath.Append(view.GetSegmentKey());
smoothKeyPath.Append(canvas.GetWindowKey());

// center the geometry in the view
view.FitWorld();
canvas.Update();

// set up keyframes for our transitions
RGBColorKeyframe colorKeyframe1 = new RGBColorKeyframe(0, new RGBColor(0, 0, 1));
RGBColorKeyframe colorKeyframe2 = new RGBColorKeyframe(1, new RGBColor(1, 1, 0));
RGBColorKeyframe colorKeyframe3 = new RGBColorKeyframe(2, new RGBColor(0, 1, 1));
RGBColorKeyframe colorKeyframe4 = new RGBColorKeyframe(3, new RGBColor(1, 1, 0));
RGBColorKeyframe colorKeyframe5 = new RGBColorKeyframe(4, new RGBColor(0, 0, 1));

// keyframes go into array
RGBColorKeyframe[] colorKeyframeArray = new RGBColorKeyframe[5];
colorKeyframeArray[0] = colorKeyframe1;
colorKeyframeArray[1] = colorKeyframe2;
colorKeyframeArray[2] = colorKeyframe3;
colorKeyframeArray[3] = colorKeyframe4;
colorKeyframeArray[4] = colorKeyframe5;

// set up color sampler for constant transitions
RGBColorSampler colorSamplerConstant = new RGBColorSampler();
colorSamplerConstant.SetInterpolation(HPS.Sampler.InterpolationType.Constant);
colorSamplerConstant.AddKeyframes(colorKeyframeArray);

// set up color sampler for smooth transitions
RGBColorSampler colorSamplerSmooth = new RGBColorSampler();
colorSamplerSmooth.SetInterpolation(HPS.Sampler.InterpolationType.Linear);
colorSamplerSmooth.AddKeyframes(colorKeyframeArray);

// create an animation object.
// note that a single animation object contains both channels
Animation animation = model.CreateAnimation("color");
animation.AddColorChannel("colorChannel1", constantKeyPath, colorSamplerConstant);
animation.AddColorChannel("colorChannel2", smoothKeyPath, colorSamplerSmooth);

AnimationControl animationControl = view.GetAnimationControl();

animationControl.SetAnimation(animation);
animationControl.SetMillisecondsPerTick(1000);
animationControl.Play();
Note there is nothing to load in a separate step - you can run this example as-is in one of the sandboxes included with HOOPS Visualize Desktop. The result of this code is shown below. The linearly interpolated cylinder is at the top, the constant interpolation is below:
Other Notes
Rendering speed. HOOPS Visualize Desktop will do its best to keep your animation running according to your specification. However, updates scheduled by the animation API are not interrupted if they cannot be completed before the next frame is scheduled. Therefore, if the hardware is unable to keep up with the rendering demands of the scene, frames will be skipped. For example, let’s say you set a “milliseconds-per-tick” value of 1000 with ten keyframes which occur at ticks 1-10 (keyframe value changes occur every second), but the hardware needs two seconds to complete each update. In this case, you would see the animation render every other tick.

