Polygons
A polygon defines a flat surface in space, and is composed of an edges and a face. Polygons may be concave or convex, but must be planar (the behavior of non-planar polygons is undefined). One way to ensure that polygons sent to HOOPS Visualize Desktop are planar is to break up your polygons into triangles, since triangles are always planar. Polygons are assumed to be closed shapes, therefore it is not necessary to specify the last point as HOOPS Visualize Desktop will close the polygon automatically.
Polygons can be thought of as a simpler alternative to shells. Polygons are implicitly connected, so inserting them is faster and easier. This makes them a good replacement for small, simple shells. They also have a more efficient representation in memory when compared to shells. However, they are not as capable - for example, they cannot be smooth shaded, multi-colored, textured, nor can attributes be set on their sub-parts. Inserting a polygon can be done in the following way:
    PointArray pointArray(5); // a PointArray is a typedef'd STL vector

    // specify points
    pointArray[0] = Point(0.15f, 0.25f, 0);
    pointArray[1] = Point(-0.35f, 0.35f, 0);
    pointArray[2] = Point(-0.65f, 0, 0);
    pointArray[3] = Point(-0.35f, -0.4f, 0);
    pointArray[4] = Point(0.15f, -0.15f, 0);

    HPS::PolygonKey polygonKey = mySegmentKey.InsertPolygon(pointArray);
HPS.Point[] pointArray = new HPS.Point[5]; // a PointArray is a typedef'd STL vector

// specify points
pointArray[0] = new HPS.Point(0.15f, 0.25f, 0);
pointArray[1] = new HPS.Point(-0.35f, 0.35f, 0);
pointArray[2] = new HPS.Point(-0.65f, 0, 0);
pointArray[3] = new HPS.Point(-0.35f, -0.4f, 0);
pointArray[4] = new HPS.Point(0.15f, -0.15f, 0);

HPS.PolygonKey polygonKey = mySegmentKey.InsertPolygon(pointArray);
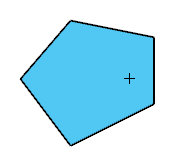
A simple polygon
NOTE: When inserting points, if the first point is the same as the last point, HOOPS Visualize Desktop will eliminate the last point in order to optimize the polygon. This is important to remember if you later edit the polygon, because the number of points will be different. If you try to index a point that is outside the range of the number of polygon points, you will get an HPS::IndexOutOfRange exception.
The shape above could have been drawn as a polyline. However, an important distinction to note is that a polyline is made up of only lines whereas a polygon, like all faceted objects, always has edges and faces. Therefore, edge attributes, such as weight, are controlled using the segment’s HPS::EdgeAttributeControl and colors are controlled by the HPS::MaterialMappingControl. Setting attributes is done in this way:
    mySegmentKey.GetVisibilityControl().SetFaces(true);
    mySegmentKey.GetEdgeAttributeControl().SetWeight(2);
    mySegmentKey.GetMaterialMappingControl().SetEdgeColor(RGBColor(0, 0, 0));
    mySegmentKey.GetMaterialMappingControl().SetFaceColor(RGBColor(0.32f, 0.78f, 0.95f));
mySegmentKey.GetVisibilityControl().SetFaces(true);
mySegmentKey.GetEdgeAttributeControl().SetWeight(2);
mySegmentKey.GetMaterialMappingControl().SetEdgeColor(new HPS.RGBAColor(0, 0, 0));
mySegmentKey.GetMaterialMappingControl().SetFaceColor(new HPS.RGBAColor(0.32f, 0.78f, 0.95f));
Editing polygons is relatively simple. Modifications can be made via deletion, replacing, or inserting points. Using the HPS::PolygonKey, the code below operates on the original polygon and transforms it into something that looks completely different. Note that after the polygon is inserted, it is possible to reuse the PointArray without any detrimental results:
    // reassign the first point
    editedPoints[0] = Point(-0.35f, 0.65f, 0);

    // replacing point at offset 1
    polygonKey.EditPointsByReplacement(1, editedPoints);

    // deleting point at offset 3
    polygonKey.EditPointsByDeletion(3, 1);

    // inserting a new point at offset 4
    editedPoints[0] = Point(0.25, 0, 0);
    polygonKey.EditPointsByInsertion(4, editedPoints);

    // to get a list of all the points in the polygon, use ShowPoints
    polygonKey.ShowPoints(editedPoints);
// reassign the first point
editedPoints[0] = new HPS.Point(-0.35f, 0.65f, 0);

// replacing point at offset 1
polygonKey.EditPointsByReplacement(1, editedPoints);

// deleting point at offset 3
polygonKey.EditPointsByDeletion(3, 1);

// inserting a new HPS.Point at offset 4
editedPoints[0] = new HPS.Point(0.25f, 0, 0);
polygonKey.EditPointsByInsertion(4, editedPoints);

// to get a list of all the points in the polygon, use ShowPoints
polygonKey.ShowPoints(out editedPoints);
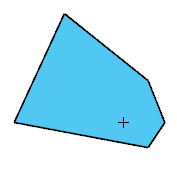
The edited polygon
If you find you need to convert a polygon into a shell to take advantage of some of the advanced options offered by shells, you can perform the conversion as described in this section.

