Highlighting
After a selection is performed, it is usually desirable to provide visual feedback to the user regarding what was selected. In HOOPS Visualize Desktop, this concept is called highlighting. The details of how to represent highlighting are up to the developer. You could choose to modify an object’s color, line weight, vertex/edge/face visibility, material, shading mode, or any combination of these and other attributes. Selection and highlighting are two distinct operations. Thus, it isn’t necessary to perform a selection before highlighting an object, nor must you highlight something that was selected.
Highlighting can be applied at several different levels:
| Selection level | Description |
|---|---|
HPS::SelectionResults |
The complete contents of a HPS::SelectionResults object can be highlighted. |
HPS::SelectionItem |
A single item within a HPS::SelectionResults object can be highlighted. |
HPS::SearchResults |
The complete results of a search can be highlighted. |
HPS::KeyPath |
A common selection case is to highlight a model sub-assembly. This is accomplished using a HPS::KeyPath. |
HPS::Key |
The contents of a segment can be highlighted. |
Note that a single geometric entity cannot be highlighted by simply providing its key. HOOPS Visualize Desktop does not allow this because commonly, geometry is duplicated across the scene through the use of include segments. To avoid the ambiguous possibility of the same geometry being rendered multiple times, a HPS::KeyPath is required to provide resolution. The HPS::KeyPath object is discussed in this section.
The HPS::HighlightControl is the object that controls this mechanic. It is only available from a HPS::WindowKey and uses the attributes of defined styles to achieve the highlight effect. The code below defines a simple style and highlights an object based on its key path.
        HPS::NamedStyleDefinition orange_style = myPortfolio.DefineNamedStyle("myHighlightStyle", mySegmentKey);
        mySegmentKey.GetMaterialMappingControl().SetFaceColor(HPS::RGBAColor(0.89f, 0.62f, 0.11f));

        HPS::HighlightOptionsKit hok;
        hok.SetStyleName(HPS::UTF8("myHighlightStyle"));
        myWindowKey.GetPortfolioControl().Push(myPortfolio);
        myWindowKey.GetHighlightControl().Highlight(keyPath, hok);
HPS.NamedStyleDefinition orange_style = myPortfolio.DefineNamedStyle("myHighlightStyle", mySegmentKey);
mySegmentKey.GetMaterialMappingControl().SetFaceColor(new HPS.RGBAColor(0.89f, 0.62f, 0.11f));

HPS.HighlightOptionsKit hok = new HPS.HighlightOptionsKit();
hok.SetStyleName("myHighlightStyle");
myWindowKey.GetPortfolioControl().Push(myPortfolio);
myWindowKey.GetHighlightControl().Highlight(keyPath, hok);
Why would you complicate matters by using the highlight control when you could just apply a style manually? You certainly could apply it manually, but the highlighting mechanic keeps track of what is highlighted so that it can easily be unhighlighted at a future time. It also enables you to easily select from highlight styles you’ve previously defined. For information on how to build a highlight style, see this section.
The following screenshots show examples of highlight styles:
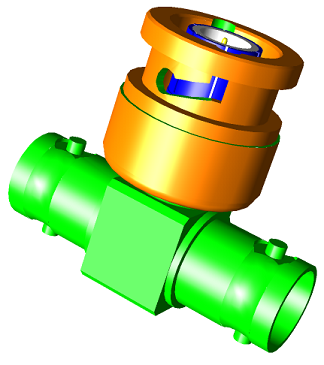
An unhighlighted model
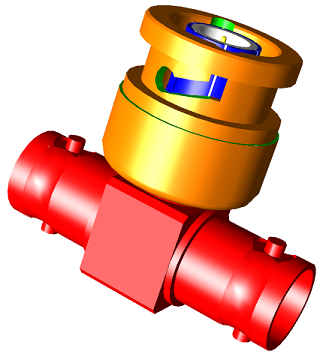
The model’s bottom tube has been highlighted with an opaque red highlight style.
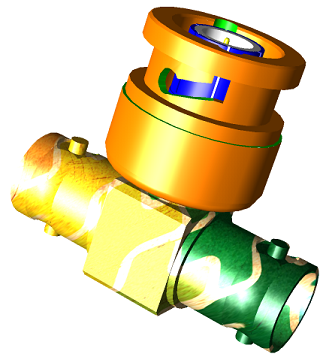
The model’s bottom tube has been highlighted with a textured highlight style.
Overlays
All highlighting is performed using the concept of overlays. An overlay will allow an entity to be highlighted without redrawing the entire scene. When using overlays with a highlight style, you should set the overlay with the highlight options kit, not in the style itself. If both the highlight options kit and highlight style define different overlay settings, the result is undefined.
More information on overlays can be found here.
Using a Highlight Operator
The HPS::HighlightOperator and HPS::HighlightAreaOperator provide visual feedback by applying a style to a selected object. The highlighting operators derive from the selection operators, and thus, can be used to perform selection as well. The style, or “highlight”, is set by passing a HPS::HighlightOptionsKit to the operator before the selection occurs.
    HPS::HighlightOperator* highlightOperator = new HPS::HighlightOperator(HPS::MouseButtons::ButtonLeft());
    myView.GetOperatorControl().Push(highlightOperator); // makes 'highlightOperator' active

    // set the highlight style, which must be predefined
    HPS::HighlightOptionsKit hok("myHighlightStyle");

    highlightOperator->SetHighlightOptions(hok);

    // ... <perform selection>
    // ... <style is applied automatically to the selection set>
HPS.HighlightOperator highlightOperator
    = new HPS.HighlightOperator(HPS.MouseButtons.ButtonLeft());
myView.GetOperatorControl().Push(highlightOperator); // makes 'highlightOperator' active

// set the highlight style, which must be predefined
HPS.HighlightOptionsKit hok = new HPS.HighlightOptionsKit("myHighlightStyle");

highlightOperator.SetHighlightOptions(hok);

// ... <perform selection>
// ... <style is applied automatically to the selection set>
For information on how to define the highlight style itself, see this section of the Programming Guide. If you need more control over how highlights are applied, refer to the custom operators section for details on how to create your own custom operator.
Searching for Highlights
There are two built-in methods for obtaining highlight information from the scene:
- the
HPS::WindowKey::FindHighlights()function - the
HPS::HighlightControl::ShowHighlightStatefunction
FindHighlights()
To find highlighted elements in your scene, pass a HPS::HighlightSearchResults object to the HPS::WindowKey function. In the following example, we’ll set an option in the HPS::HighlightSearchOptionsKit to limit our search to items that use the WithZValues overlay type:
            HPS::HighlightSearchOptionsKit hsok = HPS::HighlightSearchOptionsKit();

            // search for elements that use the Z-values overlay type
            hsok.SetOverlay(Drawing::Overlay::WithZValues);

            HPS::HighlightSearchResults hsr = HPS::HighlightSearchResults();
            size_t numHighlights = myWindowKey.FindHighlights(hsok, hsr);
            HPS::HighlightSearchResultsIterator it = hsr.GetIterator();

            while (it.IsValid()) {
                UTF8 style_name = it.GetStyleName();
                Drawing::Overlay overlay = it.GetOverlay();
                ++it;
            }
HPS.HighlightSearchOptionsKit hsok = new HPS.HighlightSearchOptionsKit();

//search for elements that use the Z-values overlay type
hsok.SetOverlay(Drawing.Overlay.WithZValues);

HPS.HighlightSearchResults hsr = new HPS.HighlightSearchResults();
ulong numHighlights = myWindowKey.FindHighlights(hsok, out hsr);
HighlightSearchResultsIterator it = hsr.GetIterator();

while (it.IsValid())
{
    string style_name = it.GetStyleName();
    Drawing.Overlay overlay = it.GetOverlay();
    it.Next();
}
Using the HPS::HighlightSearchResultsIterator, you can inspect each element in the HPS::HighlightSearchResults object.
ShowHighlightState()
The HPS::HighlightState object is populated with the HPS::HighlightControl::ShowHighlightState function. In this case, we’re filtering our results
with the HPS::HighlightSearchOptionsKit by searching only for highlighted items that use the built-in named style “highlight_style”:
            HPS::HighlightSearchOptionsKit hsok = HPS::HighlightSearchOptionsKit();

            // optional: search for elements that use the "highlight_style" named style
            hsok.SetStyleName("highlight_style");

            HPS::HighlightControl myHighlightControl = HPS::HighlightControl(myWindowKey);

            HPS::HighlightState myHighlightState = HPS::HighlightState();
            myHighlightControl.ShowHighlightState(myKeyPath, hsok, myHighlightState);

            // does this segment inherit a highlight from a parent segment?
            bool inheritsHighlight = myHighlightState.GetInheritsHighlight();

            // does this segment contain a highlighted subentity (e.g., face or vertex)?
            bool containsHighlightedSubentities = myHighlightState.GetSubentityHighlighted();

            // are any of the keys on the given keypath directly highlighted?
            bool isDirectlyHighlighted = myHighlightState.GetDirectlyHighlighted();

            // is there a highlight in a child segment on this keypath?
            bool isOnHighlightPath = myHighlightState.GetOnHighlightPath();
HPS.HighlightSearchOptionsKit hsok = new HPS.HighlightSearchOptionsKit();

//optional: search for elements that use the "highlight_style" named style
hsok.SetStyleName("highlight_style");

HPS.HighlightControl myHighlightControl = new HPS.HighlightControl(myWindowKey);

HPS.HighlightState myHighlightState = new HPS.HighlightState();
myHighlightControl.ShowHighlightState(myKeyPath, hsok, out myHighlightState);

//does this segment inherit a highlight from a parent segment?
bool inheritsHighlight = myHighlightState.GetInheritsHighlight();

//does this segment contain a highlighted subentity (e.g., face or vertex)?
bool containsHighlightedSubentities = myHighlightState.GetSubentityHighlighted();

//are any of the keys on the given keypath directly highlighted?
bool isDirectlyHighlighted = myHighlightState.GetDirectlyHighlighted();

//is there a highlight in a child segment on this keypath?
bool isOnHighlightPath = myHighlightState.GetOnHighlightPath();
After calling HPS::HighlightControl::ShowHighlightState, you can call various functions on the HighlightState object to gather details about highlighting on the keypath:
GetInheritsHighlight()indicates whether the keypath contains a highlight inherited from from a parent segment.GetSubentityHighlighted()indicates whether this segment contains a highlighted subentity (e.g., face or vertex). This function is only useful for shells and meshes.GetDirectlyHighlighted()indicates if any of the keys on theHPS::KeyPathare directly highlighted (i.e., the highlight is set on this segment and not just inherited from a parent segment).GetOnHighlightPath()indicates whether there’s a highlight in a child segment on thisHPS::KeyPath.

