HOOPS Publish Integration
HOOPS Publish is the 3D PDF export library from Tech Soft 3D. Publish enables the developer to export a HOOPS Visualize Desktop scene to a 3D PDF file or an HTML file. An introduction to Publish can be found here.
All Publish classes are members of the HPS::Publish container class.
Prerequisites
A separate license is required to use HOOPS Publish. The interface described on this page is the way to connect HOOPS Visualize Desktop with HOOPS Publish. Publish is only supported on Windows only (C++ and C#).
Steps for integrating HOOPS Visualize Desktop with HOOPS Publish are delineated below:
Step 1: Install Publish
HOOPS Publish is distributed from the Tech Soft 3D Developer Zone - the first step is to download and install it. You do not have to generate a separate key to use the Publish component. The key will be embedded with your HOOPS Visualize Desktop license key.
Step 2: Set up the Environment
Publish uses the environment path to find the location of the supporting libraries. Add the location of the libraries to the path (note the different locations for 32 and 64-bit DLLs), for example, C:\Program Files\HOOPS_Publish\bin\win64.
Step 3: Include the Libraries In Your Project
The HOOPS Visualize Desktop-Publish interface library must be included as a dependency. C++ users will need to link to hps_sprk_publish.lib or hps_sprk_publish.so. C# users need to reference the hps_cs_sprk_publish_vc11 assembly.
Step 4: Include the Header File In Your Source (C++ Only)
Your source files that use the HOOPS Visualize Desktop-Publish interface must include sprk_publish.h.
At this point, Publish is ready to use in your application.
Simple Export
When initializing the HPS::World object in your application, you must also set the Publish resource directory. This directory is part of the Publish installation.
HPS::World world;
// replace the argument with the location of your resource directory world->SetPublishResourceDirectory(“C:/Program Files/HOOPS_Publish/bin/resource”);
HPS.World world = new HPS.World();
// replace the argument with the location of your resource directory world.SetPublishResourceDirectory(“C:/Program Files/HOOPS_Publish/bin/resource”);
To export a HOOPS Visualize Desktop model using HOOPS Publish, the view hierarchy must already be in place with the model residing in the HPS::Model segment. Once that prerequisite is met, only a few calls are required:
    // the SprocketPath is required to enable the exporter to locate the model
    HPS::SprocketPath sprocketPath(canvas, canvas.GetAttachedLayout(), view, model);

    // for this simple example, a default ExportOptionsKit is used
    HPS::Publish::File::ExportPDF(sprocketPath.GetKeyPath(), filename, HPS::Publish::ExportOptionsKit());
// the SprocketPath is required to enable the exporter to locate the model
HPS.SprocketPath sprocketPath = new HPS.SprocketPath(canvas, canvas.GetAttachedLayout(), view, model);

HPS.KeyPath[] keyPathArray = new HPS.KeyPath[1];
keyPathArray[0] = sprocketPath.GetKeyPath();

// for this simple example, a default ExportOptionsKit is used
HPS.Publish.File.ExportPDF(keyPathArray, filename, new HPS.Publish.ExportOptionsKit());
The Publish API is completely synchronous, so the export is complete once the call to Export returns.
IMPORTANT: The filename parameter in HPS::Publish::File::Export must include a fully-qualified path, or the export will fail.
Exporting HOOPS Exchange Data to 3D PDF
For those developers who are using HOOPS Exchange to load a CAD model, the export process is slightly different. If your model contains B-rep, and you want that data to be exported, you need to export using a HPS::CADModel instead of a HPS::SprocketPath. Doing so will export both the CAD model and any HOOPS Visualize Desktop data as unified model. If you don’t specify a HPS::CADModel, the Exchange geometry will be exported as tessellated triangles, and the B-rep data will be lost.
HPS::Publish::File::ExportPDF(cadModel, filename, HPS::Publish::ExportOptionsKit());
HPS.Publish.File.ExportPDF(cadModel, filename, new HPS.Publish.ExportOptionsKit());
Complex Export
To make a more complex PDF document, more work is required. In the following example, a document with two views is created, but the logic could be extended to accommodate other enhancements. Performing this complex export means interacting directly with the Publish API, including creating and configuring the Publish document object hierarchy.
    HPS::Publish::ViewKit viewKit; // corresponds to a particular view of the model
    HPS::Publish::ArtworkKit artworkKit; // container for Javascript, PMI, and views
    HPS::Publish::AnnotationKit annotationKit; // represents the model as an object in the PDF
    HPS::Publish::ButtonKit buttonKit; // corresponds to a button in a PDF page
    HPS::Publish::LinkKit linkKit; // corresponds to a link with Javascript in a PDF page
    HPS::Publish::PageKit pageKit; // corresponds to a page inside the PDF
    HPS::Publish::DocumentKit documentKit; // corresponds to the document itself as a whole
HPS.Publish.DocumentKit documentKit = new HPS.Publish.DocumentKit();	    // corresponds to a particular view of the model
HPS.Publish.ViewKit viewKit = new HPS.Publish.ViewKit();                    // container for Javascript, PMI, and views
HPS.Publish.ArtworkKit artworkKit = new HPS.Publish.ArtworkKit();           // represents the model as an object in the PDF
HPS.Publish.AnnotationKit annotationKit = new HPS.Publish.AnnotationKit();  // corresponds to a page inside the PDF
HPS.Publish.PageKit pageKit = new HPS.Publish.PageKit();                    // corresponds to the document itself as a whole
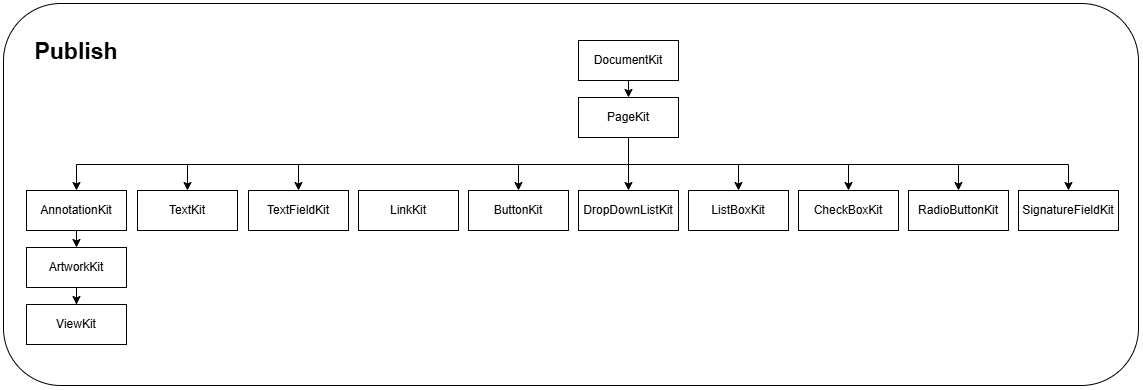
The HOOPS Publish object hierarchy
To set up each of the views, we’ll use a regular HOOPS Visualize Desktop HPS::CameraKit. The views are contained in an HPS::Publish::ArtworkKit object.
    HPS::CameraKit cameraKit;
    cameraKit = HPS::CameraKit::GetDefault();
    viewKit.SetCamera(cameraKit);
    viewKit.SetExternalName("My custom view #1"); // set the name of the view as it appears in the PDF

    artworkKit.AddView(viewKit);

    // add a second view
    cameraKit.SetPosition(Point(1, 1, 1));
    viewKit.SetCamera(cameraKit);
    viewKit.SetExternalName("My custom view #2");

    artworkKit.AddView(viewKit);
HPS.CameraKit cameraKit;
cameraKit = HPS.CameraKit.GetDefault();
viewKit.SetCamera(cameraKit);
viewKit.SetExternalName("My custom view #1");

artworkKit.AddView(viewKit);

// add a second view
cameraKit.SetPosition(new HPS.Point(1, 1, 1));
viewKit.SetCamera(cameraKit);
viewKit.SetExternalName("My custom view #2");

artworkKit.AddView(viewKit);
Setting the Export Source
Next, you’ll need to set the HPS::KeyPath (which contains the view hierarchy) as the source of the HPS::Publish::AnnotationKit. The HPS::KeyPath should point to the segment in the scene graph where the data export will begin. That segment and all of its subsegments will be exported.
NOTE: For those developers who are using HOOPS Exchange to load a CAD model, the export process is slightly different. If your model contains B-rep, and you want that data to be exported, you need to export using a HPS::CADModel instead of a HPS::KeyPath. Doing so will export both the CAD model and any HOOPS Visualize Desktop data as unified model. If you don’t specify a HPS::CADModel, the Exchange geometry will be exported as tessellated triangles, and the B-rep data will be lost. This behavior is controlled by setting the source of the annotation kit. Possible options for the source are shown below:
CADModel- Only the Exchange data is exported. If you added any HOOPS Visualize Desktop data, it will not be part of the export.KeyPathorKeyPathArray- Everything is exported, except B-rep data from the Exchange model (tessellation is still exported).CADModelandKeyPath- Everything, including B-rep and HOOPS Visualize Desktop data, is exported.
The Export function has overloads to handle all of these cases.
annotationKit.SetSource(cadModel, keyPathArray); // exporting everything
annotationKit.SetSource(cadModel, keyPathArray); // exporting everything
Putting Everything Together
When configuring the HPS::Publish::PageKit object, it is possible to specify what portion of the page that HOOPS Publish will appropriate for the 3D model. This is done by passing an HPS::IntRectangle, specified in points. Annotations are always specified using a rectangle. The origin is the bottom left corner of the page. Annotation kits can also be compressed by setting the compression options before export, as shown in the code snippet below. The compression algorithm is a lossy algorithm.
    HPS::SprocketPath sprocketPath(canvas, canvas.GetAttachedLayout(), view, model);

    annotationKit.SetArtwork(artworkKit);
    annotationKit.SetSource(sprocketPath.GetKeyPath());

    // set B-rep compression to Medium
    annotationKit.SetPRCBRepCompression(Publish::PRC::BRepCompression::Medium);
    // use tessellation compression
    annotationKit.SetPRCTessellationCompression(true);

    // the IntRectangle specifies the area of the page this model will use
    pageKit.SetAnnotation(annotationKit, IntRectangle(50, 562, 50, 742));
    documentKit.AddPage(pageKit);

    HPS::Publish::File::ExportPDF(documentKit, filename, Publish::ExportOptionsKit());
HPS.SprocketPath sprocketPath = new HPS.SprocketPath(canvas, canvas.GetAttachedLayout(), view, model);
HPS.KeyPath[] keyPathArray = new HPS.KeyPath[1];
keyPathArray[0] = sprocketPath.GetKeyPath();

annotationKit.SetArtwork(artworkKit);
annotationKit.SetSource(keyPathArray);

// set B-rep ccompression to Medium
annotationKit.SetPRCBRepCompression(HPS.Publish.PRC.BRepCompression.Medium);
// use tessellation compression
annotationKit.SetPRCTessellationCompression(true);

// the IntRectangle specifies the area of the page this model will use
pageKit.SetAnnotation(annotationKit, new HPS.IntRectangle(50, 562, 50, 742));
documentKit.AddPage(pageKit);

HPS.Publish.File.ExportPDF(documentKit, filename, new HPS.Publish.ExportOptionsKit());
IMPORTANT: The filename parameter in HPS::Publish::File::Export must include a fully-qualified path, or the export will fail.
Exporting With a Template
A PDF template is a special type of PDF file that might contain text fields, graphics, and blank areas that you can fill in with your data in order to compose a complete file. In HOOPS Visualize Desktop, templates are manipulated using the HPS::Publish::PageKit object.
A few sample templates are included with the HOOPS Publish package. This particular example is using BOM_A4Table_L.pdf. Whenever you are working with templates, you need to know beforehand the internal names of the fields that you want to fill in with data (there is no way to programmatically enumerate the field names). The template file in this example was generated using the source file found at <PUBLISH INSTALL DIR>\samples\publish\publishsource\BillOfMaterial\BillOfMaterial.cpp, and the field names can be found inside that file.
To export with a template, you would follow the steps in the previous snippets, but add the following template export code to your calls to HPS::Publish::PageKit. This code example will put the HOOPS Visualize Desktop model into the “My3DWindow” field:
        HPS::Publish::PageKit templateKit;
        templateKit.SetTemplateFile("<path to template file>");

        // see note below about the "_1" suffix
        templateKit.SetAnnotationByField("My3DWindow_1", annotationKit);

        // filling out a few of the template's text fields
        templateKit.SetTextValueByField("DocumentTitle_1", "BILL OF MATERIALS");
        templateKit.SetTextValueByField("Part NameRow1_1", "Turbine engine");
        templateKit.SetTextValueByField("SupplierRow1_1", "Tech Soft 3D");

        documentKit.AddPage(templateKit);

        HPS::Publish::File::ExportPDF(documentKit, filename, Publish::ExportOptionsKit());
HPS.Publish.PageKit templateKit = new HPS.Publish.PageKit();
templateKit.SetTemplateFile("<path to template file>");

// see note below about the "_1" suffix
templateKit.SetAnnotationByField("My3DWindow_1", annotationKit);

// filling out a few of the template's text fields
templateKit.SetTextValueByField("DocumentTitle_1", "BILL OF MATERIALS");
templateKit.SetTextValueByField("Part NameRow1_1", "Turbine engine");
templateKit.SetTextValueByField("SupplierRow1_1", "Tech Soft 3D");

documentKit.AddPage(templateKit);

HPS.Publish.File.ExportPDF(documentKit, filename, new HPS.Publish.ExportOptionsKit());
You may have noticed the “_1” suffix on the field names. The suffix indicates the page number of the PDF that you’re exporting to. So, to export to page 2, you would use a suffix of “_2”. In this way, you have control over the data that gets inserted at the page level. This example only has one page, but the field suffix is required nonetheless.
Exporting a Subtree
It is possible to export specific subtrees of a scene to a 3D PDF document, instead of having to export the whole model. To do this, you must use one of the HPS::AnnotationKit::SetSource methods and build a path to the segment you wish to export. SetSource accepts one of:
HPS::SprocketPathHPS::KeyPathHPS::KeyPathArray(for exporting multiple paths)
This example demonstrates how to export using a HPS::KeyPathArray:
    // get the path of the part you want to export
    HPS::KeyPathArray path = HPS::Component::GetKeyPath(componentModel[0]);

    // set the path on the AnnotationKit
    Publish::AnnotationKit annotationKit;
    annotationKit.SetSource(path);

    // for this simple example, a default ExportOptionsKit is used
    HPS::Publish::File::ExportPDF(annotationKit, output_filename, HPS::Publish::ExportOptionsKit());
// get the path of the part you want to export
HPS.KeyPath[] keyPath = HPS.Component.GetKeyPath(componentModel[0]);

// set the path on the AnnotationKit
HPS.Publish.AnnotationKit annotationKit = new HPS.Publish.AnnotationKit();
annotationKit.SetSource(keyPath);

// for this simple example, a default ExportOptionsKit is used
HPS.Publish.File.ExportPDF(annotationKit,
                    output_filename,
                    new HPS.Publish.ExportOptionsKit());
Widgets
Links
Publish allows you to add links in the PDF document on the exported pages. In the context of a PDF document, links are regions of the page which, when clicked, will invoke JavaScript embedded in the document. It’s important to note that the link itself is just a rectangular region on the page, which may have an associated color, border, and highlight mode. It does not contain text or images. If you want a text string or an image to appear at the link location, that needs to be inserted separately using the appropriate API functions.
    linkKit.SetJavaScript("//activate page 2\n"
                          "var a3d = this.getAnnots3D( 1 )[0];\n"
                          "a3d.activated=true;\n"
                          "c3d = a3d.context3D;\n"
                          "c3d.runtime.setView(\"ALL\", true);\n");
    linkKit.SetBorderWidth(1);
    linkKit.SetBorderColor(RGBColor(0));
    linkKit.SetHighlighting(HPS::Publish::Highlighting::Mode::Invert);

    pageKit.AddLink(linkKit, IntRectangle(251, 361, 229, 255));
HPS.Publish.LinkKit myLinkKit = new HPS.Publish.LinkKit();
myLinkKit.SetJavaScript("//activate page 2\n" +
	"var a3d = this.getAnnots3D( 1 )[0];\n" +
	"a3d.activated=true;\n" +
	"c3d = a3d.context3D;\n" +
	"c3d.runtime.setView(\"ALL\", true);\n");
myLinkKit.SetBorderWidth(1);
myLinkKit.SetBorderColor(new HPS.RGBColor(0));
myLinkKit.SetHighlighting(HPS.Publish.Highlighting.Mode.Invert);

pageKit.AddLink(myLinkKit, new HPS.IntRectangle(251, 361, 229, 255));
Buttons
Buttons can be added anywhere on the page. Size is specified with a rectangle - all other options are set in the HPS::Publish::ButtonKit.
    // add button to the page
    buttonKit.SetLabel("This is a page button")
        .SetLabelPosition(Publish::Label::Position::OnTop)
        .SetHighlighting(Publish::Highlighting::Mode::Push)
        .SetVisibility(true)
        .SetFont(Publish::Text::Font::Name::TimesRoman)
        .SetFontSize(8)
        .SetTextColor(RGBColor(0, 0, 0))
        .SetFillColor(RGBColor(0.5f, 0.5f, 0.5f))
        .SetName("execute_button"); // setting the name of the button is required!

    pageKit.AddButton(buttonKit, HPS::IntRectangle(0, 120, 400, 450));
// add button to the page
HPS.Publish.ButtonKit buttonKit = new HPS.Publish.ButtonKit();
buttonKit.SetLabel("This is a page button")
    .SetLabelPosition(HPS.Publish.Label.Position.OnTop)
    .SetHighlighting(HPS.Publish.Highlighting.Mode.Push)
	.SetVisibility(true)
    .SetFont(HPS.Publish.Text.Font.Name.TimesRoman)
	.SetFontSize(8)
    .SetTextColor(new HPS.RGBColor(0, 0, 0))
    .SetFillColor(new HPS.RGBColor(0.5f, 0.5f, 0.5f))
	.SetName("execute_button"); // setting the name of the button is required!

pageKit.AddButton(buttonKit, new HPS.IntRectangle(0, 120, 400, 450));
Button logic is handled with Javascript that you add to the PDF document’s HPS::Publish::PageKit.
    HPS::Publish::PageKit myPageKit;

    // ... create buttons

    // specify Javascript as a string
    myPageKit.SetJavaScriptActionByField("execute_button", myJavascriptSource, HPS::Publish::Source::Type::Code);

    // source the Javascript from a file - "myJavascriptSource" is a file name
    myPageKit.SetJavaScriptActionByField("execute_button", myJavascriptSource, HPS::Publish::Source::Type::File);
HPS.Publish.PageKit myPageKit = new HPS.Publish.PageKit();

// ... create buttons

// specify Javascript as a string
myPageKit.SetJavaScriptActionByField("execute_button", myJavascriptSource,
    HPS.Publish.Source.Type.Code);

// source the Javascript from a file - "myJavascriptSource" is a file name
myPageKit.SetJavaScriptActionByField("execute_button", myJavascriptSource,
    HPS.Publish.Source.Type.Code);
Modifying PDF Files
So far, we have talked about building and exporting PDF files, but HOOPS Publish also allows you to open, inspect, modify, and write a PDF that already exists. To create an in-memory copy of a PDF, use the following code:
The code snippet above loads the file specified by filename and returns a HPS::Publish::DocumentKey. The HPS::Publish::DocumentKey can then be used to query and modify the structure of the PDF. Most of the functions correspond with the functions on HPS::Publish::DocumentKit, however, the Unset and Show functions are not available due to limitations in the Publish API.
If you need to make changes to a particular page, rather than make a document-wide setting, use the HPS::Publish::PageControl:
After you are finished making changes to the file, simply re-export the document the same way you would export a newly created file. The only difference is that you would use the HPS::Publish::DocumentKey instead of a HPS::SprocketPath or HPS::Publish::AnnotationKit.
Associated memory in HOOPS Publish is freed when the last HPS::Publish::DocumentKey reference goes out of scope, or the developer calls Delete on it.
Exportable Data
Not all data in a HOOPS Visualize Desktop scene is exportable via Publish. For those entities that are supported, Publish has its own internal representation; others are not supported at all. The table below lists entites that are exportable. If an attribute or entity is not mentioned in this list, you can assume it will not be exported.
Other Limitations
PRC: PRC data is exportable only if it was originally loaded with Exchange. If you use Publish to export a model that was loaded from Exchange, just the PRC data imported from Exchange will get written to the PDF (no scene graph changes will get exported). However, if you export a model that did not come from Exchange, the PRC data will be constructed from the scene graph and put into the PDF.
CATIA drawings: CATDrawings cannot be exported to 3D PDF. Attempting to export a CATDrawing to 3D PDF will result in an exception of type HPS::IOException, which will have a result field set to HPS::IOResult::UnsupportedFormat.
You can check whether an imported model is a CATDrawing by asking the HPS::CADModel for the “Filename” metadata, then checking whether its extension is CATDrawing (case insensitive). Alternatively, you can also check whether any of the HPS::CADModel subcomponents has the type ExchangeDrawingMask.
Error Handling
During the import process, Publish will trigger events when it detects a problem or has information to give you. For example, if Publish couldn’t find a referenced subcomponent in an assembly, or if there was some sort of import failure, a warning or error could be triggered. It the responsibility of your application to catch these events and respond appropriately.
The HOOPS Visualize Desktop-Publish interface will capture all events and wrap them into one of three types: HPS::InformationEvent, HPS::ErrorEvent, or HPS::WarningEvent. Each of these types derive from HPS::Event, thus, handling them is identical to handling any other type of HOOPS Visualize Desktop event (event handling is discussed here).
HPS::WarningEvent contains both a code and a message, while HPS::InformationEvent has only a message.
Exceptions
When you attempt to add any object to a Publish page, HOOPS Visualize Desktop pulls the data out of the kit and passes it to HOOPS Publish. Thus, if you pass an empty or invalid object, HOOPS Visualize Desktop will pass the equivalent structure to Publish. If Publish returns an error, HOOPS Visualize Desktop will throw an HPS::IOException, which includes a string describing the problem as well as the error code generated by Publish.
Exporting to HTML
In HOOPS Visualize Desktop, there are two ways to export to HTML, either through the HTML sprocket or through the Publish sprocket. With the Publish sprocket, it’s possible to import a CAD model from the Exchange sprocket; this offers a performance benefit because the model data can be read directly from the PRC created in Exchange without incurring the overhead needed for data conversion.
(Please note, the Publish HTML export feature is only available for 64-bit versions of the HOOPS Visualize Desktop API, and a HOOPS Exchange license is necessary to import files with the Exchange sprocket.)
To export your CAD model to HTML, first import it via the Exchange sprocket:
    Exchange::ImportNotifier notifier;
    Exchange::ImportOptionsKit importOptions = Exchange::ImportOptionsKit::GetDefault();
    importOptions.SetBRepMode(Exchange::BRepMode::BRepAndTessellation);
    notifier = Exchange::File::Import(myCADFilePath, importOptions);
    notifier.Wait();

    if (notifier.Status() != IOResult::Success) {
        // something went wrong with the file import
    }

    CADModel _cadModel = notifier.GetCADModel();

    try {
        Publish::File::ExportHTML(_cadModel, exportedHTMLFilePath, htmlTemplateFilePath, true);
    }
    catch (IOException const&) {
        // something went wrong with the HTML export
    }
    Exchange.ImportNotifier notifier;
    Exchange.ImportOptionsKit importOptions = Exchange.ImportOptionsKit.GetDefault();
    importOptions.SetBRepMode(Exchange.BRepMode.BRepAndTessellation);
    notifier = Exchange.File.Import(myCADFilePath, importOptions);
    notifier.Wait();

    if (notifier.Status() != IOResult.Success)
    {
        // something went wrong with the file import
    }
    HPS.CADModel _cadModel = notifier.GetCADModel();

    try
    {
        Publish.File.ExportHTML(_cadModel, exportedHTMLFilePath, htmlTemplateFilePath, true);
    }
    catch (IOException)
	{
        // something went wrong with the HTML export
    }
Once the import has completed, set a new CADModel object to the CADModel retrieved from the import notifier. Then call HPS::Publish::File::ExportHTML() with your CADModel object, the output file path, and the HTML template file.
For your convenience, there are two template files in the HOOPS Visualize Desktop package, HOOPSCommunicatorTemplate.html and HOOPSCommunicatorMinimalTemplate.html. The standard template includes advanced UI features, whereas the minimal template only includes the basic functionality for viewing a model.
For more information on modifying an HTML template file, please see Modifying the HTML Template.

