Glyphs
A glyph is a defined symbol used to represent a marker, a shell vertex, an element in a line pattern, or a line endpoint such as an arrowhead.
Each HOOPS Visualize Desktop segment has its own attribute setting for the current marker symbol. As glyphs are used as marker symbols, it follows that in order to use different glyphs as markers, you must use different segments. HOOPS Visualize Desktop comes with a number of glyphs predefined and ready to use. A list of these glyphs can be found in the appendix. Before using a pre-defined glyph, you must import it into the active portfolio. The code sample below demonstrates how to set a glyph as the current marker symbol and insert the marker at the origin:
    // CircleWithCircle is the internal name of the predefined glyph
    HPS::GlyphKit myGlyphKit = HPS::GlyphKit::GetDefault(HPS::Glyph::Default::CircleWithCircle);

    // you must name the glyph so it can be referenced later
    myPortfolio.DefineGlyph("circle in a circle", myGlyphKit);

    mySegmentKey.GetPortfolioControl().Push(myPortfolio);
    mySegmentKey.GetMarkerAttributeControl().SetSymbol("circle in a circle");

    mySegmentKey.InsertMarker(HPS::Point(0, 0, 0));
// CircleWithCircle is the internal name of the predefined glyph
HPS.GlyphKit myGlyphKit = HPS.GlyphKit.GetDefault(HPS.Glyph.Default.CircleWithCircle);

// you must name the glyph so it can be referenced later
myPortfolio.DefineGlyph("circle in a circle", myGlyphKit);

mySegmentKey.GetPortfolioControl().Push(myPortfolio);
mySegmentKey.GetMarkerAttributeControl().SetSymbol("circle in a circle");

mySegmentKey.InsertMarker(new HPS.Point(0, 0, 0));
Custom Glyphs
If the set of predefined glyphs is not sufficient, you can create a custom glyph. The following section demonstrates how to do that.
Glyphs are composed of one or more HPS::GlyphElement objects which are used to draw the lines, dots, and curves of the glyph. These elements can be any of the following:
| Geometry type | Associated class |
|---|---|
| circular arcs | HPS::CircularArcGlyphElement |
| ellipses | HPS::EllipseGlyphElement |
| lines | HPS::LineGlyphElement |
| infinite lines | HPS::InfiniteLineGlyphElement |
| individual pixels | HPS::DotGlyphElement |
Attribute settings for glyphs include color and fill and are set at the attribute level. Glyphs are programmatically defined as shown in the following steps:
Step 1: Segment Structure
As glyph settings affect glyphs at the segment-level, it is important to arrange the scene hierarchy to achieve the desired result. For this example, a new segment is created in order to make a glyph in the shape of a modified X. A new HPS::GlyphKit is also initialized.
    HPS::SegmentKey mySegmentKey = parentKey.Down("glyph", true);
    HPS::GlyphKit glyphKit;
HPS.SegmentKey mySegmentKey = parentKey.Down("glyph", true);
HPS.GlyphKit glyphKit = new HPS.GlyphKit();
Step 2: Set the Glyph Canvas
All glyphs have an associated drawing canvas, the maximum size of which is 256 x 256 units. Although glyphs are rectangular in shape, each one has a “radius” which sets the drawable area. The glyph offset must also be set. This locates the origin of the glyph coordinate system relative to the center of the glyph. For example, the following code sets a drawable area of -100 to 100 in both x and y directions, and additionally creates an offset of zero, leaving the origin in the center of the glyph.
    glyphKit.SetRadius(100);
    glyphKit.SetOffset(GlyphPoint(0, 0));
glyphKit.SetRadius(100);
glyphKit.SetOffset(new HPS.GlyphPoint(0, 0));
Step 3: Set the Glyph Geometry
This glyph will be drawn using lines, so the HPS::LineGlyphElement will be used. This class requires a series of HPS::GlyphPoint objects to build the line. There can be any number of line glyph elements in a single glyph, but for this example, only one is needed. The result is a sort of polyline. Note that the color is set at the element level using SetExplicitColor.
    HPS::GlyphPoint glyphPoints[] = {HPS::GlyphPoint(-100, -100),
                                     HPS::GlyphPoint(-100, 100),
                                     HPS::GlyphPoint(100, -100),
                                     HPS::GlyphPoint(100, 100),
                                     HPS::GlyphPoint(-100, -100)};

    HPS::LineGlyphElement lineGlyphElement;
    lineGlyphElement.SetPoints(5, glyphPoints);
    lineGlyphElement.SetExplicitColor(HPS::RGBColor(1, 0, 0)); // color will be red
HPS.GlyphPoint[] glyphPoints = { new HPS.GlyphPoint(-100, -100), new HPS.GlyphPoint(-100, 100),
                                 new HPS.GlyphPoint(100, -100), new HPS.GlyphPoint(100, 100),
                                 new HPS.GlyphPoint(-100, -100) };

HPS.LineGlyphElement lineGlyphElement = new HPS.LineGlyphElement();
lineGlyphElement.SetPoints(glyphPoints);
lineGlyphElement.SetExplicitColor(new HPS.RGBAColor(1, 0, 0)); // color will be red
Step 4: Assemble the GlyphElements into an Array
For a glyph that is composed of multiple elements, assembling the glyph elements into a collection seems more natural. However, regardless of the number of elements, the HPS::GlyphElementArray is necessary, even for a single element:
    HPS::GlyphElementArray gea;
    gea.push_back(lineGlyphElement); // array will contain one element only

    glyphKit.SetElements(gea); // set the elements into the GlyphKit
HPS.GlyphElement[] gea = { lineGlyphElement };

glyphKit.SetElements(gea);
Step 5: Define the Glyph in a Portfolio
All glyphs must be associated with a portfolio, and this portfolio must be made active for the segment that will display the glyph. Give your glyph a descriptive name if there is any possibility of ambiguity. Portfolios are discussed in detail in here.
    // create portfolio if one does not already exist
    HPS::PortfolioKey myPortfolio = HPS::Database::CreatePortfolio();

    // glyph is named "myCustomGlyph"
    myPortfolio.DefineGlyph("myCustomGlyph", glyphKit);

    mySegmentKey.GetPortfolioControl().Push(myPortfolio);
// create portfolio if one does not already exist
HPS.PortfolioKey myPortfolio = HPS.Database.CreatePortfolio();

// glyph is named "myCustomGlyph"
myPortfolio.DefineGlyph("myCustomGlyph", glyphKit);

mySegmentKey.GetPortfolioControl().Push(myPortfolio);
Step 6: Custom Glyph is Ready to Use
At this point, the glyph is imported into HOOPS Visualize Desktop and is ready to use. To insert it as a marker, be sure to make it the active marker symbol:
    mySegmentKey.GetMarkerAttributeControl().SetSymbol("myCustomGlyph");

    mySegmentKey.InsertMarker(HPS::Point(0, 0, 0)); // will insert "myCustomGlyph" at the origin
mySegmentKey.GetMarkerAttributeControl().SetSymbol("myCustomGlyph");

mySegmentKey.InsertMarker(new HPS.Point(0, 0, 0)); // will insert "myCustomGlyph" at the origin
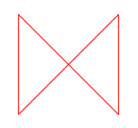
The custom glyph
Images as Glyphs
HOOPS Visualize Desktop also allows you to create a glyph from a defined image. The process is similar to creating a custom glyph as described in the previous section, except you would use the defined image as the source of a glyph element. When you define an image as a glyph element, it can be combined with other types of glyph elements to create complex glyphs.
One important difference when using image glyphs is setting the glyph radius. Normally, this value is used as the size of the “canvas” on which the glyph is drawn. With image glyphs, the radius is internally computed based on the image size. However, you must still call SetRadius(0) to initialize the glyph element properly.
The code below shows how to create a glyph from an image:
    // import the image into the database
    HPS::ImageKit myImageKit = HPS::Image::File::Import(filename, iok);

    // define the image in a portfolio
    HPS::ImageDefinition patternImageDef = myPortfolio.DefineImage("pattern", myImageKit);

    // create a glyph kit to contain your new glyph - note the radius and offset settings are required
    HPS::GlyphKit glyphKit = HPS::GlyphKit();
    glyphKit.SetRadius(0);
    glyphKit.SetOffset(GlyphPoint(0, 0));

    // create an ImageGlyphElement from the defined image
    HPS::ImageGlyphElement imageGlyphElement;
    imageGlyphElement.SetSource("pattern");
    imageGlyphElement.SetFixedScaling(false);

    // here we are only using a single glyph element to represent the glyph
    HPS::GlyphElementArray glyphElements;
    glyphElements.push_back(imageGlyphElement);
    glyphKit.SetElements(glyphElements);

    // defining the new glyph in a portfolio
    myPortfolio.DefineGlyph("patternGlyph", glyphKit);

    mySegmentKey.GetPortfolioControl().Push(myPortfolio);
    mySegmentKey.GetMarkerAttributeControl().SetSymbol("patternGlyph");

    // inserts the glyph into the scene
    mySegmentKey.InsertMarker(Point(0, 0, 0));
// import the image into the database
HPS.ImageKit myImageKit = HPS.Image.File.Import(filename, iok);

// define the image in a portfolio
HPS.ImageDefinition patternImageDef = myPortfolio.DefineImage("pattern", myImageKit);

// create a glyph kit to contain your new glyph - note the radius and offset settings are required
HPS.GlyphKit glyphKit = new HPS.GlyphKit();
glyphKit.SetRadius(0);
glyphKit.SetOffset(new HPS.GlyphPoint(0, 0));

// create an ImageGlyphElement from the defined image
HPS.ImageGlyphElement imageGlyphElement = new HPS.ImageGlyphElement();
imageGlyphElement.SetSource("pattern");
imageGlyphElement.SetFixedScaling(false);

// here we are only using a single glyph element to represent the glyph
HPS.GlyphElement[] glyphElements = { imageGlyphElement };
glyphKit.SetElements(glyphElements);

// defining the new glyph in a portfolio
myPortfolio.DefineGlyph("patternGlyph", glyphKit);

mySegmentKey.GetPortfolioControl().Push(myPortfolio);
mySegmentKey.GetMarkerAttributeControl().SetSymbol("patternGlyph");

// inserts the glyph into the scene
mySegmentKey.InsertMarker(new Point(0, 0, 0));

