
Perimeter and Silhouette Edges
The individual faces of a shell all have edges, and you can set the visibility of these edges on and off as usual. For a shell that is not a closed surface, you might want to see only the perimeter edges of the shell - those edges that are attached to only one face in the shell - and not to see the interior edges between two faces in the shell (see image below). The visibility of perimeter edges is controlled using the HPS::VisibilityControl, however, if all you did was enable the perimeter edges, the non-perimeter edges would still be visible. So, be sure to disables those edges first:
    mySegmentKey.GetVisibilityControl().SetEdges(false); // disables non-perimeter edges
    mySegmentKey.GetVisibilityControl().SetPerimeterEdges(true); // enables perimeter edges

    mySegmentKey.GetVisibilityControl().SetPerimeterEdges(false); // disables perimeter edges
mySegmentKey.GetVisibilityControl().SetEdges(false);          // disables non-perimeter edges
mySegmentKey.GetVisibilityControl().SetPerimeterEdges(true);  // enables perimeter edges

mySegmentKey.GetVisibilityControl().SetPerimeterEdges(false); // disables perimeter edges
Silhouette edges
Another alternative is that you might want to display what are called interior silhouette edges. An interior silhouette edge is an interior edge that is visible in silhouette. An edge is visible in silhouette if one of its two attached faces is facing toward the viewpoint, and the other is facing away. In the image above, there are two interior edges, and one is a silhouette edge. All other edges are perimeter edges (they have only one attached face). To make interior silhouette edges (as well as perimeter edges) visible, you can use:
mySegmentKey.GetVisibilityControl().SetInteriorSilhouetteEdges(true);
mySegmentKey.GetVisibilityControl().SetInteriorSilhouetteEdges(true);
Rendered interior silhouette edges tend to be obscured by adjacent faces, often causing a stitching effect. Silhouette edges are drawn where the difference between z-buffer values of neighboring pixels is greater than a certain threshold. You can determine the value of the threshold with the “tolerance” parameter, with values ranging from 0 to 100. As the name suggests, fast silhouette edges are hardware accelerated and take very few processing cycles as opposed to rendered interior silhouettes edges which can be computationally expensive to render. They are only supported on the shader-based drivers. The following sample code shows how you can enable fast silhouette edges and set the tolerance level to 10. The intensity of silhouette edges are rendered based on how close they are to the tolerance value. If you want all the exterior silhouette edges in your model to be rendered with an extra line to distinguish them, set the “exterior” parameter to true.
myWindowKey.GetPostProcessEffectsControl().SetSilhouetteEdges(true, 10, true);
myWindowKey.GetPostProcessEffectsControl().SetSilhouetteEdges(true, 10, true);
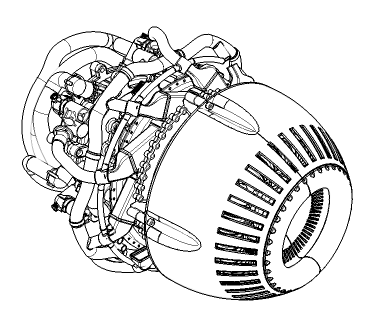
A turbine drawing rendered with fast silhouette edges. The model is rendered significantly faster with little loss of visual quality.
While perimeter and silhouette edge visibility options assist in the display of some key aspects of geometric data, they do not address the need to view interesting edges of many datasets. Enabling the visibility of hard edges will result in the display of edges whose coincident faces have an angle of intersection greater than the hard edge angle (this value can be set using the HPS::EdgeAttributeControl). This results in the display of the ‘boundary’ or ‘feature’ aspects of a model. The hard edge visibility setting would typically be used in conjunction with silhouettes or perimeters:
    mySegmentKey.GetVisibilityControl().SetHardEdges(true);
    mySegmentKey.GetEdgeAttributeControl().SetHardAngle(135);
mySegmentKey.GetVisibilityControl().SetHardEdges(true);
mySegmentKey.GetEdgeAttributeControl().SetHardAngle(135);

