
View Hierarchy
HOOPS Visualize Desktop includes a basic object hierarchy which allows you to more easily manage views within a window, scene updates, and user interactions. Four classes work together as nested containers to provide this functionality:
HPS::Canvas- analogous to the client area of an native application GUI windowHPS::Layout- determines how views are arranged in the windowHPS::View- represents a camera’s view of the modelHPS::Model- a portion of the scene graph which corresponds to a logical model
Each container nests inside the one above it. All the parent-child relationships are one-to-one, except for the layout - a HPS::Layout may have multiple views. Here’s an example of the relationships:
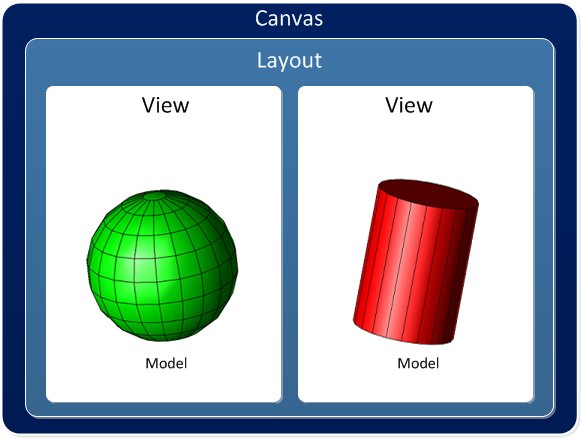
An example of a single scene with multiple views
NOTE: Use of the canvas-layout-view-model hierarchy is not required for pure HOOPS Visualize Desktop applications. However, it is required for any tookit integrations covered in our File I/O section, as well as animations. Each part of the view hierarchy is backed by a normal HPS::SegmentKey, and most use-cases that can be done with the view hierarchy can be done using naked segment keys alone. However, there is some pre-built functionality that is provided to make your job easier. For example, using the view hierarchy allows you to quickly set rendering modes, fit the camera to the scene, or provide an axis triad. See the following sections for more details.
If you do decide to use the view hierarchy, you should no longer update the scene using HPS::WindowKey::Update. Instead, call Update on any of the four view objects. For example, to update the whole window, you would call:
myCanvas.Update();
// or
myCanvas.UpdateWithNotifer();
To update only a single view, you would call:
myView.Update();
// or
myView.UpdateWithNotifer();
Refer to our section on rendering for more details on updating the scene.
In the following subsection, a simple window is built which includes a layout with two views, each one viewing a model using its own camera.
Step 1: Build the Four Core Objects
Each of the classes is instantiated by the static HPS::Factory class. To start off the process, you need the WindowKey for the window you’re planning to use. Typically, this would be returned from HPS::Database::CreateApplicationWindow, as mentioned in our section on windowing fundamentals.
    HPS::Canvas canvas = HPS::Factory::CreateCanvas(windowKey);

    HPS::Layout layout = HPS::Factory::CreateLayout();

    HPS::View view1 = HPS::Factory::CreateView();
    HPS::View view2 = HPS::Factory::CreateView();

    HPS::Model model = HPS::Factory::CreateModel();
HPS.Canvas canvas = HPS.Factory.CreateCanvas(windowKey);

HPS.Layout layout = HPS.Factory.CreateLayout();

HPS.View view1 = HPS.Factory.CreateView();
HPS.View view2 = HPS.Factory.CreateView();

HPS.Model model = HPS.Factory.CreateModel();
Step 2: Bind the Objects into a Hierarchy
After the objects are instantiated, the next step is to attach them together. When attaching views to a layout, you must specify the view rectangle, which is provided in window coordinates (see this section for details). After the view is attached to the layout, HOOPS Visualize Desktop refers to it as a layer. Layers and views can be thought of as analogous in most cases. However, when the same view is attached multiple times to one layout, each instance of that view is referred to as a layer.
    canvas.AttachLayout(layout);

    layout.AttachViewFront(view1, HPS::Rectangle(-1, 0, -1, 1)); // left view
    layout.AttachViewFront(view2, HPS::Rectangle(0, 1, -1, 1)); // right view

    view1.AttachModel(model);
    view2.AttachModel(model);
canvas.AttachLayout(layout);

layout.AttachViewFront(view1, new HPS.Rectangle(-1, 0, -1, 1)); // left view
layout.AttachViewFront(view2, new HPS.Rectangle( 0, 1, -1, 1)); // right view

view1.AttachModel(model);
view2.AttachModel(model);
In this particular example, the same model will be referenced by both views. However, it is perfectly fine to have each view refer to a different model.
Step 3: Insert the Geometry into the Model
The layers and views are set up, but the Model is still empty. Get its associated SegmentKey and insert or load geometry as you normally would.
    HPS::SegmentKey modelSegmentKey = model.GetSegmentKey();

    HPS::ShellKey shellKey = modelSegmentKey.InsertShell(myShellKit);
HPS.SegmentKey modelSegmentKey = model.GetSegmentKey();

HPS.ShellKey shellKey = modelSegmentKey.InsertShell(myShellKit);
Step 4: Set Attributes for Each View
If you have multiple views of a model, each view would typically have different viewing attributes. After the views are set up, set attributes specific to each one by using the associated SegmentKey. Some settings, such as the camera, can be set directly:
    HPS::SegmentKey viewSegmentKey = view.GetSegmentKey();
    viewSegmentKey.GetVisibilityControl().SetText(false);
    viewSegmentKey.SetCamera(cameraKit);

    modelSegmentKey.GetMaterialMappingControl().SetFaceColor(HPS::RGBAColor(0.81f, 0.72f, 0.08f));
    modelSegmentKey.GetMaterialMappingControl().SetEdgeColor(HPS::RGBAColor(0, 0, 0));
    modelSegmentKey.GetVisibilityControl().SetEdges(true);
HPS.SegmentKey viewSegmentKey = view.GetSegmentKey();
viewSegmentKey.GetVisibilityControl().SetText(false);
viewSegmentKey.SetCamera(cameraKit);

modelSegmentKey.GetMaterialMappingControl().SetFaceColor(new HPS.RGBAColor(0.81f, 0.72f, 0.08f));
modelSegmentKey.GetMaterialMappingControl().SetEdgeColor(new HPS.RGBAColor(0, 0, 0));
modelSegmentKey.GetVisibilityControl().SetEdges(true);
After completing steps 1-4, the view hierarchy is established. The result is two views in the same windows. Each view has its own camera but is viewing the same object:

Viewing the same model from different places using the view hierarchy classes
Canvas
As mentioned previously, the HPS::Canvas is analogous to the client area of a native GUI window. The HPS::Canvas encapsulates a HPS::WindowKey which can be accessed by using HPS::Canvas::GetWindowKey().
The HPS::Canvas has one main purpose: to act as the root of the view hierarchy. However, it does have a few auxiliary functions. For example, you can control updates via the Canvas methods. If you want to update the entire window, you would use HPS::Canvas::Update(). Note that if you have multiple attached objects of type HPS::View, each of those views will also be updated (to update only one HPS::View, you would call Update() on that particular HPS::View).
The standard approach is for each application GUI window to have a single 3D view, which means you will only have one HPS::View per canvas. In this case you do not need to use the HPS::Layout object, and can directly ask HOOPS Visualize Desktop to create an implicit HPS::Layout from an HPS::View:
canvas.AttachViewAsLayout(view);
canvas.AttachViewAsLayout(view);
If you are building a scene hierarchy that involves multiple HPS::View objects, you would attach each HPS::View to a HPS::Layout, and then attach the HPS::Layout to the HPS::Canvas.
Fixed Framerate
The HPS::Canvas provides the ability to maintain a fixed framerate and is covered in our section on performance.
IMPORTANT: When you are finished using the canvas and want to destroy the window, be sure to call HPS::Canvas::Delete. Doing so affords the driver a chance to shutdown cleanly before the application window is freed from memory.
Layout
As mentioned above, an HPS::Layout is used to position views on a HPS::Canvas. If you are using the standard approach where there is a single HPS::View per HPS::Canvas, you don’t need to bother with this section - simply use the code from the previous snippet.
If you do wish to have more than one view per canvas, the placement of each view is specified by a HPS::Rectangle using window coordinates.
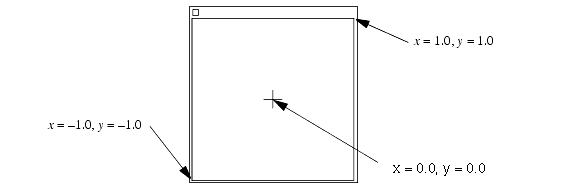
The “window” coordinate system
Using this coordinate system, a subwindow can be specified anywhere in window space, even in areas outside the [-1, 1] bounding space (although it would be clipped in this instance). For example, if you want to position a HPS::View in the lower-right quadrant of the window above, you would do the following:
    // HPS::Rectangle constructor parameters are left, right, bottom, top
    myLayout.AttachViewFront(view, HPS::Rectangle(0, 1, -1, 0));
// HPS.Rectangle constructor parameters are left, right, bottom, top
myLayout.AttachViewFront(view, new HPS.Rectangle(0, 1, -1, 0));
It is possible to have overlapping views. If you had an second subwindow positioned in the center of the screen with bounds of [-0.5, 0.5, -0.5, 0.5], one HPS::View would overlap with the other. To ensure they are layered in the order of insertion, use AttachViewFront. Similarly, AttachViewBack will add the view to the back of the list. The list is always drawn last-to-first, so that the view at the front of the list is drawn atop the others.
The layer Concept
While using the API, you may notice the use of the word ‘layer’. A layer can be thought of as a HPS::View and its position in a layout. If any views overlap, the layer is used to determine which views are drawn first. To reorder views after insertion, use one of the HPS::Layout methods, such as:
BringToFrontRepositionLayerReassignLayer
It is possible to have multiple instances of the same view attached to one layout. In this case, detaching a view using HPS::Layout::DetachView will remove both instances of the view from the layout. However, detaching a layer using HPS::Layout::DetachLayer will remove only the layer specified.
View
Among other things, a HPS::View allows you to set the rendering mode, fit the camera to the extents of the model, get an array of all attached operators, and update itself.
Rendering Mode
The rendering mode sets the general appearance of the geometry in the HPS::View. The rendering mode refers to a collection of common settings used to achieve a high-level effect. These settings can be enabled individually. However, setting the rendering mode on the HPS::View is provided as a convenience. For example, outside of the view hierarchy, there is no “wireframe” attribute. Instead, you would have to manually disable faces and enable lines to get this effect. With HPS::View, this is done for you by simply setting the render mode to Wireframe.
Other render modes enable hidden line rendering or a particular lighting interpolation algorithm. All options are listed in the reference manual page for HPS::Rendering::Mode.
    // sets geometry to wireframe
    view.SetRenderingMode(HPS::Rendering::Mode::Wireframe);

    // geometry rendered with Phong lighting
    view.SetRenderingMode(HPS::Rendering::Mode::Phong);

    // geometry rendered with hidden lines
    view.SetRenderingMode(HPS::Rendering::Mode::HiddenLine);
// sets geometry to wireframe
view.SetRenderingMode(HPS.Rendering.Mode.Wireframe);

// geometry rendered with Phong lighting
view.SetRenderingMode(HPS.Rendering.Mode.Phong);

// geometry rendered with hidden lines
view.SetRenderingMode(HPS.Rendering.Mode.HiddenLine);
FitWorld
HPS::View::FitWorld is used to automatically adjust the camera to the extents of the scene. FitWorld automatically calls HPS::View::Update, so be sure to add logic to avoid a double-redraw.
    // adjusts the camera to the scene extents and redraws the scene
    view.FitWorld();
// adjusts the camera to the scene extents and redraws the scene
view.FitWorld();
Using this function’s overloads, you can also adjust the camera to fit the extents of a segment or a specific bounding. Additionally, if you have highlight styles that make geometry invisible, this function can optionally include or exclude that geometry.
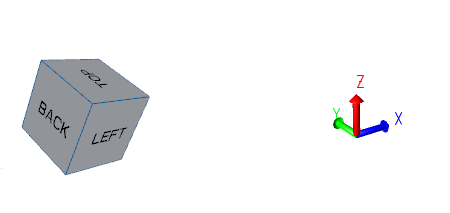
Enabling the Axis Triad and Navigation Cube
The HPS::View object is able to display an axis triad and navigation cube to assist with orientation of the user. Either object may be placed in any of the corners of the window. Enable them as follows:
    // enable axis triad
    myView.GetAxisTriadControl().SetVisibility(true).SetLocation(HPS::AxisTriadControl::Location::BottomRight);

    // enable navigation cube
    myView.GetNavigationCubeControl().SetVisibility(true).SetLocation(HPS::NavigationCubeControl::Location::BottomLeft);
// enable axis triad
myView.GetAxisTriadControl().SetVisibility(true).SetLocation(HPS.AxisTriadControl.Location.BottomRight);

// enable navigation cube
myView.GetNavigationCubeControl().SetVisibility(true).SetLocation(HPS.NavigationCubeControl.Location.BottomLeft);
You can also place the navigation cube or the axis triad in a custom location by specifying an optional rectangle. The rectangle delineates the subwindow which contains the navigation aid and is specified in window coordinates. For example, to set the navigation cube in the middle of the window:
    myView.GetNavigationCubeControl().SetLocation(HPS::NavigationCubeControl::Location::Custom,
                                                  HPS::Rectangle(-0.5f, 0.5f, -0.5f, 0.5f));
myView.GetNavigationCubeControl()
	.SetLocation(HPS.NavigationCubeControl.Location.Custom,
			     new HPS.Rectangle(-0.5f, 0.5f, -0.5f, 0.5f));
When setting a subwindow, the values are clamped between -1 and 1.
The navigation cube and the axis triad
The navigation cube and the axis triad may also be resized. The SetSize function resizes the subwindow which contains the axis triad or navigation cube. The value passed represents a percentage. For example, if you pass 0.5, the subwindow containing the axis triad or navigation cube will be 50% of the main window. If you pass a value which is less than 0 or greater than 1, a warning is logged and the request is ignored.
NOTE: SetSize only works when the navigation aid is in one of the four corner locations. If you set a size while the navigation aid is in a custom position, the size will not be applied unless the navigation aid is moved to one of the corner locations.

