
Selection
This section reviews the interface for selecting objects in the HOOPS Visualize Desktop database. The APIs covered here are fairly low-level, so if you need a ready-made solution that takes care of selection details, you are encouraged to use a selection operator.
The HOOPS Visualize Desktop selection process involves the following steps:
- Your application receives selection-location information from the GUI, based on user input
- Your application calls HOOPS Visualize Desktop selection routines whose arguments specify a selection point, ray, rectangle, polyline, polygon, volume or shell. The
HPS::SelectionControlclass is available fromHPS::WindowKey, and provides the various SelectBy[type] methods. - HOOPS Visualize Desktop returns the selection results to you via
HPS::SelectionResults - Your application code operates on the selection results. It may highlight, edit, delete and/or query the selected item(s). Note that in addition to selection operators, highlight operators are also available.
High-Level Selection Considerations
HOOPS Visualize Desktop supports various selection options that allow you to control what should be selected, and to make selection faster and thus more interactive for the user. These are important, as selection can be computationally intensive over large datasets. HOOPS Visualize Desktop can also return results much faster if you set up filters to exclude geometry that you aren’t interested in.
The HPS::SelectionOptionsControl class is available from a HPS::WindowKey. Alternatively, you can specify the options in a HPS::SelectionOptionsKit and pass it into the variants of the HPS::SelectionControl::SelectBy[type] methods that accept a HPS::SelectionOptionsKit.
The SelectBy[type] methods all perform a selection based on a start segment. The start segment and the contents of all descendant segments will be tested against the selection criteria. This is an optimization you can use if you know your selection should be restricted to a certain subtree. The start segment is set using the HPS::SelectionOptionsKit::SetScope method. The method also accepts a HPS::KeyPath object which can be used to initialize a start segment that’s not under a window key. It is expected to be a path, from leaf to root, through any number of include segments. The leaf is the start segment and the root is the window key.
NOTE: Setting any selection options with the HPS::SelectionOptionsKit::SetSelectability() method will override any selection options under either the model keys or segments.
Algorithm
HPS::SelectionOptionsControl::SetAlgorithm allows you to choose between two types of selection algorithms: analytic and visual.
Analytic selection
This is the default selection algorithm, and is based on a projection from the camera position (or other arbitrary position) through a point or points in world coordinates. It does not ignore objects which are obscured by other objects, but will return the list of objects that are intersected by the provided selection information. It also sorts the objects from back to front (relative to viewpoint space) so that the object foremost in the view will be first in the list of selection results.
In some situations, this can give unwanted results. For example, if both faces and edges are visible and selectable, and you select slightly to the side of the front-most visible edge of a cube, it’s possible that the ‘best’ edge returned by HOOPS Visualize Desktop be the back side edge, even though it is obscured. This is because the application fires a ray through the scene, and the ray may end up directly hitting the backside edge or coming closest to it. To avoid this scenario, you can instruct the system to use the visual selection algorithm described below.
Visual selection
If you only want visible objects to be selectable, then the visual selection algorithm can be specified. Visual selection performs a frame-buffer based postprocess of the selected items to remove obscured items from the selection list. It is important to note that visual selection is more algorithmically intensive than analytic selection.
    // use the visual algorithm
    myWindowKey.GetSelectionOptionsControl().SetAlgorithm(HPS::Selection::Algorithm::Visual);

    // use the analytic algorithm
    myWindowKey.GetSelectionOptionsControl().SetAlgorithm(HPS::Selection::Algorithm::Analytic);
// use the visual algorithm
myWindowKey.GetSelectionOptionsControl().SetAlgorithm(HPS.Selection.Algorithm.Visual);

// use the analytic algorithm
myWindowKey.GetSelectionOptionsControl().SetAlgorithm(HPS.Selection.Algorithm.Analytic);
Selection Level
Before doing any sort of selection, it is important to configure the selection level because this directly affects the selection results. Selection level is controlled by calling HPS::SelectionOptionsControl::SetLevel, which in turns allows you to chose from three different levels. An example of setting the selection level is shown here.
NOTE: Cylinders and spheres are a special type of primitive geometry. They are dynamically tessellated, and therefore their subentities are not selectable. If you try to do subentity selection on a sphere or cylinder, the entity key will be returned but there will be no subentity information.
Proximity
In addition to the selection level, the proximity also has a large impact on returned results. The selection proximity is a floating point value that augments a point-based selection by also including the area immediately surrounding the selection point (point-based selection is sometimes referred to as ‘aperture’ selection). The proximity is specified in real-world centimeters. To disable, set the proximity to zero.
    HPS::SelectionOptionsKit options;
    options.SetProximity(0.05f); // the distance, in centimeters, from the selection point
HPS.SelectionOptionsKit options = new HPS.SelectionOptionsKit();
options.SetProximity(0.05f); // the distance, in centimeters, from the selection point
NOTE: Proximity has no effect in area and volume selections.
Granularity
The granularity of a selection determines whether the selection test is performed on the exact shape of certain entity types. One exception is a line segment or polyline. For lines, a Detailed selection granularity has an effect when the line has a special pattern or heavy weight. For example, in a dashed line, the dashes would be selectable but the space between them would not. For a heavy weight line, the increased line thickness actually becomes part of the selectable region of the line.
    // will select on the object's bounding box
    myWindowKey.GetSelectionOptionsControl().SetGranularity(HPS::Selection::Granularity::General);

    // will select on the object's exact shape
    myWindowKey.GetSelectionOptionsControl().SetGranularity(HPS::Selection::Granularity::Detailed);
// will select on the object's bounding box
myWindowKey.GetSelectionOptionsControl().SetGranularity(HPS.Selection.Granularity.General);

// will select on the object's exact shape
myWindowKey.GetSelectionOptionsControl().SetGranularity(HPS.Selection.Granularity.Detailed);
Using General granularity will typically provide the best performance.
Selection By Point and Ray
A point selection is one of the simplest types of selection and is performed by calling HPS::SelectionControl::SelectByPoint. It is based on a window-space point, and any objects underneath the projected point are returned as potential selection objects, even if they are obscured by geometry in the foreground.
For this example, we are using the pixel coordinates of an imaginary mouse click, then converting those pixel coordinates to window space. Note that this example sets up the selection options using the HPS::SelectionOptionsControl.
        myWindowKey.GetSelectionOptionsControl().SetLevel(HPS::Selection::Level::Entity); // choosing entity-level selection
        myWindowKey.GetSelectionOptionsControl().SetProximity(0.01f);
        myWindowKey.GetSelectionOptionsControl().SetAlgorithm(HPS::Selection::Algorithm::Analytic);

        // the origin will be the selection point
        HPS::Point selectionPoint(0, 0, 0);

        HPS::SelectionResults selectionResults;
        size_t numSelectedItems = myWindowKey.GetSelectionControl().SelectByPoint( // this is the actual selection call
            selectionPoint, // the endpoint of the ray, typically the camera location
            selectionResults); // the selected geometries are returned to this object
myWindowKey.GetSelectionOptionsControl().SetLevel(HPS.Selection.Level.Entity); // choosing entity-level selection
myWindowKey.GetSelectionOptionsControl().SetProximity(0.01f);
myWindowKey.GetSelectionOptionsControl().SetAlgorithm(HPS.Selection.Algorithm.Analytic);

// the origin will be the selection point
HPS.Point selectionPoint = new HPS.Point(0, 0, 0);

HPS.SelectionResults selectionResults = new SelectionResults();
ulong numSelectedItems = myWindowKey.GetSelectionControl().SelectByPoint(  // this is the actual selection call
    selectionPoint,        // the endpoint of the ray, typically the camera location
    out selectionResults); // the selected geometries are returned to this object
In the code snippet above, the value returned by HPS::SelectionControl::SelectByPoint is the number of objects found in the selection. An entity-level selection was performed, so a collection of geometric entities would be expected. Likewise, if a segment-level selection was performed, a HPS::SegmentKey array would be returned. For an expanded example, click here.
The objects themselves can be accessed through the HPS::SelectionResults object as shown below:
        HPS::SelectionResultsIterator iter = selectionResults.GetIterator();

        while (iter.IsValid()) {
            HPS::SelectionItem selectionItem = iter.GetItem();
            Key key;
            selectionItem.ShowSelectedItem(key); // 'key' is the HPS::Key of the selected item

            if (key.Type() == HPS::Type::ShellKey) {
                // do something with this key
            }

            iter.Next();
        }
HPS.SelectionResultsIterator srIterator = selectionResults.GetIterator();

while (srIterator.IsValid())
{
    HPS.SelectionItem selectionItem = srIterator.GetItem();
    HPS.Key key;
    selectionItem.ShowSelectedItem(out key); // 'key' is the HPS.Key of the selected item

    if (key.Type() == HPS.Type.ShellKey)
    {
        // do something with this key
    }

    srIterator.Next();
}
IMPORTANT: Using the Type() function has performance implications. Please see our section on using keys for details.
Selection By Ray
A similar type of selection is also available - HPS::SelectionControl::SelectByRay. Selection by ray is similar to selection by point, but can perform a selection based on any arbitrary ray.
        myWindowKey.GetSelectionOptionsControl().SetLevel(HPS::Selection::Level::Entity); // choosing entity-level selection
        myWindowKey.GetSelectionOptionsControl().SetProximity(0.01f);
        myWindowKey.GetSelectionOptionsControl().SetAlgorithm(HPS::Selection::Algorithm::Analytic);

        HPS::Point pickStart(mouseX, mouseY, -1);
        HPS::Point pickEnd(mouseX, mouseY, 0);

        HPS::Point rayStart;
        HPS::Point rayEnd;

        myKeyPath.ConvertCoordinate(HPS::Coordinate::Space::Pixel, pickStart, HPS::Coordinate::Space::World, rayStart);
        myKeyPath.ConvertCoordinate(HPS::Coordinate::Space::Pixel, pickEnd, HPS::Coordinate::Space::World, rayEnd);

        HPS::Vector rayDir(rayEnd - rayStart);

        HPS::SelectionResults selectionResults;
        size_t numSelectedItems = myWindowKey.GetSelectionControl().SelectByRay( // this is the actual selection call
            rayStart, // the endpoint of the ray, typically the camera location
            rayDir, // the direction of the ray
            selectionResults); // the selected geometries are returned to this object
myWindowKey.GetSelectionOptionsControl().SetLevel(HPS.Selection.Level.Entity); // choosing entity-level selection
myWindowKey.GetSelectionOptionsControl().SetProximity(0.01f);
myWindowKey.GetSelectionOptionsControl().SetAlgorithm(HPS.Selection.Algorithm.Analytic);

HPS.Point pickStart = new HPS.Point(mouseX, mouseY, -1);
HPS.Point pickEnd = new HPS.Point(mouseX, mouseY, 0);

HPS.Point rayStart = new HPS.Point();
HPS.Point rayEnd = new HPS.Point();

myKeyPath.ConvertCoordinate(HPS.Coordinate.Space.Pixel, pickStart, HPS.Coordinate.Space.World, out rayStart);
myKeyPath.ConvertCoordinate(HPS.Coordinate.Space.Pixel, pickEnd, HPS.Coordinate.Space.World, out rayEnd);

HPS.Vector rayDir = new HPS.Vector(rayEnd - rayStart);

HPS.SelectionResults selectionResults;
ulong numSelectedItems = myWindowKey.GetSelectionControl().SelectByRay(  // this is the actual selection call
    rayStart,              // the endpoint of the ray, typically the camera location
    rayDir,                // the direction of the ray
    out selectionResults); // the selected geometries are returned to this object
Selection By Area and Volume
Two other ways to perform a selection are by area and by volume. An area selection is achieved by specifying a rectangle in window space. The snippet below shows the basic procedure, and in this example, note that the selection options are set up in a HPS::SelectionOptionsKit, which is then passed into a different variant of HPS::SelectionControl::SelectByArea method:
        HPS::SelectionOptionsKit selectionOptions;
        selectionOptions.SetAlgorithm(HPS::Selection::Algorithm::Analytic);
        selectionOptions.SetLevel(HPS::Selection::Level::Entity);

        HPS::SelectionResults selectionResults;

        // specify the window-space rectangle where you want to select
        size_t numSelectedItems =
            myWindowKey.GetSelectionControl().SelectByArea(HPS::Rectangle(-1, 1, -1, 1), selectionOptions, selectionResults);

        HPS::SelectionResultsIterator srIterator = selectionResults.GetIterator();

        while (srIterator.IsValid()) {
            HPS::SelectionItem selectionItem = srIterator.GetItem();
            HPS::Key key;
            selectionItem.ShowSelectedItem(key); // 'key' is the HPS::Key of the selected item

            if (key.Type() == HPS::Type::ShellKey) {
                // if we get here, the shell has selected at least one sphere
            }

            srIterator.Next();
        }
HPS.SelectionOptionsKit selectionOptions = new HPS.SelectionOptionsKit();
selectionOptions.SetAlgorithm(HPS.Selection.Algorithm.Analytic);
selectionOptions.SetLevel(HPS.Selection.Level.Entity);

HPS.SelectionResults selectionResults;

// specify the window-space rectangle where you want to select
ulong numSelectedItems = myWindowKey.GetSelectionControl().SelectByArea(new HPS.Rectangle(-1, 1, -1, 1), selectionOptions, out selectionResults);

HPS.SelectionResultsIterator srIterator = selectionResults.GetIterator();

while (srIterator.IsValid())
{
    HPS.SelectionItem selectionItem = srIterator.GetItem();
    HPS.Key key;
    selectionItem.ShowSelectedItem(out key); // 'key' is the HPS.Key of the selected item

    if (key.Type() == HPS.Type.ShellKey)
    {
        // if we get here, the shell has selected at least one sphere
    }

    srIterator.Next();
}
We should note that selecting by area will project the selection area through 3D space, and thus forms a selection frustum with infinite near and far planes. Similarly, a volume selection will select entities within a cuboid volume. Specify the two opposite corners of the cuboid to select against:
        HPS::SimpleCuboid boundingCuboid(HPS::Point(-1, -1, -1), HPS::Point(1, 1, 1));

        size_t numSelectedItems = myWindowKey.GetSelectionControl().SelectByVolume(boundingCuboid, selectionResults);
HPS.SimpleCuboid boundingCuboid = new HPS.SimpleCuboid(new HPS.Point(-1, -1, -1), new HPS.Point(1, 1, 1));

ulong numSelectedItems = myWindowKey.GetSelectionControl()
    .SelectByVolume(boundingCuboid, out selectionResults);
Sub-Entity Selection
Subentities are the faces, edges, and vertices that make up geometry. HOOPS Visualize Desktop supports subentity selection for shells and meshes. Some functionality is also available for lines, text, polygons, and NURBS curves.
The framework for selecting subentities is similar to entity-level selection. The only difference during the selection stage is setting the selection level as HPS::Selection::Level::Subentity.
However, during the retrieval stage, you also need to explicitly get the subentities. Faces, vertices, and edges are returned in separate arrays. Note that edges are returned in two parallel arrays where the edge is defined by its corresponding endpoints in each array. The point in the first array is considered the closer match to the selection criteria.
        HPS::SelectionResultsIterator itr = selectionResults.GetIterator();

        while (itr.IsValid()) {
            HPS::SelectionItem selectionItem = itr.GetItem();
            HPS::Key key;

            // get the key of the selected item
            selectionItem.ShowSelectedItem(key);

            HPS::SizeTArray out_faces, out_vertices, edges1, edges2;

            // out_faces is a list of faces
            selectionItem.ShowFaces(out_faces);

            // out_vertices is list of vertices
            selectionItem.ShowVertices(out_vertices);

            // edges1 and edges2 are parallel
            selectionItem.ShowEdges(edges1, edges2);

            itr.Next();
        }
HPS.SelectionResultsIterator srIterator = selectionResults.GetIterator();

while (srIterator.IsValid())
{
	HPS.SelectionItem selectionItem = srIterator.GetItem();
	HPS.Key key;

	// get the key of the selected item
	selectionItem.ShowSelectedItem(out key);

	ulong [] out_faces, out_vertices, edges1, edges2;

	// out_faces is a list of faces
	selectionItem.ShowFaces(out out_faces);

	// out_vertices is list of vertices
	selectionItem.ShowVertices(out out_vertices);

	// edges1 and edges2 are parallel
	selectionItem.ShowEdges(out edges1, out edges2);
	srIterator.Next();
}
Please note that as with all Show() functions, if the information is undefined or non-existent, the function will return false. Accordingly, for entities other than shells or meshes, the following conditions apply:
- Polygon:
ShowEdges()` will return only the nearest single edge, and ``ShowVertices()will return only the nearest single vertex.ShowFaces()is not supported. - NURBS Curve: Only
ShowVertices()is supported, and it will return the nearest single control point. - Text: Only
ShowCharacters()is supported, and it will return the nearest character in the text string. - Lines: Only
ShowEdges()is supported, and it will return all the line segments (defined by pairs of points) that were selected.
Collision Detection
It may be necessary to determine if a piece of geometry intersects a particular shell. This is commonly referred to as collision or clash detection. Detecting intersections between shells is implemented as another form of selection - selection by shell. Selection by shell is always performed as an analytic selection.
        HPS::SelectionOptionsKit selectionOptions;
        selectionOptions.SetAlgorithm(HPS::Selection::Algorithm::Analytic);
        selectionOptions.SetLevel(HPS::Selection::Level::Entity);
        selectionOptions.SetScope(myWindowKey);

        HPS::SelectionResults selectionResults;

        // myShellKit contains the shell definition that is doing the selecting
        size_t numSelectedItems = HPS::Database::SelectByShell(myShellKit, selectionOptions, selectionResults);

        HPS::SelectionResultsIterator srIterator = selectionResults.GetIterator();

        while (srIterator.IsValid()) {
            HPS::SelectionItem selectionItem = srIterator.GetItem();
            HPS::Key key;
            selectionItem.ShowSelectedItem(key); // 'key' is the HPS::Key of the selected item

            if (key.Type() == HPS::Type::ShellKey) {
                // if we get here, the shell has selected at least one other body
            }

            srIterator.Next();
        }
HPS.SelectionOptionsKit selectionOptions = new HPS.SelectionOptionsKit();
selectionOptions.SetAlgorithm(HPS.Selection.Algorithm.Analytic);
selectionOptions.SetLevel(HPS.Selection.Level.Entity);
selectionOptions.SetScope(myWindowKey);

HPS.SelectionResults selectionResults;

// myShellKit contains the shell definitions that is doing the selecting
ulong numSelectedItems = HPS.Database.SelectByShell(myShellKit, selectionOptions, out selectionResults);

HPS.SelectionResultsIterator srIterator = selectionResults.GetIterator();

while (srIterator.IsValid())
{
    HPS.SelectionItem selectionItem = srIterator.GetItem();
    HPS.Key key;
    selectionItem.ShowSelectedItem(out key); // 'key' is the HPS.Key of the selected item

    if (key.Type() == HPS.Type.ShellKey)
    {
        // if we get here, the shell has selected at least one other body
    }

    srIterator.Next();
}
The user provides a shell kit to HPS::Database::SelectByShell, and HOOPS Visualize Desktop uses it to calculate a selection on any intersecting faceted items within or below the start segment (faceted items include shells, meshes, NURBS surfaces, circles, ellipses, polygons, and polycylinders). The start segment can be set using HPS::SelectionOptionsKit::SetScope. The selection process is subject, as usual, to selectability attributes. The return value indicates the number of items selected. The selection is always performed in world space, so the method does not need to be called from HPS::WindowKey. If any transform needs to be applied to the points, it must be applied before calling SelectByShell.
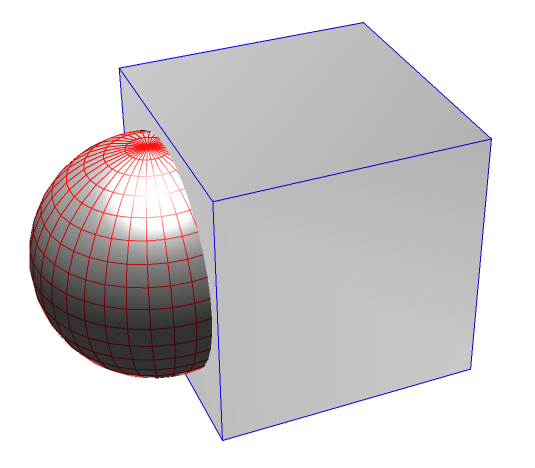
The cube will “select” the sphere using ``Database::SelectByShell``, indicating a collision is detected
Also related to selection by shell is the shell relation interface, used to determine spatial relationships between shells and point sets.
Proximity Value for Collision Detection
When performing a selection by shell, the selection proximity has a slightly different meaning from the proximity value of other selection methods. In this context, a positive proximity value of x will cause the selection algorithm to detect a collision when the distance between the two bodies is x or less. This means the bodies do not have to be touching in order for HOOPS Visualize Desktop to detect a collision.
If the proximity value is equal to 0, the bodies must be coincident or penetrating for a collision to be detected. When the proximity value has a negative value, for example, -10, the bodies must penetrate each other at least 10 units before a collision is detected.
In the following diagram, the objects are separated by 0.08 units. Normally, this is not a collision. However, it would be detected as such if the selection proximity value was 0.08 or greater.

Illustrating collision detection
Below, the objects penetrate each other to a depth of 0.16. This is a collision in all cases except for selection proximity values less than -0.16.
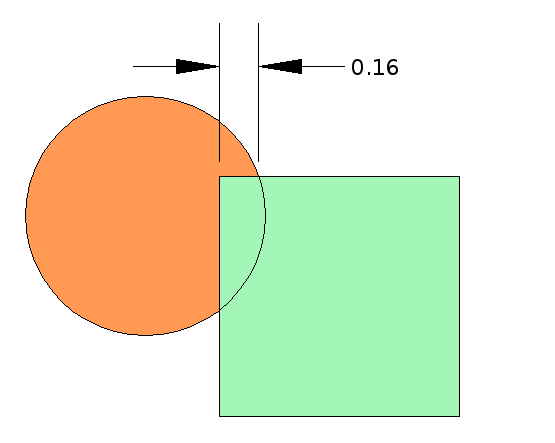
Illustrating collision detection
Using a TreeContext to Improve Performance
Use of a HPS::TreeContext may be beneficial when selecting by shell. If many shell selections are going to be performed without modifying the segment tree, using an HPS::TreeContext can significantly boost performance if you have many selections to perform between modifying the segment hierarchy. If a tree is not specified, a new one is computed each time a selection is performed. To use the tree context with your selection, simply instantiate a HPS::TreeContext object and pass it to HPS::SelectionOptionsKit::SetTreeContext.
Filtering Selection Results
So far, we’ve discussed different selection algorithms, as well as different ways to select objects. There are also several ways to limit selection results to a subset of scene geometry.
Selectability
The HPS::SelectabilityControl allows you to specify which types of geometry (markers, vertices, edges, lines, faces) and what aspects of the scene (windows, lights) are actually selectable by the selection routines. If the selectability of a type of scene-graph item is disabled, then the selection routines will not select on them, thereby filtering results and speeding up the overall selection process.
Let’s look at a sample case. Imagine we have a large amount of faceted geometry represented by shells, and the faces, edges, and vertices are all visible - but we only want to select the faces. We would use the HPS::SelectabilityControl to indicate that all items except for faces are selectable. The easiest way is to first call HPS::SelectabilityControl::SetEverything(false) to turn everything off, and then turn on selectability just for faces.
If a geometry type is not currently visible (due to the HPS::VisibilityControl having been used to indicate that its visibility is off), then the selection routines will not select that type. If you want the selection routines to still select items even if their visibility is set to off, you must specify the HPS::Selectability::Value::ForcedOn value for those types, when calling one of the HPS::SelectabilityControl ‘Set’ methods.
Internal Limit
This limits the number of subentities for shells and meshes that will be returned if performing subentity selection, and is set via SelectionOptionsKit::SetInternalLimit.
The following code sample demonstrates these three selection options:
    // faces are made selectable, but markers are not
    myWindowKey.GetSelectabilityControl().SetEdges(HPS::Selectability::Value::On).SetMarkers(HPS::Selectability::Value::Off);

    // forces selectability to on even if faces are invisible
    myWindowKey.GetSelectabilityControl().SetFaces(HPS::Selectability::Value::ForcedOn);

    // only the 10 closest subentites of shells and meshes will be returned as selected, even if more fell within the selection
    // boundary
    myWindowKey.GetSelectionOptionsControl().SetInternalLimit(10);

    // only 2 objects will be returned
    myWindowKey.GetSelectionOptionsControl().SetRelatedLimit(2);
// faces are made selectable, but markers are not
myWindowKey.GetSelectabilityControl().SetEdges(HPS.Selectability.Value.On).SetMarkers(HPS.Selectability.Value.Off);

// forces selectability to on even if faces are invisible
myWindowKey.GetSelectabilityControl().SetFaces(HPS.Selectability.Value.ForcedOn);

// only the 10 closest subentites of shells and meshes will be returned as selected, even if more fell within the selection boundary
myWindowKey.GetSelectionOptionsControl().SetInternalLimit(10);

// only 2 objects will be returned
myWindowKey.GetSelectionOptionsControl().SetRelatedLimit(2);
Selection Culling
HOOPS Visualize Desktop offers various types of culling to improve rendering performance. You have the ability to control whether culled objects are selectable using the HPS::SelectionOptionsKit or HPS::SelectionOptionsControl. If selection culling is disabled, HOOPS Visualize Desktop will consider culled objects when processing a selection event. As a result, the user could end up highlighting culled geometry, suddenly making it appear visually in the scene or as an entry in selection results.
    SelectionOptionsKit sok;
    sok.SetExtentCullingRespected(true); // extent-culled objects will not be selected
    sok.SetVectorCullingRespected(false); // vector-culled objects will be selected
HPS.SelectionOptionsKit sok = new HPS.SelectionOptionsKit();
sok.SetExtentCullingRespected(true);   // extent-culled objects will not be selected
sok.SetVectorCullingRespected(false);  // vector-culled objects will be selected
Selection culling can be used with deferral extent, extent, frustum, and vector culling.
Boolean Operations on Selection Results
Selection results may be further refined or augmented by applying Boolean operations to two HPS::SelectionResults objects. Operations include union, intersection, difference, and symmetric difference. These operations are especially useful during user interaction.
For example, let’s say the user has performed an area selection and was returned a set of results. Before applying his operation, he notices there is a single object that does not belong in the selection set. It is common to expect the ability to hold CTRL (or another modifier key) and click a selected object to deselect it.
Programmatically speaking, both the first area selection and the second CTRL-click selection would each be represented by a single HPS::SelectionResults object. As the developer, you can call HPS::SelectionResults::SymmetricDifference to remove the second selection set from the first.
You can also expect this behavior to happen automatically when using a selection operator. When control is held, the HPS::SelectAreaOperator will perform a union with the another results object, and the HPS::SelectOperator will perform a symmetric difference (exclusive OR).
The Boolean operations only work for selections that were performed at the same selection level. For example, trying to apply a Boolean operation to an entity-level selection and a segment-level selection will not work.
Using a Selection Operator
The purpose of the selection operator is to perform a selection at a particular pixel in the window. This usually means at the mouse cursor or at the location of a touch-screen event. If you have some special selection mechanism that isn’t covered by these input events, you are free to perform a manual selection or create your own custom operator.
When using the HPS::SelectOperator or HPS::SelectAreaOperator, you push them onto the operator stack just like any other operator. When selection is performed, results are returned to you in a HPS::SelectionResults object. Once you have the results, you can parse them according to your needs. An example of how to do that is demonstrated here.
You can control how the selection is performed by configuring a HPS::SelectionOptionsKit and setting it on the operator. The kit controls things such as internal limit, level, and proximity. The selection process is detailed in following snippet:
    HPS::SelectOperator* selectOperator = new HPS::SelectOperator(HPS::MouseButtons::ButtonLeft());
    myView.GetOperatorControl().Push(selectOperator); // makes 'selectOperator' active

    // configure the selection options as needed
    HPS::SelectionOptionsKit sok;
    sok.SetInternalLimit(3);
    sok.SetLevel(HPS::Selection::Level::Entity);
    sok.SetProximity(2.0f);

    selectOperator->SetSelectionOptions(sok);

    // ... <user performs selection>

    // get the results
    HPS::SelectionResults selectionResults = selectOperator->GetActiveSelection();
HPS.SelectOperator selectOperator
    = new HPS.SelectOperator(HPS.MouseButtons.ButtonLeft());
myView.GetOperatorControl().Push(selectOperator); // makes 'selectOperator' active

// configure the selection options as needed
HPS.SelectionOptionsKit sok = new HPS.SelectionOptionsKit();
sok.SetInternalLimit(3);
sok.SetLevel(HPS.Selection.Level.Entity);
sok.SetProximity(2.0f);

selectOperator.SetSelectionOptions(sok);

// ... <user performs selection>

// get the results
HPS.SelectionResults selectionResults = selectOperator.GetActiveSelection();
Note that the HPS::SelectOperator does not provide visual feedback. If you need visual feedback, see the next section for how to use the HPS::HighlightOperator.

