
Standard Operators
In addition to rendering a scene, your application will likely require some way for the user to interact with it. While you may
choose to handle user input independently, HOOPS Visualize Desktop provides operators for this purpose. An operator is a hook into the
user input event loop present on all supported GUI platforms. HOOPS Visualize Desktop has a set of pre-built, standard operators to handle zooming,
panning, and rotation, and also offers the ability to subclass these for custom functionality. When using operators in C++, include the
header sprk_ops.h. All operators must derive from HPS::Operator.
The purpose of operators is to process input events. The three primary types of events that can be processed are HPS::KeyboardEvent, HPS::MouseEvent, and HPS::TouchEvent. Touch events are triggered in response to the action of the user’s fingers on a touch-screen. Additionally, your operator can overload a function to intercept a timer tick event.
HOOPS Visualize Desktop’s standard operators provide common functionality for interacting with a 3D scene; many of these operators can be combined:
Camera manipulation operators:
|
Selection operators:
|
Please note that while HOOPS Visualize Desktop’s standard operators handle many common situations, they do not attempt to address every possible application-specific GUI behavior. Source code is provided to allow developers to easily customize the operators for their own needs.
Using Operators
When active, operators are always associated with a HPS::View object. For example, to enable the HPS::OrbitOperator, you would attach it to the view as shown:
        HPS::View myView = HPS::Factory::CreateView();

        // ... do other initialization

        HPS::OperatorPtr orbitOperator(new HPS::OrbitOperator(HPS::MouseButtons::ButtonMiddle()));
        myView.GetOperatorControl().Push(orbitOperator); // makes 'orbitOperator' active
HPS.View myView = HPS.Factory.CreateView();

// ... do other initialization

HPS.OrbitOperator orbitOperator = new HPS.OrbitOperator(HPS.MouseButtons.ButtonMiddle());
myView.GetOperatorControl().Push(orbitOperator); // makes 'orbitOperator' active
After the code above executes, you should be able to orbit the camera around your scene by dragging the middle mouse button. Unlike most other HOOPS Visualize Desktop classes, C++ developers must use a pointer to instantiate and use the operator. However, after the call to Push, HOOPS Visualize Desktop will take ownership of the pointer and you no longer have to keep a reference to it or worry about its deletion. HOOPS Visualize Desktop will free the memory automatically.
In the code sample above, the parameter to the HPS::OrbitOperator constructor is called the operator trigger. You can combine the mouse button with a keyboard button to create a complex trigger. For example, if you want to orbit the scene when the user holds down CTRL and the right mouse button, you can add a HPS::ModifierKeys parameter, like so:
        HPS::OperatorPtr orbitOperator(new HPS::OrbitOperator(HPS::MouseButtons::ButtonRight(), HPS::ModifierKeys::KeyControl()));

        // ... do other initialization
HPS.OrbitOperator orbitOperator
    = new HPS.OrbitOperator(HPS.MouseButtons.ButtonRight(), HPS.ModifierKeys.KeyControl());

// ... do other initialization
If you require more complex logic than trapping a single modifier key, you should create your own operator, as the standard operators do not include logic to handle all possible keyboard combinations.
To disable the operator, detach it from the view.
orbitOperator->DetachView(); // detaching operator from the view
orbitOperator.DetachView(); // detaching operator from the view
This push-and-detach mechanic is identical for all the standard operators.
Combining Operators
Propagation of Events
Generally speaking, an operator will consume an event if there’s something the operator can do with it. For example, the HPS::PanOperator, which pans the scene when the user drags the mouse, will consume a HPS::MouseEvent but pass on a HPS::KeyboardEvent.
In order for an operator to respond to an event, it has to overload the appropriate function. For example, the Pan operator will respond to MouseDown events, so it overloads the HPS::PanOperator::OnMouseDown function.
Since all operators must derive from the HPS::Operator base class, you can look at that class to see what functions are available to be overloaded, and therefore which events the operators can respond to. Here is a sample of events that can be overloaded:
| Event | Purpose |
|---|---|
OnMouse[Down|Up|Move] |
Handle mouse clicks |
OnMouseWheel |
Handle the mouse wheel |
OnMouse[Enter|Leave] |
Handle the mouse cursor entering/leaving the active window |
OnTouch[Down|Up|Move] |
Handle touches |
OnKey[Down|Up] |
Handle keyboard presses |
OnTextInput |
A special case, used to handle text input from software keyboards, like those on smartphones |
OnTimerTick |
Called on each tick of the %HPS clock |
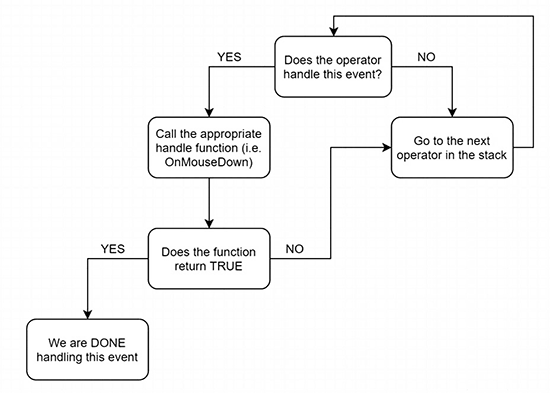
All of these functions return a Boolean. Returning TRUE means that the event which caused this function to be called should be destroyed.
Returning FALSE means that the event which caused this function to be called should be allowed to propagate to other operators. This diagram summarizes how operator events are propagated:
Illustrating collision detection
Adding Operators to a View
Now that we’ve covered the basic characteristics of operators, let’s discuss how to incorporate them into a scene. Each instance of an operator can only be associated with a single HPS::View. However, one HPS::View can have multiple operators associated simultaneously in one of three operator stacks, with each operator stack representing an operator priority: High, Default, or Low. When attaching an operator to a view, you can decide which priority to give it. If no priority is specified, the HPS::Operator::Priority::Default priority is used. Here’s an example:
        HPS::OperatorPtr walkOperatorPtr(new HPS::WalkOperator(HPS::MouseButtons::ButtonLeft()));
        myView.GetOperatorControl().Push(walkOperatorPtr, Operator::Priority::Default);
HPS.WalkOperator walkOperator = new HPS.WalkOperator(HPS.MouseButtons.ButtonLeft());
myView.GetOperatorControl().Push(walkOperator, Operator.Priority.Default);
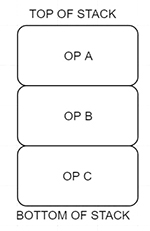
Why are these priority stacks necessary? Let’s say we have three operators on the Default stack. They all respond to the Left Mouse event:
Illustrating collision detection
Now let’s say that you want OP C to intercept the event, but with this current configuration it won’t work because OP A will intercept the event first and discard it. Because the operator that was attached last receives the input event first, one potential workaround is to detach OP C from the view and then push it onto the view again so that it will land on top of OP A. This can be problematic, though, since detaching the operator will delete the operator along with any state information stored within the operator.
To get around this problem, we can use the High Priority stack. Operators added to the High Priority stack will receive events before operators in the Default stack.
If we move OP C to the High Priority stack, then our Operator Priority stacks will look like this:
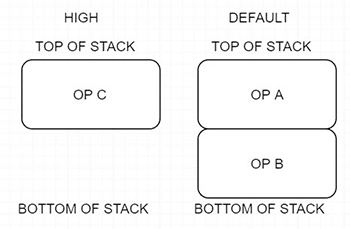
With this stack configuration, events will always go through OP C first. If OP C does not discard them, the events will be passed on to OP A. If OP A does not discard them, the events will be passed on to OP B.
To change the Priority stack of an operator, use the Set function:
        // The Set command will remove all the operators in the given priority stack
        // and add the operator(s) specified in the parameter list.
        myView.GetOperatorControl().Set(walkOperatorPtr, Operator::Priority::High);
// The Set command will remove all the operators in the given priority stack
// and add the operator(s) specified in the parameter list.
myView.GetOperatorControl().Set(walkOperator, Operator.Priority.High);
Please note, however, that the HPS::OperatorControl::Set function will remove any operators already on the stack; to preserve your existing operators, add them to the HPS::OperatorControl::Set Operator array parameter (using the overloaded version of HPS::OperatorControl::Set that takes an Operator array as a parameter).
You can use the operator stack to combine operators, giving your scene the ability to respond to multiple types of input events. For example, you could use the mouse wheel input to zoom the scene, right button to pan, and left button to orbit. The code below demonstrates how you could set that up:
        myView.GetOperatorControl()
            .Push(new HPS::ZoomOperator(HPS::MouseButtons::ButtonMiddle()))
            .Push(new HPS::PanOperator(HPS::MouseButtons::ButtonRight()))
            .Push(new HPS::OrbitOperator(HPS::MouseButtons::ButtonLeft()));
myView.GetOperatorControl().Push(new HPS.ZoomOperator(HPS.MouseButtons.ButtonMiddle()))
	                       .Push(new HPS.PanOperator(HPS.MouseButtons.ButtonRight()))
	                       .Push(new HPS.OrbitOperator(HPS.MouseButtons.ButtonLeft()));
HandlesOperator
The HPS::HandlesOperator combines several manipulator handles into a single operator. The following handle types are available:
- Plane handles: Allow user to translate geometry anywhere on the plane represented by the selected handle.
- Center handle: Allows user to translate geometry anywhere in the view plane.
- Rotation handles: Allow user to rotate the model around the associated axis.
- Axis handles: Allow user to move the model along the associated axis.
The HPS::HandlesOperator is enabled with the same method used to enable the other operators:
myView.GetOperatorControl().Push(new HPS::HandlesOperator(HPS::MouseButtons::ButtonLeft()));
myView.GetOperatorControl().Push(new HPS.HandlesOperator(HPS.MouseButtons.ButtonLeft()));
Once the operator is enabled, the manipulator handles will appear when any geometry is double-clicked. Clicking anywhere on the background makes the handles disappear.

The HandlesOperator
The Handles operator can be constrained to suit the needs of your application. Rotation, axis translation, or plane translation handles can be removed individually or as a group by calling RemoveHandles with the appropriate parameter. For example, if you wanted to set up some handles which made sense for a 2D drawing which lies on the XY plane, you could do the following:
        // do not translate in the Z axis direction
        myHandlesOperator.RemoveHandles(HPS::HandlesOperator::HandleType::AxisTranslationZ);

        // remove all rotation handles
        myHandlesOperator.RemoveHandles(HPS::HandlesOperator::HandleType::Rotation);

        // add rotation around Z
        myHandlesOperator.AddHandles(HPS::HandlesOperator::HandleType::RotationZ);

        // remove all plane translation handles
        myHandlesOperator.RemoveHandles(HPS::HandlesOperator::HandleType::PlaneTranslation);

        // add XY plane translation
        myHandlesOperator.AddHandles(HPS::HandlesOperator::HandleType::PlaneTranslationXY);
// do not translate in the Z axis direction
myHandlesOperator.RemoveHandles(HPS.HandlesOperator.HandleType.AxisTranslationZ);

// remove all rotation handles
myHandlesOperator.RemoveHandles(HPS.HandlesOperator.HandleType.Rotation);

// add rotation around Z
myHandlesOperator.AddHandles(HPS.HandlesOperator.HandleType.RotationZ);

// remove all plane translation handles
myHandlesOperator.RemoveHandles(HPS.HandlesOperator.HandleType.PlaneTranslation);

// add XY plane translation
myHandlesOperator.AddHandles(HPS.HandlesOperator.HandleType.PlaneTranslationXY);
When using the HPS::HandlesOperator on models loaded through the Exchange, Parasolid, or ExchangeParasolid APIs, you will need to call HPS::HandlesOperator::SetCADModel(), passing it the HPS::CADModel that is attached to your view. This should be done before the operator is used.
There are a number of options for customizing the handles’ appearance. Please see the HPS::HandlesOperator API Reference for more details about these options as well as the limitations of the operator.
MeasurementOperator
HOOPS Visualize Desktop includes two different operators which handle measurement. This section discusses MeasurementOperator, which allows the user to measure tessellated geometry. This operator responds to both mouse and touch events. Five different measuring types are available:
- Point to point
- Line
- Distance
- Angle
- Area
Whenever a measurement is inserted, an Event of type HPS::MeasurementEvent is injected. This event can be handled in order to to get details about the measurement, such as its type, value, its parent View, and what segment it was placed in. The segment in which the measurement is placed can be used to customize the appearance of the measurement, delete it, or hide it.
HPS::Exchange::MeasurementOperator is similar to HPS::MeasurementOperator, but it works on B-rep data. Only point-to-point measurement is available for files imported through Exchange without B-rep data.
When vertex snapping is enabled, the measurement operator will try to snap to vertices close to the location that was clicked or touched. The value of the proximity snapping is expressed in centimeters and is set using the operator’s SetVertexSnapping function. Snapping is not taken into consideration when placing distance measurements. When snapping is enabled, you will see a square when the cursor is hovering over a vertex.
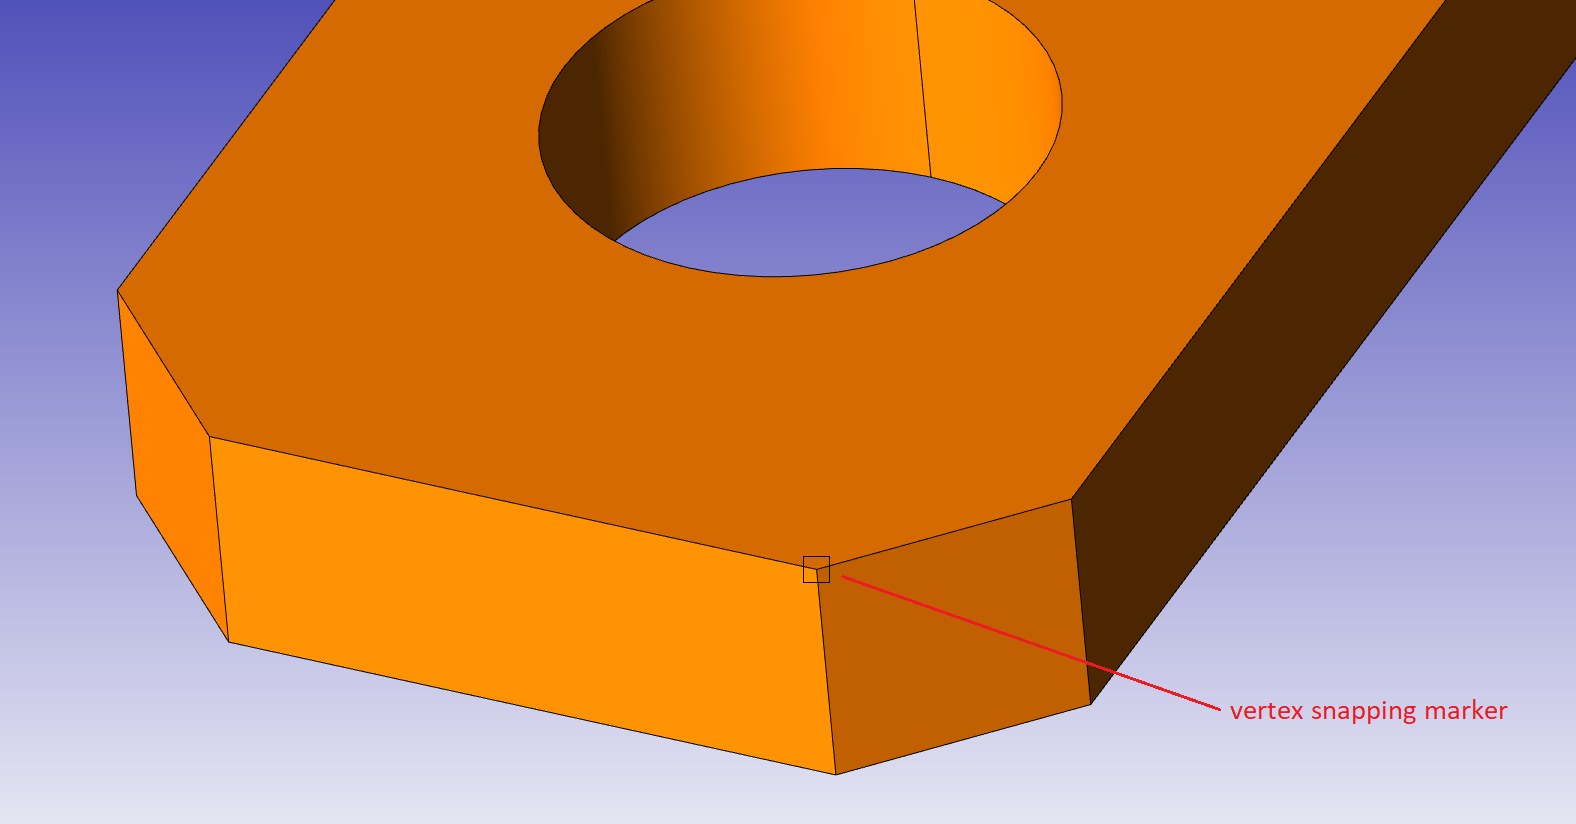
A circle indicates you will select a face, and an X means nothing is snappable at the cursor location.
For measurements that depend on points being in the exact same location as other points, such as when delineating a closed polygon to measure area, it is important to use vertex snapping so that the exact point in space can be easily selected.
The number of decimal places shown in measurement labels can be changed through the SetPrecision function, and defaults to 2.
When working with a HPS::CADModel, the CADModel can be passed to this operator through the HPS::MeasurementOperator::SetCADModel function. Setting a CADModel allows the operator to detect the unit of measurements used in the loaded file, which will be displayed when inserting measurement labels. When a CADModel is not set, measurements are considered unitless.
While inserting a measurement, the last point inserted can be undone by pressing CTRL+Z. Note that in order to delete a single measurement that was already inserted, you should delete its associate segment, which can be obtained by intercepting HPS::MeasurementEvent events. Deleting all measurements at once can be easily done through the HPS::MeasurementOperator:::DeleteAllMeasurements function.
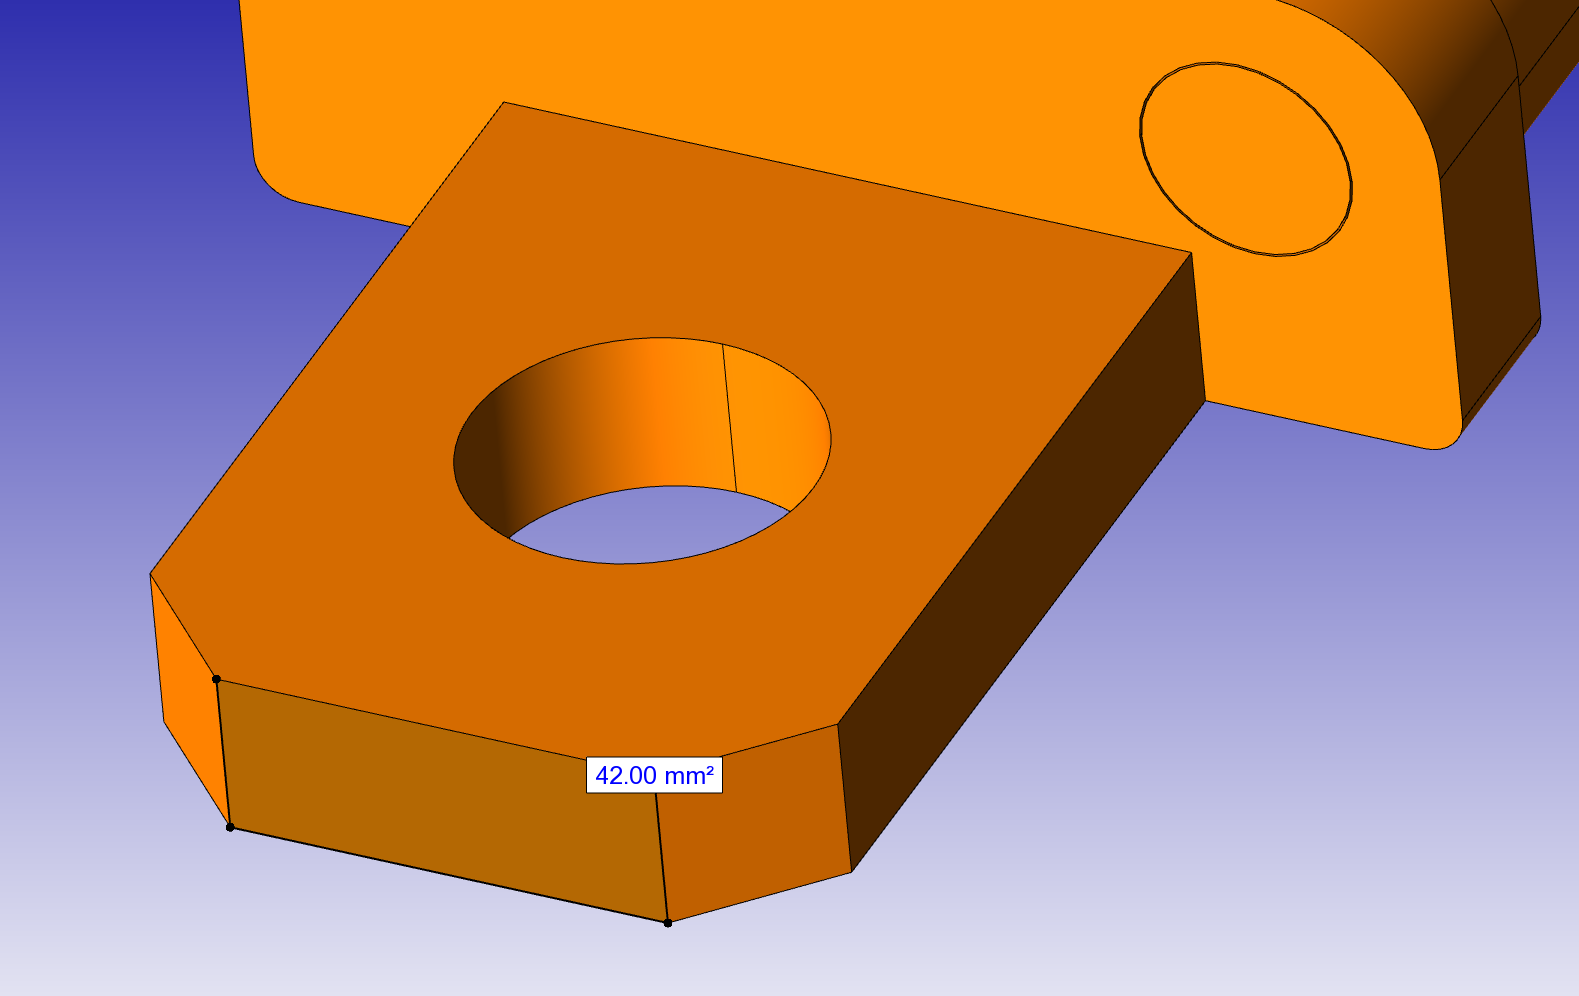
In this scene, we’ve inserted an area measurement (highlighted in red), and the measurement value can be seen on-screen.
To programmatically get the measurement value, you’ll need to handle the MeasurementEvent emitted by HOOPS Visualize Desktop using a custom event handler. An example implementation of the handler is show below. The value will be delivered in the measurement_value field.
public class MeasurementInsertedHandler : HPS.EventHandler
{
    public MeasurementInsertedHandler()
        : base()
    {
    }

    ~MeasurementInsertedHandler()
    {
        Shutdown();
    }

    public override HandleResult Handle(HPS.Event in_event)
    {
        if (in_event.GetClassID() == HPS.Object.ClassID<HPS.MeasurementOperator.MeasurementEvent>())
        {
            HPS.MeasurementOperator.MeasurementEvent measurement_event = new MeasurementOperator.MeasurementEvent(in_event);
            float myValue = measurement_event.measurement_value;
            return HandleResult.Handled;
        }

        return HandleResult.NotHandled;
    }
};
Next, you should instantiate and subscribe your handler to the event system using the HPS::EventDispatcher:
HPS.MeasurementOperator measurementOperator = new HPS.MeasurementOperator();
MeasurementInsertedHandler measurement_handler = new MeasurementInsertedHandler();

measurementOperator = new HPS.MeasurementOperator();
measurementOperator.SetMeasurementType(HPS.MeasurementOperator.MeasurementType.Area);
measurementOperator.SetVertexSnapping(true, 5);
myView.GetOperatorControl().Push(measurementOperator);

Database.GetEventDispatcher().Subscribe(measurement_handler, HPS.Object.ClassID<HPS.MeasurementOperator.MeasurementEvent>());
Changing the Appearance of the Measurement
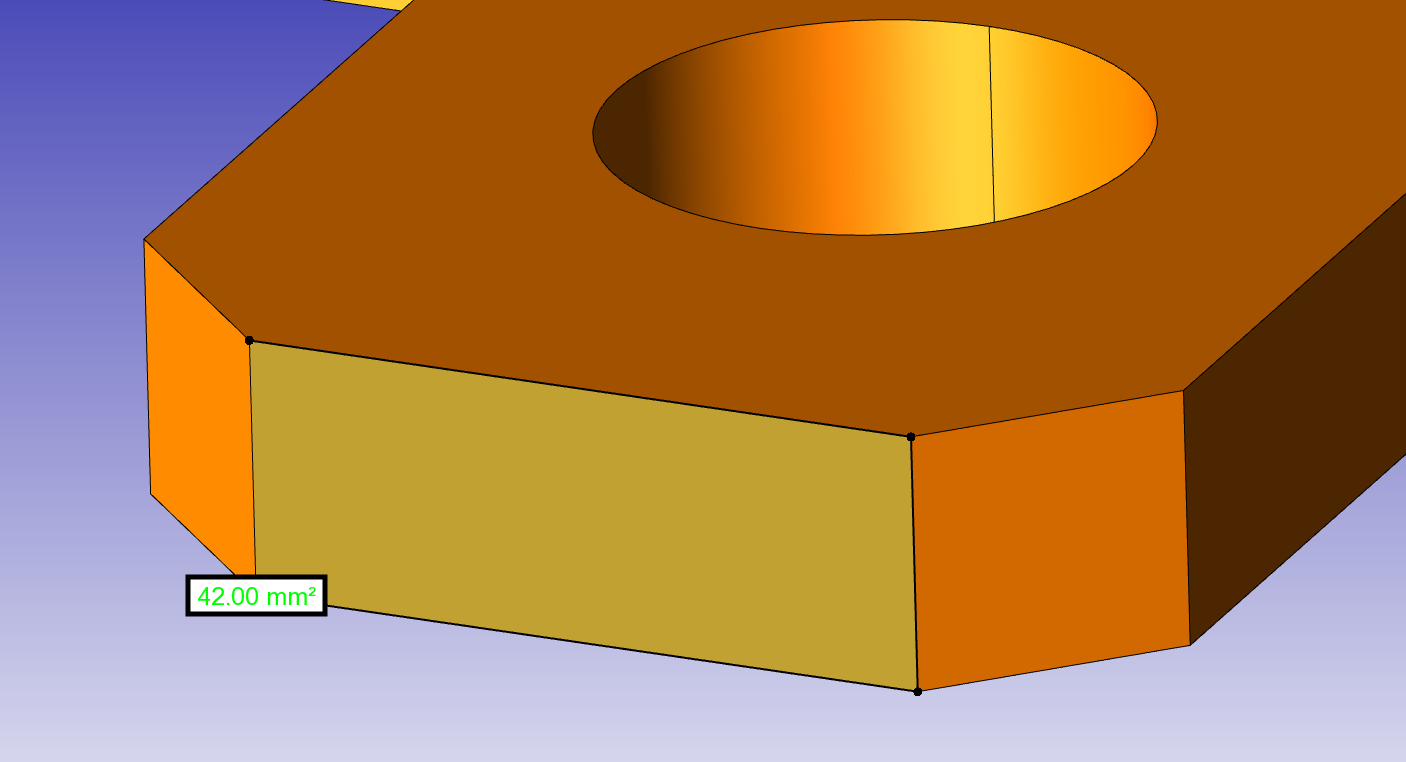
Earlier, we mentioned that you can adjust the appearance of the measurement geometry by changing the attributes in its associated segment. For example, in the following screenshot, we’ve changed the measurement text to green and the measurement box’s border has a thicker edge.
To do this, you need to save a reference to the segment key in your measurement handler (see code snippet above regarding measurement handlers). In that snippet, the HandleResult function saves the reference in the measurementKey variable. When you are ready to change the appearance of the measurement, simply adjust the segment attributes as you would any other segment:
// set appearance
measurementKey.GetMaterialMappingControl().SetTextColor(new HPS.RGBAColor(0, 1, 0));
measurementKey.GetEdgeAttributeControl().SetWeight(5);
Any attribute can be changed in this way, including transform, scale, and other visual features.
Notes About Specific Measurement Types
- Line Measurements. Lines are measured as points are picked. An arbitrary number of points describing a line can be picked. To signal that you are done describing a line, either select the last point inserted, or double click/tap anywhere in the scene. The position of the label for line measurement can be chosen through the
SetLineMeasurementPosition. - Area Measurements. Placing at least three points is required when measuring an area. All points placed should be co-planar. After the third point has been inserted, attempting to insert a point that does not lie on the same plane will result in a warning (an
HPS::WarningEventwill be issued which can be handled to provide feedback to the end user), and the operator will discard this point. To signal that you are done inserting points for the area measurement, either select the first point inserted, or double click/tap anywhere in the scene. Using vertex snapping is recommended for this type of measurement. - Distance Measurements. The distance measurement finds the shortest distance between two objects. The two objects in question can be either individual faceted entities (shells, polygons, meshes, etc…) or bodies. This setting can be controlled through the
SetDistanceMeasurementReferencefunction. When bodies are selected as the reference but aCADModelis not associated with this operator, segments will be used instead. Note that when comparing whole bodies it might take a noticeable amount of time for the operator to complete the calculation.
SpaceMouseOperator
The SpaceMouseOperator is a special operator that is designed to work with the proprietary 3DConnexion Space Mouse. The Space Mouse allows for 6 degrees of freedom - it can be used to pan, orbit, zoom, and select all at once. Use of this operator has additional requirements as noted below.
- Acquire XInput.lib (this is part of DirectX) and link your application to it
- Add sprk_space_mouse_op.h and sprk_space_mouse_op.cpp to your project’s build environment
- If the project is using precompiled headers, set sprk_space_mouse_op.cpp to NOT use them (or add the precompiled header to it)
You are now ready to use the operator. It can be enabled similarly to the other operators by pushing an instance onto the HPS::OperatorControl:
#include "sprk_space_mouse_op.h"

// ...

GetCanvas().GetFrontView().GetOperatorControl().Push(new SpaceMouseOperator((HPS::WindowHandle)theApp.m_pMainWnd->GetSafeHwnd(), GetCanvas()));
The SpaceMouseOperator is limited to C++ on Windows systems. Please see our sample which demonstrates use of the operator.

