Creating a Skybox
This walkthrough shows how to create a skybox in HOOPS Visualize Desktop. A skybox is a collection of 2D textures applied to the six faces of a cube that serve as the background of a scene, creating the illusion of 3D immersion.
The skybox is built by applying textures to a cubemap. Ideally, these textures will be created from spherical panoramas (using, for example, iOS or Android camera apps that produce these images). To convert your spherical image to six different textures, use an online application such as this one: https://jaxry.github.io/panorama-to-cubemap/.
If you would like to see a working sample, feel free to copy and paste the full source code (provided below) into the User Code slots in either the MFC Sandbox or the WPF Sandbox, assigning myCanvas to the respective built-in GetCanvas() functions in the sandbox.
In addition, a video demonstration for the provided code is available on YouTube (this demo was created using the MFC Sandbox).
For your convenience, here is a link to a downloadable zip file containing PNG images you can use to define your cubemap:
7.1 Image Mapping Overview
The following images show how a spherical panoramic photograph is mapped to each face in the cubemap:
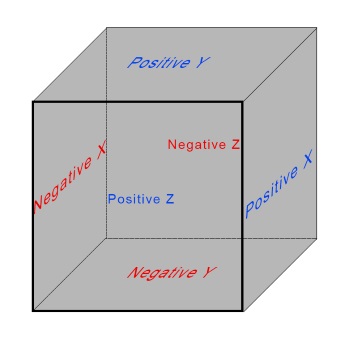
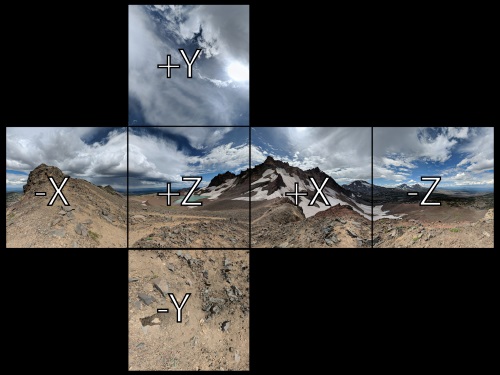
Textures on faces of cubemap
Each face of the cube represents a plane at the extent of each of the three axes: positive x, negative x, positive y, negative y, positive z, and negative z. A texture is applied to each of these faces.
7.2 Importing Images
To assign our textures to the faces of the cubemap, we’ll need to import the six images into HOOPS Visualize Desktop using an HPS::Image::ImportOptionsKit.
    HPS::Image::ImportOptionsKit iok;
    iok.SetFormat(HPS::Image::Format::Jpeg); // set format: jpeg, png, bmp, etc.

    // import the images
    ImageKit frontImg = HPS::Image::File::Import(image_path_positive_z, iok);
    ImageKit leftImg = HPS::Image::File::Import(image_path_negative_x, iok);
    ImageKit rightImg = HPS::Image::File::Import(image_path_positive_x, iok);
    ImageKit backImg = HPS::Image::File::Import(image_path_negative_z, iok);
    ImageKit bottomImg = HPS::Image::File::Import(image_path_negative_y, iok);
    ImageKit topImg = HPS::Image::File::Import(image_path_positive_y, iok);
HPS.Image.ImportOptionsKit iok = new HPS.Image.ImportOptionsKit();
iok.SetFormat(HPS.Image.Format.Jpeg);

// import the images
ImageKit frontImg = HPS.Image.File.Import(image_path_positive_z, iok);
ImageKit leftImg = HPS.Image.File.Import(image_path_negative_x, iok);
ImageKit rightImg = HPS.Image.File.Import(image_path_positive_x, iok);
ImageKit backImg = HPS.Image.File.Import(image_path_negative_z, iok);
ImageKit bottomImg = HPS.Image.File.Import(image_path_negative_y, iok);
ImageKit topImg = HPS.Image.File.Import(image_path_positive_y, iok);
7.3 Define the Cubemap in a Portfolio
Once the images have been imported, we’ll add them to a HPS::Portfolio object and call HPS::PortfolioKey::DefineCubeMap(), passing the six images as parameters:
    HPS::PortfolioKey myPortfolioKey = myCanvas.GetPortfolioKey();
    HPS::ImageDefinition frontDef = myPortfolioKey.DefineImage("frontDef", frontImg);
    HPS::ImageDefinition leftDef = myPortfolioKey.DefineImage("leftDef", leftImg);
    HPS::ImageDefinition rightDef = myPortfolioKey.DefineImage("rightDef", rightImg);
    HPS::ImageDefinition backDef = myPortfolioKey.DefineImage("backDef", backImg);
    HPS::ImageDefinition topDef = myPortfolioKey.DefineImage("topDef", topImg);
    HPS::ImageDefinition botDef = myPortfolioKey.DefineImage("botDef", bottomImg);

    HPS::CubeMapDefinition skybox = myPortfolioKey.DefineCubeMap("skybox", backDef, frontDef, leftDef, rightDef, botDef, topDef);

    myView = myCanvas.GetFrontView();
    myView.GetSegmentKey().GetSubwindowControl().SetBackground(Subwindow::Background::Cubemap, "skybox");
// Set up the Images in a portfolio
HPS.PortfolioKey myPortfolioKey = myCanvas.GetPortfolioKey();
HPS.ImageDefinition frontDef = myPortfolioKey.DefineImage("frontDef", frontImg);
HPS.ImageDefinition leftDef = myPortfolioKey.DefineImage("leftDef", leftImg);
HPS.ImageDefinition rightDef = myPortfolioKey.DefineImage("rightDef", rightImg);
HPS.ImageDefinition backDef = myPortfolioKey.DefineImage("backDef", backImg);
HPS.ImageDefinition topDef = myPortfolioKey.DefineImage("topDef", topImg);
HPS.ImageDefinition botDef = myPortfolioKey.DefineImage("botDef", bottomImg);

// Define the Cubemap texture
HPS.CubeMapDefinition skybox = myPortfolioKey.DefineCubeMap("skybox", backDef, frontDef, leftDef, rightDef, botDef, topDef);
myView.GetSegmentKey().GetSubwindowControl().SetBackground(Subwindow.Background.Cubemap, "skybox"); // Set the skybox texture
Once all the importing is finished, a call to HPS::SubwindowControl::SetBackground() will set the cubemap as the background on our subwindow.
At this point, your skybox is set up. Geometry and lighting can now be added to the scene and they will be contained inside of the skybox.
In the next section, simply as a demonstration, we’ll add some animation to our scene – these steps are entirely optional.
7.4 Animation: Inserting a Cube
To give a frame of reference in our animation, let’s insert a cube. As our camera position changes, this cube will appear in the center of the screen and will seem to rotate as the camera moves:
static HPS::ShellKey InsertCube(HPS::SegmentKey segmentKey, HPS::Point center, float size)
{
    HPS::PointArray baseVertices;
    baseVertices.resize(24);

    float halflength = size / 2;
    baseVertices[0] = HPS::Point(-halflength + center.x, -halflength + center.y, halflength + center.z);
    baseVertices[1] = HPS::Point(halflength + center.x, -halflength + center.y, halflength + center.z);
    baseVertices[2] = HPS::Point(halflength + center.x, halflength + center.y, halflength + center.z);
    baseVertices[3] = HPS::Point(-halflength + center.x, halflength + center.y, halflength + center.z);
    baseVertices[4] = HPS::Point(-halflength + center.x, -halflength + center.y, -halflength + center.z);
    baseVertices[5] = HPS::Point(halflength + center.x, -halflength + center.y, -halflength + center.z);
    baseVertices[6] = HPS::Point(halflength + center.x, halflength + center.y, -halflength + center.z);
    baseVertices[7] = HPS::Point(-halflength + center.x, halflength + center.y, -halflength + center.z);

    HPS::PointArray vertices;
    vertices.resize(24);

    int tmpList[] = {0, 1, 2, 3, 1, 5, 6, 2, 5, 6, 7, 4, 4, 7, 3, 0, 3, 2, 6, 7, 0, 4, 5, 1};

    for (int i = 0; i < 24; i++)
        vertices[i] = baseVertices[tmpList[i]];

    int flist[] = {4, 0, 1, 2, 3, 4, 4, 5, 6, 7, 4, 8, 9, 10, 11, 4, 12, 13, 14, 15, 4, 16, 17, 18, 19, 4, 20, 21, 22, 23};

    HPS::IntArray faceList;
    faceList.resize(30);
    for (int i = 0; i < 30; i++)
        faceList[i] = flist[i];

    return segmentKey.InsertShell(vertices, faceList);
}
protected ShellKey InsertCube(SegmentKey segmentKey, Point center, float size)
{
    float halflength = size / 2;

    Point[] pointArray = { new Point(-halflength + center.x, -halflength + center.y, halflength + center.z),
                new Point(halflength + center.x, -halflength + center.y, halflength + center.z),
                new Point(halflength + center.x, halflength + center.y, halflength + center.z),
                new Point(-halflength + center.x, halflength + center.y, halflength + center.z),

                new Point(-halflength + center.x, -halflength + center.y, -halflength + center.z),
                new Point(halflength + center.x, -halflength + center.y, -halflength + center.z),
                new Point(halflength + center.x, halflength + center.y, -halflength + center.z),
                new Point(-halflength + center.x, halflength + center.y, -halflength + center.z)
                };

    int[] faceList = { 4, 0, 1, 2, 3, 4, 1, 5, 6, 2, 4, 5, 6, 7, 4, 4, 4, 7, 3, 0, 4, 3, 2, 6, 7, 4, 0, 4, 5, 1 };

    return segmentKey.InsertShell(pointArray, faceList);
}
This function defines a basic cube and returns a HPS::ShellKey. We’ll call this function in our main application code later.
7.5 Animation: Creating a SmoothTransition EventHandler
Next we’ll set up a custom event class to manage the transition between keyframes; this class can be defined outside of our main application code. Our class will have one variable that is updated once any HPS::View::SmoothTransition() function has completed.
    class SmoothTransHandler: public HPS::EventHandler {
      public:
        bool volatile transitionComplete = false;

        ~SmoothTransHandler() { Shutdown(); } // Destructor

        EventHandler::HandleResult Handle(Event const* in_event)
        {
            transitionComplete = true; // Update the member variable
            return HandleResult::Handled;
        }
    };
class SmoothTransHandler : HPS.EventHandler
{
    public volatile bool transitionComplete = false;
    ~SmoothTransHandler() { Shutdown(); } // Destructor
    public override HandleResult Handle(Event in_event)
    {
        transitionComplete = true; // Update the member variable
        return HandleResult.Handled;
    }
};
7.6 Animation: Adjusting the Camera
Returning back to our main application code, we’ll now insert a cube in the center of the screen and implement our animation by calling HPS::View::SmoothTransition() twice, rotating the camera 180 degrees with each call:
    // As a convenience, display the NavCube in the scene
    myView.GetNavigationCubeControl().SetVisibility(true).SetInteractivity(true);

    // For demonstration purposes, create a new cube to go in the center of the screen
    HPS::SegmentKey cubeSegmentKey = myView.GetSegmentKey().Subsegment();
    cubeSegmentKey.GetMaterialMappingControl().SetFaceColor(RGBAColor(0.4f, 0.4f, 0.4f, 0.6f));
    cubeSegmentKey.GetVisibilityControl().SetEdges(false);
    HPS::ShellKey myShellKey = InsertCube(cubeSegmentKey, Point(0, 0, 0), 0.5f);

    // Once the scene has been created, update the window
    HPS::WindowKey myWindowKey = myCanvas.GetWindowKey(); // Get the Window Key
    HPS::UpdateNotifier notifier = myWindowKey.UpdateWithNotifier();
    notifier.Wait();

    SmoothTransHandler* myHandler = new SmoothTransHandler(); // Instantiate a custom event handler
    HPS::EventDispatcher dispatcher = HPS::Database::GetEventDispatcher(); // Get an event dispatcher
    dispatcher.Subscribe(*myHandler, HPS::Object::ClassID<SmoothTransitionCompleteEvent>());

    HPS::CameraKit camkit = HPS::CameraKit::GetDefault();
    camkit.Orbit(180, 0);
    camkit.Zoom(0.2f);
    camkit.SetField(16, 12); // Adjust field of view according to desired resolution
    myView.SmoothTransition(camkit, 2);

    while (!myHandler->transitionComplete) {
        ; // Wait for the first 180 rotation to complete
    }

    camkit.Orbit(180, 0);
    myHandler->transitionComplete = false;
    myView.SmoothTransition(camkit, 2);
    while (!myHandler->transitionComplete) {
        ; // Wait for the next 180 rotation to complete
    }
// As a convenience, display the NavCube in the scene
myView.GetNavigationCubeControl().SetVisibility(true).SetInteractivity(true);

// For demonstration purposes, create a new cube to go in the center of the screen
HPS.SegmentKey cubeSegmentKey = myView.GetSegmentKey().Subsegment();
cubeSegmentKey.GetMaterialMappingControl().SetFaceColor(new RGBAColor(0.4f, 0.4f, 0.4f, 0.6f));
cubeSegmentKey.GetVisibilityControl().SetEdges(false);
HPS.ShellKey myShellKey = InsertCube(cubeSegmentKey, new HPS.Point(0, 0, 0), 0.5f);

SmoothTransHandler myHandler = new SmoothTransHandler(); // Instantiate a custom event handler
HPS.EventDispatcher dispatcher = HPS.Database.GetEventDispatcher(); // Get an event dispatcher
dispatcher.Subscribe(myHandler, HPS.Object.ClassID<SmoothTransitionCompleteEvent>());


// Get the window key and set up the camera
myView.Update();

HPS.CameraKit camkit = HPS.CameraKit.GetDefault();
camkit.Orbit(180, 0);
camkit.Zoom(0.2f);
camkit.SetField(16,12);   // Adjust field of view according to desired resolution
myView.SmoothTransition(camkit, 2);


while (!myHandler.transitionComplete)
{
    ; // Wait for the first 180 rotation to complete
}

camkit.Orbit(180, 0);
myHandler.transitionComplete = false;
myView.SmoothTransition(camkit, 2);
while (!myHandler.transitionComplete)
{
    ; // Wait for the next 180 rotation to complete
}
The first line of code enables the built-in navigation cube, which will appear at the corner of the scene - this is helpful for manually rotating your camera.
In addition, we’ve inserted a cube into the center of the scene using the InsertCube() function we defined in
section 7.4.
We then update the scene with an HPS::UpdateNotifier. Calling HPS::UpdateNotifier::Wait ensures that the scene is up to date before any other changes take place. After the update has been completed, we define an HPS::EventDispatcher, which will let us know when camera rotations have been completed.
The while loop continuously checks to see if the HPS::View::SmoothTransition() is complete, after which the camera is orbited another 180 degrees, concluding our simple animation.
7.7 Usage Notes
If the camera’s field of view (FOV) is too small the image quality of the skybox will be noticeably poor. Adjusting the values of the field of view in your View’s HPS::CameraKit with the function HPS::CameraKit::SetField() will help fix this problem.
Appendix – Full Source Code
Main application code. If you’re using one of the sandboxes, this code should be added to one of the OnUserCode slots (MFC Sandbox) or one of the DemoUserCommand.Execute() slots (WPF Sandbox).
You will likely need to initialize myCanvas to the value returned by the sandbox’s built-in GetCanvas() function.
    View myView = Factory::CreateView();
    myCanvas.AttachViewAsLayout(myView);

    //! [00700_skybox_import_images]
    HPS::Image::ImportOptionsKit iok;
    iok.SetFormat(HPS::Image::Format::Jpeg); // set format: jpeg, png, bmp, etc.

    // import the images
    ImageKit frontImg = HPS::Image::File::Import(image_path_positive_z, iok);
    ImageKit leftImg = HPS::Image::File::Import(image_path_negative_x, iok);
    ImageKit rightImg = HPS::Image::File::Import(image_path_positive_x, iok);
    ImageKit backImg = HPS::Image::File::Import(image_path_negative_z, iok);
    ImageKit bottomImg = HPS::Image::File::Import(image_path_negative_y, iok);
    ImageKit topImg = HPS::Image::File::Import(image_path_positive_y, iok);
    //! [00700_skybox_import_images]

    //! [00700_skybox_portfolio]
    HPS::PortfolioKey myPortfolioKey = myCanvas.GetPortfolioKey();
    HPS::ImageDefinition frontDef = myPortfolioKey.DefineImage("frontDef", frontImg);
    HPS::ImageDefinition leftDef = myPortfolioKey.DefineImage("leftDef", leftImg);
    HPS::ImageDefinition rightDef = myPortfolioKey.DefineImage("rightDef", rightImg);
    HPS::ImageDefinition backDef = myPortfolioKey.DefineImage("backDef", backImg);
    HPS::ImageDefinition topDef = myPortfolioKey.DefineImage("topDef", topImg);
    HPS::ImageDefinition botDef = myPortfolioKey.DefineImage("botDef", bottomImg);

    HPS::CubeMapDefinition skybox = myPortfolioKey.DefineCubeMap("skybox", backDef, frontDef, leftDef, rightDef, botDef, topDef);

    myView = myCanvas.GetFrontView();
    myView.GetSegmentKey().GetSubwindowControl().SetBackground(Subwindow::Background::Cubemap, "skybox");
    //! [00700_skybox_portfolio]

    //! [00700_skybox_animation]
    // As a convenience, display the NavCube in the scene
    myView.GetNavigationCubeControl().SetVisibility(true).SetInteractivity(true);

    // For demonstration purposes, create a new cube to go in the center of the screen
    HPS::SegmentKey cubeSegmentKey = myView.GetSegmentKey().Subsegment();
    cubeSegmentKey.GetMaterialMappingControl().SetFaceColor(RGBAColor(0.4f, 0.4f, 0.4f, 0.6f));
    cubeSegmentKey.GetVisibilityControl().SetEdges(false);
    HPS::ShellKey myShellKey = InsertCube(cubeSegmentKey, Point(0, 0, 0), 0.5f);

    // Once the scene has been created, update the window
    HPS::WindowKey myWindowKey = myCanvas.GetWindowKey(); // Get the Window Key
    HPS::UpdateNotifier notifier = myWindowKey.UpdateWithNotifier();
    notifier.Wait();

    SmoothTransHandler* myHandler = new SmoothTransHandler(); // Instantiate a custom event handler
    HPS::EventDispatcher dispatcher = HPS::Database::GetEventDispatcher(); // Get an event dispatcher
    dispatcher.Subscribe(*myHandler, HPS::Object::ClassID<SmoothTransitionCompleteEvent>());

    HPS::CameraKit camkit = HPS::CameraKit::GetDefault();
    camkit.Orbit(180, 0);
    camkit.Zoom(0.2f);
    camkit.SetField(16, 12); // Adjust field of view according to desired resolution
    myView.SmoothTransition(camkit, 2);

    while (!myHandler->transitionComplete) {
        ; // Wait for the first 180 rotation to complete
    }

    camkit.Orbit(180, 0);
    myHandler->transitionComplete = false;
    myView.SmoothTransition(camkit, 2);
    while (!myHandler->transitionComplete) {
        ; // Wait for the next 180 rotation to complete
    }

    //! [00700_skybox_animation]
View myView = HPS.Factory.CreateView();
myCanvas.AttachViewAsLayout(myView);

//! [00700_skybox_import_images]
HPS.Image.ImportOptionsKit iok = new HPS.Image.ImportOptionsKit();
iok.SetFormat(HPS.Image.Format.Jpeg);

// import the images
ImageKit frontImg = HPS.Image.File.Import(image_path_positive_z, iok);
ImageKit leftImg = HPS.Image.File.Import(image_path_negative_x, iok);
ImageKit rightImg = HPS.Image.File.Import(image_path_positive_x, iok);
ImageKit backImg = HPS.Image.File.Import(image_path_negative_z, iok);
ImageKit bottomImg = HPS.Image.File.Import(image_path_negative_y, iok);
ImageKit topImg = HPS.Image.File.Import(image_path_positive_y, iok);
//! [00700_skybox_import_images]

//! [00700_skybox_portfolio]
// Set up the Images in a portfolio
HPS.PortfolioKey myPortfolioKey = myCanvas.GetPortfolioKey();
HPS.ImageDefinition frontDef = myPortfolioKey.DefineImage("frontDef", frontImg);
HPS.ImageDefinition leftDef = myPortfolioKey.DefineImage("leftDef", leftImg);
HPS.ImageDefinition rightDef = myPortfolioKey.DefineImage("rightDef", rightImg);
HPS.ImageDefinition backDef = myPortfolioKey.DefineImage("backDef", backImg);
HPS.ImageDefinition topDef = myPortfolioKey.DefineImage("topDef", topImg);
HPS.ImageDefinition botDef = myPortfolioKey.DefineImage("botDef", bottomImg);

// Define the Cubemap texture
HPS.CubeMapDefinition skybox = myPortfolioKey.DefineCubeMap("skybox", backDef, frontDef, leftDef, rightDef, botDef, topDef);
myView.GetSegmentKey().GetSubwindowControl().SetBackground(Subwindow.Background.Cubemap, "skybox"); // Set the skybox texture
 //! [00700_skybox_portfolio]

//! [00700_skybox_animation]
// As a convenience, display the NavCube in the scene
myView.GetNavigationCubeControl().SetVisibility(true).SetInteractivity(true);

// For demonstration purposes, create a new cube to go in the center of the screen
HPS.SegmentKey cubeSegmentKey = myView.GetSegmentKey().Subsegment();
cubeSegmentKey.GetMaterialMappingControl().SetFaceColor(new RGBAColor(0.4f, 0.4f, 0.4f, 0.6f));
cubeSegmentKey.GetVisibilityControl().SetEdges(false);
HPS.ShellKey myShellKey = InsertCube(cubeSegmentKey, new HPS.Point(0, 0, 0), 0.5f);

SmoothTransHandler myHandler = new SmoothTransHandler(); // Instantiate a custom event handler
HPS.EventDispatcher dispatcher = HPS.Database.GetEventDispatcher(); // Get an event dispatcher
dispatcher.Subscribe(myHandler, HPS.Object.ClassID<SmoothTransitionCompleteEvent>());


// Get the window key and set up the camera
myView.Update();

HPS.CameraKit camkit = HPS.CameraKit.GetDefault();
camkit.Orbit(180, 0);
camkit.Zoom(0.2f);
camkit.SetField(16,12);   // Adjust field of view according to desired resolution
myView.SmoothTransition(camkit, 2);


while (!myHandler.transitionComplete)
{
    ; // Wait for the first 180 rotation to complete
}

camkit.Orbit(180, 0);
myHandler.transitionComplete = false;
myView.SmoothTransition(camkit, 2);
while (!myHandler.transitionComplete)
{
    ; // Wait for the next 180 rotation to complete
}

//! [00700_skybox_animation]
Event Handler. This is a simple event handler to manage the animation sequence; this code should live outside your main application function:
    class SmoothTransHandler: public HPS::EventHandler {
      public:
        bool volatile transitionComplete = false;

        ~SmoothTransHandler() { Shutdown(); } // Destructor

        EventHandler::HandleResult Handle(Event const* in_event)
        {
            transitionComplete = true; // Update the member variable
            return HandleResult::Handled;
        }
    };
class SmoothTransHandler : HPS.EventHandler
{
    public volatile bool transitionComplete = false;
    ~SmoothTransHandler() { Shutdown(); } // Destructor
    public override HandleResult Handle(Event in_event)
    {
        transitionComplete = true; // Update the member variable
        return HandleResult.Handled;
    }
};
Here’s the program to insert a cube into the scene:
static HPS::ShellKey InsertCube(HPS::SegmentKey segmentKey, HPS::Point center, float size)
{
    HPS::PointArray baseVertices;
    baseVertices.resize(24);

    float halflength = size / 2;
    baseVertices[0] = HPS::Point(-halflength + center.x, -halflength + center.y, halflength + center.z);
    baseVertices[1] = HPS::Point(halflength + center.x, -halflength + center.y, halflength + center.z);
    baseVertices[2] = HPS::Point(halflength + center.x, halflength + center.y, halflength + center.z);
    baseVertices[3] = HPS::Point(-halflength + center.x, halflength + center.y, halflength + center.z);
    baseVertices[4] = HPS::Point(-halflength + center.x, -halflength + center.y, -halflength + center.z);
    baseVertices[5] = HPS::Point(halflength + center.x, -halflength + center.y, -halflength + center.z);
    baseVertices[6] = HPS::Point(halflength + center.x, halflength + center.y, -halflength + center.z);
    baseVertices[7] = HPS::Point(-halflength + center.x, halflength + center.y, -halflength + center.z);

    HPS::PointArray vertices;
    vertices.resize(24);

    int tmpList[] = {0, 1, 2, 3, 1, 5, 6, 2, 5, 6, 7, 4, 4, 7, 3, 0, 3, 2, 6, 7, 0, 4, 5, 1};

    for (int i = 0; i < 24; i++)
        vertices[i] = baseVertices[tmpList[i]];

    int flist[] = {4, 0, 1, 2, 3, 4, 4, 5, 6, 7, 4, 8, 9, 10, 11, 4, 12, 13, 14, 15, 4, 16, 17, 18, 19, 4, 20, 21, 22, 23};

    HPS::IntArray faceList;
    faceList.resize(30);
    for (int i = 0; i < 30; i++)
        faceList[i] = flist[i];

    return segmentKey.InsertShell(vertices, faceList);
}
protected ShellKey InsertCube(SegmentKey segmentKey, Point center, float size)
{
    float halflength = size / 2;

    Point[] pointArray = { new Point(-halflength + center.x, -halflength + center.y, halflength + center.z),
                new Point(halflength + center.x, -halflength + center.y, halflength + center.z),
                new Point(halflength + center.x, halflength + center.y, halflength + center.z),
                new Point(-halflength + center.x, halflength + center.y, halflength + center.z),

                new Point(-halflength + center.x, -halflength + center.y, -halflength + center.z),
                new Point(halflength + center.x, -halflength + center.y, -halflength + center.z),
                new Point(halflength + center.x, halflength + center.y, -halflength + center.z),
                new Point(-halflength + center.x, halflength + center.y, -halflength + center.z)
                };

    int[] faceList = { 4, 0, 1, 2, 3, 4, 1, 5, 6, 2, 4, 5, 6, 7, 4, 4, 4, 7, 3, 0, 4, 3, 2, 6, 7, 4, 0, 4, 5, 1 };

    return segmentKey.InsertShell(pointArray, faceList);
}

