Analyzing Performances
The well known windows performance monitor!
This book is about performance. Performance is key to 3d graphics, for all kinds of images that can be processed: it’s key in 2D drafting for the rendering of large datasets, it’s key in real-time 3D to add more effects to the rendering and it’s also key to photo-realistic images generation as you don’t want to spend hours waiting for one single image!
So this book will try to provide hints on how to get the best rendering performance out of HOOPS Luminate. First, we can access some measurements on what has happened during the rendering of a frame. These measurements can be found in the RED::FrameStatistics class.
Enabling Frame Statistics
A RED::FrameStatistics object contains a lot of useful informations on what has happened during the previous image rendering. RED::FrameStatistics can be used by two mechanisms:
- They are accessible from any window, through
RED::IWindow::GetFrameStatistics.- They can be retrieved during the processing of a frame using the code snippet below.
// Let's declare a data container to be passed as callback argument and our RED::RENDERING_PROGRESS_CALLBACK:
typedef struct
{
    int _data01;
    int _data02;

} MyUserData;

RED_RC myProgressCallback( const RED::FrameStatistics& fstats,
                        void*                       user_data )
{
    // Get a pointer back to your user data:
    MyUserData* data = (MyUserData*)user_data;

    // Get informations from 'fstats' contents.

    return RED_OK;
}
And then the callback just needs to be registered for the window to monitor:
// Create some user data (not mandatory, user data can be ignored):
MyUserData* data = new MyUserData();
if( !data )
    RC_TEST( RED_ALLOC_FAILURE );

// Access our window interface ('window' should be your HOOPS Luminate window object here):
RED::IWindow* iwindow = window->As< RED::IWindow >();

// Set our rendering progress callback:
iwindow->SetRenderingProgressCallback( myProgressCallback, data );
The various access methods in the RED::FrameStatistics class will provide all the details on what happened to the window in terms of rendering. This covers all the rendered VRLs in the window for all cameras rendered by these VRLs.
A RED::FrameStatistics stored in one window contains one RED::ViewpointStatistics for each camera in each VRL of the window. Each RED::ViewpointStatistics instance lets you access a list of RED::PassStatistics, that contain a description of all what has happened for each rendering pass that had to be processed.
A RED::FrameStatistics object contains software timers and culling timers enabled by default as these come at no cost. However, hardware timers must be enabled, using calls to RED::FrameStatistics::QueryPassTime.
A concrete example of FrameStatistics usage can be found in the HOOPS Luminate framework. See RFK::TutorialApplication::ShowInspector, for the display of the performance inspector.
Reading Frame Statistics
As illustrated below, RED::FrameStatistics may show a lot of informations. Here’s an example below captured from one of the HOOPS Luminate tutorials, using hardware rendering:
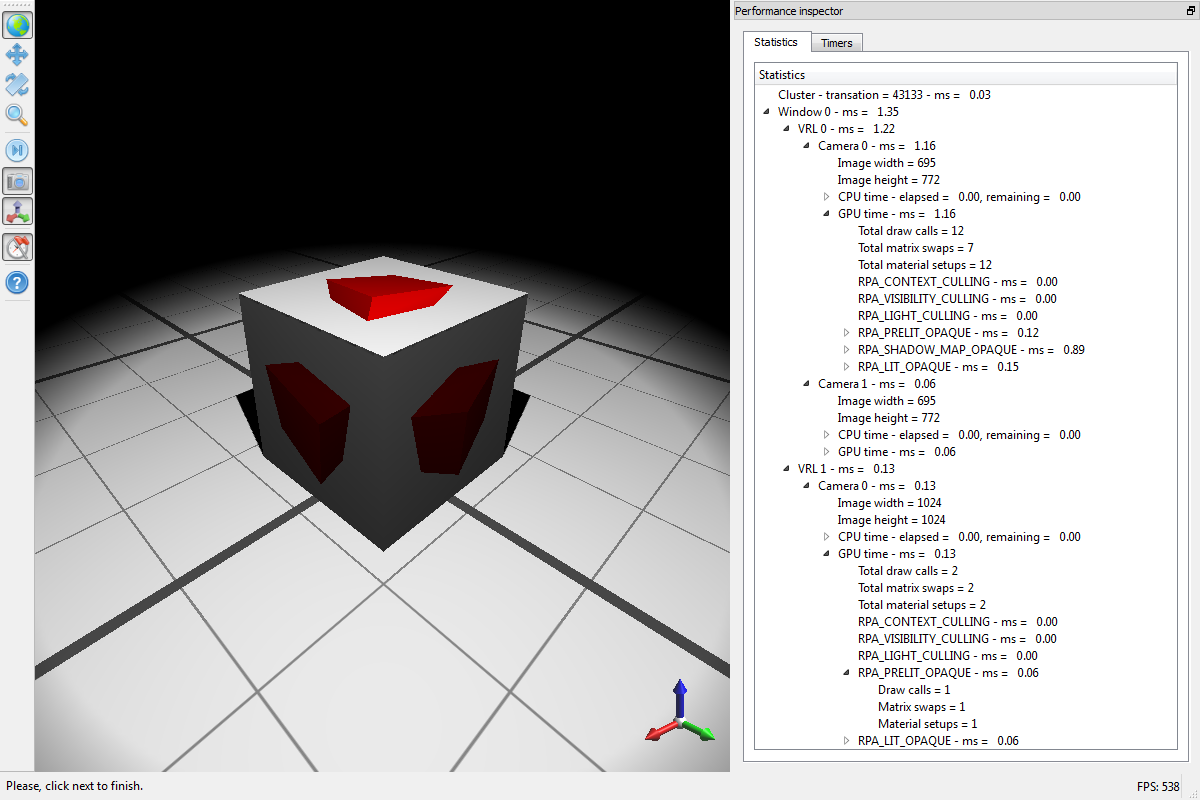
A typical RED::FrameStatistics report
In this example, all timers have been enabled using RED::FrameStatistics::QueryPassTime. Consequently, reported times are greater than the real-time that can be measured with no timers enabled, because RED::FrameStatistics timers are intrusive: they force a hardware flush before and after the measurement to really capture the amount of time spent within one single rendering pass.
The RED::FrameStatistics report is made of RED::ViewpointStatistics for each camera in each VRL, and each viewpoint statistics is composed of all the rendering passes that are needed to render that viewpoint. Therefore, back to our example above, we see:
- A first VRL (no 0), composed of two cameras: the main scene (camera 0) and the small 3 axis scene (camera 1)
- An auxiliary VRL (no 1), with one camera, used to render the texture with the red rotating cube, that is reused by one of the materials in the VRL 0
If we look at the pass details of the VRL no 1, camera no 0, we see:
- A set of culling passes: These passes are CPU rendering passes, in the engine, that are looking for the set of data to render in that context
- Rendering passes: here, we have a
RED::RPA_PRELIT_OPAQUEpass and aRED::RPA_LIT_OPAQUEpass, indicating that we have something to draw in theRED::MTL_PRELITpass of the red cube’s material and at least one light to process too (see The Shading Pipeline for details on the rendering pipeline)
If we look at the details of each pass, we’ll see:
- A number of draw calls: this is the actual number of calls to glDrawElements by HOOPS Luminate that have occurred for that pass
- A number of matrix swaps: this is the number of interruptions during the draw to setup a new transformation matrix
- A number of material setups: this is the number of times we had to setup the rendering pipeline (shaders, parameters, etc…)
Of course, the lower the better: reducing these numbers will increase the rendering performance for the considered pass. More on this can be found here: Hardware Display Performances.
Hardware Display
If you’re using the GPU with HOOPS Luminate, then there are several key items to consider to reach a good performance level for your application. Some items are related to the data you send to HOOPS Luminate, and some other items are just general facts to consider for hardware rendering. Details can be found here: Hardware Display Performances.
Software Display
As HOOPS Luminate is a hybrid engine delivering both hardware and software rendering solutions, caution should be also taken for the setup of scenes aimed at being rendered in software. The key performance items are not the same as for hardware rendering. Software rendering is generally used to generate higher quality images than hardware rendering and thus uses different rendering algorithms to reach its objectives. Details here: Software Display Performances.
How is Memory Used?
One important point to be aware of for a good graphic application is the memory consumption of the graphics. Graphic applications nowadays can use extremely large data (huge sky textures, massive meshes, etc…) and therefore it’s really important to have an insight of the amount of memory consumed by the engine and by the data. If we consider a simple 2D background image, for a 4k HD rendering, we’ll easily go for a 16384 x 8192 RGB HDR image, so that’s up to 800 Mb of memory for a single image. You’ve got to be prepared to that. If it has to go to the GPU, wow, even with a 4 Gb GPU, with a single background texture you may have consumed a big part of its memory. Consider that the graphic driver keeps a copy of that image (just in case of need or if the video has to flush the texture away due to insufficient space) and still for a single texture image, you can consume nearly 2Gb of memory. That’s worth noting it.
After reading this you’ll think we’re exaggerating, and yes, of course, you may use smaller background images. But the idea is there: screen resolutions are getting higher and higher, so does texture dimensions, and generally speaking all other resources involved in your rendering application.
So this chapter will talk about that, and give you insights of how memory is managed by HOOPS Luminate and what happens if we’re too short in memory. See here: Memory Usage.
Editing the Scene
The way the engine will react to changes is also a key parameter to consider in our discussions on performances. HOOPS Luminate is a fully dynamic engine, meaning that nothing is pre-calculated and anything in the data can be changed anytime. This is true for real-time rendering, but also true for software rendering. Of course, this don’t mean that changing the data or the organization of the rendered scene comes at no cost! There’s a cost for each modification. Many of them are neglectable, others may require attention from the application. See the details here: Modifying Engine Data.
Using Anti Aliasing
Anti-aliasing is often required for a high quality display whether be it real-time or photo-realistic. HOOPS Luminate features a wide range of anti-aliasing techniques, ranging from those that come at no cost up to pure brute force image supersampling. Learn all the details here: Anti-Aliasing.

