Defining a Custom Volumetric Effect
This tutorial will describe how to extend the RED::VolumetricEffect class to create our own custom volumetric effect.
Note
Rendering large images with volumetric effects can take time as it is really CPU expensive; this tutorial can take several minutes to render, so be prepared…
Some parameters influence the rendering time but also the quality of the final image:
- Number of lights
- Size of the volume
- Lights samples count
- Volume samples count
- Volume steps
- Heterogeneous medium vs. homogeneous medium
- etc.
The tutorial scene is composed of a ground plane, a physical area light and a cube primitive. Volumetric effects are only available in software rendering, the tone mapping is activated as well as the HDR pipeline.
// Turn on camera tone mapping.
RED::PostProcess& pp = icamera->GetPostProcessSettings();
RC_TEST( pp.SetToneMapping( RED::TMO_PHOTOGRAPHIC ) );

// HDR pipeline needs to be turned on to capture the full range of light intensities:
RED::IOptions* iwinopt = window->As< RED::IOptions >();
RC_TEST( iwinopt->SetOptionValue( RED::OPTIONS_WINDOW_HDR, 2, state ) );
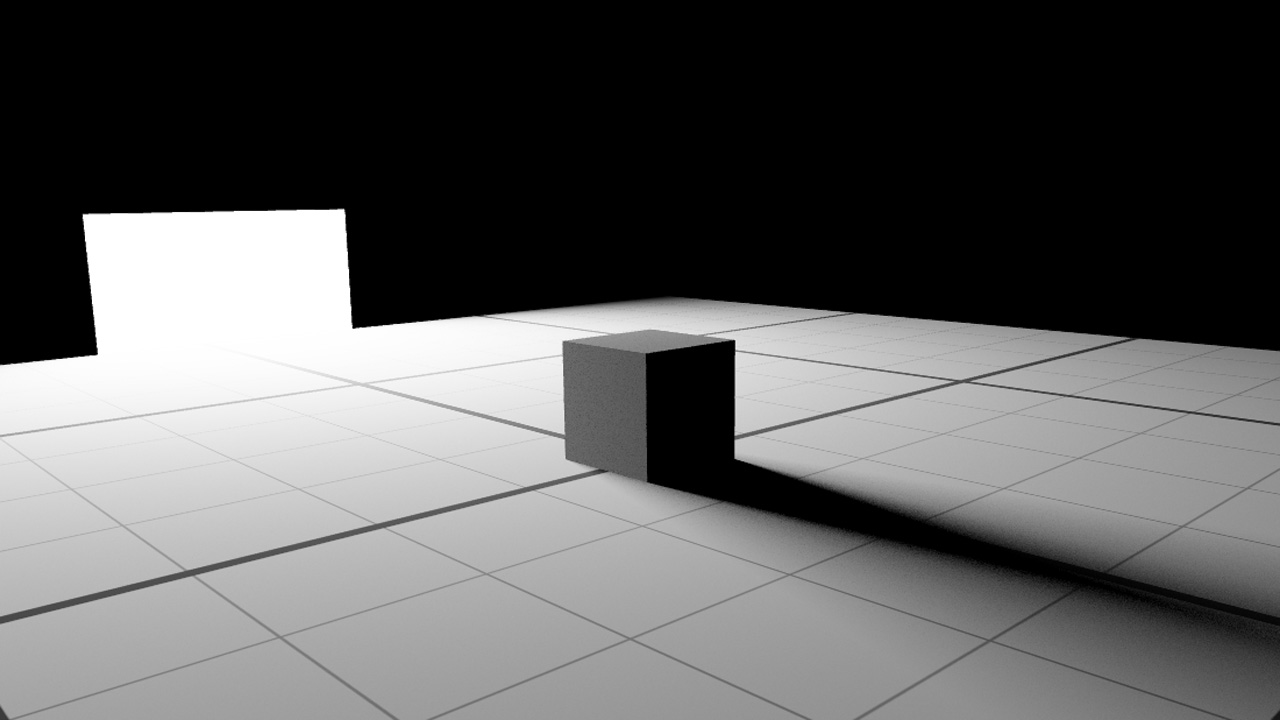
The scene without medium
Adding a Volumetric Effect to the Scene
Before adding any volumetric effect in the scene, the first thing to do is to activate the volume rendering using the RED::OPTIONS_RAY_VOLUME to the camera. We don’t have reflection nor refractions in our scene so a ray depth value of ‘1’ is enough.
// Enable volumetric rendering:
RC_TEST( icamopt->SetOptionValue( RED::OPTIONS_RAY_VOLUME, 1, state ) );
Then we need to create a RED::VolumeShape and add it the the scenegraph. This special shape will handle all the RED::VolumetricEffect objects of the scene:
// Create a volume shape to hold volumetric effect:
RED::Object* volume = RED::Factory::CreateInstance( CID_REDVolumeShape );
RED::IVolumeShape* ivolume = volume->As< RED::IVolumeShape >();

// Set volume rendering parameters:
RC_TEST( ivolume->SetRayMarchingStep( 1.0, state ) );
RC_TEST( ivolume->SetScatteringSamples( 16, state ) );
RC_TEST( ivolume->SetRayCutoff( 0.001, state ) );

// Add the shape to the scenegraph:
RC_TEST( iroot->AddChild( volume, RED_SHP_DAG_NO_UPDATE, state ) );
Volume rendering parameters were set here:
- Ray Marching Step is the size of a single volume step along the ray used when sampling the medium. Decreasing this value will increase the rendering quality and time, especially for heterogeneous media
- Scattering Samples defines the number of samples that will be used to sample the volume during its illumination process with surrounding lights. Increasing it increases the volume rendering quality and time
- Ray Cutoff is an optional value to stop the ray propagation when the result value is below the threshold
The next step is to create and add a volumetric effect to the volume shape:
// Add the volumetric effect:
RC_TEST( ivolume->AddVolumetricEffect( &g_effect, state ) );
And that’s it: our scene is ready to render our custom volumetric effect. Let’s see how to create it.
Creating a Basic Custom Volumetric Effect
To create a custom effect, the RED::VolumetricEffect class needs to be derived. We create a new class called ‘CustomEffect’ which will implement all the necessary virtual methods.
RED::VolumetricEffect::IsHomogeneous
To begin, we will just return true as our medium is homogeneous, i.e. its properties are the same in all its volume.
RED::VolumetricEffect::GetSigmaA
Simply return the sigma a coefficients. These are color absorption factors of the medium. In this tutorial we defined the coefficients to absorb the green and blue colors, resulting in a red medium.
RED::VolumetricEffect::GetSigmaSIn and RED::VolumetricEffect::GetSigmaSOut
Simply return the sigma s coefficients. These are color scattering factors of the medium. They are divided into in-scattering and out-scattering factors. To be physically correct, just return the same coefficients for both two methods. In the tutorial, we set the same value for each color channel. The medium will scatter each component of the light equally.
RED::VolumetricEffect::GetDensity
For homogeneous media, this function must return a single value. It defines the amount of particles contained in a sample of the medium.
RED::VolumetricEffect::GetPhase
The phase function defines how the lights is scattered to the viewing direction. To keep it simple, we define an isotropic phase function: the light is equally scattered in all directions.
void GetPhase( double       oPhase[3],
            const double iPosition[3],
            const double iDirection1[3],
            const double iDirection2[3] ) const
{
    // Isotropic phase funtion:
    oPhase[0] = oPhase[1] = oPhase[2] = 0.25 / RED_PI;
}
RED::VolumetricEffect::GetVolumeIntervals
This is a big part of the volume definition. This method must return the intersection intervals of a ray crossing the medium volume. In this tutorial, we chose to define our volume as a sphere centered on the scene origin. A ray-sphere intersection function have been written for this purpose.
The volume intervals function becomes:
// Returns the volume intervals of a ray intersecting the volume.
// - oIntervals is the array that must be filled with volume intervals.
// - iE is the ray start point.
// - iP is the ray end point.
RED_RC GetVolumeIntervals( RED::Vector< double >&            oIntervals,
                        const double                      iE[3],
                        const double                      iP[3],
                        const RED::ISoftRenderingContext& iRenderCtx ) const
{
    double t1, t2;

    oIntervals.clear();

    // Ray-sphere intersection function.
    // - t1 is the returned interval starting point.
    // - t2 is the returned interval ending point.
    // - center is the sphere center.
    // - radius is the sphere radius.
    if( RaySphereIntersection( t1, t2, iE, iP, _center, _radius ) )
    {
        // If an intersection is found, just fill the output array.
        oIntervals.push_back( t1 );
        oIntervals.push_back( t2 );
    }

    return RED_OK;
}
After filling all of the previous mandatory functions, the resulting rendering is seen in the next image:
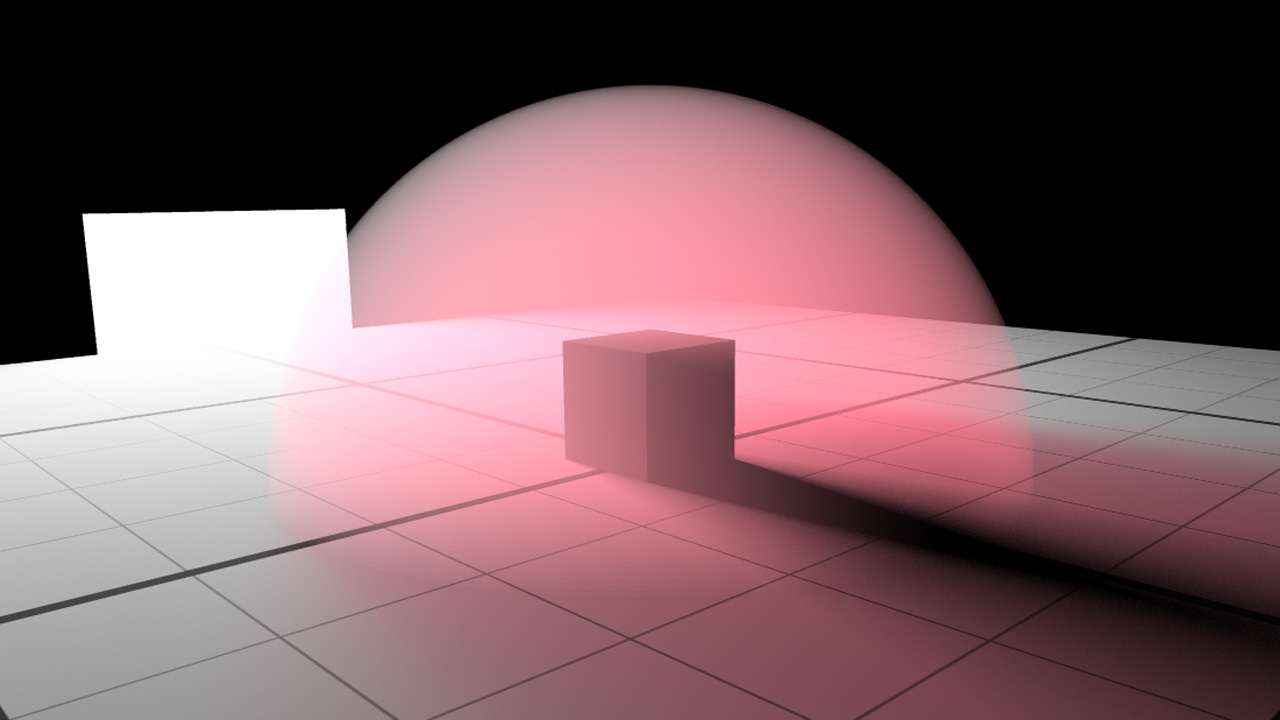
Basic homogeneous volumetric effect
Turning the Medium Heterogeneous and Adding Noise
In the last step of the tutorial, we will update the custom volumetric effect by setting it heterogeneous. The medium density will not be the same in all the volume but will change following a noise function.
The RED::VolumetricEffect::IsHomogeneous function will now return ‘false’.
As said previously, the other function that will change is the RED::VolumetricEffect::GetDensity one. HOOPS Luminate provides mathematical functions to create a 2D/3D noise the RED::Noise class. In this tutorial, we implemented a fractal based on FBM (fractional Brownian motion). Its parameters are:
- An output value
- The current position
- The number of octaves to compute the noise. Increasing the number of octaves increases the level of noise details
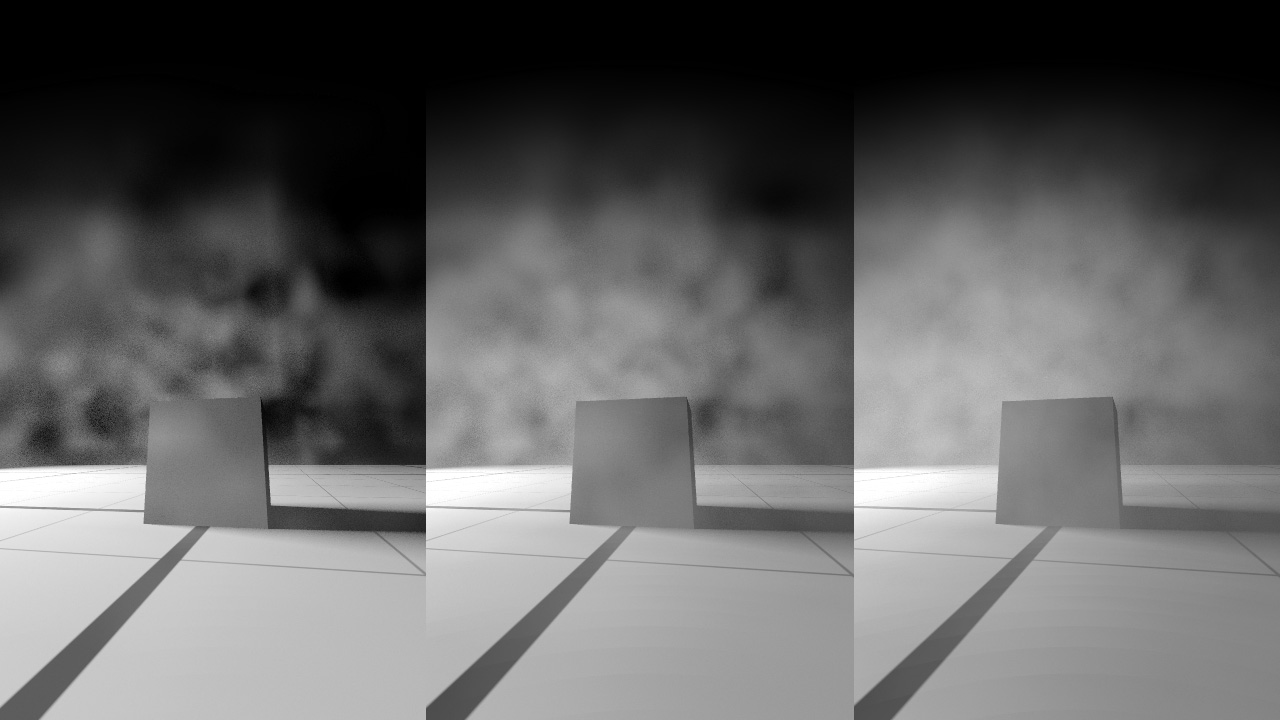
Increasing the number of octaves of the noise function: 1, 2 and 6 octaves
Here is the complete code of the new density function:
double posToCenter[3], fade, noise, p[3];

// Compute the position-to-sphere vector:
posToCenter[0] = _center[0] - iPosition[0];
posToCenter[1] = _center[1] - iPosition[1];
posToCenter[2] = _center[2] - iPosition[2];

// Compute the position-to-sphere distance:
fade = sqrt( posToCenter[0] * posToCenter[0] + posToCenter[1] * posToCenter[1] + posToCenter[2] * posToCenter[2] );

// Fade on sphere border - 25% of the radius:
fade = 1.0 - REDMax( 0.0, REDMin( 1.0, ( fade - ( 0.75 * _radius ) ) / ( 0.25 * _radius ) ) );

// Add Noise:

// Scale the noise by 30%:
p[0] = iPosition[0] * 0.3;
p[1] = iPosition[1] * 0.3;
p[2] = iPosition[2] * 0.3;

double frequency = 1.0;

noise = 0.0;
for( int o = 0; o < _noise_octaves; ++o )
{
    double pn;
    RED::Noise::Perlin3d( pn, p );
    pn += 0.5;
    noise += pn <= 0.0 ? 0.0 : pn * frequency;
    frequency *= 0.5;
    p[0] *= 2.0;
    p[1] *= 2.0;
    p[2] *= 2.0;
}
The first part of the function fades the density on the border of the sphere volume. The second part uses the RED::Noise::Perlin3d function to generate a noise value for the given position.
The following picture shows the final rendering result of our noisy heterogeneous medium in a sphere volume:

Heterogeneous volumetric effect

