Viewpoint Render Lists
The “Viewpoint Render List” (or VRL) is a very important object in the HOOPS Luminate architecture. This is on purpose that we skipped it for the very early setup of a HOOPS Luminate application, as there’s always one implicit viewpoint render list created with a window. We’ve seen (in the doc Windows under the section Window and Viewpoint Render Lists) that a window can store several VRLs. Each VRL is associated to an on-screen or off-screen rendering buffer.
The VRL stores the specification of the data to be displayed by a window. There can be several VRLs involved in the rendering of a frame, defining each separated rendering passes, that can target off-screen buffers. Therefore, a single window can assemble a cascade of rendering VRLs to define a complete multi-pass rendering pipeline, from inside the window.
The default VRL of a window renders on-screen. It’s retrieved using RED::IWindow::GetDefaultVRL, or RED::IWindow::GetVRL specifying the VRL number 0.
An auxiliary VRL in a window renders off-screen. In OpenGL words, it renders to a Framebuffer object (FBO) or to a p-buffer on very old hardware. See the dedicated tutorial here: Rendering to an Offscreen Buffer.
A VRL’s rendering buffer uses a pixel format that can be chosen from the available list of RED::FORMAT image formats. See RED::IWindow::CreateVRL for details.
A VRL’s exposes a wide range of services, among which we find details in pages below:
- Scene background management: See Adding a Background
- Anti-aliasing: See VRL Anti-Aliasing for details
Creating and Accessing an Auxiliary VRL’s Render Image
// Assuming that 'window' is a valid HOOPS Luminate window object:
RED::IWindow* iwindow = window->As< RED::IWindow >();

// Creating an auxiliary VRL that render to a HD half float buffer:
RED::Object* auxvrl;
RC_TEST( iwindow->CreateVRL( auxvrl, 1920, 1080, RED::FMT_HALF_FLOAT_RGBA, true, iresmgr->GetState() ) );

// Retrieve the VRL interface:
RED::IViewpointRenderList* iauxvrl = auxvrl->As< RED::IViewpointRenderList >();

// Add data to visualize.

// Render the window:
RC_TEST( iwindow->FrameDrawing() );

// Access the built-in VRL image:
RED::Object* image = iauxvrl->GetRenderImage();
RED::IImage2D* iimage2D = image->As< RED::IImage2D >();

// For instance, read-back the VRL pixels to CPU:
RC_TEST( iimage2D->GetPixels() );
A viewpoint render list (VRL) is either corresponding to an off-screen buffer if it’s an auxiliary VRL or to an on-screen buffer if it’s the default VRL of a window. A VRL has two built-in render images that provide an access to its contents:
RED::IViewpointRenderList::GetRenderImage: access the color buffer image with the contents of the VRL after it has been drawn.RED::IViewpointRenderList::GetRenderDepthImage: access the depth buffer image of the contents of the VRL after it has been drawn.
These methods return ready-to-use, GPU uploaded, 2D images, using the RED::TGT_TEX_RECT target. Note that the application may also specify other images for accessing a VRLs contents, using RED::IImage2D::SetRenderImage or RED::IImage2D::SetRenderDepthImage.
Defining a Rendering Pipeline using VRLs
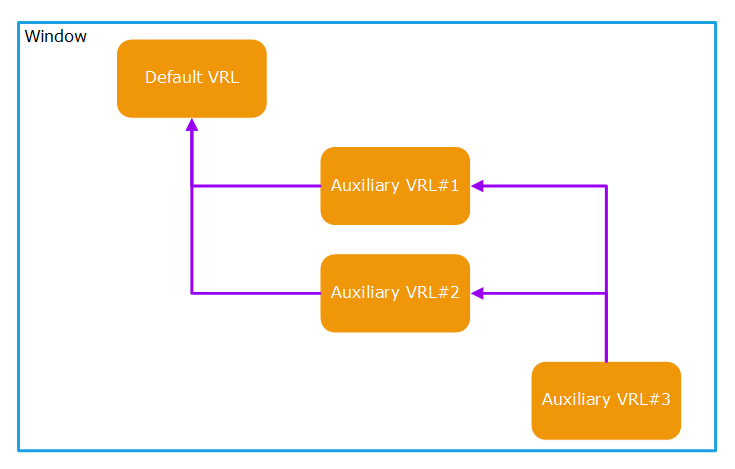
Using the mechanism provided by auxiliary VRLs, an application can easily define a rendering cascade, implying many rendering passes, all being executed by a single window rendering call. Let’s consider the example below:

An example of a VRL cascade in the rendering of a window
Let’s imagine that we want to apply two post-processing effects over a scene and have them recombined in the final window. This could be achieved by setting up the cascade described above. After the creation of the three VRLs that we need, we can access their render images and have them being used as parameters for other shaders and materials in subsequent passes.
HOOPS Luminate will proceed as following:
- Render auxiliary VRL#3
- Generate render images for VRL#3
- Supply these images to the scenes in VRL#2, VRL#1 and to the default VRL
- Render auxiliary VRL#2
- Generate render images for VRL#2
- Supply these images to the scenes in VRL#1 and to the default VRL
- Render auxiliary VRL#1
- Generate render images for VRL#1
- Supply these images to the scene in the default VRL
So as we can see, this is a kind of ‘back to front’ rendering process. HOOPS Luminate will always start processing the last VRL in the list of VRLs of the window. It’ll render all the VRLs from the last to the first (which is always the default VRL of the window). Therefore, this can be leveraged to assemble any kind of ‘shading tree’, each node of the tree being the result of the rendering of a full VRL.
Contents of a VRL
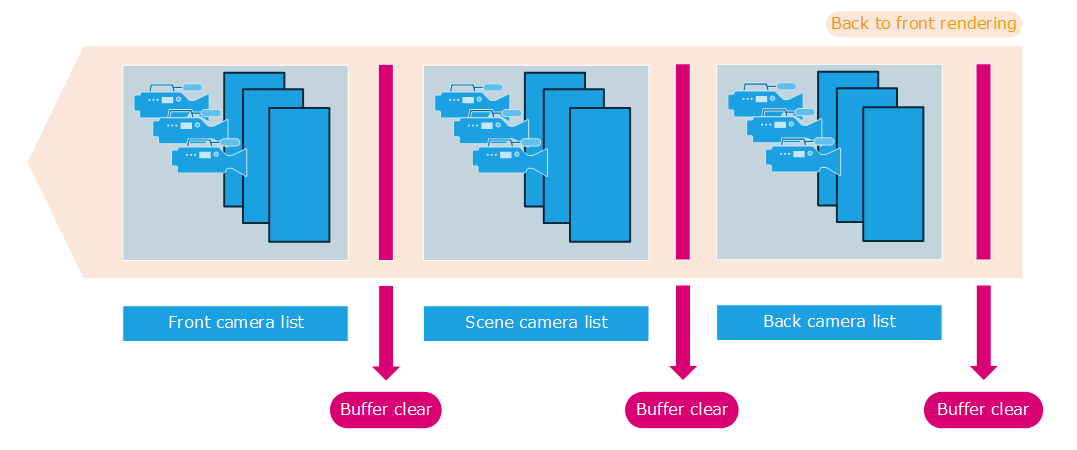
A VRL can render several cameras. Each camera can be linked to a different scene graph. Therefore, a VRL has extended display capabilities in the sense that in a single VRL can mix a lot of informations from different sources:

Camera composition in a single VRL
The VRL owns three separate lists of cameras. On inserting a camera into the VRL, the list of camera to which the camera is added is specified. Those are:
RED::VST_BACK: The background list of camerasRED::VST_SCENE: The scene list of camerasRED::VST_FRONT: The foreground list of cameras
Between the rendering of all cameras in a list, the rendering buffer of a VRL will be cleared. The rendering procedure is as follows:
- Clear the rendering buffer color + depth + stencil (unless specified not to clear)
- Render the background list of cameras
- Clear the rendering buffer depth + stencil only (unless specified not to clear)
- Render the scene list of cameras
- Clear the rendering buffer depth + stencil only (unless specified not to clear)
- Render the foreground list of cameras
To preserve the results of each list, the clear after a list rendering does not affect the color buffer. It only affects the depth and stencil buffers of the VRL. So as we can see here, the scene graph drawn by a foreground camera of the VRL will always appear above any other scene graph in scene or background cameras. This enables compositing capabilities inside a single VRL. For example, textual indications that have to appear on top of a model will be always visible if they’re drawn by a foreground camera.
Then, all cameras among a single list of cameras of the VRL do share the same depth buffer space.
Activating or Desactivating a VRL
The rendering of a given VRL can be enabled or disabled using RED::IViewpointRenderList::Activate. A desactivated VRL is not rendered at all. However, all ray-tracing acceleration structures related to the rendering of cameras in the VRL are kept uptodate.
Render images associated to desactivated VRLs are not modified. They can still be accessed.
VRL Software Setup and Callbacks
The VRL is a target of choice for setting up various callbacks that can change the behavior of HOOPS Luminate if it renders an image in software. All these callbacks are set for each viewpoint that can be rendered in the VRL:
RED::IViewpointRenderList::SetViewpointSoftBucketCallback: This callback works with theRED::ISoftBucketinterface to redefine the bucket rendering order in an imageRED::IViewpointRenderList::SetViewpointSoftRayProcessingCallbacks: Define custom software ray-tracing intersection callbacks to intersect custom primitives. These primitives can be managed by the application and can be of any type wished by the userRED::IViewpointRenderList::SetViewpointSoftPixelAnalysisCallback: Enables analytic beam processing in software to get an accurate analysis of what’s behind a pixel. This can be used to generate vector graphics out of HOOPS Luminate
In addition to these callbacks, several other settings can be taylored for software rendering needs:
RED::IViewpointRenderList::SetViewpointGICache: Specifies that an external global illumination (GI) cache needs to be used for the rendering of a camera scene graphRED::IViewpointRenderList::SetViewpointSoftClipBox: Relimits the scene in software by a clipping boxRED::IViewpointRenderList::SetViewpointSoftTileOffset: Get a hook over the random number generator seed for each tile processed in a large image

