Tone Mapping
In this chapter, we’ll focus on tone mapping details. This completes the Tonemapping Explained chapter with a deeper technical focus.
Enabling Tone Mapping
RED::IViewpoint* iviewpoint = viewpoint->As< RED::IViewpoint >();
RED::PostProcess& pp = iviewpoint->GetPostProcessSettings();

RC_TEST( pp.SetToneMapping( RED::TMO_PHOTOGRAPHIC ) );
All tone mapping controls are available on the RED::PostProcess class instance of the viewpoint. Please note that the RED::PostProcess class is accessed directly, without any RED::State transaction parameter. Consequently, changing the tone mapper settings should only occur from the rendering thread, before or after a rendering call. This lets the calling application dynamically change the tone mapping of an image while its calculated.
Anti-Aliasing and Tone Mapping
Many rendering engine force the user to choose its tone mapper settings before rendering the image. Once the image is calculated, it can’t be modified, and if the tone mapper settings are not correct, another image has to be rendered. The technical reason for this way of doing calculations is generally related to anti-aliasing that gets broken if tone mapping is applied after the image calculation.
In HOOPS Luminate, this is not true: tone mapper settings can be changed anytime: during the rendering and after the rendering, once the image has been calculated. Tone mapping can even be applied just to an image that was saved earlier.
HOOPS Luminate has a special format for anti-aliased image, the RED::FMT_FLOAT_RGBA_AA. This format keeps anti-aliasing informations available for the tone mapper, so that tone mapping can be applied really as a post-process step, without the need for re-rendering the scene. It can even be applied from another executable, not necessarily the one that was used to render the image.
This is a key feature in HOOPS Luminate aiming at reducing the number of needed image calculations to get the right result.
GPU Accelerated or Software Tone Mapping
HOOPS Luminate has two implementations of the tone mapping controls: one is GPU based and the other one is CPU based. HOOPS Luminate will use GPU tone mapping whenever possible. This is a faster processing that takes less than 1 millisecond to complete. So:
- If HOOPS Luminate is started in hardware mode or hybrid mode, tone mapping will be performed using the available GPU acceleration
- If HOOPS Luminate is started in software mode, tone mapping will be performed using the CPU. This step can take up to a few milliseconds for large images
A Tone Mapping Only Rendering Loop
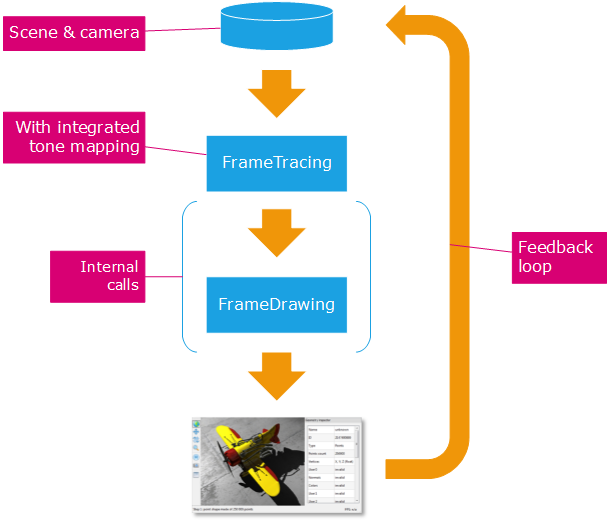
As mentioned above, HOOPS Luminate can be used to only apply tone mapping to a completed image. A typical software rendering application uses the following feedback loop to process an image:

Typical software rendering loop.
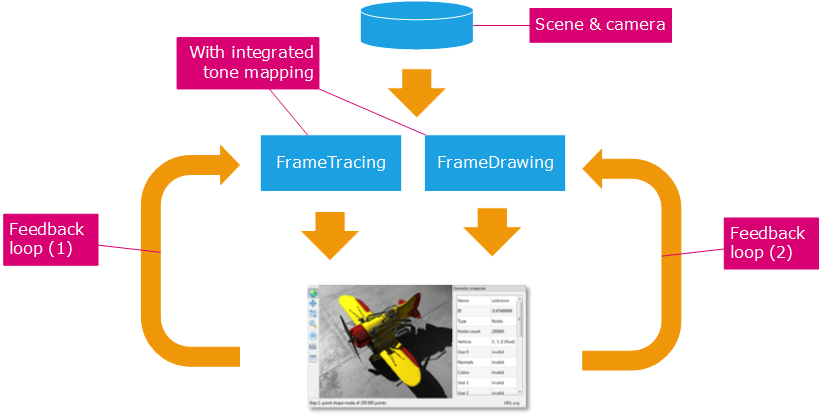
While the image is not complete, proceed with RED::IWindow::FrameTracing. Then, internally, HOOPS Luminate calls RED::IWindow::FrameDrawing and the tone mapping is performed on the actual software image result, which is refining iteratively. Once the image has beeen calculated, we can add another internal feedback loop. This time we’ll explicitely call RED::IWindow::FrameDrawing (2), and we won’t call RED::IWindow::FrameTracing (1) anymore after the completion of the image:

The tone mapping only application loop.
The first feedback loop - before image is completed - is identical to the case seen earlier. The second feedback loop that occur after is just calling FrameDrawing, instead of FrameTracing, after having specified images to tone map using RED::IViewpointRenderList::SetViewpointSoftImages. These images should have been retrieved after feedback loop (1), either calling RED::IWindow::FrameTracingImages or RED::IWindow::FrameTracingImageLayers.
Luminance Control for Animations or Tiled Rendering
Some specific rendering workflows require the knowledge of image luminance informations needed by the tone mapping beforehand. Among these workflows, two are typical:
- The rendering of large images using tiles
- Animations
Tone mapping works using luminance informations. There are two sources of luminance informations in HOOPS Luminate:
RED::IImage2D: Luminance query methods areRED::IImage2D::GetAverageLuminance,RED::IImage2D::GetLogAverageLuminance,RED::IImage2D::GetMinLuminance,RED::IImage2D::GetMaxLuminance. An image that is the result of a rendering (typically an image supplied as a color rendering layer, or an image supplied as color image ofRED::IWindow::FrameTracingImges) has valid luminance values filled in it. These luminance values are calculated during the rendering.RED::PostProcess: The post process class instance can receive user defined luminance informations, thanks toRED::PostProcess::OverrideLuminance. In this case, luminance values are supplied by the application to the tone mapper, and the image luminance informations are ignored.
So, back to our two scenarios:
- Large images rendered using tiles: To tonemap a large image, all tiles need to be rendered first. Then all their luminance informations need to be gathered, and averaged by the application. Finally, the chosen luminance values can feed the
RED::PostProcess::OverrideLuminance.- Animations: The rendering of animations with tone mapping enabled each frame causes a lot of image flickering due to the constant variation of luminance informations over the course of the animation. There are several ways to overcome this. The simplest is maybe to force the luminance to vary smoothly; like a real human eye does. On suddenly getting into a dark room, the eye does not immediately sees the details. It needs time to adjust to the low luminance. This can be reproduced using the
RED::PostProcess::OverrideLuminancemethod.
The Ignore Background Option
The background can occupy a large place in an image. For instance on rendering a mechanical assembly, or an outdoor model, we can see large portions of the background in the resulting image. Sometimes the user wishes to tone map this background, sometimes not. In the example of a background photography, the user may want it to remain ‘as is’ while its model is still rendered and properly tonemapped. The RED::OPTIONS_TONE_MAPPING_IGNORE_BACKGROUND let the application control the behavior of HOOPS Luminate regarding the background.

