Anchoring Viewpoints in a Window
This simple tutorial details the usage of the RED::IViewpointRenderList::InsertViewpoint method. It’s all about anchoring a camera in a window’s default VRL, which is the visible rendering surface of the window. The few parameters we play with are:
// A front camera, anchored bottom left, whose size stretches:
RED::Object* viewpoint;
RC_TEST( CreateColoredQuadCamera( viewpoint, RED::Color::RED ) );

RC_TEST( ivrl->InsertViewpoint( viewpoint, RED::VST_FRONT, RED::LIST_LAST,
                                20, 20, 150, 150, 0.0f, 0.0f,
                                RED::VSP_ANCHOR_FIXED, RED::VSP_SIZE_STRETCHED_AUTO_RATIO,
                                iresmgr->GetState() ) );
- The
RED::VRL_SORTlist we’re in - The
RED::LIST_POSwe’re in in our list of viewpoints - The 4 anchoring coordinates: iXAnchor, iYAnchor, iXSize and iYSize
Creating Anchored Viewpoints
We create 4 viewpoints, as illustrated in the image below:
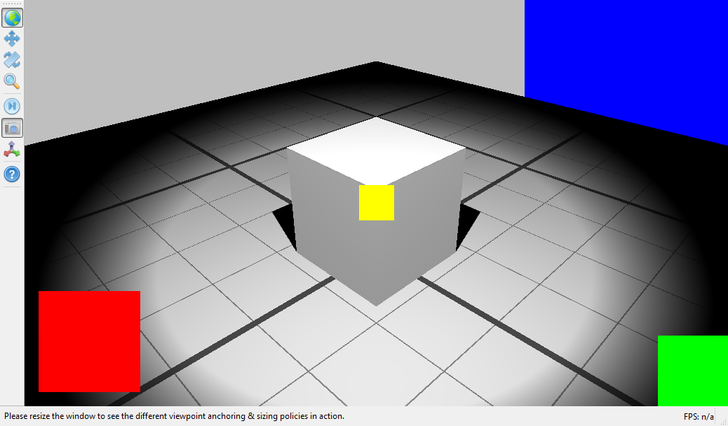
The 4 created viewpoints, each with its own anchoring and sizing policy.
We have three viewpoint in the RED::VST_FRONT list: red, green and yellow. Therefore, they all appear in front of the scene, which is the RED::VST_SCENE list (the built-in simple scene goes to that list). Note that calling RED::IWindow::InsertViewpoint does an insertion of the supplied viewpoint in the RED::VST_SCENE list of the default VRL of the window. Then, we have the blue viewpoint, which is inserted in the RED::VST_BACK list.
Then, each viewpoint has an anchoring position (given width and height, the window dimensions):
- The red viewpoint is anchored at ( 20, 20 ), so this is at the lower left corner of the window (see 2D Image Origin for any details).
- The green viewpoint is anchored at ( width, 0 ), so this is the lower right corner of the window.
- The blue viewpoint is anchored at ( width, height ), so this the upper right corner of the window.
- And last, the yellow viewpoint that is anchored at the window center shifted of half the viewpoint’s viewporting region dimensions.
Viewport Size
Then, the size of the viewpoint does matter. By default, a positive size value indicates a size headed toward the window right and top corners, while negative values head toward opposite directions, as illustrated below:
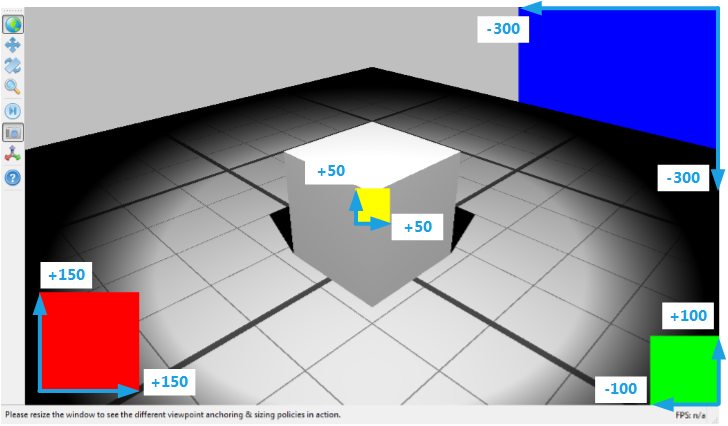
Size of each viewpoint’s viewport
The Window Resizing the Window
On a call to RED::IWindow::Resize (implicitely done by the RFK::TutorialApplication on resizing the window), the default VRL of the window gets resized. Note that auxiliary VRLs in a window are NOT resized during this operation. The resizing operation uses the RED::VRL_SIZEPOS values specified during RED::IViewpointRenderList::InsertViewpoint to calculate each viewpoint’s new position and viewport:
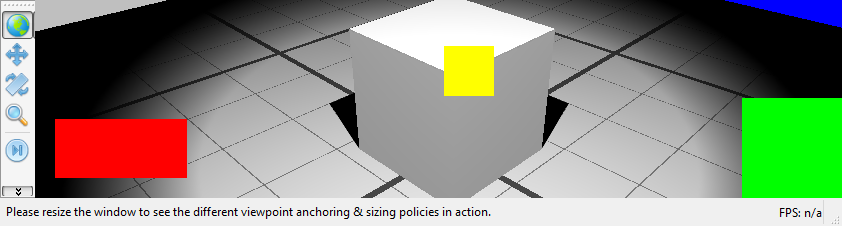
The same window after a resize operation
A viewpoint whose anchor is using the RED::VSP_ANCHOR_STRETCHED flag is scaled according to the window size change. Please not that due to an internal storage of the viewport’s anchoring coordinates using integer values, numerical erosion of the viewport’s anchoring coordinates can occur (this can be seen on the yellow viewpoint, whose anchor tends to not remain in the window center) due to roundup to (int) values after the resize operation.
A viewpoint’s viewport size can then either be stretched (using RED::VSP_SIZE_STRETCHED or RED::VSP_SIZE_STRETCHED_AUTO_RATIO) or remain fixed. The green viewpoint has a fixed size and the red one has a stretched size. Finally, the RED::VSP_SIZE_STRETCHED_AUTO_RATIO preserves the pixel ratio intact and modifies the camera’s frustum accordingly.