Loading and Playing Skeletal Animations
The goal of this tutorial is to describe how to load a skinned mesh and several skeletal locomotion animations. Once loaded, we will see how to get and play them.
The mesh is a classical rigged and skinned biped.
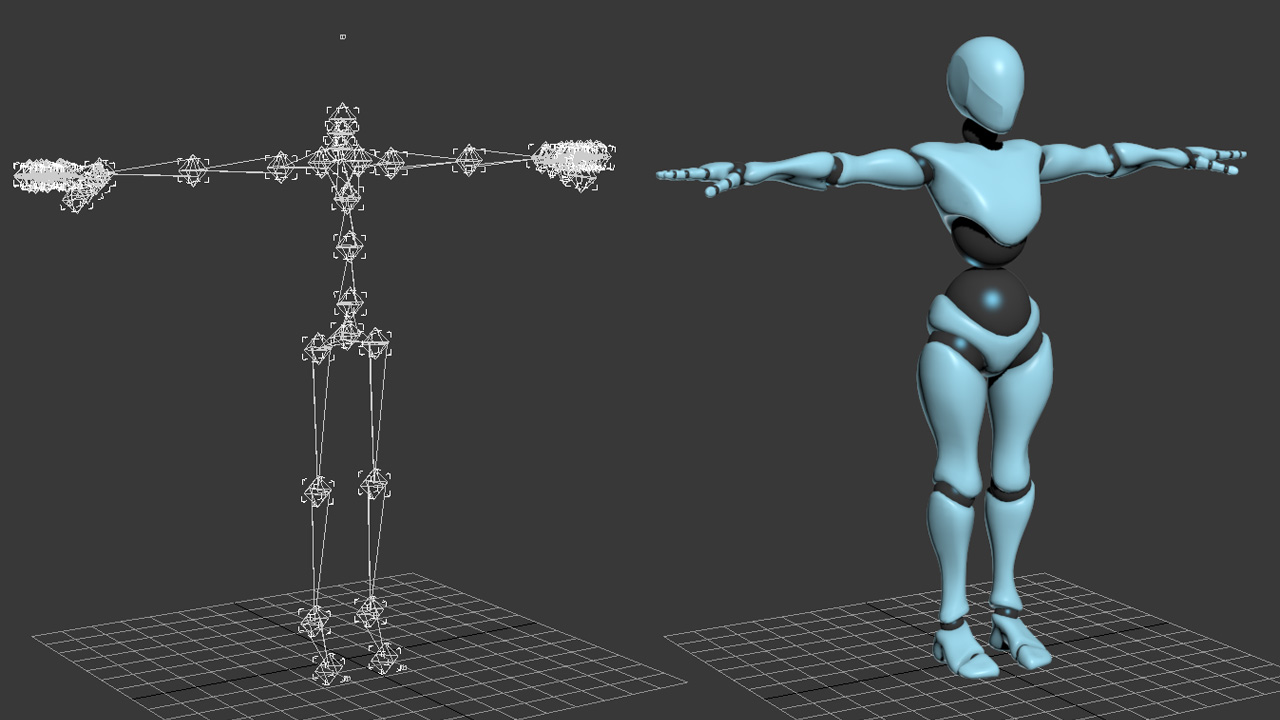
The rigged and skinned mesh used in this tutorial (3dsMax view)
Four skeletal animations will be loaded for the biped skeleton:
- Idle
- Walk
- Jog
- Run
These animations will be blended together to ensure smooth transitions from one to another in real-time.
Note
The mesh and animations used in this tutorial come from the Mixamo tool: www.mixamo.com
Loading the Mesh and Animations
The first step of this tutorial is to load the external data. To do this, we simply use the RED::IOTools::Load function to import several .fbx files:
- “idle.fbx” contains the skinned mesh as well as the first idle animation
- “walking_inPlace_noSkin.fbx” contains only the walking animation without mesh
- “jogging_inPlace_noSkin.fbx” contains only the jogging animation without mesh
- “running_inPlace_noSkin.fbx” contains only the running animation without mesh
RED::Vector< unsigned int > context;
RED::LayerSet rt = RED::LayerSet::ALL_LAYERS;
RC_TEST( RED::IOTools::Load( context, "../resources/idle.fbx", RED::IOOT_ALL,
                            RED::IOLMT_GENERIC, &rt, NULL, RED::IOLTT_ALPHA, RED::IOSU_CM, false,
                            iresmgr->GetState(), 0, NULL, (RED::ProgressCallback)progressCallback ) );

RC_TEST( RED::IOTools::Load( context, "../resources/walking_inPlace_noSkin.fbx", RED::IOOT_ANIMATION,
                            RED::IOLMT_GENERIC, &rt, NULL, RED::IOLTT_ALPHA, RED::IOSU_CM, false,
                            iresmgr->GetState(), 0, NULL, (RED::ProgressCallback)progressCallback ) );

RC_TEST( RED::IOTools::Load( context, "../resources/jogging_inPlace_noSkin.fbx", RED::IOOT_ANIMATION,
                            RED::IOLMT_GENERIC, &rt, NULL, RED::IOLTT_ALPHA, RED::IOSU_CM, false,
                            iresmgr->GetState(), 0, NULL, (RED::ProgressCallback)progressCallback ) );

RC_TEST( RED::IOTools::Load( context, "../resources/running_inPlace_noSkin.fbx", RED::IOOT_ANIMATION,
                            RED::IOLMT_GENERIC, &rt, NULL, RED::IOLTT_ALPHA, RED::IOSU_CM, false,
                            iresmgr->GetState(), 0, NULL, (RED::ProgressCallback)progressCallback ) );
From now, all the data are stored in the RED::IDataManager, we can retrieve all we need from it. Each call to the Loading function created a new data context containing the related data.
The animation controllers are retrieved using the RED::IDataManager::GetSkeletalAnimationClipController function:
RC_TEST( idatamgr->GetSkeletalAnimationClipController( g_anim_ctrl[ AID_IDLE ], context[0], 0 ) );
RC_TEST( idatamgr->GetSkeletalAnimationClipController( g_anim_ctrl[ AID_WALK1 ], context[1], 0 ) );
RC_TEST( idatamgr->GetSkeletalAnimationClipController( g_anim_ctrl[ AID_JOG ], context[2], 0 ) );
RC_TEST( idatamgr->GetSkeletalAnimationClipController( g_anim_ctrl[ AID_RUN ], context[3], 0 ) );
The first file contains in fact three RED::IMeshShape meshes because of the different materials. They use the same skeleton. They can be get from their ID once the loaded scenegraph had been added to the viewpoint scene root:
g_meshes.resize( g_meshes_count );
RC_TEST( iroot->GetChildByID( g_meshes[0], "Beta_HighJointsGeo" ) );
RC_TEST( iroot->GetChildByID( g_meshes[1], "Beta_HighLimbsGeo" ) );
RC_TEST( iroot->GetChildByID( g_meshes[2], "Beta_HighTorsoGeo" ) );
To complexify a little, we would like to have a slow walk and a fast walk. We will duplicate the skeletal controller of the walk animation and change its playing speed. One more skeletal animation clip controller (implementing the RED::ISkeletalAnimationController and RED::IAnimationClipController interfaces) is created based on the loaded walk animation clip (RED::AnimationClip):
// Create another walk animation clip controller (to have slow walk and fast walk).
// The walk controllers shares the same animation clip.
RED::IAnimationClipController* ianimctrl = g_anim_ctrl[ AID_WALK1 ]->As< RED::IAnimationClipController >();
RED::AnimationClip* clip;
RC_TEST( ianimctrl->GetAnimationClip( clip ) );
RED_RC rc;
g_anim_ctrl[ AID_WALK2 ] = RED::Factory::CreateSkeletalAnimationClipController( *resmgr, *clip, rc );
if( rc != RED_OK )
    return rc;
Setup of the Animation Controllers
We would like to build the following animation system:
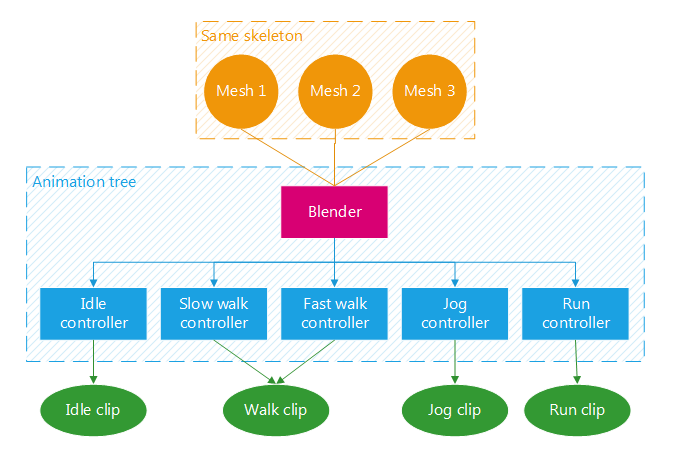
Animation systems for the three meshes
All the objects in the previous figure were already created except the blender. Let’s do it:
// Create an animation blender:
// ----------------------------
// It holds the animation controllers and controls the 3 meshes.
// Only possible because the 3 meshes have the same skeleton.

// Create the blender:
g_blender = RED::Factory::CreateSkeletalAnimationBlender( *resmgr, rc );
if( rc != RED_OK )
    return rc;

// Add the skinned meshes to it:
RED::ISkeletalAnimationController* icontroller = g_blender->As< RED::ISkeletalAnimationController >();
for( int i = 0; i < g_meshes_count; ++i )
{
    RC_TEST( icontroller->AddSkinnedMesh( g_meshes[i] ) );
}

// Add the animation controllers to it:
RED::ISkeletalAnimationBlender* iblender = g_blender->As< RED::ISkeletalAnimationBlender >();
for( int i = 0; i < AID_COUNT; ++i )
{
    RC_TEST( iblender->AddController( g_anim_ctrl[i] ) );
}
Note
A skeletal animation blender can control several meshes as soon as they share the same skeleton.
The next step is to configure the animation controllers: speed, loop, etc.
// Animation clip parameters:
RED::IAnimationClipController* ianimctrl = g_anim_ctrl[i]->As< RED::IAnimationClipController >();
RC_TEST( ianimctrl->SetLoop( true ) );

if( i == AID_WALK1 )
{
    // Slow walk.
    RC_TEST( ianimctrl->SetSpeed( 0.8 ) );
}
else if( i == AID_WALK2 )
{
    // Fast walk.
    RC_TEST( ianimctrl->SetSpeed( 1.1 ) );
}
else
{
    // All other animations at normal speed.
    RC_TEST( ianimctrl->SetSpeed( 1.0 ) );
}
The blender must be the only controller to apply the animation result to the skinned meshes, sub-controllers must not. Here is a function to define that: RED::ISkeletalAnimationController::SetIsAppliedToSkeleton. Finally the skinned meshes must be added to each controller to inform them about the skeleton data.
// Skeletal animation parameters:
RED::ISkeletalAnimationController* iskanim = g_anim_ctrl[i]->As< RED::ISkeletalAnimationController >();

// Don't apply the animation directly to the meshes. Only the base blender have to do it.
iskanim->SetIsAppliedToSkeleton( false );

// The current animation must have a blend weight at 1, others at 0.
iskanim->SetFadeParameters( 0.0, ( i == g_current_anim ) ? 1.0 : 0.0 );

// Bind meshes to the animation controllers:
// Idle was already associated to the three meshes during the loading because they were in the same file.
if( i != AID_IDLE )
{
    for( int j = 0; j < g_meshes.size(); ++j )
    {
        RC_TEST( iskanim->AddSkinnedMesh( g_meshes[j] ) );
    }
}
Now the animation system is well initialized and ready to be updated.
Updating the Skeletal Animation System
At each frame, the animation system needs to be updated. Here we just have to call the RED::ISkeletalAnimationController::Update method of the blender with the time elapsed since the last frame. No need to call the Update method of the sub-controllers, it is automatically done by the parent controller.
// Update the blender:
RED::ISkeletalAnimationController* iblender = g_blender->As< RED::ISkeletalAnimationController >();
RC_TEST( iblender->Update( dt, iresmgr->GetState() ) );
The previous lines of code move the skeleton accordingly to the animation data. One more thing must be done: the skinning operation on the meshes. This will move the vertices accordingly to the skeleton bones:
for( int i = 0; i < g_meshes_count; ++i )
{
    // Do the mesh skinning:
    RED::IMeshShape* imesh = g_meshes[i]->As< RED::IMeshShape >();
    RC_TEST( imesh->DoSkinning( iresmgr->GetState() ) );
}
In the tutorial window, you can now see the mesh moved by the Idle animation controller (the default one, we set its fade factor to 1 previously).
Blending to Other Animations
At any time during the application, we can now blend to other animations contained in the blender.
RED::ISkeletalAnimationBlender* iblender = g_blender->As< RED::ISkeletalAnimationBlender >();
RC_TEST( iblender->BlendTo( g_anim_ctrl[ g_current_anim ], 0.3 ) );
The RED::ISkeletalAnimationBlender::BlendTo function allows to fade-in a new animation while the others are faded-out. The duration of the fade is a parameter. The targeted blend weight can also be transmitted (default is 1).
Because the animations are controlled by setting time and are not of the same duration, we need to adjust the timings of the target animations before blending to them. Indeed, as they are locomotion animations, their cycles need to be synchronized. If the character is walking with the left leg in front of him and we blend to the jog animation, we need to adjust the jog animation to have the left leg in front also.
Example of the transition from the walk to the jog animation:
// Walk 1 to Jog.
// Walk has one step cycle, Jog has two step cycles.
// Hence the '* 0.5': blend to the first jog cycle (between 0 and 0.5).
else if( g_current_anim == AID_JOG )
{
    RC_TEST( ictrlTo->GetDuration( durationTo ) );
    RC_TEST( ictrlFrom->GetDuration( durationFrom ) );
    RC_TEST( ictrlFrom->GetTime( time ) );
    time = ( time / durationFrom ) * 0.5 * durationTo;
    RC_TEST( ictrlTo->JumpToTime( time ) );
}
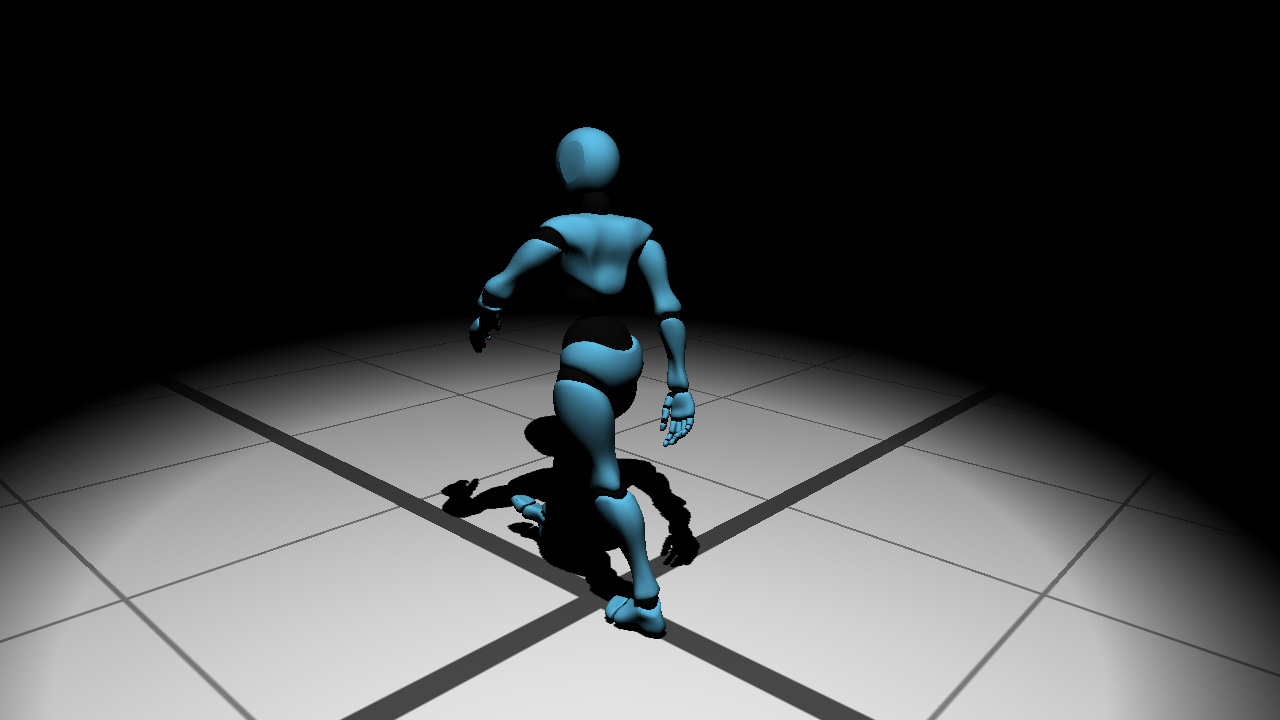
Walking character
Defining Root Motion Policies
As you probably saw, the loaded animations are “in-place”, i.e. the character walks and runs but its position stays the same. It’s up to the user to move its character in the scene. In this last part of the tutorial, we will load moving animations and see the different root motion policies of HOOPS Luminate.
First the new animations are loaded in the exact same way as in the first step: RED::IOTools::Load. Three new animations are loaded:
- “walking_noSkin.fbx”
- “jogging_noSkin.fbx”
- “running_noSkin.fbx”
These animations are the same as the previous ones except they move and are not “in-place”. The Idle one is “in-place” by definition so no need to reload it.
We will not use the animation controllers directly but instead get their animation clips and replace our previous ones in the existing controllers. This will avoid us to setup the controllers. We have already done this once!
// Copy the new animation clips into the existing controllers.
// Walk.
RED::Object* anim;
RC_TEST( idatamgr->GetSkeletalAnimationClipController( anim, context[0], 0 ) );
RED::IAnimationClipController* animctrl = anim->As< RED::IAnimationClipController >();
const RED::AnimationClip* animclip;
RC_TEST( animctrl->GetAnimationClip( animclip ) );
animctrl = g_anim_ctrl[ AID_WALK1 ]->As< RED::IAnimationClipController >();
RC_TEST( animctrl->SetAnimationClip( *animclip ) );
animctrl = g_anim_ctrl[ AID_WALK2 ]->As< RED::IAnimationClipController >();
RC_TEST( animctrl->SetAnimationClip( *animclip ) );
The new loaded controllers and all the contexts can then be deleted from the data manager with the RED::IDataManager::ReleaseContext function. We don’t need them anymore.
Now the most important part of this section: setting the root motion policies for the blender and the controllers:
// Set the root motion policies for the blender and the controllers.
RED::ISkeletalAnimationController* iblender = g_blender->As< RED::ISkeletalAnimationController >();
RC_TEST( iblender->SetRootMotionPolicy( RED::RMC_POSITION_X, RED::RMP_DELTA, true ) );
RC_TEST( iblender->SetRootMotionPolicy( RED::RMC_POSITION_Y, RED::RMP_DELTA, true ) );

for( int i = 0; i < AID_COUNT; ++i )
{
    RED::ISkeletalAnimationController* iskanim = g_anim_ctrl[i]->As< RED::ISkeletalAnimationController >();
    RC_TEST( iskanim->SetRootMotionPolicy( RED::RMC_POSITION_X, RED::RMP_DELTA, true ) );
    RC_TEST( iskanim->SetRootMotionPolicy( RED::RMC_POSITION_Y, RED::RMP_DELTA, true ) );
}
To move the root bone, there are several options available for each component (rotation and position components):
RED::RMP_DEFAULT: the root bone is treated like any other bone: it is animated and set to the mesh skeletonRED::RMP_DELTA: the root bone transform is the animation delta transforms at each frameRED::RMP_CUMULATIVE: the root bone transform is the sum of the animation delta transforms at each frameRED::RMP_ZERO: the root motion is set to zero: the character doesn’t move
Then there is the extraction option. HOOPS Luminate gives two possibilities:
- Let the root motion in the mesh skeleton root bone
- Or extract it and allow the user to do whatever he wants with it (typically apply it to a mesh parent)
In the previous code sample, we want the rotation and translation Z component to be handled by the animation: we let them to the default option. The character moves along the X and Z axes. These component policies are set to delta and extracted. Thus we can retrieve the delta translation of the animation and apply it to the mesh parent shape at update.
// Get the extracted root motion transform.
const RED::Matrix* rootMotion;
iblender->GetRootMotionMatrix( rootMotion );

// Get the mesh parent shape matrix.
RED::Matrix* meshParentMatrix;
RED::ITransformShape* imeshParent = g_mesh_parent->As< RED::ITransformShape >();
RC_TEST( imeshParent->GetMatrix( meshParentMatrix, iresmgr->GetState() ) );

// Applies the root motion transform (delta) to the mesh parent shape.
*meshParentMatrix = *rootMotion * *meshParentMatrix;
To test the different policies, you can test several options.
RED::RMP_CUMULATIVEwith no extraction will move the root bone of the mesh in the scene but the mesh parent shape will not moveRED::RMP_DEFAULTwith no extraction will simply play the animation and the root bone position will loopRED::RMP_ZEROwill keep the character at the origin

