Shape Attributes in a Scene Graph
A shape owns or share several attributes telling HOOPS Luminate how to display the shape.
Parents and Children
This is a property common to all shapes in a HOOPS Luminate scene graph: All shapes have a list of parents and a list of children. The management of the parent list of shape is implemented in the RED::IShape interface. Then, the access to the list of children in a shape is in the RED::IShape interface too, for easy navigation programming. But, the addition or removal of children is implemented in the RED::ITransformShape interface because the transform shape is the only one node in the HOOPS Luminate scene graph.
Material
Every shape in HOOPS Luminate may have a material. The material in HOOPS Luminate is created directly from the RED::IResourceManager interface, and is shared among shapes in a scene. Two shapes that have to be rendered with the same material should use the same shared material address.
By default, the material of a shape is set to NULL. The RED::IShape::SetMaterial method can be used to assign set a material for the shape. The engine is then in charge of calculating which material has to be used for the rendering of each shape. It uses a ‘last on path’ inheritance rule to solve the material determination, as illustrated below:
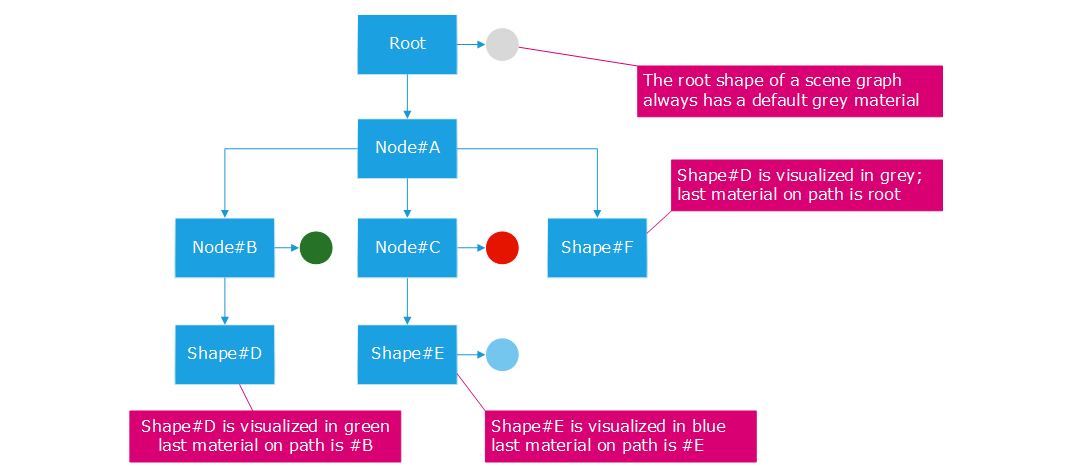
Material inheritance rule in a HOOPS Luminate scene graph.
In the example above, Shape#D has no material. Therefore, it must be rendered using the material of one of its parents. Here, parent Node#B is the closest one to have a material on the path from the scene graph root down to #D, so Shape#D will be rendered green. Similarly, we can note that Shape#E blue material overrides both the Root material and Node#C material. Shape#F has no material on its path, so it’ll be rendered using the material of the Root node. The Root node of a scene graph (which is accessed from RED::IViewpoint::GetRootShape) always has a grey material.
The material inheritance rule described above can be overriden locally in a scene graph. If we call RED::ITransformShape::SetSubMaterialsOverride(true), we can modify the rule used to figure out which material will be used for all children of the shape that the material override flag set. If a transform shape overrides all sub-materials, then the material of that transform shape is used for all children of that shape, regardless of the materials they could own.
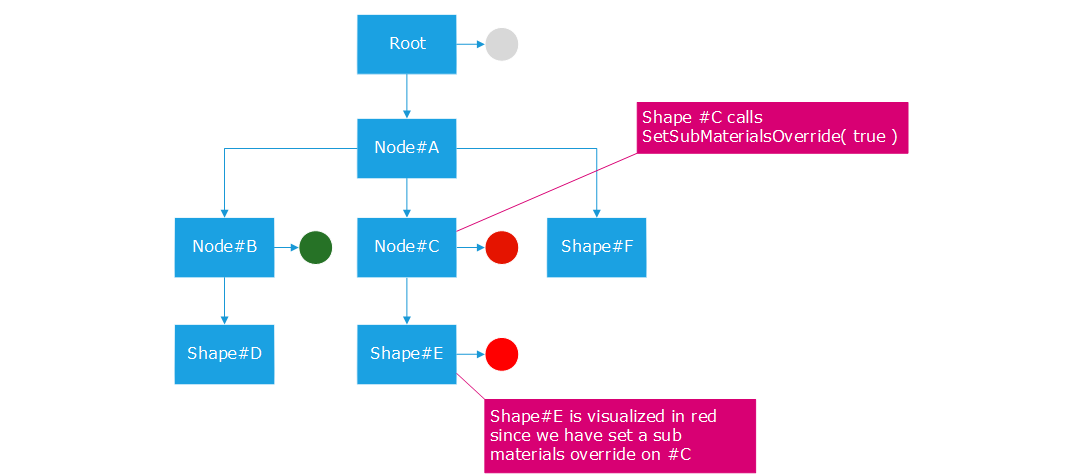
Overriding the material inheritance rule for Node#C.
Layersets
Layersets are powerful tools to customize the visibility of shapes in a scene graph. A layerset is defined using the RED::LayerSet class. Basically, a layerset is a mask of bits that can be compared to another mask to calculate a boolean yes / no result as illustrated below:

A bitwise AND operation using two RED::LayerSet objects
In this example, we have two RED::LayerSet objects, composed of several bits that are combined together. The result is true because we have a layer (one bit in the mask) that is common to both layersets.
In the RED::LayerSet, a “layer” is one single bit in the mask. Layers are not defined using binary values, but have each an identifier associated to them. The ID may be an integer value, or an integer value resulting of a RED::Object::GetIDFromString conversion:
Creating a RED::LayerSet
// Building a sample 'layerset' with two layers:
RED::LayerSet layerset;

RC_TEST( layerset.AddLayer( RED::Object::GetIDFromString( "layer1" ) ) );
RC_TEST( layerset.AddLayer( RED::Object::GetIDFromString( "layer2" ) ) );
In the sample code above, a RED::LayerSet is created on the program stack with two layers added to it ‘layer1’ and ‘layer2’. This layerset object will intersect (RED::LayerSet::Intersects) with any other layerset that has received ‘layer1’ or ‘layer2’. It’ll also intersect with RED::LayerSet::ALL_LAYERS.
A RED::LayerSet is used for different tasks:
- Shape visibility control using
RED::IShape::ApplyLayerSet- Shader scope definition using
RED::IMaterial::AddShaderToPass- Lighting control using
RED::ILightShape::SetLayerSetLit,RED::ILightShape::SetLayerSetShadowCaster, orRED::ILightShape::SetLayerSetShadowReceiver
Layersets of shapes and materials are compared to the RED::LayerSet used by the rendered viewpoint and defined by RED::IViewpoint::ApplyLayerSet.
A layerset is assigned to a shape using RED::IShape::ApplyLayerSet. It can also be constructed ‘in place’ directly using RED::IShape::AddToLayer, which internally creates a layerset for the shape and add the specified layer to it.
The engine uses layersets to figure out which shapes are visible and which are to be discarded from the rendering. It uses an inheritance rule identical to the one used for materials: this is the ‘last on path’ choice that is used:

An example of layerset inheritance rule.
In the example above, Shape#B has no layerset on its own (layersets are visualized in orange color), so we ascend its hierarchy to look for the first layerset we find. Or said otherwise, we descend from the root down to the shape and pick the last layerset found on the path. So Shape#B is visualized with the layerset from Node#A. It happens that the layerset in Node#A does not intersect with the camera layerset: 1001 & 0110 = false; so Shape#B will not be displayed.
Similarly, we can find out that Shape#C will be rendered using its own layerset and will be displayed: 1001 & 0001 = true; both layersets intersect, so the shape will be rendered for our camera.
Now, the whole point on using layersets is that we can avoid changing the data in the scene graph and just change the camera layerset to control our visibility:
Change a Shape Visibility using Layersets
The code below illustrates the effects of changing the layerset at the camera level to modify the entire scene graph visibility:
A simple scene graph and the effect of changing the camera layerset
// Access our current transaction:
RED::Object* resmgr = RED::Factory::CreateInstance( CID_REDResourceManager );
RED::IResourceManager* iresmgr = resmgr->As< RED::IResourceManager >();

// Create our example layersets
RED::LayerSet layersetA, layersetB, layersetAB;
RC_TEST( layersetA.AddLayer( RED::Object::GetIDFromString( "layerA" ) ) );
RC_TEST( layersetB.AddLayer( RED::Object::GetIDFromString( "layerB" ) ) );
RC_TEST( layersetAB.AddLayer( RED::Object::GetIDFromString( "layerA" ) ) );
RC_TEST( layersetAB.AddLayer( RED::Object::GetIDFromString( "layerB" ) ) );

// Create a basic shape hierarchy:
RED::Object* camera = RED::Factory::CreateInstance( CID_REDViewpoint );
RED::Object* shape1 = RED::Factory::CreateInstance( CID_REDLineShape );
RED::Object* shape2 = RED::Factory::CreateInstance( CID_REDLineShape );

RED::IViewpoint* icamera = camera->As< RED::IViewpoint >();
RC_TEST( icamera->AddShape( shape1, iresmgr->GetState() ) );
RC_TEST( icamera->AddShape( shape2, iresmgr->GetState() ) );

// Assign layersets:
RED::IShape* ishape1 = shape1->As< RED::IShape >();
RC_TEST( ishape1->ApplyLayerSet( &layersetA, iresmgr->GetState() ) );

RED::IShape* ishape2 = shape2->As< RED::IShape >();
RC_TEST( ishape2->ApplyLayerSet( &layersetB, iresmgr->GetState() ) );

// If the camera uses 'layersetAB', both A and B are seen:
RC_TEST( icamera->ApplyLayerSet( layersetAB, iresmgr->GetState() ) );

// If the camera uses 'layersetA', only A is visible:
RC_TEST( icamera->ApplyLayerSet( layersetA, iresmgr->GetState() ) );
Bounding Spheres
The HOOPS Luminate scene graph uses bounding spheres to facilitate all culling operations (see details here: Culling Methods). These bounding spheres have to enclose all the geometry of the node and of its children nodes. The bounding sphere is calculated in the shape’s local axis system. A bounding sphere is defined using the RED::BoundingSphere class.
Bounding spheres are assigned to shapes using RED::IShape::GetBoundingSphere. The method creates the bounding sphere and return it to the caller for modification. A shape that has no bounding sphere won’t be checked for culling, unless one of its parents has a bounding sphere. In that case, the shape is assumed to be in the parent sphere, by definition of the bounding sphere; so if the parent gets culled, so does the child.
The RED::BoundingSphere class delivers a few automatic calculation methods such as RED::BoundingSphere::Add to generate a bounding sphere that enclose a set of vertices in space.
Update Bounding Spheres for a Hierarchy of Shapes
// Access our current transaction:
RED::Object* resmgr = RED::Factory::CreateInstance( CID_REDResourceManager );
RED::IResourceManager* iresmgr = resmgr->As< RED::IResourceManager >();

// Create a hierarchy of shapes (node->mesh):
RED::Object* node = RED::Factory::CreateInstance( CID_REDTransformShape );
RED::Object* mesh = RED::Factory::CreateInstance( CID_REDMeshShape );
RED::ITransformShape* itnode = node->As< RED::ITransformShape >();
RC_TEST( itnode->AddChild( mesh, RED_SHP_DAG_NO_UPDATE, iresmgr->GetState() ) );
// Fill-in 'child' with some geometry...

// Generate correct bounding spheres for both 'node' and 'mesh':
RED::IShape* inode = node->As< RED::IShape >();
RC_TEST( inode->UpdateBoundingSpheres( RED_SHP_DAG_PROPAGATE_DOWNWARD | RED_SHP_DAG_UPDATE_LEAVES, iresmgr->GetState() ) );
The code above will generate two RED::BoundingSphere objects: one will enclose all the geometry in ‘mesh’ and the parent ‘node’ bounding sphere will be set to enclose all the geometry in its children. On large assemblies, the calculation of bounding spheres may take some milliseconds.
User Data
User data aim at solving the problem of linking the HOOPS Luminate graphic scene graph back with the application data. For instance, the results of a picking operation (Picking) is a set of HOOPS Luminate shapes, that at not necessarily related to the application data.
There are two mechanisms to link a HOOPS Luminate shape with external application data:
- Through the shape ID: RED::IShape::GetID / RED::IShape::SetID is a simple mechanism that can be used to assign an ID to any shape to identify it in the semantic context of a given application. Note that we also have the
RED::Object::GetIDFromStringmethod that can be used to convert a readable string into an ID value. This mechanism is not collision free or course, but it provides very good results if used for specified application names.- Through using the
RED::UserDatacontainer. ARED::UserDatacontainer is a class that can be derived for custom application needs. It provides a convenient way to associate data to a given shape, thanks to theRED::IUserDatainterface which is implemented by all HOOPS Luminate shapes.
The Saving and Reloading a Custom Container tutorial provides an example of user data customization for some applicative needs, or the following task below illustrates an easy way for storing user data associated to HOOPS Luminate shapes:
Using Built-In User Data
// Create a sample application data container:
typedef struct
{
    int _data1;
    int _data2;

} Container;

Container* container = new Container();

// Create a HOOPS Luminate user data raw container. Use HOOPS Luminate's built-in memory allocators if the shape is to own the data:
RED::UserDataRaw* rawdata = rnew RED::UserDataRaw( container, sizeof( Container ), "MyUserData", true );

// Create a sample shape (a transform shape here):
RED::Object* transform = RED::Factory::CreateInstance( CID_REDTransformShape );

// Assign user data to the shape:
RED::IUserData* itransformdata = transform->As< RED::IUserData >();
itransformdata->SetUserData( rawdata, true );

// ...

// Destroy everyone when finished. Access our current transaction:
RED::Object* resmgr = RED::Factory::CreateInstance( CID_REDResourceManager );
RED::IResourceManager* iresmgr = resmgr->As< RED::IResourceManager >();

// Here due to the ownership flags, the destruction of the 'transform' shape will destroy the data container.
RC_TEST( RED::Factory::DeleteInstance( transform, iresmgr->GetState() ) );
HOOPS Luminate only provides a simple ‘raw’ data container in its default class hierarchy. It can be used to store a chunk of memory managed by the application. Using user data is straightforward, except that caution must be paid to the memory management. User data may be released by HOOPS Luminate or may be released by the application. If the application decides on managing the memory, it’s up to it to handle user data sharing of data pointers. There’s no garbage collection mechanism in HOOPS Luminate, and there’s no reference counting.
If the application lets HOOPS Luminate destroy user data along with the destruction of shapes, then user data must be allocated using HOOPS Luminate’s memory allocators (see the RED::MemoryAllocator class for details).

