Ray-Tracing Options
Lets proceed below to a complete review of our ray-tracer rendering options. For a general qualitative review of some of these options, please look here: Setup the Rendering. Global illumination options, caustics options are detailed in other tables down this page.
| General ray-tracing options | Description |
|---|---|
RED::OPTIONS_RAY_PRIMARY |
Turn on the ray-tracer, and is implicitely turned on by setting on reflections, refractions or shadows. Used in database persistency workflows. See Persistence of Objects in the Acceleration Structure. |
RED::OPTIONS_RAY_USE_EMBREE |
Enable or disable the use of Embree acceleration kernels for the ray-tracer. See Using Embree. |
RED::OPTIONS_RAY_FORCE_EMBREE |
Force the use of Embree acceleration kernels for the ray-tracer. See Using Embree. |
RED::OPTIONS_SAMPLER |
Specify the sampler that’ll be used for all calculations. Affects software ray-tracing and all other HOOPS Luminate algorithms. |
RED::OPTIONS_RAY_ADAPTIVE_SAMPLING_THRESHOLD |
Specify the amount of adaptation in image calculations. See Adaptive Sampling for details. |
RED::OPTIONS_RAY_SHADOWS |
Enable or disable the casting of ray-traced shadows. |
RED::OPTIONS_SHADOW_MAP_DEPTH |
Enable or disable shadow map casting. Shadow maps work both in hardware and software rendering modes. |
RED::OPTIONS_RAY_SOFT_SHADOW_MAP_TRANSPARENCY |
Enable or disable the special shadow map transparency option. See Shadow Map Transparency. |
RED::OPTIONS_RAY_REFLECTIONS |
Enable or disable the casting of ray-traced reflections. |
RED::OPTIONS_RAY_REFRACTIONS |
Enable or disable the casting of ray-traced refractions. |
RED::OPTIONS_RAY_TRANSPARENCY |
Sets the number of transparency layers being rendered. |
RED::OPTIONS_RAY_REFRACTIONS_BACK |
Special refraction exit option. See Refraction Back Option |
RED::OPTIONS_RAY_MAX_THREADS |
Performance option: Sets the number of calculating threads in the ray-traced image. See Software Display Performances |
RED::OPTIONS_RAY_CUTOFF |
Performance option: Sets the intensity cutoff threshold below which rays don’t get a chance to be propagated. See Software Display Performances |
RED::OPTIONS_LIGHT_CUTOFF |
Performance option: Sets the intensity of lights below which they are ignored during shading. See Software Display Performances |
RED::OPTIONS_RAY_ENABLE_GLOSSY_EFFECTS |
Enable or disable the processing of ray-traced glossy reflections and refractions. |
RED::OPTIONS_RAY_ENABLE_AREA_SAMPLING |
Enable or disable multi-sampling in the processing of lighting and shadows. |
RED::OPTIONS_RAY_LIGHTS_SAMPLING_RATE |
Determines the quality of lighting and shadowing. See Setup the Rendering |
RED::OPTIONS_RAY_GLOSSY_SAMPLING_RATE |
Determines the quality of glossy reflections or refractions. See Setup the Rendering |
RED::OPTIONS_RAY_VOLUME |
Enable or disable the rendering of volumetric effects. See Volumetric Effects |
RED::OPTIONS_RAY_DISPLACEMENT |
Enable or disable the rendering of displacement maps. See Adding Displacement Mapping to a Material |
RED::OPTIONS_RAY_SOFT_PREVIEW |
Enable or disable software material previewing workflows. |
| Global illumination options Description | |
|---|---|
RED::OPTIONS_RAY_GI |
Global illumination on / off toggle. See Global Illumination. |
RED::OPTIONS_RAY_GI_ENABLE_VOLUME |
Enable or disable GI calculation in volumetric effects shading. See Rendering Volumetric Effects for a practical example. |
RED::OPTIONS_RAY_GI_ERROR |
Rules the error level of the global illumination signal. See The GI Error for details. |
RED::OPTIONS_RAY_GI_ESTIMATOR_SAMPLING_RATE |
Defines the number of GI estimator samples. See GI Estimator Parameters for details. |
RED::OPTIONS_RAY_GI_CACHE_PASSES_COUNT |
Defines the number of GI cache rendering passes. See GI Cache Parameters for details. |
RED::OPTIONS_RAY_GI_CACHE_HEMI_SAMPLING_RATE |
Defines the quality of a GI cache sample. See GI Cache Parameters for details. |
RED::OPTIONS_RAY_GI_CACHE_INTERP_SAMPLES_COUNT |
Defines the quality of a GI cache sample. See GI Cache Parameters for details. |
RED::OPTIONS_RAY_GI_SHOW_SAMPLES |
Toggles the display of GI samples in the final image. |
RED::OPTIONS_RAY_GI_CACHE_PRECISE |
Enable or disable extra dynamic accuracy of the GI cache during ray-tracing passes. See Setup the Rendering. |
RED::OPTIONS_RAY_GI_FOR_GLOSSINESS |
Specify how the GI cache can be used to approximate glossiness calculations. See Setup the Rendering. |
RED::OPTIONS_RAY_GI_FOR_LIGHTING |
Specify how the GI cache can be used to approximate lighting calculations. See Setup the Rendering. |
| Caustics rendering options | Description |
|---|---|
RED::OPTIONS_RAY_ENABLE_CAUSTICS |
Enable or disable the calculation of caustics. |
RED::OPTIONS_RAY_CAUSTICS_SAMPLING_RATE |
Setup the quality of caustics. See Caustics. |
RED::OPTIONS_RAY_CAUSTICS_SEARCH_RADIUS |
Caustics reconstruction parameter. See Caustics. |
RED::OPTIONS_RAY_CAUSTICS_SEARCH_COUNT |
Caustics reconstruction parameter. See Caustics. |
Setup Rendering Depths
The first ray, which is fired from the camera through a pixel to the model to render is called the primary ray. It’s assigned rendering depth is 0. All rays fired from the hit point in the scene are then called indirect rays. Their depth is 1. From this numbering, we derive the fact that to get shadows cast for all hit points on geometries, we need one more shadowing depth than we have of reflection, refraction or transparency depths.
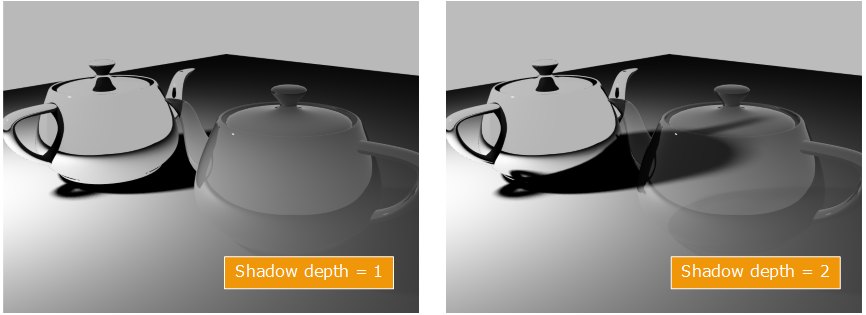
Effect of increasing the depth of shadows vs. the other ray-tracing options.
In the example above - left image - we have one depth of transparency, one depth of reflections and one depth of shadows. Consequently we don’t see shadows through the transparencies. Similarly shadows are not seen through reflections as this would involve a 2nd depth ray. Increasing the shadow depth to 2 solve this issue.
Using Embree
HOOPS Luminate can run either using its own acceleration structure or using Embree’s ray-tracing kernels (https://embree.github.io). Embree ray-tracing kernels provide a significant acceleration over HOOPS Luminate’s native acceleration structure. However, Embree ray-tracing kernels have some limitations:
- Double precision datasets are not supported. Double precision meshes are automatically sent to the native HOOPS Luminate acceleration structure, regardless of the value of the
RED::OPTIONS_RAY_USE_EMBREE.- Displacement mapping is not supported. As for meshes, displacement mapped surfaces are handled by HOOPS Luminate’ native rendering system.
- Rendering of lines or points is not supported. Similarly, all these primitives will be drawn by HOOPS Luminate directly. In the case of mixed edges / polygon renderings, Embree is automatically disabled, unless the
RED::OPTIONS_RAY_FORCE_EMBREEis turned on.- Embree does not run on all operating systems: there’s no Linux x86 version, and Embree is disabled on Windows 2000, Windows XP 32, Windows XP 64, Windows Vista 32 and Windows Vista 64. On these operating systems, the legacy HOOPS Luminate acceleration structure is used instead of Embree.
- If the
RED::OPTIONS_RAY_FORCE_EMBREEis turned on, then Embree is used for all primitives it can render; all lines and points are ignored and all displaced surfaces are still visible and rendered by HOOPS Luminate’s native ray-casting algorithms.
Embree ray-tracing kernels co-exist with HOOPS Luminate’s acceleration structure. Therefore, keeping the RED::OPTIONS_RAY_USE_EMBREE enabled does not prevent HOOPS Luminate to operate in parallel with Embree so that data that are not supported by Embree are automatically redirected to HOOPS Luminate’s native acceleration structure and processed normally by it.
Please note that in the case of scenes with many displacement mapped surfaces, the rendering may go a lot faster with Embree disabled, as if part of the scene goes to Embree and part of the scene goes to HOOPS Luminate, ray-processing tends to have to do twice the job to produce an image, so that the time saved by Embree gets lost by the extra processing implied by the fact that Embree don’t support displaced surfaces.
Persistence of Objects in the Acceleration Structure
The startup of a software image begins by creating or updating the acceleration structure. The first time a scene is being rendered, the HOOPS Luminate internal acceleration structure is created. The second time and all other frames after the first one, the structure is updated.
In HOOPS Luminate, there are several mechanisms to filter an object from the display. Each mechanism has a specific behavior concerning the ray-tracer acceleration structure:
| Mechanism | Description | Objects in database |
|---|---|---|
| Layerset filtering | Objects may be removed from the view using a RED::Layerset applied to some shape in the scene. See: Layersets | No |
| Context switch callback | Objects may be removed from any display using a context switch callback. See: Using Culling Callbacks | No |
| Visibility switch callback | Objects may be removed from direct view using a visibility switch callback. See: Using Culling Callbacks | Yes |
The visibility switch callback only discards objects from the primary ray casting process (to remove a blocking wall for instance). Therefore, objects that are discarded by the visibility switch callback must still be present for other rendering passes. So they persist in the database even if they don’t appear directly.
On the other hand, using a context switch callback or discarding objects using layersets remove the object from all rendering passes. Consequently, by design, these objects are also removed from the engine accereration structure.
Finally, in the case of the context switch callback, objects persitence can be preserved on enabling the RED::OPTIONS_RAY_CONTEXT_CALLBACK_PERSISTENCE.
Shadow Map Transparency
Shadow maps are not supposed to be transparent. At least, the initial algorithm does not allow transparency to be handled by shadow mapping technique. This is true in hardware rendering, for which shadow maps are black (or using the shadowing color, but this is a constant color anyway). HOOPS Luminate’s software implementation of shadow maps allow shadow maps to support transparencies, as illustrated in the example below (lower right corner). Shadow map transparency is ruled by the RED::OPTIONS_RAY_SOFT_SHADOW_MAP_TRANSPARENCY.
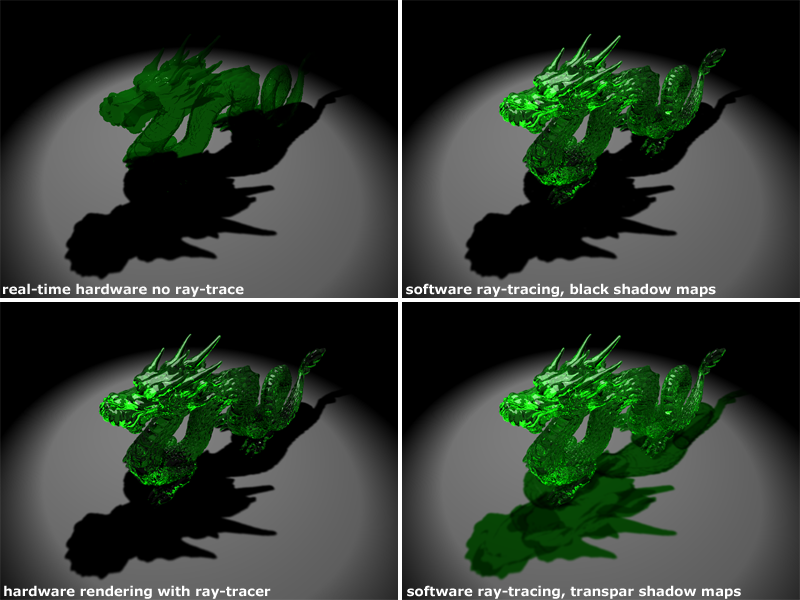
Rendering with shadow maps in hardware or in software.
Refraction Back Option
This is the RED::OPTIONS_RAY_REFRACTIONS_BACK. This option controls the behavior of rays that endlessly remain caught and bouncing inside a refractive object. If the rendering depth is not big enough, this may cause black regions to appear in images. The refraction back option forces all rays to exit the refractive object at one time or another, before the ray path has reached its full depth.
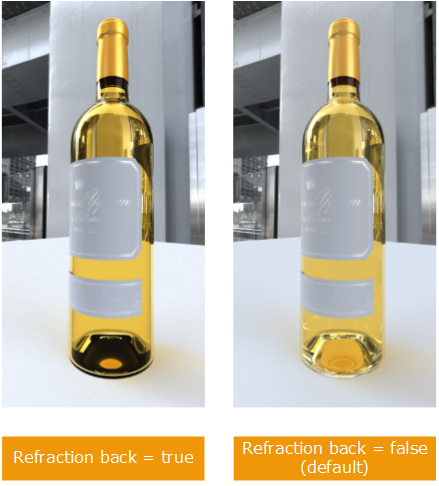
Effect of the refraction back option on the result