Writing Material Controller Properties
HOOPS Luminate materials can be quite complex and usually contain a great number of shaders and parameters. Upon edition or deployment of such materials, it can be a good thing to have a compact, high level vision of them. That’s the purpose of the material controller. Each time a HOOPS Luminate material is built, a material controller can be built too and associated to it. The material controller will manage a set of properties describing what in the material can be edited and how.
In this tutorial we’ll start by creating a RED material made of three kinds of built-in shaders. Then, we’ll create a material controller along with its properties. Finally we’ll see how those properties can be accessed and modified.
Creating the Material
Our base material has three components: ambient, Phong shading and environmental reflections. Each is rendered using a built-in shader: RED::RenderShaderAmbient, RED::RenderShaderPhong, and RED::RenderShaderEnvironmental.
First thing to do: creating the material using the RED::IResourceManager::CreateMaterial function:
// Create the material:
RED::Object* mat;
RC_TEST( iresmgr->CreateMaterial( mat, state ) );
RED::IMaterial* imat = mat->As< RED::IMaterial >();
The three built-in shaders are created and registered to the material in the same way:
// Ambient:
// --------

RED::RenderShaderAmbient ambient( RED::MTL_PRELIT,
                                RED::Color::WHITE, NULL, RED::Matrix::IDENTITY, RED::MCL_TEX0,
                                RED::Color::BLACK, NULL, RED::Matrix::IDENTITY, RED::MCL_TEX0,
                                RED::Color::BLACK, NULL, RED::Matrix::IDENTITY, RED::MCL_TEX0,
                                RED::Color::WHITE, NULL, RED::Matrix::IDENTITY, RED::MCL_TEX0,
                                true, resmgr, rc );
RC_TEST( rc );
RC_TEST( imat->RegisterShader( ambient, state ) );
RC_TEST( imat->AddShaderToPass( ambient.GetID(), RED::MTL_PRELIT, RED::LIST_LAST, RED::LayerSet::ALL_LAYERS, state ) );
// Phong:
// ------

RED::RenderShaderPhong phong( RED::MTL_LIT,
                            RED::Color::BLACK, g_tex, uvmat,                 RED::MCL_TEX0,
                            RED::Color::WHITE, NULL,  RED::Matrix::IDENTITY, RED::MCL_TEX0,
                            10.0f,             NULL,  RED::Matrix::IDENTITY, RED::MCL_TEX0, 10.0f,
                            RED::Color::WHITE, NULL,  RED::Matrix::IDENTITY, RED::MCL_TEX0,
                                                NULL,  RED::Matrix::IDENTITY, RED::MCL_TEX0, RED::MCL_USER0,
                            0.0f, false, resmgr, rc );
RC_TEST( rc );
RC_TEST( imat->RegisterShader( phong, state ) );
RC_TEST( imat->AddShaderToPass( phong.GetID(), RED::MTL_LIT, RED::LIST_LAST, RED::LayerSet::ALL_LAYERS, state ) );
// Environmental:
// --------------

RED::RenderShaderEnvironmental environmental( RED::MTL_POSTLIT,
                                            RED::Color::BLACK, g_tex, uvmat,                 RED::MCL_TEX0,
                                            RED::Color::WHITE, NULL,  RED::Matrix::IDENTITY, RED::MCL_TEX0,
                                                                cube,  RED::Matrix::IDENTITY, false, false, 0.0f,
                                            false, 1.0f,       NULL,  RED::Matrix::IDENTITY, RED::MCL_TEX0,
                                                                NULL,  RED::Matrix::IDENTITY, RED::MCL_TEX0, RED::MCL_USER0,
                                            resmgr, rc );
RC_TEST( rc );
RC_TEST( imat->RegisterShader( environmental, state ) );
RC_TEST( imat->AddShaderToPass( environmental.GetID(), RED::MTL_POSTLIT, RED::LIST_LAST, RED::LayerSet::ALL_LAYERS, state ) );
The ambient shader is added to the RED::MTL_PRELIT pass, the Phong shader is added to the RED::MTL_LIT pass and the environmental shader is added to the RED::MTL_POSTLIT pass. We don’t care about the RED::LayerSet here: all the shaders are defined with the RED::LayerSet::ALL_LAYERS parameter.
The Phong and environmental shaders use the same texture (RED::IImage2D) for diffuse and environment specular.
The environment map is a RED::IImageCube (RED::IResourceManager::CreateImageCube) and is filled with the RED::IImageCube::CreateEnvironmentMap function.
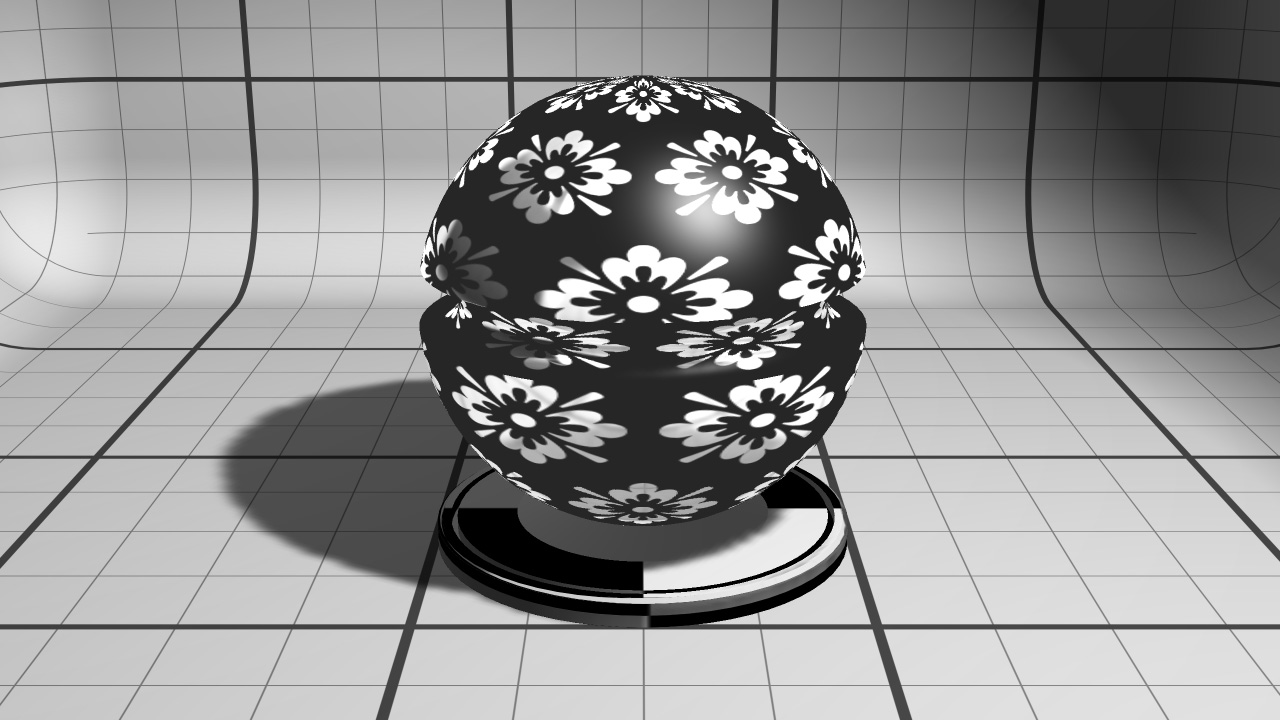
The base custom material
Creating the Material Controller and its Properties
As many other objects in HOOPS Luminate, the material controller is created using a RED::Factory method. It is automatically registered to the resource manager (to be later retrieved by material).
Note
By default, when saving a material to a .RED file, its controller is automatically saved too (see RED::StreamingPolicy::SetMaterialControllerAutoSaving for further details).
// Create a material controller for our material:
RED::Object* controller = RED::Factory::CreateMaterialController( *resmgr,
                                                                mat,
                                                                "Custom",
                                                                "Material Controller Tutorial",
                                                                "Simple controller to show how to easily modify shader parameter values",
                                                                "WritingMaterialControllerPropertyTutorial",
                                                                "Tech Soft 3D",
                                                                rc );
RC_TEST( rc );
RED::IMaterialController* ictrl = controller->As< RED::IMaterialController >();
We arrive now to the main point of the tutorial: creating the material properties RED::IMaterialControllerProperty.
Three properties are added to the controller:
- One to handle the ambient colour
- One to handle the diffuse texture of the Phong shader
- One to handle the diffuse and environmental texture rotation around the z axis
// ambient color property:
// -----------------------

RED::Object* propamb = ictrl->AddProperty( "Ambient color", "Controls the ambient color of the material" );
RED::IMaterialControllerProperty* ipropamb = propamb->As< RED::IMaterialControllerProperty >();

RC_TEST( ipropamb->SetColor( RED::Color::WHITE, state ) );
The script of the property consists in a simple direct assignation of the input color to the shader parameter named RED_SHADER_AMBIENT_BASE_COLOR.
// Diffuse texture property:
// -------------------------

RED::Object* proptexdif = ictrl->AddProperty( "Diffuse texture", "Controls the diffuse texture of the material" );
RED::IMaterialControllerProperty* iproptexdif = proptexdif->As< RED::IMaterialControllerProperty >();

RC_TEST( iproptexdif->SetTexture( g_tex, "", state ) );
RC_TEST( iproptexdif->SetScript( RED::String( RED_RSH_PHONG_DIFFUSE_TEXTURE ) + " = \"Diffuse texture\"" ) );
Same as previously, the texture address is directly assigned to the shader parameter handling the pointer to the diffuse texture.
// uv matrices z rotation property:
// --------------------------------

RED::Object* propzrot = ictrl->AddProperty( "Z rotation", "Controls the rotation of the texture around Z-axis" );
RED::IMaterialControllerProperty* ipropzrot = propzrot->As< RED::IMaterialControllerProperty >();

RC_TEST( ipropzrot->SetFloatValue( 0.f, state ) );

// The script starts by resetting all uv matrices to identity. Then, the original scaling vector
// is restored. Finally, the input rotation angle in degrees in converted to radians and applied
// to the matrix.
RED::String script = RED::String( RED_RSH_PHONG_DIFFUSE_MATRIX ) + "= identity;";
script += RED::String( RED_RSH_PHONG_DIFFUSE_MATRIX ) + ".scalex = 3;";
script += RED::String( RED_RSH_PHONG_DIFFUSE_MATRIX ) + ".scaley = 3;";
script += RED::String( RED_RSH_PHONG_DIFFUSE_MATRIX ) + ".scalez = 3;";
script += RED::String( RED_RSH_PHONG_DIFFUSE_MATRIX ) + ".rotz = \"Z rotation\" * pi / 180;";
script += RED::String( RED_RSH_ENVIRONMENTAL_SPECULAR_MATRIX ) + "= identity;";
script += RED::String( RED_RSH_ENVIRONMENTAL_SPECULAR_MATRIX ) + ".scalex = 3;";
script += RED::String( RED_RSH_ENVIRONMENTAL_SPECULAR_MATRIX ) + ".scaley = 3;";
script += RED::String( RED_RSH_ENVIRONMENTAL_SPECULAR_MATRIX ) + ".scalez = 3;";
script += RED::String( RED_RSH_ENVIRONMENTAL_SPECULAR_MATRIX ) + ".rotz = \"Z rotation\" * pi / 180";
RC_TEST( ipropzrot->SetScript( script ) );
In that case, the script is a little bit more complicated than before. The reason is that we have more things to do: there are two matrices being edited. First, we start by assigning the identity matrix to each matrix as our rotation angle is globally defined (not incremental). Then, we have to restore the original scaling vector (3, 3, 3) applied previously at matrix creation. Last, we must apply our new rotation angle. We define the input angle in degree so we have to convert it in radian, hence the ‘* pi / 180’.
In a simpler form, the previous script could be written:
Matrix = identity;
Matrix.scalex = 3;
Matrix.scaley = 3;
Matrix.scalez = 3;
Matrix.rotz = Z_ROTATION * pi / 180;
where Matrix should be substituted with the right matrix name.
Adding properties to a controller means that you perfectly know how your shader parameters are named and used. In our case, only built-in shaders are used, so we exactly know how they are built. Controllers are a practical way to let the users work with complex materials they do not know.
Editing the Material Controller Properties
Knowing a material, it’s easy to retrieve its controller using the RED::IResourceManager::GetMaterialController method. Enumerating the controller’s properties is just as simple. Based on its type, a property value can be get or set using the GetXXX/SetXXX methods of the RED::IMaterialControllerProperty interface. The next steps of the tutorial are dedicated to properties retrieving and edition.
// Get the material controller:
RED::Object* controller = iresmgr->GetMaterialController( mat );
RED::IMaterialController* ictrl = controller->As< RED::IMaterialController >();

// Get the ambiant material controller property:
RED::Object* prop = ictrl->GetProperty( "Ambient color" );
RED::IMaterialControllerProperty* iprop = prop->As< RED::IMaterialControllerProperty >();
After we get our property, editing it only consists in calling the right method according to the property type. Ambient color is changed by calling the RED::IMaterialControllerProperty::SetColor method:
// Set the new ambient color through the controller:
RC_TEST( iprop->SetColor( RED::Color::RED, state ) );
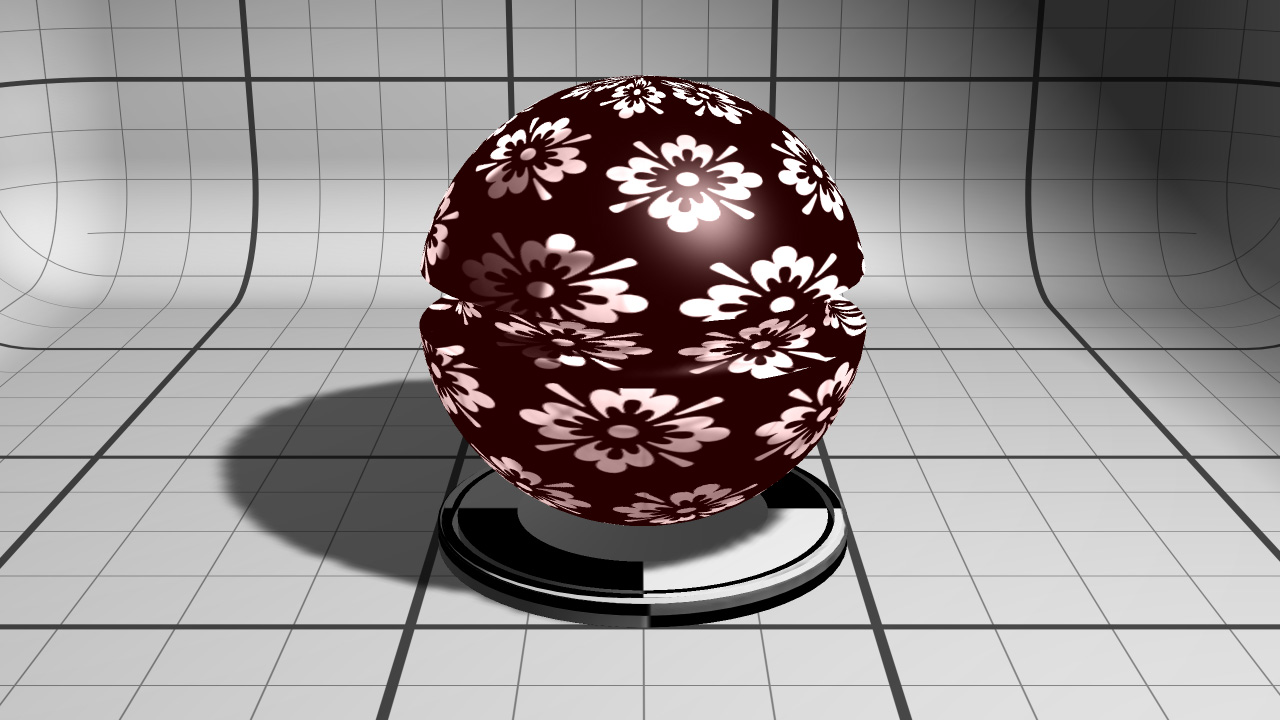
The material after editing the ambient colour
Diffuse texture is changed using the RED::IMaterialControllerProperty::SetTexture method:
// Get the diffuse texture material controller property:
RED::Object* prop = ictrl->GetProperty( "Diffuse texture" );
RED::IMaterialControllerProperty* iprop = prop->As< RED::IMaterialControllerProperty >();

// Replace the diffuse texture by the newly loaded one:
RC_TEST( iprop->SetTexture( newtex, "", state ) );
And z-rotation is changed by calling the RED::IMaterialControllerProperty::SetFloatValue method:
// Get the rotation material controller property:
RED::Object* prop = ictrl->GetProperty( "Z rotation" );
RED::IMaterialControllerProperty* iprop = prop->As< RED::IMaterialControllerProperty >();

// Set the new rotation angle of the textures through the controller:
RC_TEST( iprop->SetFloatValue( angle, state ) );
Note
The rotation is visible in real-time by launching the tutorial application.
Note
Here the properties have been retrieved by their name with the RED::IMaterialController::GetProperty function. We also could have get them by their indices (0 for the ambient, 1 for the z-rotation and 2 for the texture).
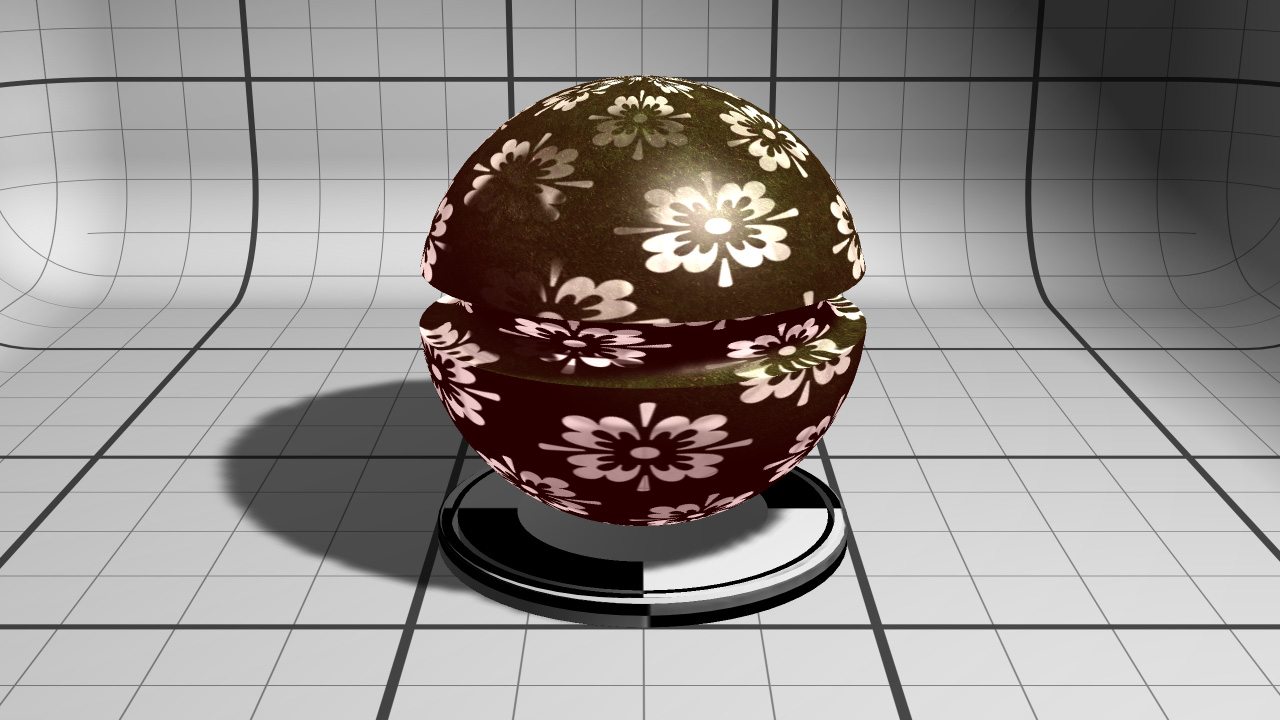
The material after editing the Phong diffuse texture

