HTC Vive
This tutorial will describe how HOOPS Luminate can render a virtual reality scene in the HTC Vive headset.
Vive is a virtual reality device made by HTC and Valve allowing to visualize and interact with a 3D virtual world.
HTC Vive headset
In order to communicate with the device, we first need a runtime called SteamVR which is part of Valve Steam application. We will also use the OpenVR SDK available on github.
Note
To have further details about the OpenVR SDK, please read the documentation provided with it.
OpenVR Initialization and Shutdown
Initializing OpenVR
First thing to do during the initialization phase is to call the vr::VR_Init function which initializes OpenVR.
// Load the SteamVR Runtime:
vr::EVRInitError eError = vr::VRInitError_None;
g_hmd = vr::VR_Init( &eError, vr::VRApplication_Scene );
if ( eError != vr::VRInitError_None )
{
g_hmd = NULL;
char buf[1024];
  sprintf_s( buf, sizeof( buf ), "VR_Init Failed: Unable to init VR runtime: %s", vr::VR_GetVRInitErrorAsEnglishDescription( eError ) );
  RFK::TutorialApplication::DisplayError( "Error", buf );
}

// Create the OpenVR compositor:
if ( !vr::VRCompositor() )
{
  RFK::TutorialApplication::DisplayError( "Error", "Compositor initialization failed. See log file for details\n" );
}
The main interface to the OpenVR API is the vr::IVRSystem class. An object of this type is returned by the init function. It will be used everywhere in the application.
OpenVR provides recommended render target width and height. We will need them later when we will create our HOOPS Luminate VRL.
// Get the recommended render target size:
unsigned int w, h;
g_hmd->GetRecommendedRenderTargetSize( &w, &h );
for( int eye = 0; eye < 2; ++eye )
{
  g_texSize[eye].w = w;
  g_texSize[eye].h = h;
}
Shutting Down OpenVR
Before the application shutdown, a call to vr::VR_Shutdown allows to quit properly:
// Shutdown the OpenVR services:
if( g_hmd != NULL )
{
  vr::VR_Shutdown();
  g_hmd = NULL;
}
Creating the HOOPS Luminate Objects to Handle the Scene
Rendering a scene for virtual reality headset consists in fact of two renderings: one for each eye. Therefore we will need two RED::IViewpointRenderList vrl objects, left and right. Each one containing a RED::IViewpoint camera. Of course, the scene is not duplicated: both cameras hold the same scene graph.
We also created a render target texture for each vrl using the size provided by the OpenVR API. The content of these render targets will later be send to the VR system.
// Create a VRL for each eye:
RC_TEST( iwindow->CreateVRL( eyevrl[eye], g_texSize[eye].w, g_texSize[eye].h, RED::FMT_RGBA, true, iresmgr->GetState() ) );
RED::IViewpointRenderList* ivrl = eyevrl[eye]->As< RED::IViewpointRenderList >();

// Set the viewpoint corresponding to left and right eye:
RC_TEST( ivrl->InsertViewpoint( g_camera[eye], iresmgr->GetState() ) );
RC_TEST( ivrl->SetClearColor( RED::Color::BLACK, iresmgr->GetState() ) );
RC_TEST( ivrl->SetEngineAntiAlias( 2, true, iresmgr->GetState() ) );

// Set the cube image as background:
RC_TEST( ivrl->SetBackgroundImages( bg_img_cube, RED::Matrix::IDENTITY, NULL, RED::Matrix::IDENTITY, true, 1.0, 1.0, iresmgr->GetState() ) );

// Create a 2D render texture allowing to get the VRL output later:
RC_TEST( iresmgr->CreateImage2D( g_eyeRenderTextures[eye], iresmgr->GetState() ) );
RED::IImage2D* iTex2d = g_eyeRenderTextures[eye]->As< RED::IImage2D >();
RC_TEST( iTex2d->SetRenderImage( eyevrl[eye], g_texSize[eye].w, g_texSize[eye].h, 0, 0, RED::TGT_TEX_2D, iresmgr->GetState() ) );
Note
Beware of the antialiasing: we want high frame rate with two renderings!
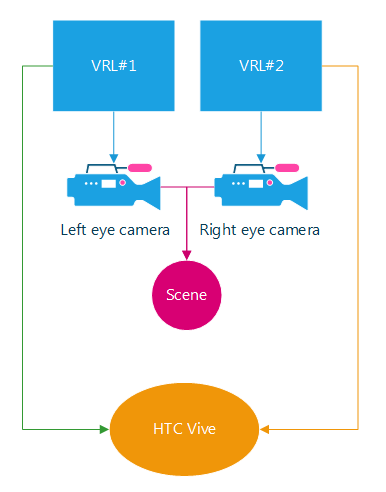
HOOPS Luminate objects needed to render for VR
Rendering the Scene with Correct Camera Settings
In order to render the correct images at each frame, HOOPS Luminate needs camera/eye data provided by the VR device.
OpenVR gives 3 transformation matrices:
- The headset device position and orientation called device pose
- The eye Transforms relative to the headset called eye to head transforms
- The projection matrices For each eye
We add a fourth matrix to convert from OpenVR coordinate system to our.
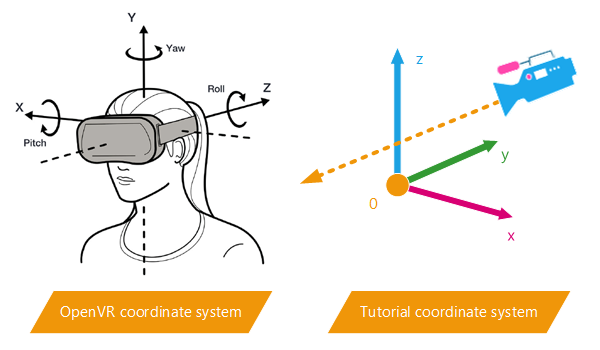
OpenVR SDK coordinate system conversion
| Axis | OpenVR | Tutorial | Conversion |
|---|---|---|---|
| x | right | left | xtuto = -xopenvr |
| y | up | back | ytuto = zopenvr |
| z | back | up | ztuto = yopenvr |
The conversion matrix is (4th column holding the camera position in our virtual scene):
rconv.SetColumn( 0, RED::Vector4( -1.0,  0.0,  0.0, 0.0 ) );
rconv.SetColumn( 1, RED::Vector4(  0.0,  0.0,  1.0, 0.0 ) );
rconv.SetColumn( 2, RED::Vector4(  0.0,  1.0,  0.0, 0.0 ) );
rconv.SetColumn( 3, RED::Vector4(  0.0,  3.0, -1.0, 1.0 ) );
Retrieving the headset transform matrix:
// Get all the device poses.
vr::TrackedDevicePose_t trackedDevicePose[ vr::k_unMaxTrackedDeviceCount ];
vr::VRCompositor()->WaitGetPoses( trackedDevicePose, vr::k_unMaxTrackedDeviceCount, NULL, 0 );

// Get the HMD pose matrix.
if( trackedDevicePose[ vr::k_unTrackedDeviceIndex_Hmd ].bPoseIsValid )
{
vr::HmdMatrix34_t hmdpose = trackedDevicePose[ vr::k_unTrackedDeviceIndex_Hmd ].mDeviceToAbsoluteTracking;

  rhmdpose.SetColumn( 0, RED::Vector4( hmdpose.m[0][0], hmdpose.m[1][0], hmdpose.m[2][0], 0.0 ) );
  rhmdpose.SetColumn( 1, RED::Vector4( hmdpose.m[0][1], hmdpose.m[1][1], hmdpose.m[2][1], 0.0 ) );
  rhmdpose.SetColumn( 2, RED::Vector4( hmdpose.m[0][2], hmdpose.m[1][2], hmdpose.m[2][2], 0.0 ) );
  rhmdpose.SetColumn( 3, RED::Vector4( hmdpose.m[0][3], hmdpose.m[1][3], hmdpose.m[2][3], 1.0 ) );
}
For each eye, getting the view and projection matrices and applying them to our cameras. The view matrix is a combination of conversion, device pose and eye to head transform:
// View matrix:
vr::HmdMatrix34_t mateye = g_hmd->GetEyeToHeadTransform( (vr::EVREye)eye );

rview.SetColumn( 0, RED::Vector4( mateye.m[0][0], mateye.m[1][0], mateye.m[2][0], 0.0 ) );
rview.SetColumn( 1, RED::Vector4( mateye.m[0][1], mateye.m[1][1], mateye.m[2][1], 0.0 ) );
rview.SetColumn( 2, RED::Vector4( mateye.m[0][2], mateye.m[1][2], mateye.m[2][2], 0.0 ) );
rview.SetColumn( 3, RED::Vector4( mateye.m[0][3], mateye.m[1][3], mateye.m[2][3], 1.0 ) );
rview = rconv * rhmdpose * rview;

// Projection matrix:
vr::HmdMatrix44_t matproj = g_hmd->GetProjectionMatrix( (vr::EVREye)eye, 0.2f, 1000.0f, vr::API_OpenGL );

rproj.SetColumn( 0, RED::Vector4( matproj.m[0][0], matproj.m[1][0], matproj.m[2][0], matproj.m[3][0] ) );
rproj.SetColumn( 1, RED::Vector4( matproj.m[0][1], matproj.m[1][1], matproj.m[2][1], matproj.m[3][1] ) );
rproj.SetColumn( 2, RED::Vector4( matproj.m[0][2], matproj.m[1][2], matproj.m[2][2], matproj.m[3][2] ) );
rproj.SetColumn( 3, RED::Vector4( matproj.m[0][3], matproj.m[1][3], matproj.m[2][3], matproj.m[3][3] ) );

// Update eye camera:
RED::IViewpoint* icam = g_camera[eye]->As< RED::IViewpoint >();
RC_TEST( icam->SetViewingMatrix( rview, iresmgr->GetState() ) );
RC_TEST( icam->SetFrustumCustom( rproj, iresmgr->GetState() ) );
Submitting the Render Texture to OpenVR
Once the rendering had been done with the correct camera view and projection matrices (i.e. we called RED::IWindow::FrameDrawing method with success), both left and right eye VRL render textures contain the images we want to display in the VR device.
The OpenVR API allows to send them via the vr::VRCompositor()::Submit method:
// Access OpenGL texture of the auxiliary VRL buffer:
unsigned int texid;
RED::IImage* iTex = g_eyeRenderTextures[eye]->As< RED::IImage >();
RC_TEST( iTex->GetOpenGLInfo( texid ) );

// Submit the render texture to the OpenVR compositor:
vr::Texture_t eyeTexture = { (void*)texid, vr::API_OpenGL, vr::ColorSpace_Gamma };
vr::EVRCompositorError eError = vr::VRCompositor()->Submit( (vr::EVREye)eye, &eyeTexture );
if( eError != vr::VRCompositorError_None )
{
  RFK::TutorialApplication::DisplayError( "Error", "VRCompositor submit failed.\n" );
}
Displaying a Window Feedback
Like in the Oculus Rift tutorial, we can display a feedback scene by simply drawing the content of the two VRL in the main window.
To do this, two quads are drawn in front of an orthographic viewpoint (for left and right eyes). On each quad, a custom material and shader displays the content of the corresponding render target.

VRL, viewpoints and shapes organization