Adaptive Sampling
This page details how HOOPS Luminate can be used with a dynamic adaptation of its sampling quality, to generate faster images, while preserving image quality. Adaptive sampling is a technique that is specific to software ray-traced images. There are two modes for using adaptive sampling in HOOPS Luminate:
- One is based on a wished quality level (
RED::OPTIONS_RAY_ADAPTIVE_SAMPLING_THRESHOLD),- The other is based on an amount of time spent generating the image (
RED::OPTIONS_RAY_ADAPTIVE_SAMPLING_ALLOWED_TIME).
See the Adaptive Sampling Controls paragraph down the page for details on these two modes.
Brute Force Ray-Tracing vs. Adaptive Ray-Tracing
The default HOOPS Luminate setup use a brute force ray-tracing approach. This means that for a given pixel to compute in an image a constant computation effort is allowed to it. This amount of computation effort is the result of the ray-tracing rendering options that are turned on for the image processing: reflect & refract depths, shadowing depth, ray cutoff, light cutoff, anti-aliasing, etc…As a result, we get an image with a variable noise level per pixel, that depends on the frequency of the phenomenon we have to sample (reflections, shadows of tiny objects, etc…).
Let’s consider a simple scene to illustrate this point:

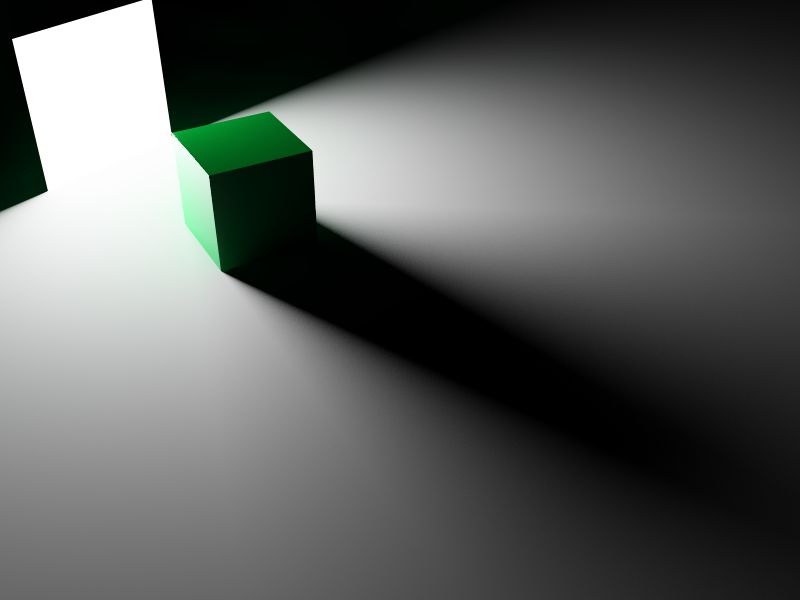
A brute force processed image.
As we can see, we have no noise in completely dark areas, a very small noise in completely lit areas due to the surface of the ligh and we do have much more noise in penumbra areas, where the investment per pixel is not enough to generate a noiseless, perfectly smooth, signal.
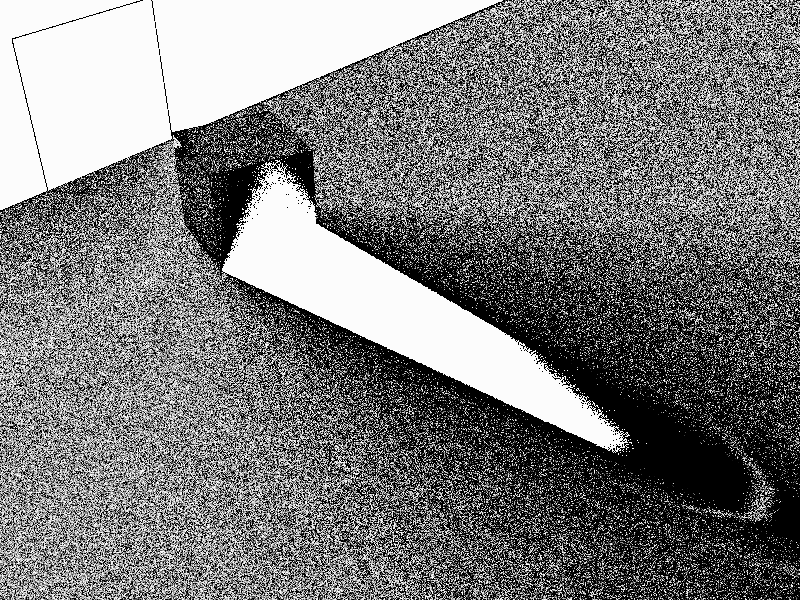
Then, the idea behind processing the image using adaptive sampling is to tolerate a user specified noise level everywhere in the image. As soon as this noise level is reached for a given pixel, we can stop calculating for it, and thus we can save time, focusing calculations in image regions where there’s more complexity to handle. The image below illustrates this point. This is an amplified view of amount of calculations saved per pixel:

Brighter areas are those where we skip the more calculations.
As we can see, regions of the image that are fully obscured (those in full shadows or behind the light) are receiving a limited amount of calculations due to the fact that for each sample fired, we just get a black color. Therefore, we quickly see that the signal is constant in these areas, so we quickly stop calculating redundant samples there and concentrate on other image areas. At the opposite side, penumbra regions are shown as the darker ones in the image above: due to the fact that we’re in penumbra regions, we need to compute more samples before we can eventually reach the wished noise threshold.
Practically, compared to a brute force image, adaptive sampling will remove useless calculations and progressively equalize the noise level in the image. For limited changes in the image, the usage of adaptive sampling can save a lot of time compared to a full brute force image.
Turning on Adaptive Sampling
Adaptive sampling requires three options & engine parameters to be effective:
- The image must be rendered with software anti-aliasing turned on, using
RED::IViewpointRenderList::SetSoftAntiAlias, possibly at a higher level than for regular images to allow for more adaptation.- The sampler used must be set to the progressive HM sampler, by switching the
RED::OPTIONS_SAMPLERvalue at the resource manager level.- The wished quality must be specified using the
RED::OPTIONS_RAY_ADAPTIVE_SAMPLING_THRESHOLDvalue, or an amount of time allowed to compute the image must be set using theRED::OPTIONS_RAY_ADAPTIVE_SAMPLING_ALLOWED_TIMEoption. See below for typical values for these settings.
Adaptive sampling don’t require any other change to the scene rendering options.
Adaptive Sampling Controls

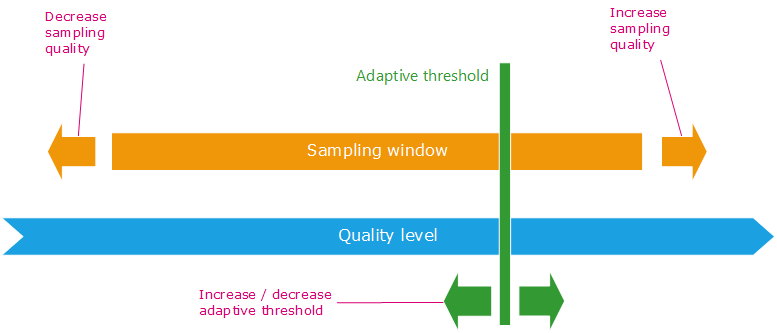
Adaptive sampling controls
The “sampling window” depicted in the picture above translates the quality that can have the final image. For instance if the RED::OPTIONS_RAY_LIGHTS_SAMPLING_RATE is set to 16 this means that up to 16 x 16 rays will be fired to estimate the quality of the lighting at one point. If we fire all 256 rays we’re on the right of the image and if we fire less, we’re on the left of the image. This is for the orange bar in the picture above. Now moving the RED::OPTIONS_RAY_ADAPTIVE_SAMPLING_THRESHOLD to higher values (lower the quality: move the slider to the left) or to lower values (higher quality: love the slider to the right) will cut the image calculation when the wished quality level has been reached.
So, we have two main levers to control adaptive sampling:
- Values for sampling options (
RED::OPTIONS_RAY_LIGHTS_SAMPLING_RATEandRED::OPTIONS_RAY_GLOSSY_SAMPLING_RATE) define a rendering window: this bounds the minimal and maximal quality in the final image. It’ll not be possible to get out of this window, whatever the other options values. Increasing the light and / or glossy sampling rates will move the window toward a better quality, reducing sampling rates doing the opposite. On increasing or decreasing sampling rates, the whole window is moved, so the lower quality boundary moves as well as the higher quality boundary.- Then, the value of the adaptive threshold (
RED::OPTIONS_RAY_ADAPTIVE_SAMPLING_THRESHOLD) caps the maximal quality to the user specified threshold. Note that reducing the threshold increases the maximal quality and vice-versa. If the threshold is too small, then the image will render as if there were no adaptation. If the threshold is too large, the image will render as if there were with no adaptation, as if it were rendered with lower sampling options.
Typical values for adaptive sampling are:
- Software anti-alias set to 8, lights sampling rate set to 16 and glossiness sampling rate set to 16: We’ll fire up to 64 rays per pixel and these 64 rays will have up to 256 lighting & glossy samples.
- Software anti-alias set to 16, lights sampling rate set to 16 and glossiness sampling rate set to 16. Compared to the previous settings, this one fire more rays (defined by the AA rate) that have a lesser unitary quality: it’ll fire up to 256 rays having in common up to 256 lighting & glossy samples, so roughly 1 lighting & glossy sample allowed per extra ray.
- A scale up of these values AA 16 LS 32 GS 32 and these sort of values. All values should scale up together to preserve a good adaptation.
But we have another lever we can trigger which is the RED::OPTIONS_RAY_ADAPTIVE_SAMPLING_ALLOWED_TIME. If set to a positive value in seconds, then the adaptive threshold set by RED::OPTIONS_RAY_ADAPTIVE_SAMPLING_THRESHOLD will be ignored and the computer will spend that amount of time processing and refining the image. It’ll stop after having spent approximately the requested amount of time.
There are two limits to the time that’ll be practically taken by a calculated image:
- If the time specified is below the time taken by the GI calculation phase and by a first image parsing pass, then the image will stop after these two phases. This means that the time taken to process the image has a bottom limit defined by the time taken to compute the GI plus some time to reach the low end of the quality for the image (e.g. the left side of the sampling window depicted above).
- If the time specified is really high, the calculations will stop when the full adaptation will have been performed for the entire image (e.g. we have reached the right side of the sampling window).
