Computing an Automatic White Balance Reference
When rendering realistic images, you often end with a picture exhibiting strong colorimetric deviation due to prominent coloured light sources (like the sun or the sky for example). It’s not such an effort to automatically process those pictures to reduce (or even fully correct) this effect. This task gives some example code to compute a proper rough estimate of the white reference of an image. This reference can then be used to correct the image using the RED::PostProcess class in HOOPS Luminate.
We’ll assume here that we work on an image in 32bit pixel format. Here is the code to compute the white reference of the image:
// "buffer" is a pointer to the image content: each pixel is a 32bit value encoded as 0xAARRGGBB.
// "buffer_width" and "buffer_height" are respectively the width and height of "buffer".

RED::Vector< unsigned int > brightest_pixels;
unsigned int brightness, darkest = 0;
unsigned int N = REDMax< int >( 1, (int)( 0.001 * buffer_width * buffer_height ) );

// Brightest pixels so far are stored into an array of ARGB 32bits values.
// The alpha component is used to store the value of the RGB triplet and
// to sort candidates from bright to dark.
for( unsigned int y = 0; y < buffer_height; ++y )
{
    for( unsigned int x = 0; x < buffer_width; ++x )
    {
        // Extracts the current pixel color.
        unsigned int rgba = buffer[x + y * buffer_width];

        // Computes the pixel brightness as (red + green + blue) / 3.
        brightness = ( rgba >> 16 ) & 0xff;
        brightness += ( rgba >> 8 ) & 0xff;
        brightness += rgba & 0xff;
        brightness /= 3;

        // Stores the pixel brightness into the unused pixel alpha component.
        rgba = ( rgba & 0x00ffffff ) | ( brightness << 24 );
        if( ( brightest_pixels.size() == N ) && ( darkest > brightness ) )
        {
            // Discards the pixel cause its darker than the already known darkest pixel.
        }
        else
        {
            // The pixel is at least brighter than the darkest stored pixel.
            int b = REDMin< int >( N - 1, (int)( brightest_pixels.size() - 1 ) );
            if( b == ( N - 1 ) )
            {
                // The list is full, override the latest element.
                brightest_pixels[b] = rgba;
            }
            else
            {
                // The list is not full, append the element at the end.
                brightest_pixels.push_back( rgba );
                ++b;
            }

            // The newest element is at the end of the list. To keep the list
            // sorted from brightest to darkest, we use bubble sorting.
        while( b > 0 )
        {
            if( ( brightest_pixels[b-1] >> 24 ) < brightness )
            {
                unsigned int d = brightest_pixels[b-1];
                brightest_pixels[b-1] = brightest_pixels[b];
                brightest_pixels[b] = d;
                --b;
            }
            else
                break;
        }

        // Keeps track of the brightness of the darkest pixel in the array.
        darkest = brightest_pixels[brightest_pixels.size() - 1] >> 24;
    }
  }
}

// Average the N brightest image pixel together.
double red = 0.0, green = 0.0, blue = 0.0;

if( brightest_pixels.size() == 0 )
    return RED::Color( red, green, blue );

for( int b = 0; b < brightest_pixels.size(); ++b )
{
    red   += ( ( brightest_pixels[b] >> 16 ) & 0xff ) / 255.0;
    green += ( ( brightest_pixels[b] >>  8 ) & 0xff ) / 255.0;
    blue  += ( ( brightest_pixels[b] >>  0 ) & 0xff ) / 255.0;
}

red /= brightest_pixels.size();
green /= brightest_pixels.size();
blue /= brightest_pixels.size();

return RED::Color( red, green, blue );
The algorithm used is very simple: we compute the average of the N brightest pixel of the image as an estimate of the white reference. As long as we process new image pixels, a list of the (up to) N ordered brightest pixels is kept up-to-date. At the end of the image pixels processing loop, the N entries of our list are averaged together and returned.
To process white balance correction of a RED image using the white reference computed above, you just need to go through the RED::PostProcess object:
// Applies the white reference (iviewpoint is a pointer to the RED viewpoint to use to draw the RED image to be processed).
RED::PostProcess& pp = iviewpoint->GetPostProcessSettings();
pp.SetWhiteReference( RED::Color( red, green, blue ) );
Below is an example of an image processed using the algorithm described here to attenuate the colour shift:
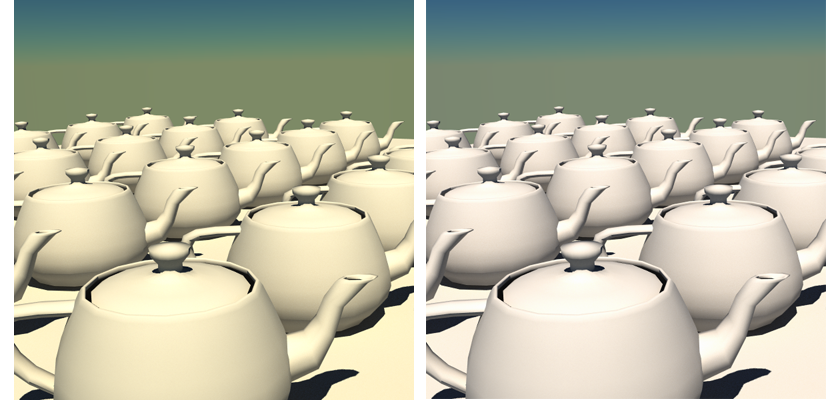
Original image on the left, colour-corrected image on the right

