GI Cache and Tone Mapping for Panorama
This tutorial comes after the Creating Panorama one. Its goal is to show how to enable the global illumination and calculate a GI cache to be used for the six faces rendering. On the same way, it will describe how to use the same tone mapping options for the six faces of the cube.
Note
This tutorial will not detail how to create the panorama itself, this topic is covered in the Creating Panorama tutorial.
To correctly see the GI contribution, the scene is composed of a viewpoint (RED::IViewpoint) inside a colored room composed of six planes (RED::IMeshShape::Quad) illuminated by a physical rectangular area light (RED::IPhysicalLightShape).
A Single Tone Mapping for All the Faces of the Cube
When using physical lights, the first thing to do is to enable the HDR rendering. This is done at the window level with the RED::OPTIONS_WINDOW_HDR option.
// HDR pipeline needs to be turned on to capture the full range of light
// intensities
RED::IOptions* iwinopt = iwindow->As< RED::IOptions >();
RC_TEST( iwinopt->SetOptionValue( RED::OPTIONS_WINDOW_HDR, 2, iresmgr->GetState() ) );
Then, we must activate the tone mapping to recalibrate the output color in the correct range. The tone mapping is associated to the viewpoint.
// Turn on tone mapping:
RED::PostProcess& pp = icamera->GetPostProcessSettings();
pp.SetToneMapping( RED::TMO_PHOTOGRAPHIC );
Tone mapping is a dynamic operation done at each rendering frame and depends on the image luminance. Therefore it differs according to the views. In order to have homogeneous colors for each of the six faces of the cube, we must use the same values of luminance. Two HOOPS Luminate post process functions allow to retrieve the luminance values and override them:
RED::PostProcess::GetLuminanceInformationandRED::PostProcess::OverrideLuminance
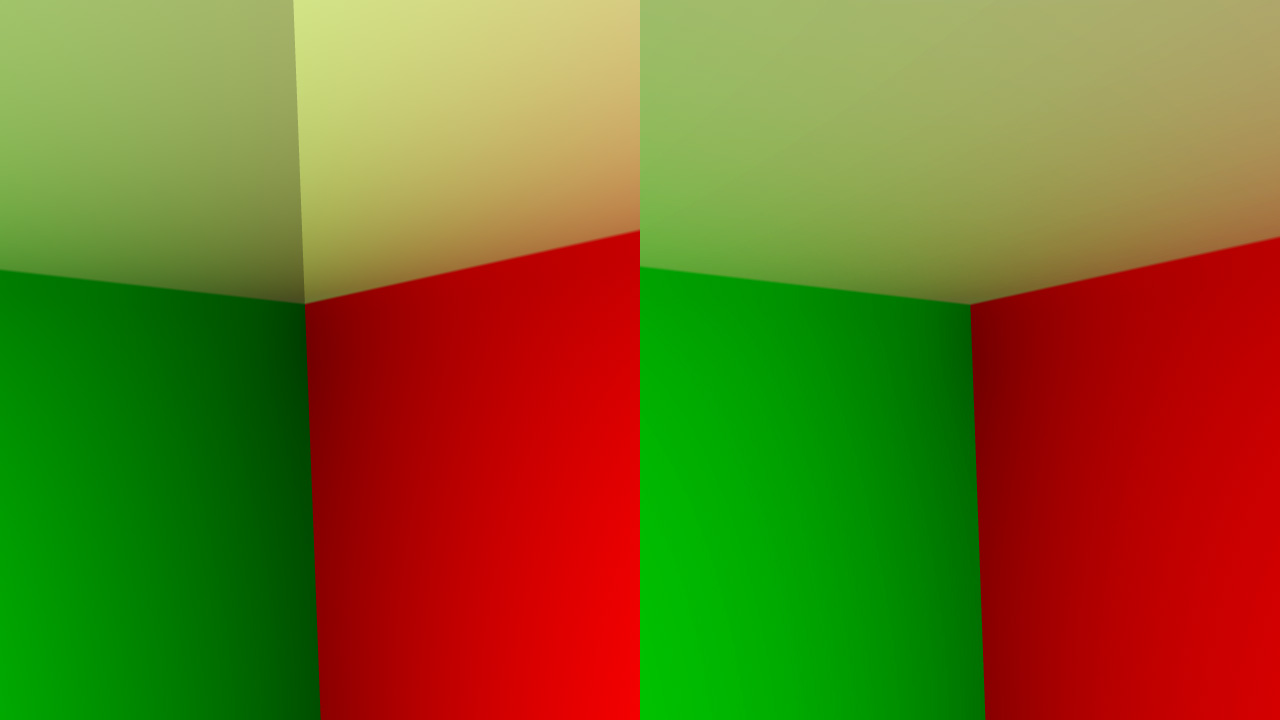
A corner of the scene with view-dependent tone mapping on the left and with consolidated tone mapping on the right
In this tutorial, we get the luminance information of each face of the cube after it is rendered and save it:
// Get the viewpoint and post process used to render the cube faces:
RED::IViewpoint* ivp = g_cube_viewpoint->As< RED::IViewpoint >();
RED::PostProcess& pp = ivp->GetPostProcessSettings();

// Get the luminance information for this face:
pp.GetLuminanceInformation( g_pp_info[ g_current_face-1 ].avg,
                            g_pp_info[ g_current_face-1 ].logavg,
                            g_pp_info[ g_current_face-1 ].samples,
                            g_pp_info[ g_current_face-1 ].min,
                            g_pp_info[ g_current_face-1 ].max );
The luminance information used by the post process is composed of
- The average luminance of the image
- The log value of the average luminance
- The number of samples taken to calculate the average
- The minimum luminance value
- The maximum luminance value
In order to have an homogeneous post process for all the faces of the cube, we will consolidate all the luminance data of all the calculated faces and ‘merge’ them into a single batch of luminance data:
// Consolidate the overall luminance informations based on the previously calculated images:
float avg = 0.0f;
float logavg = 0.0f;
float min = 10000.0f;
float max = 0.0f;
unsigned int samples = 0;

for( int i = 0; i < g_current_face; ++i )
{
    // Average = sum( x ) / samples
    avg += g_pp_info[i].avg * g_pp_info[i].samples;

    // LogAverage = exp( sum( x ) / samples )
    logavg += log( g_pp_info[i].logavg ) * g_pp_info[i].samples;

    // Get overall min and max
    min = REDMin( min, g_pp_info[i].min );
    max = REDMax( max, g_pp_info[i].max );

    // Cumulate the samples
    samples += g_pp_info[i].samples;
}

avg /= samples;
logavg = exp( logavg / samples );
The next step is to use the consolidated data to re-apply the correct tone mapping on the previously computed faces. The ‘Applying Tone Mapping on a Completed Image’ tutorial describes this process in details.
First, we need to create six render and depth images for the six faces of the panorama. They will handle the raw face rendering without the tone mapping pass.
// Create six render images to contain the six faces of the cube before tone mapping:
RC_TEST( iresmgr->CreateImage2D( g_pp_info[i].color_image, iresmgr->GetState() ) );
RC_TEST( iresmgr->CreateImage2D( g_pp_info[i].depth_image, iresmgr->GetState() ) );
The RED::IWindow::FrameTracingImages will have to be used then to draw in the previously created textures. A tutorial framework function allows to define this:
// Add frame tracing images for the next face:
RC_TEST( RFK::TutorialApplication::AddFrameTracingImages( g_pp_info[ g_current_face ].color_image, g_pp_info[ g_current_face ].depth_image, g_cube_viewpoint ) );
After each face rendering, the tone mapping is applied manually to the previous ones with the consolidated luminance informations. Do not forget to call RED::IViewpointRenderList::SetViewpointSoftImages to set the raw faces textures as a rendering base.
// Set viewpoint soft images before calling RED::IWindow::FrameDrawing.
// This allows to use the software images as a base for the tone mapping.
RC_TEST( ivrl->SetViewpointSoftImages( g_pp_info[i].color_image, g_pp_info[i].depth_image,
                                    g_cube_viewpoint,
                                    iresmgr->GetState() ) );

// Override the luminance with the consolidated data:
RC_TEST( pp.OverrideLuminance( avg, logavg, samples, min, max ) );

// Do a frame tracing to apply the tone mapping:
RC_TEST( iresmgr->EndState() );
RC_TEST( iwindow->FrameDrawing() );
iresmgr->BeginState();
Like in the classic ‘Creating Panorama’ tutorial, the next step is to use RED::IViewpointRenderList::GetRenderImage to retrieve the rendered result and copy it to the background cube using RED::IImageCube::SetFacePixels.
Finally you have to tell the framework to not use the render textures anymore after the face has been rendered:
// Remove the frame tracing images of the previous face:
RC_TEST( RFK::TutorialApplication::RemoveFrameTracingImages( g_pp_info[ g_current_face-1 ].color_image, g_pp_info[ g_current_face-1 ].depth_image, g_cube_viewpoint ) );
By executing the associated tutorial application, you will see that the luminance of the previously calculated cube faces will change each time a new face is calculated. The final correct consolidated luminance is applied after the last face as been calculated.
GI Cache Calculation
This section will describe how to use a precomputed GI cache to add global illumination to the six faces of the cube without having to recalculate it at each face.
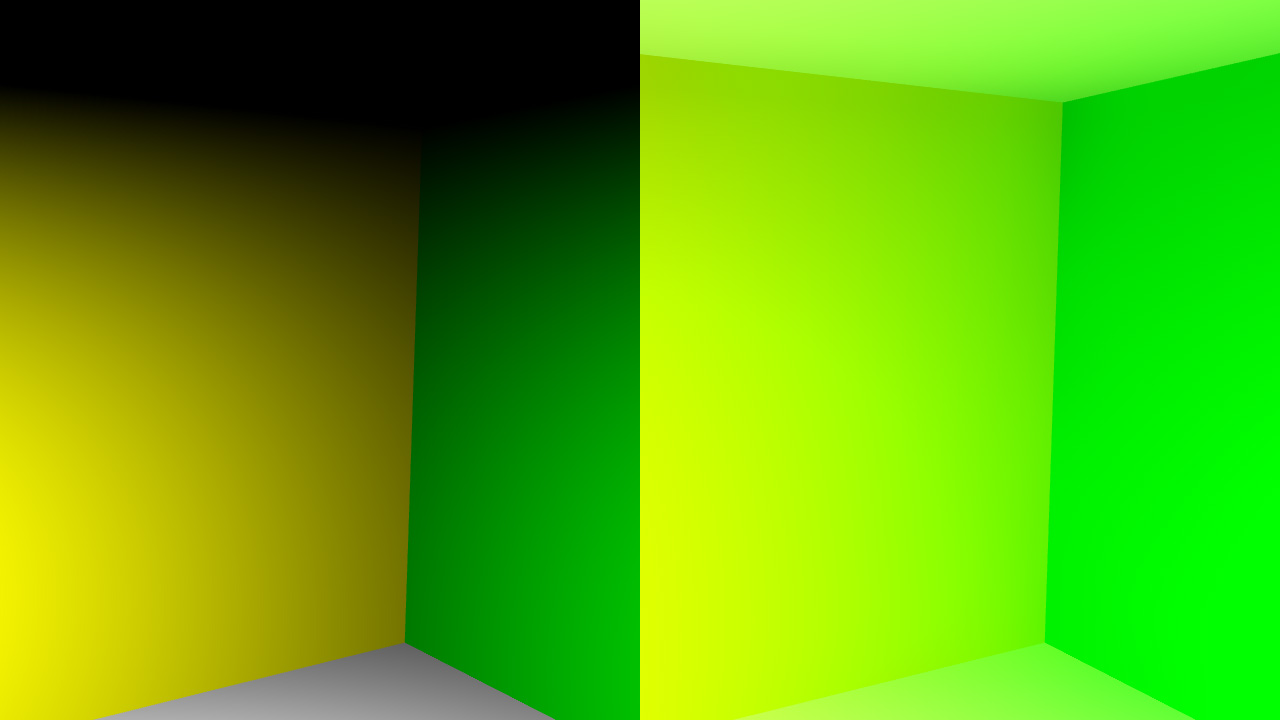
A corner of the scene without GI on the left and with GI on the right
First thing to do: enable the global illumination via the correct viewpoint option:
// Enable global illumination:
RED::IOptions* icamopt = camera->As< RED::IOptions >();
RC_TEST( icamopt->SetOptionValue( RED::OPTIONS_RAY_GI, true, iresmgr->GetState() ) );
Once the option is activated, we need to create the RED::IGICache object. This is done using a special frame tracing function: RED::IWindow::FrameTracingGICache. It returns the created cache object. In this tutorial, we use the RED::GICM_CAMERA_SPHERICAL method. The GI cache is computed for the whole set of directions around the camera position.
// Calculates a GI cache:
// g_gi_cache is a RED::IGICache object.
RC_TEST( iresmgr->EndState() );
RED::Vector< RED::Vector3 > nofilter;
RED::Vector< RED::Object* > noexclude, noblock;
bool complete = false;
while( !complete )
{
    RC_TEST( iwindow->FrameTracingGICache( complete, g_gi_cache, camera, RED::GICM_CAMERA_SPHERICAL, nofilter, noexclude, noblock ) );
}
iresmgr->BeginState();
After the RED::IGICache object is created, you can set it to the RED::IViewpointRenderList.
// Apply the GI cache to the VRL:
RED::IViewpointRenderList* ivrl = vrl->As< RED::IViewpointRenderList >();
RC_TEST( ivrl->SetViewpointGICache( g_gi_cache, camera, iresmgr->GetState() ) );
After doing this, all the VRL renderings (RED::IWindow::FrameTracing) will use the GI cache to compute global illumination and will not recalculate one from scratch, saving a lot of time.
Note
The RED::IGICache object can be saved in a red file like any other HOOPS Luminate object using RED::IREDFile::Write allowing it to be reloaded later and used without having to recalculate it.
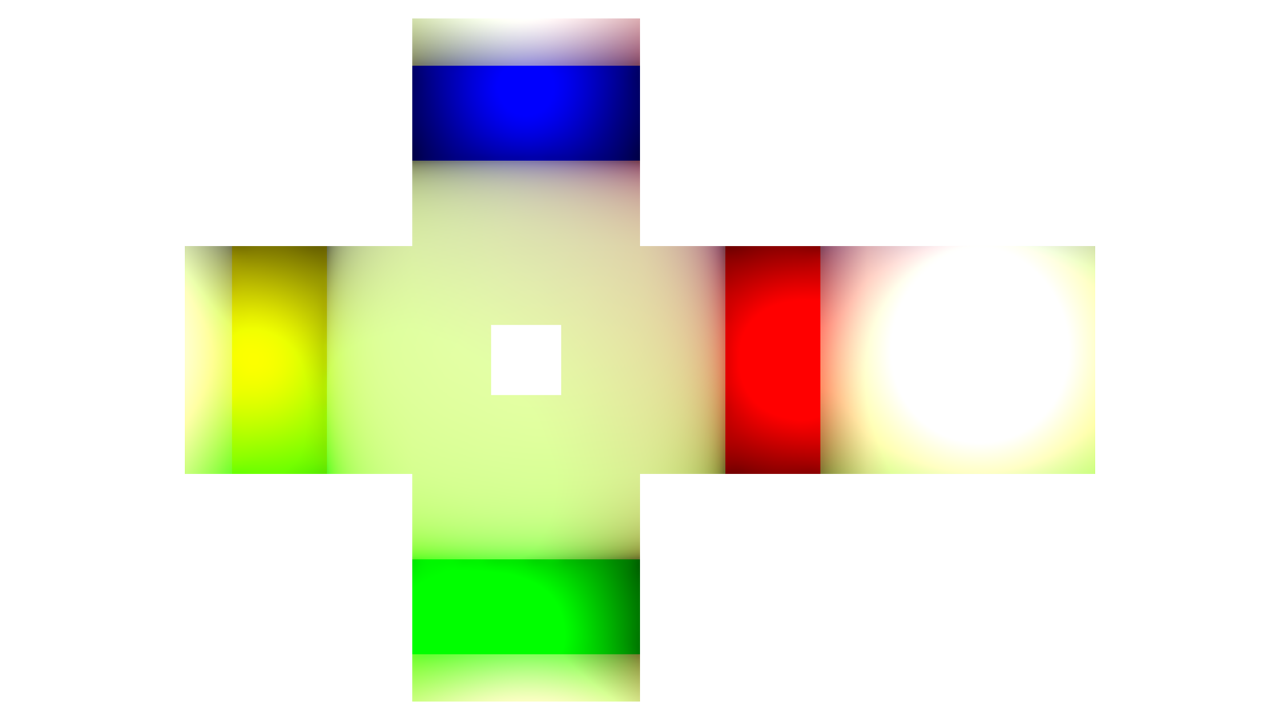
The panorama as a cube image after GI and tone mapping