Cartoon Shading
Introduction
Cartoon (or ‘cel’) shading is a classical rendering style and is heavily used in games and movies. In this tutorial, we’ll show how you can create a basic cartoon shading material with HOOPS Luminate.
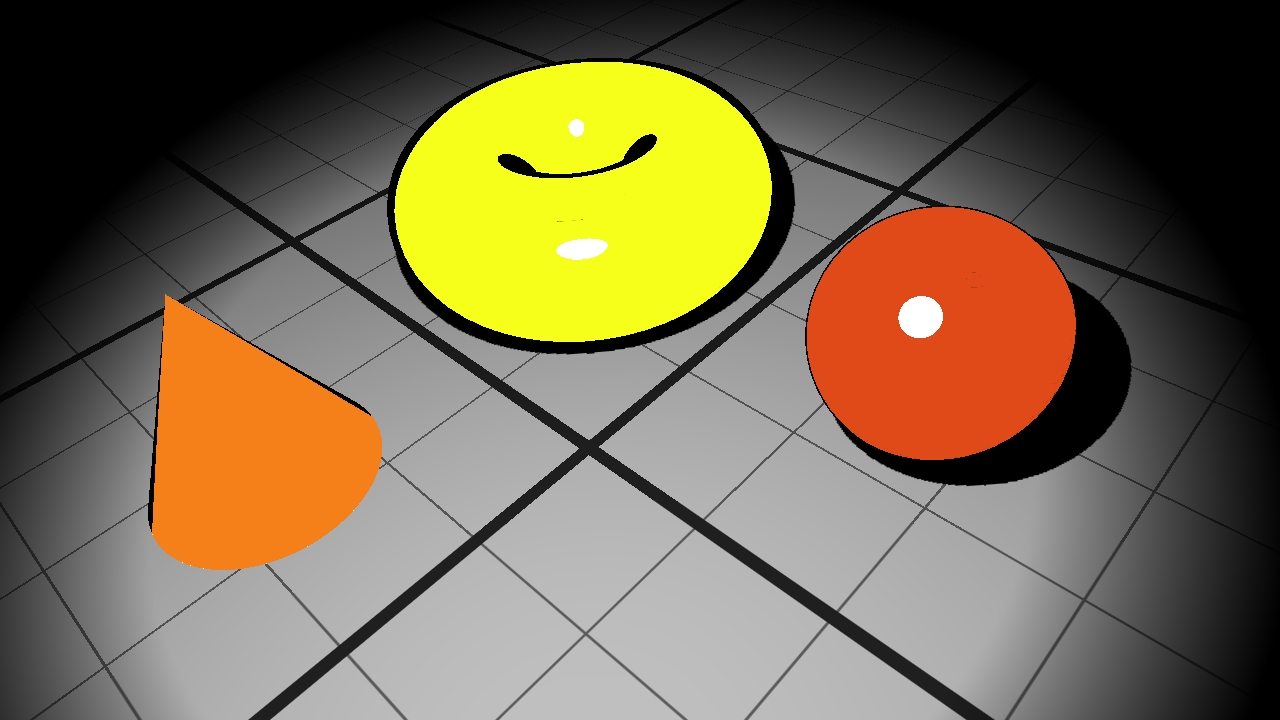
The tutorial scene rendered using the cartoon shading material.
Description
This material should have the following properties:
- Uniform diffuse shading: lit areas are displayed using a constant color
- Phong like specular highlight: specular highlight are simulated using the Phong model
- Edge drawing: simple edge detection and over draw
The Lighting Model
The lighting model that can handle these properties for one light is quite simple:
color(P) = ambient + edge * (diffuse * diffuse_attenuation + specular * specular_attenuation) * light_color * light_attenuation
with:
- P: the point in space where we want to evaluate the lighting
- ambient: ambient color of the material
- diffuse: diffuse color of the material
- specular: specular color of the material
- light_color: color of the light
- light_attenuation: 1 if P is visible from the light (lit), 0 otherwise (in shadow)
- diffuse_attenuation: 1 if the dot product between N and L > 0 (light is front facing), 0 otherwise (light is back facing)
- specular_attenuation: 1 if Phong term > specular_cutoff, 0 otherwise; the specular_cutoff value is a per-material user defined value (decrease the value to get larger specular highlight)
- edge: 1 if P lies on an edge, 0 otherwise
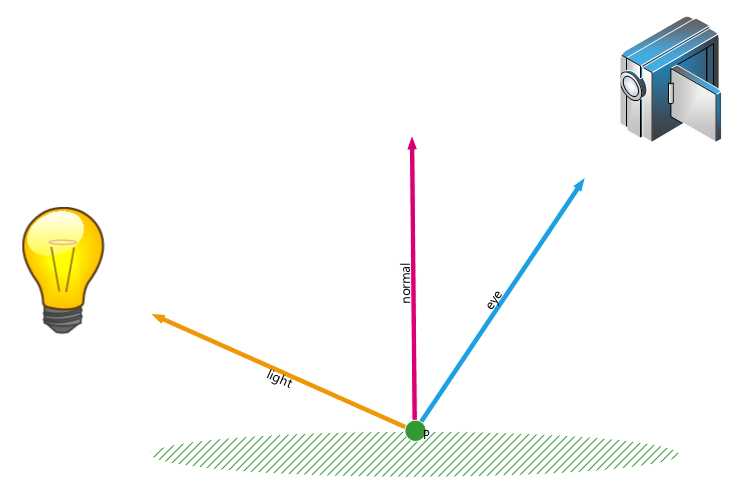
The various data needed to compute our cartoon lighting model. Note that all vectors are normalized.
The Phong term is computed using the following equation:
Phong term = cos( R, L ) ^ n; where R is the reflected vector of E (the eye vector) by N, and n the specular exponent. If cos( R, L ) < 0, then Phong term = 0.
Edge detection is performed by comparing the dot product between point normal and viewing direction. If the dot product is greater than a user defined cutoff value no edge is detected. By modifying the cutoff value, the user can increase or decrease the silhouette size.
The Cartoon Material
Our material is made of two shaders: one for the ambient lighting and another one for the sources lighting (which includes the toon lighting model described above). Each shader has two configurations, a hardware one and a software one. This authorizes our material to be rendered the same with both CPU or GPU based renderers.
The ambient shader used is the one which is provided by HOOPS Luminate. It already provides the hardware and software configurations. Using it is only a matter of registering it to our material and insert it into the right rendering pass:
RED_RC rc;
RED::RenderShaderAmbient ambientshd( RED::MTL_PRELIT,
                                    iAmbient,          NULL, RED::Matrix::IDENTITY, RED::MCL_TEX0,
                                    RED::Color::BLACK, NULL, RED::Matrix::IDENTITY, RED::MCL_TEX0,
                                    RED::Color::BLACK, NULL, RED::Matrix::IDENTITY, RED::MCL_TEX0,
                                    RED::Color::WHITE, NULL, RED::Matrix::IDENTITY, RED::MCL_TEX0,
                                    true, resmgr, rc );
RC_TEST( rc );

// Create the material.
RC_TEST( iresmgr->CreateMaterial( oMaterial, iresmgr->GetState() ) );

RED::IMaterial* imat = oMaterial->As< RED::IMaterial >();

// Register the ambient shader.
RC_TEST( imat->RegisterShader( ambientshd,iresmgr->GetState() ) );
RC_TEST( imat->AddShaderToPass( ambientshd.GetID(), RED::MTL_PRELIT, RED::LIST_LAST, RED::LayerSet::ALL_LAYERS, iresmgr->GetState() ) );
The lighting shader computes our custom toon lighting model and should be written from the ground up. A shader is made of configurations intended for different rendering targets. For each target, different shader programs can be used with different sets of inputs.
The hardware target makes use of two hardware programs: a vertex program and a pixel program. We use a built-in vertex program (RED_VSH_VSPACE_VNLE in our case) as HOOPS Luminate comes with a huge list of ready-to-use programs saving us a lot of effort. Here is the hardware configuration of the fragment program written in ARB language:
// Pixel shader:
// -------------
//  o Inputs: fragment.texcoord[0]: VCS light vector.
//            fragment.texcoord[1]: VCS eye vector.
//            fragment.texcoord[2]: VCS normal.

RED::ShaderProgramID psh;
str.PixelShaderStart();

str.Param( "ambient", 0 );
str.Param( "diffuse", 1 );
str.Param( "specular", 2 );
str.Param( "misc", 3 );
str.Param( "lightdiffcol", 4 );

str.Temp( "R0" ); // working register
str.Temp( "R1" ); // normalized normal N
str.Temp( "R2" ); // normalized eye vector E
str.Temp( "R3" ); // normalized light vector L
str.Temp( "R4" ); // working register
str.Temp( "R5" ); // working register


// Compute the silhouette:
// -----------------------
//  o Normalize normal and eye vectors
//  o Compute the scalar product between pixel normal and eye vector
//  o Compare the scalar product result with the silhouette cutoff value

str.Add( "DP3 R2, fragment.texcoord[1], fragment.texcoord[1];\n" );
str.Add( "RSQ R2, R2.x;\n" );
str.Add( "MUL R2, R2, fragment.texcoord[1];\n" );

str.Add( "DP3 R1, fragment.texcoord[2], fragment.texcoord[2];\n" );
str.Add( "RSQ R1, R1.x;\n" );
str.Add( "MUL R1, R1, fragment.texcoord[2];\n" );

str.Add( "DP3_SAT R0, R2, R1;\n" );
str.Add( "SGE R0, R0, misc.xxxx;\n" );


// Modulate the diffuse intensity:
// -------------------------------
//  o By the silhouette, light color and visibility.
//  o Note that we must normalize the light vector

str.Add( "MUL R0, R0, diffuse;\n" );
str.Add( "MUL R0, R0, lightdiffcol;\n" );

str.Add( "DP3 R3, fragment.texcoord[0], fragment.texcoord[0];\n" );
str.Add( "RSQ R3, R3.x;\n" );
str.Add( "MUL R3, R3, fragment.texcoord[0];\n" );

str.Add( "DP3 R4, R1, R3;\n" );
str.Add( "SGE R4, R4, { 0 }.xxxx;\n" );

str.Add( "MUL R0, R0, R4;\n" );


// Compute the specular term:
// --------------------------
//  o Using the Phong specular model

// Compute the reflected vector (R) from E by N
str.Add( "DP3 R5, R1, R2;\n" );             // R5 = E.N
str.Add( "MUL R1, R1, { 2 }.xxxx;\n" );     // R1 = 2*N
str.Add( "MAD R5, R5, -R1, R2;\n" );        // R5 = E - 2*N*( E.N) = -R

// Compute the Phong term
str.Add( "DP3_SAT R5, -R5, R3;\n" );        // R5 = R.L
str.Add( "POW R5, R5.x, misc.z;\n" );       // R5 = (R.L)^shininess
str.Add( "SGE R5, R5.xxxx, misc.yyyy;\n" );
str.Add( "MUL R4, R5.xxxx, R4;\n" );
str.Add( "MUL R4, specular, R4;\n" );

// Add the specular term
str.Add( "MAD R0, lightdiffcol, R4, R0;\n" );


// Write the result:
// -----------------
//  o Modulate by the shadow value

str.Add( "TEX R1, fragment.position, texture[0], RECT;\n" );
str.Add( "MUL result.color, R0, R1;\n" );

str.ShaderEnd();

RC_TEST( iresmgr->LoadShaderFromString( psh, str ) );
This program directly implements the toon lighting model described above.
The software configuration of the fragment shader is very different:
// Software version of the shader. This is a user callback that will
// be automatically called each time the shader gets evaluated by the
// engine.
RED::ShaderProgramID soft_psh;
RED::ShaderString soft_str;
RED::Version version;

// Leave the first string empty to declare a user callback. The second string is the
// label of the callback as passed to the RED::IResourceManager::RegisterShadingCallback
// method.
soft_str.SoftShaderStart( "", "ToonMaterialSoftwareShader", version );
soft_str.ShaderEnd();

RC_TEST( iresmgr->LoadShaderFromString( soft_psh, soft_str ) )
When the engine will render the fragment program in software mode, it’ll look for a registered shading callback named ToonMaterialSoftwareShader. This callback needs to be defined and registered by the application in order for the material to render correctly (in software at least).
Once the programs are defined, the shader needs to know how the input data are bound for each configuration:
// Render shader setup.
RED::RenderShader shader;

// Set the hardware version of the shader.
RC_TEST( shader.SetVertexProgramId( vsh, RED_LALL, resmgr ) );
RC_TEST( shader.SetPixelProgramId( psh, RED_LALL, resmgr ) );

RED::RenderCode rendercode;
rendercode.BindChannel( RED_VSH_VERTEX, RED::MCL_VERTEX );
rendercode.BindChannel( RED_VSH_NORMAL, RED::MCL_NORMAL );
RC_TEST( shader.SetRenderCode( rendercode, RED_LALL ) );

// Set the software version of the shader.
RC_TEST( shader.SetVertexProgramId( soft_psh, RED_LALL, resmgr, RED::HW_SOFT_TRACER ) );
RC_TEST( shader.SetPixelProgramId( soft_psh, RED_LALL, resmgr, RED::HW_SOFT_TRACER ) );

RED::RenderCode soft_rendercode;
soft_rendercode.BindChannel( RED_VSH_VERTEX, RED::MCL_VERTEX );
soft_rendercode.BindChannel( RED_VSH_NORMAL, RED::MCL_NORMAL );
RC_TEST( shader.SetRenderCode( soft_rendercode, RED_LALL, RED::HW_SOFT_TRACER ) );

// Register the software shading callback to the resource manager.
RC_TEST( iresmgr->RegisterShadingCallback( "ToonMaterialSoftwareShader", ToonMaterialSoftwareShader, NULL ) );


// Shader parameters setup.
RED::RenderShaderParameter ambient( "ambient", 0, RED::RenderShaderParameter::PSH );
ambient.SetValue( iAmbient );
RC_TEST( shader.AddParameter( ambient, RED_LALL ) );
RC_TEST( shader.AddParameter( ambient, RED_LALL, RED::HW_SOFT_TRACER ) );

RED::RenderShaderParameter diffuse( "diffuse", 1, RED::RenderShaderParameter::PSH );
diffuse.SetValue( iDiffuse );
RC_TEST( shader.AddParameter( diffuse, RED_LALL ) );
RC_TEST( shader.AddParameter( diffuse, RED_LALL, RED::HW_SOFT_TRACER ) );

RED::RenderShaderParameter specular( "specular", 2, RED::RenderShaderParameter::PSH );
specular.SetValue( iSpecular );
RC_TEST( shader.AddParameter( specular, RED_LALL ) );
RC_TEST( shader.AddParameter( specular, RED_LALL, RED::HW_SOFT_TRACER ) );

RED::RenderShaderParameter misc( "misc", 3, RED::RenderShaderParameter::PSH );
misc.SetValue( RED::Vector4( iSilhouetteCutoff, iSpecularCutoff, iShininess, 0.f ) );
RC_TEST( shader.AddParameter( misc, RED_LALL ) );
RC_TEST( shader.AddParameter( misc, RED_LALL, RED::HW_SOFT_TRACER ) );

// Setup the reference to the shadow image.
RED::RenderShaderParameter paramshadow( "shadowimage", 0, RED::RenderShaderParameter::PSH );
paramshadow.SetReference( RED::RenderShaderParameter::REF_LIGHT_SHADOW_IMAGE_TEX );
RC_TEST( shader.AddParameter( paramshadow, RED_LALL ) );
RC_TEST( shader.AddParameter( paramshadow, RED_LALL, RED::HW_SOFT_TRACER ) );

// Setup the reference to the light diffuse color.
RED::RenderShaderParameter paramlight( "lightdiffcol", 4, RED::RenderShaderParameter::PSH );
paramlight.SetReference( RED::RenderShaderParameter::REF_LIGHT_DIFCOL );
RC_TEST( shader.AddParameter( paramlight, RED_LALL ) );
RC_TEST( shader.AddParameter( paramlight, RED_LALL, RED::HW_SOFT_TRACER ) );


// Setup the vertex shader references:
RED::RenderShaderParameter parampolyfacing( "polygon_facing", 0, RED::RenderShaderParameter::VSH );
parampolyfacing.SetReference( RED::RenderShaderParameter::REF_POLYGON_FACING );
RC_TEST( shader.AddParameter( parampolyfacing, RED_LALL ) );

RED::RenderShaderParameter paramlightpos( "light_pos_vcs", 2, RED::RenderShaderParameter::VSH );
paramlightpos.SetReference( RED::RenderShaderParameter::REF_LIGHT_POS_VCS );
RC_TEST( shader.AddParameter( paramlightpos, RED_LALL ) );
That’s it for the shader inputs binding. Everything is duplicated to address both hardware (default one) and software targets (RED::HW_SOFT_TRACER).
Our custom shader is finally added to the material just the same way we did for the built-in ambient shader:
RC_TEST( imat->RegisterShader( shader, iresmgr->GetState() ) );
RC_TEST( imat->AddShaderToPass( shader.GetID(), RED::MTL_LIT, RED::LIST_LAST, RED::LayerSet::ALL_LAYERS, iresmgr->GetState() ) );
Note
The rendering pass where the shader is added is now RED::MTL_LIT (the ambient shader was added to the RED::MTL_PRELIT pass). This is because our shader must be evaluated for each light source in the scene (where the ambient needs to be called only once!).
The material is now complete and supports both hardware and software rendering.

