Picking using a Lasso
Introduction
This tutorial completes the Picking example. This time we’ll do a wide region picking, using one of the two methods described hereafter:
- A rectangular area picking, using RED::IWindow::FramePickingRectangle
- A lasso picking, using a custom rendering system to identify elements under the lasso region
The toolbar icon allows you to choose between rectangular area picking and lasso picking.
Visualizing the Picking Region
Let’s start by describing how the picked region is being displayed. In the example, by holding down the shift key, the user can start dragging the mouse to define either a rectangle or a freeform lasso shape. In the tutorial, we create two shapes to visualize the results: one contour shape (drawn using a white color based material) and one interior polygon shape (drawn using a semi-transparent material). The setup code for the border shape is below:
g_pick_border = RED::Factory::CreateInstance( CID_REDLineShape );
if( !g_pick_border )
    RC_TEST( RED_ALLOC_FAILURE );

RED::IShape* iborder_shape = g_pick_border->As< RED::IShape >();
RED::ILineShape* iborder_line = g_pick_border->As< RED::ILineShape >();

float vertex[ 12 ] = { 0.0f, 0.0f, 0.0f,
                    0.0f, 0.0f, 0.0f,
                    0.0f, 0.0f, 0.0f,
                    0.0f, 0.0f, 0.0f };

int lindex[ 8 ] = { 0, 1, 1, 2, 2, 3, 3, 0 };

RC_TEST( iborder_line->SetArray( RED::MCL_VERTEX, vertex, 4, 3, RED::MFT_FLOAT, iresmgr->GetState() ) );
RC_TEST( iborder_line->AddSegments( lindex, 4, iresmgr->GetState() ) );
RC_TEST( iborder_shape->SetMaterial( g_white_matr, iresmgr->GetState() ) );

RC_TEST( ipicking_camera->AddShape( g_pick_border, iresmgr->GetState() ) );
Both shapes are added to a picking camera that is drawn after all other cameras in the RED::VST_FRONT list of cameras in the VRL. Then, the picking mechanism uses a two step pass once the shift key has been pressed down:
- Step 0: start the definition of the picking region
- Step 1: extend the picking region, until either shift or the left mouse button is released
The code is here (working for both types of areas at the same time):
switch( g_pick_step )
{
    // Initialize the picking area definition:
    case 0:
    {
        if( g_shift_key_down == true && evt._mouse_left == true )
        {
            // Clear all previously picked entities in the overlay camera:
            RC_TEST( ioverlay_camera->GetRootShape( root ) );
            RED::IShape* isroot = root->As< RED::IShape >();

            RC_TEST( isroot->GetChildrenCount( count ) );
            for( i = count - 1; i >= 0; i-- )
            {
                RC_TEST( isroot->GetChild( child, i ) );
                RC_TEST( RED::Factory::DeleteInstance( child, iresmgr->GetState() ) );
            }

            g_xrect = mx;
            g_yrect = my;
            g_xpos = mx;
            g_ypos = my;

            g_lasso_vertex.clear();
            RC_TEST( g_lasso_vertex.push_back( (float)g_xpos ) );
            RC_TEST( g_lasso_vertex.push_back( (float)g_ypos ) );
            RC_TEST( g_lasso_vertex.push_back( 0.0f ) );

            g_last_xpos = g_xpos;
            g_last_ypos = g_ypos;

            g_pick_step++;
        }

        break;
    }

    // Extend the picking area:
    case 1:
    {
        if( g_shift_key_down == true && evt._mouse_left == true )
        {
            g_xpos = mx;
            g_ypos = my;

            if( g_last_xpos != g_xpos || g_last_ypos != g_ypos )
            {
                g_last_xpos = g_xpos;
                g_last_ypos = g_ypos;

                RC_TEST( g_lasso_vertex.push_back( (float)g_xpos ) );
                RC_TEST( g_lasso_vertex.push_back( (float)g_ypos ) );
                RC_TEST( g_lasso_vertex.push_back( 0.0f ) );
        }
    }
From this point, we have all the necessary informations to proceed with the picking operation by itself.
Rectangular Area Picking
Picking using a rectangular area is performed by a HOOPS Luminate built-in function:
if( g_lasso == false )
{
    RC_TEST( iwindow->FramePickingRectangle( picklist, vrl,
                                            ( g_xpos < g_xrect ) ? g_xpos : g_xrect,
                                            ( g_xpos > g_xrect ) ? g_xpos : g_xrect,
                                            ( g_ypos < g_yrect ) ? g_ypos : g_yrect,
                                            ( g_ypos > g_yrect ) ? g_ypos : g_yrect,
                                            NULL ) );
}
else
{
    RC_TEST( LassoPicking( picklist, camera, picking_camera ) );
}
This is RED::IWindow::FramePickingRectangle. This method is not using any hardware based rendering workflow, unlike the lasso picking method that’ll be detailed hereafter. The rectangle picking method does only return object level RED::ShapePath informations, unless specified otherwise in the method (and in this case, thousands of results can be returned, so be careful on performances!).
Lasso Picking
Due to the complexity of the lasso shape, we have to use a hardware based rendering workflow in order to proceed with the lasso picking operation. Analytical solutions will be too long to process to remain interactive. The principle of the method is to use an auxiliary VRL to perform a masked rendering of the scene to identify shapes in the mask:
- One masking pass occurs first
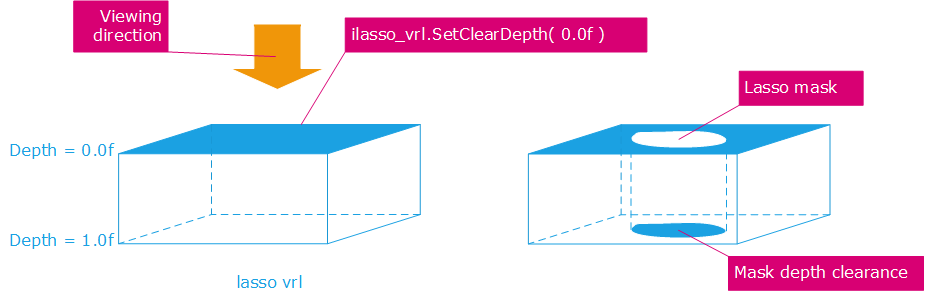
Depth levelling using the lasso shape as a mask
- One rendering pass using unique identifiers turned into colors occurs then, to uniquely identify visible shapes on screen

Geometries in the mask region appear rendered using colors
Finally, from the rendered colors that are found in the visualized image, we can get the list of shape instances to highlight.
Practical Implementation of the Lasso Picking Workflow
First, we need to setup the rendering workflow detailed above. This requires parsing the scene graph of our model to collect several informations:
- Associate one color based ID to each shape path in the scene.
- Collect all materials used by the scene and setup a “color as ID” rendering shader in a specific
RED::LayerSetto be able to get colors instead of shaded results when we’ll draw the scene for the purpose of lasso picking. Note that this shader is Using Instance Counters for the purpose of associating shape paths to color IDs.
// Collect scene graph informations:
// ---------------------------------

RED::ShapePath path;
RED::Map< RED::Object*, int > lasso_matr;
unsigned int colorid = 0;

RC_TEST( ParseSceneGraphForLasso( root, path, lasso_matr, g_lasso_path_to_id, g_lasso_id_to_path, colorid ) );


// Create a shape coloring shader using instance counters:
// -------------------------------------------------------
//  o This shader outputs one color for every shape path that'll use an instance counter color.

RED::ShaderProgramID vshid, pshid;
RED::ShaderString vsh, psh;

RED::RenderCode rcode;
rcode.BindChannel( RED_VSH_VERTEX, RED::MCL_VERTEX );

vsh.VertexShaderStart();
vsh.VertexTransform( "result.position", "state.matrix.program[2]", "vertex.attrib[0]" );
vsh.ShaderEnd();

RC_TEST( iresmgr->LoadShaderFromString( vshid, vsh ) );

psh.PixelShaderStart();

// Output the object ID using the instance color, but discard elements with color.w = 0xff.
psh.Param( "color", 0 );
psh.Temp( "filter" );
psh.Add( "SGE filter.x, color.w, { 0.999 }.x;\n" );
psh.Add( "KIL -filter.x;\n" );
psh.Add( "MOV result.color, color;\n" );

psh.ShaderEnd();

RC_TEST( iresmgr->LoadShaderFromString( pshid, psh ) );

RED::RenderShader rsh_color;
RC_TEST( rsh_color.SetRenderCode( rcode, RED_L0 ) );
RC_TEST( rsh_color.SetVertexProgramId( vshid, RED_L0, resmgr ) );
RC_TEST( rsh_color.SetPixelProgramId( pshid, RED_L0, resmgr ) );

RED::RenderShaderParameter instance_color( "instance_color", 0, RED::RenderShaderParameter::PSH );
instance_color.SetReference( RED::RenderShaderParameter::REF_INSTANCE_COUNTER );
RC_TEST( rsh_color.AddParameter( instance_color, RED_L0 ) );


// Create the shape coloring material configurations:
// --------------------------------------------------
//  o Each material in the scene graph receives a coloring shader in a specific layerset. Then we connect
//    an instance counter callback to perform the association between a shape instance (identified by a
//    path) and a color, during the rendering, for the material configuration using that specific layerset.

RED::Object* matr;
RED::Vector< RED::RenderShaderParameter* > list_param;

RED::LayerSet lasso_layer;
RC_TEST( lasso_layer.AddLayer( RED::Object::GetIDFromString( "MyLasso" ) ) );

for( lasso_matr.begin(); !lasso_matr.end(); lasso_matr.next() )
{
    matr = lasso_matr.current_key();
    if( matr )
    {
        RED::IMaterial* imatr = matr->As< RED::IMaterial >();

        RC_TEST( imatr->RegisterShader( rsh_color, iresmgr->GetState() ) );
        RC_TEST( imatr->AddShaderToPass( rsh_color.GetID(), RED::MTL_PRELIT, RED::LIST_LAST, lasso_layer, iresmgr->GetState() ) );
    }
}
Then, we setup the masking rendering pipeline:
- We create the masking shader that we need to “dig” into the depth buffer to authorize elements to be drawn.
- We setup the rendering pipeline in re-using our picking camera in the auxiliary VRL. This time, the picking camera - that will do the depth levelling - will be rendered before the scene, so it’s last in the
RED::VST_SCENElist of cameras of the lasso VRL.
// Create the lasso mask material shaders:
// ---------------------------------------
//  o We reuse the mask shapes (border and contour) to 'dig' into the depth buffer during the lasso mask
//    rendering pass. We setup the masking material needed there into a 'lasso_layer' layerset configuration.

// Creating and registering the state shader:
RED::StateShader mask_ssh;
RC_TEST( mask_ssh.SetDepthTest( RED::StateShader::ON ) );
RC_TEST( mask_ssh.SetDepthFunction( RED::StateShader::ALWAYS ) );
RC_TEST( mask_ssh.SetDepthMask( RED::StateShader::ON ) );
RC_TEST( mask_ssh.SetFaceCulling( RED::StateShader::NONE ) );

// Creating and registering the render shader:
rcode.Reset();
rcode.BindChannel( RED_VSH_VERTEX, RED::MCL_VERTEX );

vsh.VertexShaderStart();
vsh.VertexTransform( "result.position", "state.matrix.program[2]", "vertex.attrib[0]" );
vsh.ShaderEnd();

RC_TEST( iresmgr->LoadShaderFromString( vshid, vsh ) );

psh.PixelShaderStart();
psh.Add( "MOV result.color, { 0 }.x;\n" );
psh.Add( "MOV result.depth.z, { 1 }.x;\n" );
psh.ShaderEnd();

RC_TEST( iresmgr->LoadShaderFromString( pshid, psh ) );

RED::RenderShader mask_rsh;
RC_TEST( mask_rsh.SetRenderCode( rcode, RED_L0 ) );
RC_TEST( mask_rsh.SetVertexProgramId( vshid, RED_L0, resmgr ) );
RC_TEST( mask_rsh.SetPixelProgramId( pshid, RED_L0, resmgr ) );

// Assigning masking shaders to our mask shapes materials:
RED::IShape* iborder_shape = g_pick_border->As< RED::IShape >();
RC_TEST( iborder_shape->GetMaterial( matr ) );
RED::IMaterial* iborder_matr = matr->As< RED::IMaterial >();

RC_TEST( iborder_matr->RegisterShader( mask_ssh, iresmgr->GetState() ) );
RC_TEST( iborder_matr->AddShaderToPass( mask_ssh.GetID(), RED::MTL_PRELIT, RED::LIST_LAST, lasso_layer, iresmgr->GetState() ) );
RC_TEST( iborder_matr->RegisterShader( mask_rsh, iresmgr->GetState() ) );
RC_TEST( iborder_matr->AddShaderToPass( mask_rsh.GetID(), RED::MTL_PRELIT, RED::LIST_LAST, lasso_layer, iresmgr->GetState() ) );

RED::IShape* isurface_shape = g_pick_surface->As< RED::IShape >();
RC_TEST( isurface_shape->GetMaterial( matr ) );
RED::IMaterial* isurface_matr = matr->As< RED::IMaterial >();

RC_TEST( isurface_matr->RegisterShader( mask_ssh, iresmgr->GetState() ) );
RC_TEST( isurface_matr->AddShaderToPass( mask_ssh.GetID(), RED::MTL_PRELIT, RED::LIST_LAST, lasso_layer, iresmgr->GetState() ) );
RC_TEST( isurface_matr->RegisterShader( mask_rsh, iresmgr->GetState() ) );
RC_TEST( isurface_matr->AddShaderToPass( mask_rsh.GetID(), RED::MTL_PRELIT, RED::LIST_LAST, lasso_layer, iresmgr->GetState() ) );


// Create an auxiliary VRL and render image:
// -----------------------------------------
//  o Turned off until we have to render for a lasso selection.
//  o This VRL contains the scene camera and a another camera that renders the lasso mask
//    prior to rendering the scene with colors as IDs instead of the regular scene materials.
//  o The lasso mask camera 'digs' the depth buffer so that only geometries within the lasso
//    shape are passing the depth test and are rendered.

RED::Object* lasso_vrl;

RC_TEST( iwindow->CreateVRL( lasso_vrl, width, height, RED::FMT_RGBA, true, iresmgr->GetState() ) );
RED::IViewpointRenderList* ilasso_vrl = lasso_vrl->As< RED::IViewpointRenderList >();

RC_TEST( ilasso_vrl->SetClearColor( RED::Color( 0.0f ), iresmgr->GetState() ) );
RC_TEST( ilasso_vrl->SetClearDepth( 0.0f, iresmgr->GetState() ) );

RC_TEST( ilasso_vrl->Activate( false, iresmgr->GetState() ) );

RC_TEST( ilasso_vrl->InsertViewpoint( camera, RED::VST_SCENE, RED::LIST_LAST,
                                    0, 0, width, height, 0.0f, 0.0f,
                                    RED::VSP_ANCHOR_FIXED, RED::VSP_SIZE_STRETCHED_AUTO_RATIO,
                                    iresmgr->GetState() ) );

RC_TEST( ilasso_vrl->InsertViewpoint( picking_camera, RED::VST_SCENE, RED::LIST_LAST,
                                    0, 0, width, height, 0.0f, 0.0f,
                                    RED::VSP_ANCHOR_FIXED, RED::VSP_SIZE_STRETCHED,
                                    iresmgr->GetState() ) );
Once everything is properly set, we can do the rendering of the picking. This involves several steps:
- Turn off the master VRL, turn on the lasso VRL.
- Set the instance counter callback on the scene camera.
- Assign the lasso layerset to render objects with color IDs.
- Draw: Force the instance counter to update all IDs. First camera = picking camera that ‘digs’ a hole into the depth buffer. Second camera = scene camera rendered using lasso_layer materials (color = ID of shape path).
- Readback the render image of the VRL.
- Extract selected objects IDs.
- Loop back to step 4 for the wished number of depths.
- Restore original setup.
We achieve a “deep” picking by rendering several passes 4 and 7. Each time, we remove IDs of the already picked objects from the list of valid IDs. This is the shape coloring shader that discards invalid ID values to make sure these don’t appear more than once.
// 1. Turn off the master VRL, turn on the lasso VRL.
RC_TEST( ivrl->Activate( false, iresmgr->GetState() ) );
RC_TEST( ilasso_vrl->Activate( true, iresmgr->GetState() ) );


// 2. Set the instance counter callback on the scene camera.
RC_TEST( icamera->SetInstanceCounterCallback( InstanceCounterCB, NULL, iresmgr->GetState() ) );


// 3. Assign the lasso layerset to render objects with color IDs.
RED::LayerSet lasso_layer;
RC_TEST( lasso_layer.AddLayer( RED::Object::GetIDFromString( "MyLasso" ) ) );

RC_TEST( icamera->ApplyLayerSet( lasso_layer, iresmgr->GetState() ) );
RC_TEST( ipicking_camera->ApplyLayerSet( lasso_layer, iresmgr->GetState() ) );


// 4. Draw.
int d, dmax = 5;

g_already_picked.clear();

for( d = 0; d < dmax; d++ )
{
    // 4.1 Force the update of the entire scene graph to initialize instance counters.
    RED::Matrix* matx;
    RED::ITransformShape* iroot = root->As< RED::ITransformShape >();
    RC_TEST( iroot->GetMatrix( matx, iresmgr->GetState() ) );

    // 4.2 Draw.
    RC_TEST( iresmgr->EndState() );

    RC_TEST( iwindow->FrameDrawing() );

    iresmgr->BeginState();


    // 5. Readback the render image.
    RED::IImage2D* ilasso_image_2D = ilasso_vrl->GetRenderImage()->As< RED::IImage2D >();
    RC_TEST( ilasso_image_2D->GetPixels() );

    // Uncomment the line below if you want to see each picked layer:
    //RED::ImageTools::Save( ilasso_vrl->GetRenderImage(), true, RED::String( "c:\\render_%1.png" ).Arg( d ), false, true, 1.0f );

    // 6. Extract selected objects IDs.
    int i, j, n, id, id_last;
    unsigned char* lpix;
    RED::Map< RED::ShapePath, int > to_highlight;

    id_last = -1;

    lpix = ilasso_image_2D->GetLocalPixels();

    for( j = 0; j < height; j++ )
    {
        for( i = 0; i < width; i++ )
        {
            n = 4 * ( j * width + i );

            if( lpix[ n ]     != 0 ||
                lpix[ n + 1 ] != 0 ||
                lpix[ n + 2 ] != 0 ||
                lpix[ n + 3 ] != 0 )
            {
                id = lpix[ n ] + ( lpix[ n + 1 ] << 8 ) + ( lpix[ n + 2 ] << 16 ) + ( lpix[ n + 3 ] << 24 );

                if( id != id_last )
                {
                id_last = id;
                if( g_lasso_id_to_path.find( id ) != NULL )
                {
                    const RED::ShapePath& path = g_lasso_id_to_path.current();
                    RC_TEST( to_highlight.insert( path, 0 ) );
                }
                else
                    RC_TEST( RED_FAIL );
            }
        }
    }
}

for( to_highlight.begin(); !to_highlight.end(); to_highlight.next() )
{
    RC_TEST( picklist.push_back( to_highlight.current_key() ) );
    RC_TEST( g_already_picked.insert( to_highlight.current_key(), d ) );
}


// 7. Loop back:
}


// 8. Restore everything.
RC_TEST( ivrl->Activate( true, iresmgr->GetState() ) );
RC_TEST( ilasso_vrl->Activate( false, iresmgr->GetState() ) );
RC_TEST( icamera->SetInstanceCounterCallback( NULL, NULL, iresmgr->GetState() ) );
RC_TEST( icamera->ApplyLayerSet( RED::LayerSet::ALL_LAYERS, iresmgr->GetState() ) );
RC_TEST( ipicking_camera->ApplyLayerSet( RED::LayerSet::ALL_LAYERS, iresmgr->GetState() ) );

