Text Shapes
The rendering of texts is always a difficult task in computer graphics. Despite appearances of simplicity, there are many pitfalls related to the display of texts…HOOPS Luminate’s API try to handles most of these problems to provide simple text display solutions for any application.
First, HOOPS Luminate can display any text using a font that is understood by the operating system. On Windows, this means that any TrueType, raster, stroke font that can be rendered using the operating system font mapper can be displayed by HOOPS Luminate.
Second, there’s a text shape in the HOOPS Luminate scene graph: it’s created using the CID_REDTextShape with the RED::Factory::CreateInstance call. A text shape implements the following interfaces:
| Interface | Description |
|---|---|
RED::ITextShape |
API dedicated to the setup of texts in HOOPS Luminate. |
RED::IShape |
Global shape API. Controls shape tree navigation and shape attributes. |
RED::IUserData |
User data API to store application custom data associated to a shape. |
RED::IChunkSaver |
Shape serialization interface. |
RED::IReferenceSolving |
Shape serialization interface. |
Text Shapes vs. Fonts
The text shape defines the list of character strings to display. The font object defines how these strings are to be rendered. Therefore, all spatial parameters relative to a text are found in the shape itself: this is the scene graph object, in charge of the actual geometry to display; and all stylization parameters of the text are found in the font object. The font object implements the RED::IFont interface.
Assembling a Text for Display
We’ll need a font properly setup first:
Creating a Font
A font is a shared resource in HOOPS Luminate. It must be created directly from the cluster’s resource manager:
// Create the font using the resource manager and retrieve its font interface:
RED::Object* font;
RC_TEST( iresmgr->CreateFont( font, iresmgr->GetState() ) );
RED::IFont* ifont = font->As< RED::IFont >();
Then, the font MUST be configured before it can be used for the rendering. If a font is not configured, then HOOPS Luminate rendering methods will return an error:
// Setup minimal font parameters for the display:
RC_TEST( ifont->SetType( RED::FNT_SYSTEM, iresmgr->GetState() ) );
RC_TEST( ifont->SetRenderMode( RED::FNT_TRIANGLE, iresmgr->GetState() ) );
RC_TEST( ifont->SetTypeFaceName( "Arial", iresmgr->GetState() ) );
RC_TEST( ifont->SetCharSet( RED::FNT_ANSI_CHARSET, iresmgr->GetState() ) );
RC_TEST( ifont->SetSize( 0.0f, 80.0f, iresmgr->GetState() ) );
And then a text shape using that font:
Creating a Text Shape
The creation of a text shape is similar to the creation of all other HOOPS Luminate shapes, except that it uses the CID_REDTextShape value as parameter of the RED::Factory::CreateInstance call:
// Create the text shape:
RED::Object* text = RED::Factory::CreateInstance( CID_REDTextShape );
if( text == NULL )
RC_TEST( RED_ALLOC_FAILURE );

// Access its RED::ITextShape interface and assign a font to it:
RED::ITextShape* itext = text->As< RED::ITextShape >();
RC_TEST( itext->SetFont( font, iresmgr->GetState() ) );
The text shape will show something only if:
- It has a font assigned to it.
- It has a string to display!
- It’s part of the scene graph being drawn.
Strings can be easily added to text shapes:
// Adding a string to display:
RC_TEST( itext->AddString( "MyFirstString!", RED::Vector3( 10.0, 50.0, 100.0 ), RED::TAP_CENTER, iresmgr->GetState() ) );
Then, the text string should appear centered in 3D at the position specified by RED::Vector3 ( 10.0, 50.0, 100.0 ).
The tutorial linked here: Displaying Texts will provide a practical example on text setup and display.
Choosing the Type of Text to Display
HOOPS Luminate currently has 4 different methods to display a text. Each method has pros & cons that are all listed below:
| Type | 3D? | Zoomable? | Software? | Near quality | Far quality | Performance | Pickable | Operating system | Snapshot(*) |
|---|---|---|---|---|---|---|---|---|---|
RED::FNT_BITMAP |
No | No | No | N/A | N/A | Low | No | Windows | 
|
RED::FNT_TRIANGLE |
Yes | Yes | No | Good | Poor | Average | No | Windows | 
|
RED::FNT_LINE |
Yes | Yes | No | Good | Poor | Average | No | Windows | 
|
RED::FNT_TEXTURE |
Yes | Yes | Yes | Average | Good | Good | Yes | Windows Linux MacOS | 
|
Note
(*) Please note that the RED::FNT_TRIANGLE and RED::FNT_LINE snapshot quality is voluntarily low to show the tessellation of the characters. Practically, it can be of any good enough quality, at the expense of rendering more triangles for each character.</i>
There’s no text solution today that render perfectly under all circumstances, but the RED::FNT_TEXTURE type is however the best solution so far available in HOOPS Luminate. It has two advantages compared to the other techniques available:
- It renders in software ray-tracing, which makes it usable on all virtualization environments.
- It has a good display quality even when seen for far away.
The image below illustrates this last point:
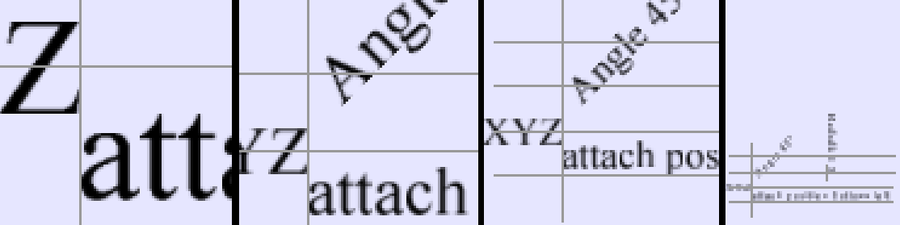
The quality of textured texts remain correct even zoomed away.
On the other hand, when seen from very close, the RED::FNT_TEXTURE texts will reveal the texels of the bitmaps that are used to define font glyphs.
So in summary, bitmap texts are screen aligned texts, that are not zoomable. They have the best display quality for static display (like in a text editor). Other text display techniques are better for display in zoom-dynamic environments like in a drafting plan. Among these techniques, the RED::FNT_TEXTURE texts have an overall better quality than other texts; they display a lot faster; but they also consume video memory to store the font glyph texture (as specified in the RED::IFont::SetGlyphTextureSize).
More on Textured Texts
This section will provide some more details on setting up textured texts and the way textured texts interact with the rendering pipeline in general. Let’s consider a simple string displayed using textured texts, as illustrated below:
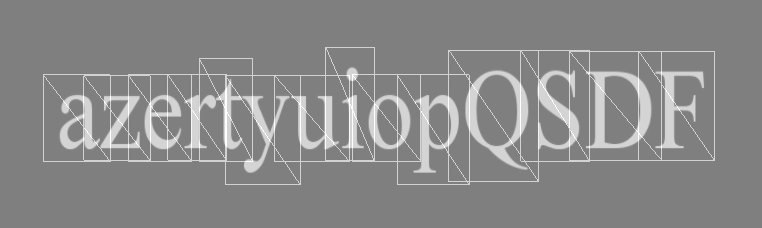
A textured text string and the polygons used to draw it.
We use one quadrilateral to cover every string character (glyph). The rendering is done using a simple texturing shader; the RED::RenderShaderText. From a performance standpoint, a string and furthermore a group of strings is drawn as a simple mesh. At the cost of 2 triangles per letter to display, we clearly see that we can display entire books before being annoyed by the text display performance.
The geometrical setup of this polygon is not flat, as shown by the schema below:
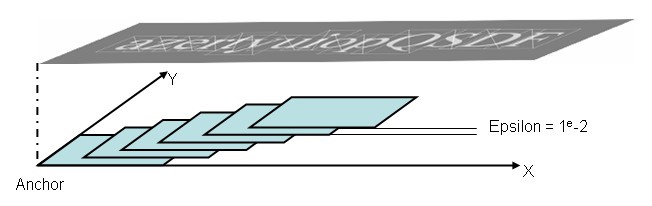
Polygon placement for a single string in a textured text
We avoid setting up triangles that overlap, because this would cause the apparition of stitching artefacts under some viewing conditions for the strings. Consequently, each glyph in each string has a slight depth offset along the shape’s local z axis to make it unique in depth compared to other glyphs of the shape. The value of this depth offset can be customized using RED::IFont::SetGlyphTextureOffset and RED::IFont::GetGlyphTextureOffset.
Now, this single string offset setup won’t solve overlapping problems among strings. If we have the configuration below with two overlapping strings, we may have display problems:

Overlapping strings without any setup fixing things up
This arises because the whole surface of each quadrilateral covering the font characters is opaque. The font is drawn as a list of triangles, using an ADDITIVE blending equation. Nevertheless, polygons are not transparent outside of the characters silhouette. The previous configuration can be solved by several means:
- Set the depth of each string according to the rendering orders of the items in the scene graph to avoid issues. This consists in setting up strings so that they are rendered back to front. It’s a manual sorting of strings.
- Disable the depth testing / masking for the strings in the
RED::StateShaderof the text. This will reduce the overlapping artifacts. The drawing order will rule the results (turn offRED::StateShader::SetDepthTestandRED::StateShader::SetDepthMask).- Turn on custom depth interpolation algorithms for strings. This’ll let you assign a depth to each string, therefore controlling for each string it’s rendering position in the complete set of strings in the scene. This is among the
RED::TEXT_ALPHA_MODEinterpolations (RED::TEXT_ALPHA_LINEAR_DEPTH,RED::TEXT_ALPHA_3A2_MINUS_2A3_DEPTH,RED::TEXT_ALPHA_SQRTA_DEPTH).
If we disable depth testing, the problem is solved:

Overlapping strings with depth testing disabled
The custom depth mechanism can provide another mechanism for adding strings with a very fine grain rendering order control, because each string receive a custom depth value that is directly used as the zbuffer output.
Textured Texts and Transparency
Setting up textured texts in 2d or 3d environments that contain transparent elements may be something complex. Because that kind of texts is using a RED::StateShader::ADDITIVE blending formula, they can’t be rendered freely without considering their display order. As for all geometries that rely on blending, texts must be rendered at some point after the geometries that are below them. This may introduce a bit of complexity in the setup.
Let’s start by the setup of an opaque textured text material:
// First create the material:
RED::Object* matr;
RC_TEST( iresmgr->CreateMaterial( matr, iresmgr->GetState() ) );
RED::IMaterial* imatr = matr->As< RED::IMaterial >();

// Then, declare the state shader with the appropriate blending:
RED::StateShader shstate;
shstate.SetBlendingMode( RED::StateShader::ADDITIVE );

RC_TEST( imatr->RegisterShader( shstate, iresmgr->GetState() ) );
RC_TEST( imatr->AddShaderToPass( shstate.GetID(), RED::MTL_POSTLIT, RED::LIST_LAST, RED::LayerSet::ALL_LAYERS, iresmgr->GetState() ) );

// Declare the rendering shader for the textured texts:
RED_RC rc;
RED::RenderShaderText shtext( RED::Color::WHITE, RED::TEXT_ALPHA_LINEAR, false, resmgr, rc );
RC_TEST( rc );

RC_TEST( imatr->RegisterShader( shtext, iresmgr->GetState() ) );
RC_TEST( imatr->AddShaderToPass( shtext.GetID(), RED::MTL_POSTLIT, RED::LIST_LAST, RED::LayerSet::ALL_LAYERS, iresmgr->GetState() ) );
Despite its blending formula, the geometry associated to this text is opaque! It has not been declared as transparent in the RED::StateShader, for instance using RED::StateShader::SetSortedTransparency. This means that whatever the RED::IMaterial::SetPriority being set in the material or, whatever the rendering pass RED::MTL_POSTLIT that is used to add the shaders to the material, the geometry of the text will be rendered BEFORE any transparent elements, as illustrated below:
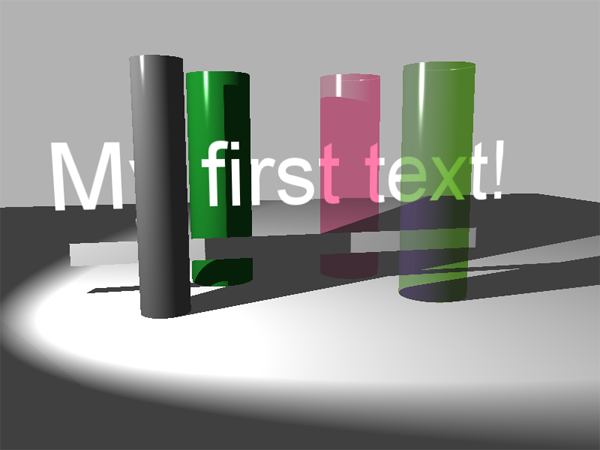
An opaque textured text rendered before all transparencies.
The ‘My first text!’ string should appear in front of the pink cylinder. Not behind it!
We can fix this by indicating HOOPS Luminate that this material IS transparent and that the ray-tracer should handle it as a transparent material:
// Set the state shader transparent. Note that we don't care of the shadow color as texts don't cast shadows anyway.
RC_TEST( shstate.SetSortedTransparency( RED::Color::WHITE ) );
The text will be considered as being transparent and it’ll be properly blended by the hardware ray-tracer:

A transparent textured text rendered with the proper blending in hardware.
In order to get a proper display, enough transparency layers must be declared for the RED::OPTIONS_RAY_TRANSPARENCY. If the transparency setup is not high enough, we’ll see the overlapping quadrilaterals in the display, as illustrated below with only one depth of ray-traced transparency:
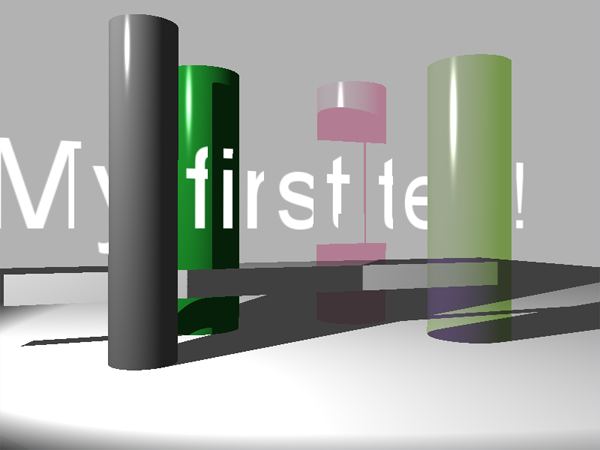
Result with an insufficient transparency depth for the hardware ray-tracer.
For the example scene above, at least four or five transparency layers are needed to get all rays to get through the scene.

